Page 9 of 142

OPERATION .................................................. 6-1
Starting a cold engine ................................ 6-1
Starting a warm engine .............................. 6-3
Operating the drive select lever and
driving in reverse ...................................... 6-3
Engine break-in .......................................... 6-4
Parking ....................................................... 6-5
Parking on a slope ..................................... 6-5
Accessories and loading ............................ 6-6
RIDING YOUR ATV ...................................... 7-1
GETTING TO KNOW YOUR ATV............... 7-2
RIDE WITH CARE AND GOOD
JUDGMENT .............................................. 7-2
BE CAREFUL WHERE YOU RIDE ............. 7-9
TURNING YOUR ATV .............................. 7-12
CLIMBING UPHILL ................................... 7-13
RIDING DOWNHILL.................................. 7-16
CROSSING A SLOPE............................... 7-17
CROSSING THROUGH SHALLOW
WATER ................................................... 7-18
RIDING OVER ROUGH TERRAIN ........... 7-21
SLIDING AND SKIDDING ......................... 7-21
WHAT TO DO IF... .................................... 7-22
WHAT TO DO... ........................................ 7-23PERIODIC MAINTENANCE AND
ADJUSTMENT................................................8-1
Owner’s manual and tool kit .......................8-1
Periodic maintenance chart for the
emission control system ...........................8-3
General maintenance and lubrication
chart ..........................................................8-5
Removing and installing the panel ..............8-9
Checking the spark plug .............................8-9
Engine oil and oil filter cartridge ................8-12
Final gear oil .............................................8-16
Changing the differential gear oil ..............8-18
Cleaning the air filter element ...................8-20
Cleaning the spark arrester ......................8-23
V-belt cooling duct check hose .................8-24
V-belt case drain plug ...............................8-25
Adjusting the carburetor ............................8-25
Adjusting the engine idling speed .............8-25
Adjusting the throttle cable free play .........8-27
Valve clearance ........................................8-27
Adjusting the drive select lever safety
system cable ...........................................8-28
Brakes .......................................................8-28
Checking the front brake pads and
rear brake shoes .....................................8-28
Checking the brake fluid level ...................8-29
Changing the brake fluid ...........................8-30U1AB60E0.book Page 2 Wednesday, April 29, 2009 10:19 AM
Page 24 of 142
3-1
3
EBU17680
DESCRIPTION
EBU17690Left view
EBU17700Right view
1. Fuel cock
2. Throttle stop screw
3. Air filter case
4. Fuses
5. Battery
6. Tail/brake light
7. Recoil starter
8. Engine oil filler cap
9. Oil filter cartridge
10.V-belt cooling duct check hose
3
4,5 1
26
10978
1. Rear shock absorber assembly spring preload adjusting
ring
2. Spark arrester
3. Storage compartment and tool kit
4. Spark plug
5. Front shock absorber assembly spring preload adjusting
ring
6. Rear brake light switch
7. Brake pedal
8. V-belt case drain plug12 3 4 5
6 7 8
U1AB60E0.book Page 1 Wednesday, April 29, 2009 10:19 AM
Page 76 of 142

7-19
7The ATV can be used to cross slow moving, shal-
low water of up to a maximum of 35 cm (14 in) in
depth. Before entering the water, choose your path
carefully. Enter where there is no sharp drop off,
and avoid rocks or other obstacles which may be
slippery or upset the ATV. Drive slowly and care-
fully.
Test your brakes after leaving the water. If neces-
sary, apply them several times to let friction dry out
the linings. Do not continue to ride your ATV with-
out verifying that you have regained proper brakingability. WARNING! Wet brakes may have re-
duced stopping ability, which could cause loss
of control.
[EWB02621]
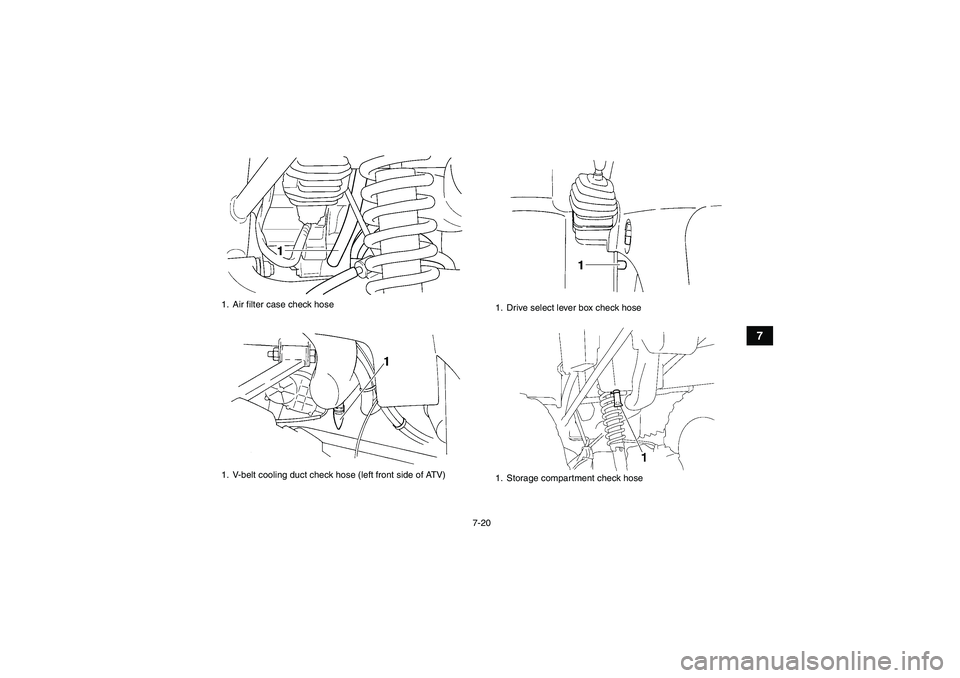
After riding your ATV in water, be sure to drain the
trapped water by removing the check hose at the
bottom of the air filter case, the V-belt cooling duct
check hose, the drive select lever box check hose
and the storage compartment check hose. Also,
remove the V-belt case drain plug to drain any wa-
ter that may have accumulated. NOTICE: Und-
rained water can cause damage or improper
operation.
[ECB00841]
Wash the ATV in fresh water if it has been operat-
ed in salt water or muddy conditions.
U1AB60E0.book Page 19 Wednesday, April 29, 2009 10:19 AM
Page 77 of 142
7-20
7
1. Air filter case check hose
1. V-belt cooling duct check hose (left front side of ATV)
1. Drive select lever box check hose
1. Storage compartment check hose
U1AB60E0.book Page 20 Wednesday, April 29, 2009 10:19 AM
Page 85 of 142

8-5
8
EBU21865General maintenance and lubrication chart TIP�For ATVs not equipped with an odometer or an hour meter, follow the month maintenance intervals.�For ATVs equipped with an odometer or an hour meter, follow the km (mi) or hours maintenance inter-
vals. However, keep in mind that if the ATV isn’t used for a long period of time, the month maintenance
intervals should be followed.�Items marked with an asterisk should be performed by a Yamaha dealer as they require special tools,
data and technical skills.NO. ITEMCHECK OR MAINTENANCE
JOBINITIAL EVERY
Whichev-
er comes
firstmonth136612
km
(mi)320
(200)1300
(800)2500
(1600)2500
(1600)5000
(3200)
hours 20 80 160 160 320
1 Air filter elementClean and replace if necessary.Every 20–40 hours (more often in wet or
dusty areas)
2*Front brakeCheck operation and correct if necessary.
Check fluid level and ATV for fluid leakage, and
correct if necessary.√√√√√
Replace brake pads. Whenever worn to the limit
3*Rear brakeCheck operation and correct if necessary.
Check brake lever and pedal free play, and adjust
if necessary.√√√√√
Replace brake shoes. Whenever worn to the limit
U1AB60E0.book Page 5 Wednesday, April 29, 2009 10:19 AM
Page 100 of 142
8-20
87. Check the differential gear case for oil leak-
age. If oil is leaking, check for the cause.
EBU23646Cleaning the air filter element The air filter element should be cleaned at the in-
tervals specified in the periodic maintenance and
lubrication chart. Clean or, if necessary, replace
the air filter element more frequently if you are
riding in unusually wet or dusty areas.TIPThere is a check hose at the bottom of the air filter
case. If dust or water collects in this hose, empty
the hose and clean the air filter element and air fil-
ter case.
1. Place the ATV on a level surface.
2. Remove the seat. (See page 4-14.)
3. Remove the air filter case cover by unhooking
the air filter case cover holders. Tightening torque:
Differential gear oil filler bolt:
23 Nm (2.3 m·kgf, 17 ft·lbf)1. Air filter case check hose
U1AB60E0.book Page 20 Wednesday, April 29, 2009 10:19 AM
Page 101 of 142
8-21
8 4. Pull the air filter element out of the air filter
case.5. Pull off the air filter element lock plate, and
then remove the sponge material from the air
filter element frame.
1. Air filter case cover holder
2. Air filter case cover
1. Air filter element
U1AB60E0.book Page 21 Wednesday, April 29, 2009 10:19 AM
Page 102 of 142

8-22
86. Wash the sponge material gently but thor-
oughly in solvent. WARNING! Always use
parts cleaning solvent to clean the sponge
material. Never use low-flash-point sol-
vents or gasoline to clean the sponge ma-
terial because the engine could catch fire
or explode.
[EWB01941]
7. Squeeze the excess solvent out of the sponge
material and let it dry. NOTICE: Do not twist
the sponge material when squeezing it.
[ECB00441]
8. Check the sponge material and replace it if
damaged.
9. Apply Yamaha foam air filter oil or other qual-
ity foam air filter oil to the sponge material.TIPThe sponge material should be wet but not drip-
ping.10. Pull the sponge material over the air filter ele-
ment frame, and then install the lock plate.
11. Insert the air filter element into the air filter
case, and then install the air filter case cover
by hooking the holders onto the air filter case.
NOTICE: Make sure that the air filter ele-
ment is properly seated in the air filter
1. Air filter element frame
2. Sponge material
3. Air filter element lock plateU1AB60E0.book Page 22 Wednesday, April 29, 2009 10:19 AM