Page 17 of 386
15
OVERVIEW
FEATURES/OPERATIONS
SAFETY AND EMERGENCY FEATURES
Clock
(1) Push and hold the CLOCK button to enter adjustment mode. (2) Press
CLOCK button to adjust hours. (3) Wait five seconds to adjust the minutes.
(4) Wait another five seconds for process to complete.
Clock adjust button
Cup holders
Front
Rear
Rear console boxRear seat armrest (if equipped)
Bottle holders-Front seat
Page 40 of 386

26
1-2. Opening, closing and locking the doors
Wireless remote control∗
∗: If equipped
nOperation signals
The emergency flashers flash to indicate that the doors have been locked/
unlocked. (Locked: Once; Unlocked: Twice)
nPanic mode
nKey battery depletion
The standard battery life is 1 to 2 years. (The battery becomes depleted
even if the key is not used.) If the wireless remote control function does not
operate, the battery may be depleted. Replace the battery when necessary.
(→P. 261)
n Security feature
If a door is not opened within approximately 30 seconds after the vehicle is
unlocked, the security feature automatically locks the vehicle again.
The wireless remote control can be used to lock/unlock the vehicle
from outside the vehicle.
Locks all doors
Sounds alarm
(push and hold)
Unlocks all doors
Pressing the button unlocks
the driver’s door. Pressing the
button again within 3 seconds
unlocks the other doors.
When is pushed for longer than about
1 second, an alarm will sound for about
60 seconds and the vehicle lights will
flash to deter any person from trying to
break into or damage your vehicle.
To stop the alarm, push any button on the
wireless remote control.
Page 154 of 386

141
2-4. Using other
driving systems
2
When driving
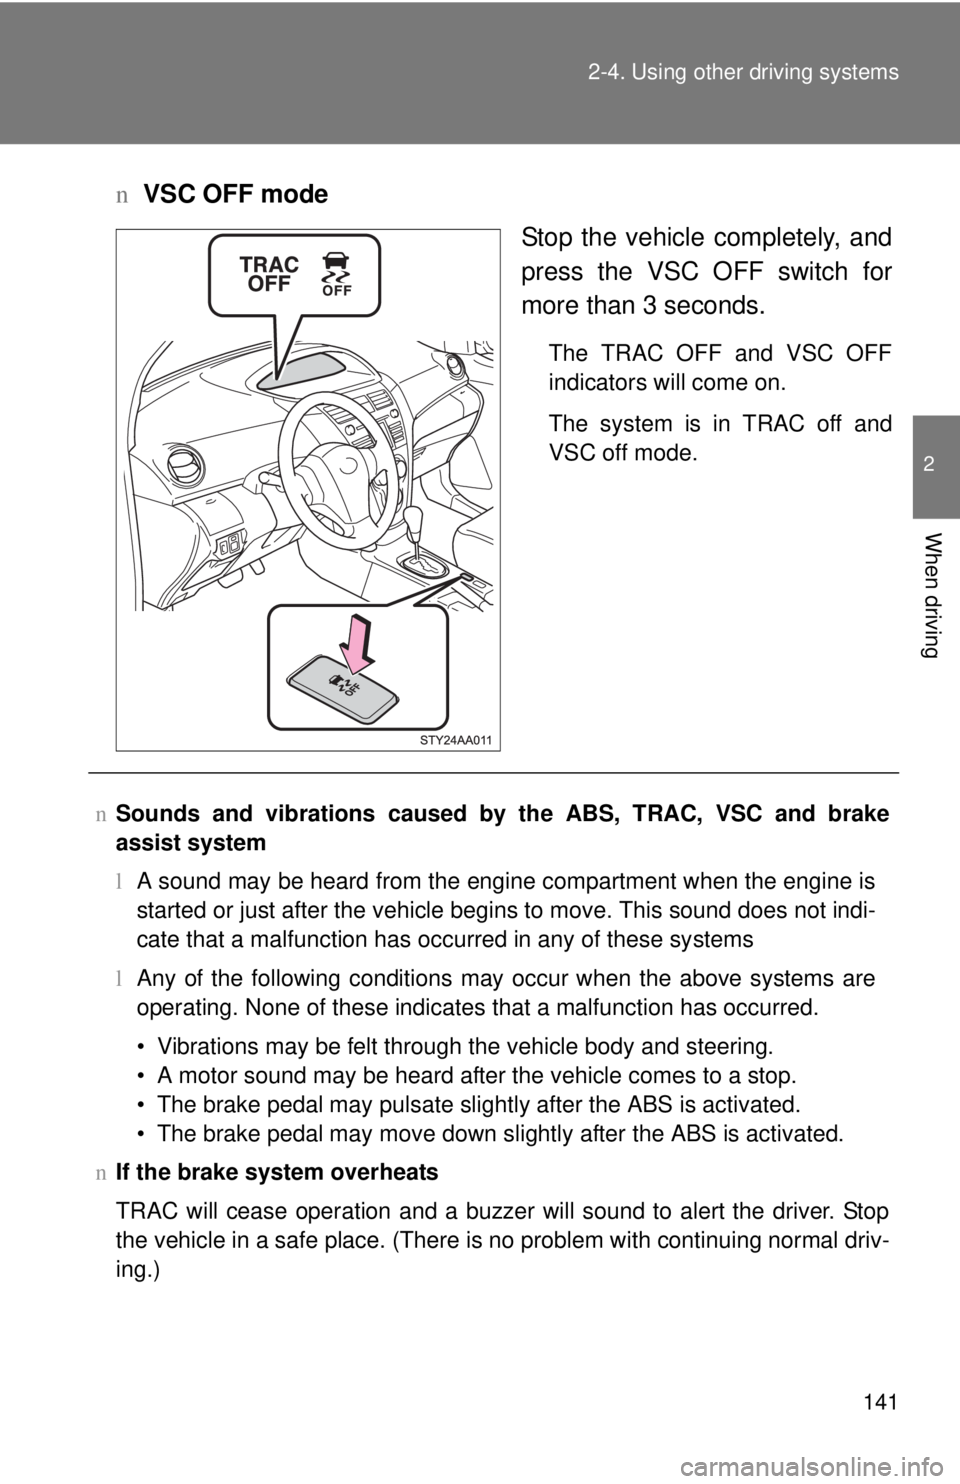
nVSC OFF mode
Stop the vehicle completely, and
press the VSC OFF switch for
more than 3 seconds.
The TRAC OFF and VSC OFF
indicators will come on.
The system is in TRAC off and
VSC off mode.
nSounds and vibrations caused by the ABS, TRAC, VSC and brake
assist system
lA sound may be heard from the engine compartment when the engine is
started or just after the vehicle begins to move. This sound does not indi-
cate that a malfunction has occurred in any of these systems
l Any of the following conditions may occur when the above systems are
operating. None of these indicates that a malfunction has occurred.
• Vibrations may be felt through the vehicle body and steering.
• A motor sound may be heard after the vehicle comes to a stop.
• The brake pedal may pulsate slightly after the ABS is activated.
• The brake pedal may move down slightly after the ABS is activated.
n If the brake system overheats
TRAC will cease operation and a buzzer will sound to alert the driver. Stop
the vehicle in a safe place. (There is no problem with continuing normal driv-
ing.)
Page 181 of 386

169
3-1. Using the air conditioning system
and defogger
3
Interior features
nUsing the system in recirculated air mode
The windows will fog up more easily if the recirculated air mode is used for
an extended period.
n When outside air temperature approaches 32°F (0°C)
The air conditioning system may not operate even when
is pressed.
n When
is selected for the air outlets used
For your driving comfort, air flowing to the feet may be warmer than air flow-
ing to the upper body depending on the position of the temperature adjust-
ment dial.
n Air conditioning odors
lDuring use, various odors from inside and outside the vehicle may enter
into and accumulate in the air conditioning system. This may then cause
odor to be emitted from the vents.
l To reduce potential odors from occurring:
It is recommended that the air conditioning system be set to outside air
mode prior to turning the vehicle off.
CAUTION
nTo prevent the windshield from fogging up
Do not set the air outlet selection dial to during cool air operation in
extremely humid weather. The difference between the temperature of the
outside air and that of the windshield can cause the outer surface of the
windshield to fog up, blocking your vision.
NOTICE
nTo prevent battery discharge
Do not leave the air conditioning system on longer than necessary when the
engine is stopped.
Page 203 of 386

191
3-2. Using the audio system
3
Interior features
n
Lens cleaners
Do not use lens cleaners. Doing so may damage the CD player.
n MP3 and WMA files
MP3 (MPEG Audio LAYER3) is a standard audio compression format.
Files can be compressed to approximately 1/10 of their original size by using
MP3 compression.
WMA (Windows Media
TM Audio) is a Microsoft audio compression format.
This format compresses audio data to a size smaller than that of the MP3
format.
There is a limit to the MP3 and WMA file standards and to the media/formats
recorded by them that can be used.
l MP3 file compatibility
• Compatible standards
MP3 (MPEG1 LAYER3, MPEG2 LSF LAYER3)
• Compatible sampling frequencies MPEG1 LAYER3: 32, 44.1, 48 (kHz)
MPEG2 LSF LAYER3: 16, 22.05, 24 (kHz)
• Compatible bit rates (compatible with VBR) MPEG1 LAYER3: 64, 80, 96, 112, 128, 160, 192, 224, 256, 320 (kbps)
MPEG2 LSF LAYER3: 64, 80, 96, 112, 128, 144, 160 (kbps)
• Compatible channel modes: stereo, joint stereo, dual channel and monaural
l WMA file compatibility
• Compatible standards
WMA Ver. 7, 8, 9
• Compatible sampling frequencies 32, 44.1, 48 (kHz)
• Compatible bit rates (only compatible with 2-channel playback) Ver. 7, 8: CBR 48, 64, 80, 96, 128, 160, 192 (kbps)
Ver. 9: CBR 48, 64, 80, 96, 128, 160, 192, 256, 320 (kbps)
l Compatible media
Media that can be used for MP3 and WMA playback are CD-Rs and CD-
RWs.
Playback in some instances may not be possible, depending on the status
of the CD-R or CD-RW. Playback may not be possible or the audio may
jump if the disc is scratched or marked with fingerprints.
Page 204 of 386

192 3-2. Using the audio system
lCompatible disc formats
The following disc formats can be used.
• Disc formats: CD-ROM Mode 1 and Mode 2
CD-ROM XA Mode 2, Form 1 and Form 2
• File formats: ISO9660 Level 1, Level 2, (Romeo, Joliet) MP3 and WMA files written in any format other than those listed above
may not play correctly, and their file names and folder names may not
be displayed correctly.
Items related to standards and limitations are as follows.
• Maximum directory hierarchy: 8 levels
• Maximum length of folder names/file names: 32 characters
• Maximum number of folders: 192 (including the root)
• Maximum number of files per disc: 255
l File names
The only files that can be recognized as MP3/WMA and played are those
with the extension .mp3 or .wma.
l Multi-sessions
As the audio system is compatible with multi-sessions, it is possible to play
discs that contain MP3 and WMA files. However, only the first session can
be played.
l ID3 and WMA tags
ID3 tags can be added to MP3 files, making it possible to record the track
title and artist name, etc.
The system is compatible with ID3 Ver. 1.0, 1.1, and Ver. 2.2, 2.3 ID3 tags.
(The number of characters is based on ID3 Ver. 1.0 and 1.1.)
WMA tags can be added to WMA files, making it possible to record the
track title and artist name in the same way as with ID3 tags.
l MP3 and WMA playback
When a disc containing MP3 or WMA files is inserted, all files on the disc
are first checked. Once the file check is finished, the first MP3 or WMA\
file
is played. To make the file check finish more quickly, we recommend you
do not write in any files other than MP3 or WMA files or create any unnec-
essary folders.
If the discs contain a mixture of music data and MP3 or WMA format data,
only music data can be played.
Page 220 of 386
208
3-5. Other interior features
Clock
nThe clock is displayed when
The engine switch is in the ON position.
n When disconnecting and reco nnecting battery terminals
The time display will automatically be set to 1:00.
Press and hold the CLOCK button to enter the adjustment
mode for the clock.
Press the CLOCK button to adjust the hours.
After adjusting the hours, wait 5 seconds to allow the hours to be
automatically input.
Press the CLOCK button to adjust the minutes.
After adjusting the minutes, wait 5 seconds to allow the minutes to
be automatically input and then return to normal mode.
Page 225 of 386

213
3-5. Other interior features
3
Interior features
Floor mat
CAUTION
Observe the following precautions.
Failure to do so may cause the driver’s floor mat to slip, possibly interfering
with the pedals while driving. An unexpectedly high speed may result or it may
become difficult to stop the vehicle, leading to a serious accident.
nWhen installing the driver’s floor mat
lDo not use floor mats designed for other models or different model year
vehicles, even if they are Toyota Genuine floor mats.
l Only use floor mats designed for the driver’s seat.
l Always install the floor mat securely using the retaining hooks (clips) pro-
vided.
l Do not use two or more floor mats on top of each other.
l Do not place the floor mat bottom-side up or upside-down.
Use only floor mats designed specifically for vehicles of the same
model and model year as your vehic le. Fix them securely in place
onto the carpet.
Fix the floor mat in place using
the retaining hooks (clips) pro-
vided.
For details, refer to the floor
mat retention clip installation
instructions supplied with the
clips.