Page 17 of 26
15
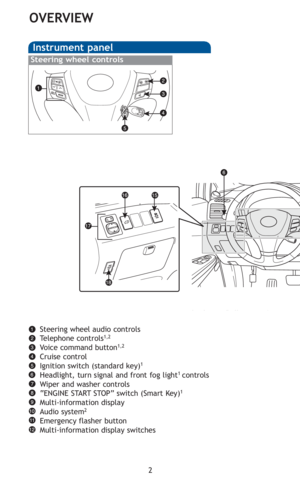
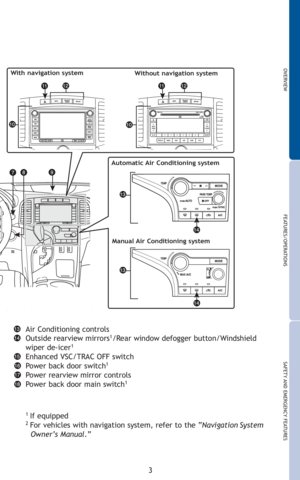
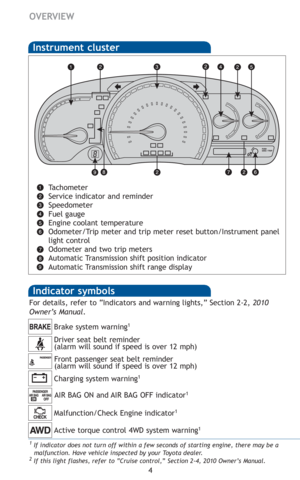
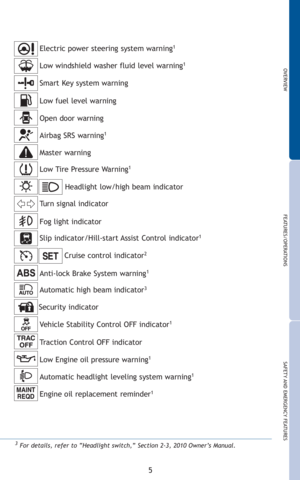
OVERVIEW
FEATURES/OPERATIONS
SAFETY AND EMERGENCY FEATURES
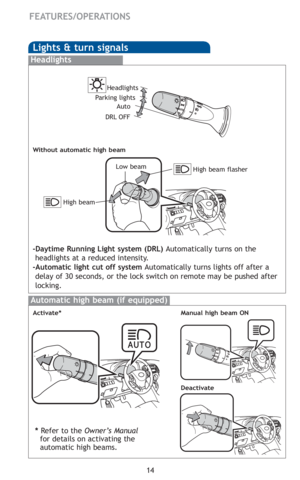
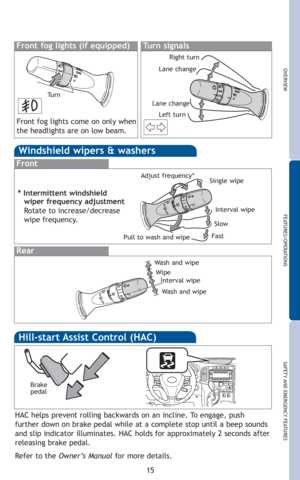
Turn signalsFront fog lights (if equipped)
Front fog lights come on only when
the headlights are on low beam.
Right turn
Lane change
Lane change
Left turn
Tu r n
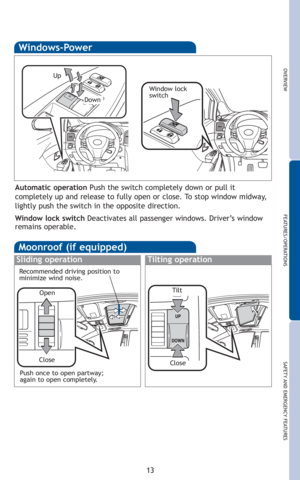
Windshield wipers & washers
Interval wipe Single wipe
Slow
Fast
Front
Rear
Wash and wipe
Wipe
Interval wipe
Wash and wipe
* Intermittent windshield
wiper frequency adjustment
Rotate to increase/decrease
wipe frequency.
Adjust frequency*
Pull to wash and wipe
HAC helps prevent rolling backwards on an incline. To engage, push
further down on brake pedal while at a complete stop until a beep sounds
and slip indicator illuminates. HAC holds for approximately 2 seconds after
releasing brake pedal.
Refer to the Owner’s Manualfor more details.
Brake
pedal
Hill-start Assist Control (HAC)
Page 18 of 26
16
FEATURES/OPERATIONS
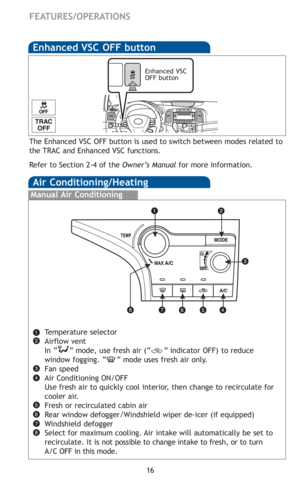
Air Conditioning/Heating
Manual Air Conditioning
Temperature selector
Airflow vent
In “ ” mode, use fresh air (“ ” indicator OFF) to reduce
window fogging. “ ” mode uses fresh air only.
Fan speed
Air Conditioning ON/OFF
Use fresh air to quickly cool interior, then change to recirculate for
cooler air.
Fresh or recirculated cabin air
Rear window defogger/Windshield wiper de-icer (if equipped)
Windshield defogger
Select for maximum cooling. Air intake will automatically be set to
recirculate. It is not possible to change intake to fresh, or to turn
A/C OFF in this mode.
The Enhanced VSC OFF button is used to switch between modes related to
the TRAC and Enhanced VSC functions.
Refer to Section 2-4 of the Owner’s Manualfor more information.
Enhanced VSC
OFF button
Enhanced VSC OFF button
Page 19 of 26
17
OVERVIEW
FEATURES/OPERATIONS
SAFETY AND EMERGENCY FEATURES
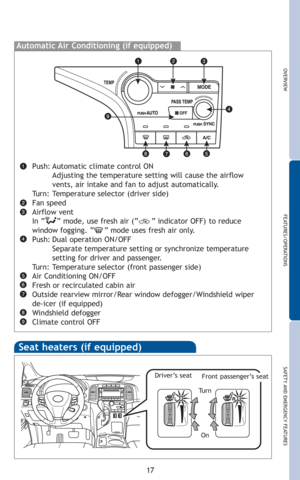
Automatic Air Conditioning (if equipped)
Push: Automatic climate control ON
Adjusting the temperature setting will cause the airflow
vents, air intake and fan to adjust automatically.
Turn: Temperature selector (driver side)
Fan speed
Airflow vent
In “ ” mode, use fresh air (“ ” indicator OFF) to reduce
window fogging. “ ” mode uses fresh air only.
Push: Dual operation ON/OFF
Separate temperature setting or synchronize temperature
setting for driver and passenger.
Turn: Temperature selector (front passenger side)
Air Conditioning ON/OFF
Fresh or recirculated cabin air
Outside rearview mirror/Rear window defogger/Windshield wiper
de-icer (if equipped)
Windshield defogger
Climate control OFF
Seat heaters (if equipped)
Driver’s seatFront passenger’s seat
Tu r n
On
Page 20 of 26
 18
FEATURES/OPERATIONS
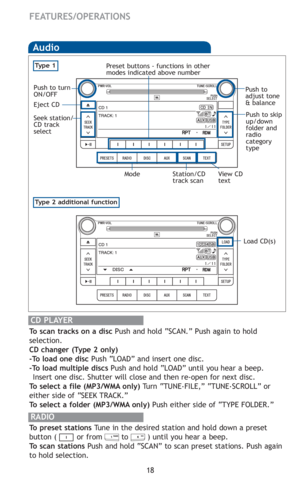
Audio
RADIO
To preset stations Tune in the desired station and hold down a preset
button ( or from to ) until you hear a beep.
To scan stations Push and hold “SCAN” to sc")
18
FEATURES/OPERATIONS
Audio
RADIO
To preset stations Tune in the desired station and hold down a preset
button ( or from to ) until you hear a beep.
To scan stations Push and hold “SCAN” to scan preset stations. Push again
to hold selection.
CD PLAYER
To scan tracks on a disc Push and hold “SCAN.” Push again to hold
selection.
CD changer (Type 2 only)
-To load one disc Push “LOAD” and insert one disc.
-To load multiple discs Push and hold “LOAD” until you hear a beep.
Insert one disc. Shutter will close and then re-open for next disc.
To select a file (MP3/WMA only) Tu r n “ T U N E.
FILE,” “TUNE.
SCROLL” or
either side of “SEEK TRACK.”
To select a folder (MP3/WMA only) Push either side of “TYPE FOLDER.”
Type 2 additional function
Audio
Ty p e 1
Load CD(s)
Push to
adjust tone
& balance
Push to skip
up/down
folder and
radio
category
type
Station/CD
track scan Mode View CD
text Preset buttons - functions in other
modes indicated above number
Eject CD
Seek station/
CD track
select
Push to turn
ON/OFF
Page 21 of 26
19
OVERVIEW
FEATURES/OPERATIONS
SAFETY AND EMERGENCY FEATURES
“ ”
Use to search within the selected audio medium (radio, CD, iPod, etc.).
“MODE”
Push to turn audio ON and to select an audio mode. Push and hold to
turn audio system OFF.vv
AUX audio jack/USB adapter
Steering wheel switches
Volume control
By connecting to the AUX audio jack (or USB adapter), you can listen to
music from a portable audio device (or USB memory) through the vehicle’s
speaker system while in AUX or USB mode.
Page 22 of 26
20
FEATURES/OPERATIONS
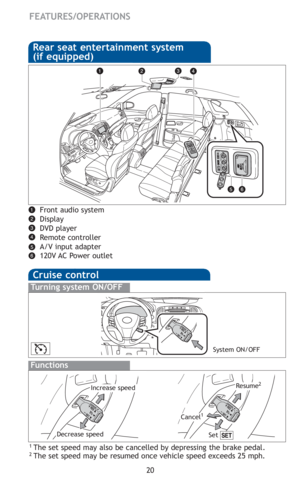
Cruise control
1 The set speed may also be cancelled by depressing the brake pedal.2 The set speed may be resumed once vehicle speed exceeds 25 mph.
Turning system ON/OFF
Functions
System ON/OFF
Increase speed
Decrease speed
Cancel1
Resume2
Rear seat entertainment system
(if equipped)
Front audio system
Display
DVD player
Remote controller
A/V input adapter
120V AC Power outlet
Set
Page 23 of 26
21
OVERVIEW
FEATURES/OPERATIONS
SAFETY AND EMERGENCY FEATURES
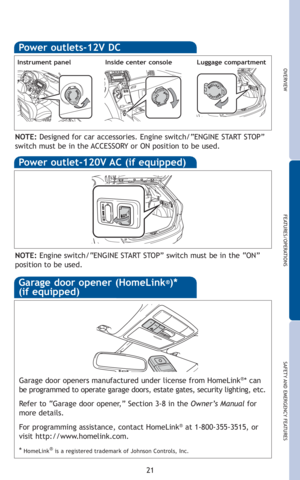
Power outlets-12V DC
Garage door openers manufactured under license from HomeLink®* can
be programmed to operate garage doors, estate gates, security lighting, etc.
Refer to “Garage door opener,” Section 3-8 in the Owner’s Manualfor
more details.
For programming assistance, contact HomeLink
®at 1-800-355-3515, or
visit http://www.homelink.com.
*
HomeLink®is a registered trademark of Johnson Controls, Inc.
NOTE:Engine switch/“ENGINE START STOP” switch must be in the “ON”
position to be used.
Instrument panelInside center console
NOTE:Designed for car accessories. Engine switch/“ENGINE START STOP”
switch must be in the ACCESSORY or ON position to be used.
Luggage compartment
Power outlet-120V AC (if equipped)
Garage door opener (HomeLink®)*
(if equipped)
Page 24 of 26
22
FEATURES/OPERATIONS
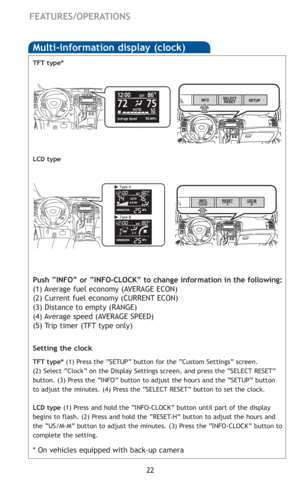
Multi-information display (clock)
Push “INFO” or “INFO-CLOCK” to change information in the following:
(1) Average fuel economy (AVERAGE ECON)
(2) Current fuel economy (CURRENT ECON)
(3) Distance to empty (RANGE)
(4) Average speed (AVERAGE SPEED)
(5) Trip timer (TFT type only)
TFT type*
LCD type
Setting the clock
TFT type*(1) Press the “SETUP” button for the “Custom Settings” screen.
(2) Select “Clock” on the Display Settings screen, and press the “SELECT RESET”
button. (3) Press the “INFO” button to adjust the hours and the “SETUP” button
to adjust the minutes. (4) Press the “SELECT RESET” button to set the clock.
LCD type(1) Press and hold the “INFO-CLOCK” button until part of the display
begins to flash. (2) Press and hold the “RESET-H” button to adjust the hours and
the “US/M-M” button to adjust the minutes. (3) Press the “INFO-CLOCK” button to
complete the setting.
* On vehicles equipped with back-up camera


 15
OVERVIEW
FEATURES/OPERATIONS
SAFETY AND EMERGENCY FEATURES
Turn signalsFront fog lights (if equipped)
Front fog lights come on only when
the headlights are on low beam.
Right turn
Lane change
Lane")
 16
FEATURES/OPERATIONS
Air Conditioning/Heating
Manual Air Conditioning
Temperature selector
Airflow vent
In “ ” mode, use fresh air (“ ” indicator OFF) to reduce
window fogging. “ ” mode")
 17
OVERVIEW
FEATURES/OPERATIONS
SAFETY AND EMERGENCY FEATURES
Automatic Air Conditioning (if equipped)
Push: Automatic climate control ON
Adjusting the temperature setting will cause the airflow
vent")
 19
OVERVIEW
FEATURES/OPERATIONS
SAFETY AND EMERGENCY FEATURES
“ ”
Use to search within the selected audio medium (radio, CD, iPod, etc.).
“MODE”
Push to turn audio ON and to select an aud")
 20
FEATURES/OPERATIONS
Cruise control
1 The set speed may also be cancelled by depressing the brake pedal.2 The set speed may be resumed once vehicle speed exceeds 25 mph.
Turning system ON/OFF
Functi")
 21
OVERVIEW
FEATURES/OPERATIONS
SAFETY AND EMERGENCY FEATURES
Power outlets-12V DC
Garage door openers manufactured under license from HomeLink®* can
be programmed to operate garage doors, estate gat")
 22
FEATURES/OPERATIONS
Multi-information display (clock)
Push “INFO” or “INFO-CLOCK” to change information in the following:
(1) Average fuel economy (AVERAGE ECON)
(2) Current fuel economy (C")