Page 269 of 592

269
3-2. Using the audio system
3
Interior features
■
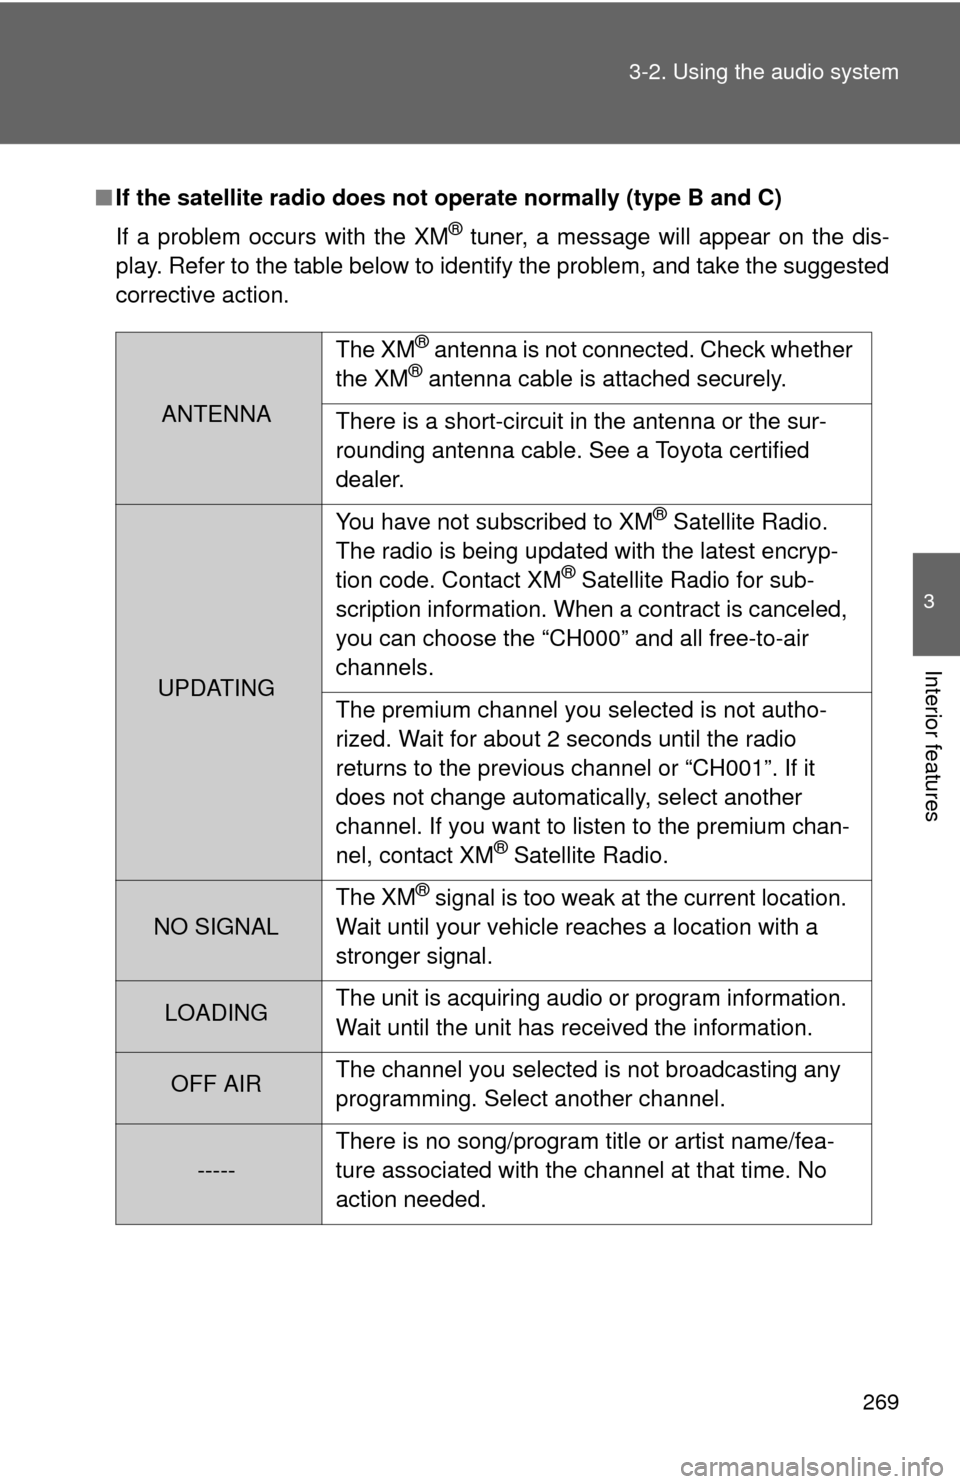
If the satellite radio does not operate normally (type B and C)
If a problem occurs with the XM
® tuner, a message will appear on the dis-
play. Refer to the table below to identify the problem, and take the suggested
corrective action.
ANTENNA The XM
® antenna is not connected. Check whether
the XM® antenna cable is attached securely.
There is a short-circuit in the antenna or the sur-
rounding antenna cable. See a Toyota certified
dealer.
UPDATING You have not subscribed to XM
® Satellite Radio.
The radio is being updated with the latest encryp-
tion code. Contact XM
® Satellite Radio for sub-
scription information. When a contract is canceled,
you can choose the “CH000” and all free-to-air
channels.
The premium channel you selected is not autho-
rized. Wait for about 2 seconds until the radio
returns to the previous channel or “CH001”. If it
does not change automatically, select another
channel. If you want to listen to the premium chan-
nel, contact XM
® Satellite Radio.
NO SIGNAL The XM
® signal is too weak at the current location.
Wait until your vehicle reaches a location with a
stronger signal.
LOADING The unit is acquiring audio or program information.
Wait until the unit has received the information.
OFF AIRThe channel you selected is not broadcasting any
programming. Select another channel.
-----There is no song/program title or artist name/fea-
ture associated with the channel at that time. No
action needed.
Page 327 of 592

327
3
Interior features
3-4. Using the hands-free phone system (for cellular phone)
Hands-free phone system (for cellular phone) features (if equipped)
■Conditions affecting operation
The hands-free phone system may not operate normally in the following situ-
ations:
●The cellular phone is turned off, or located outside the service area.
● The cellular phone has a low battery.
● The cellular phone is not connected to the system.
● The cellular phone is behind the seat or in the glove box, or metal mate-
rial covers or touches the phone.
■ When transferring ownership of the vehicle
Be sure to initialize the system to prevent personal data from being improp-
erly accessed.
■ Required profiles for the cellular phone
●HFP (Hands Free Profile) Ver. 1.0
● OPP (Object Push Profile) Ver. 1.1
If your cellular phone does not support HFP, you cannot enter the Bluetooth
®
phone, and take OPP service individually.
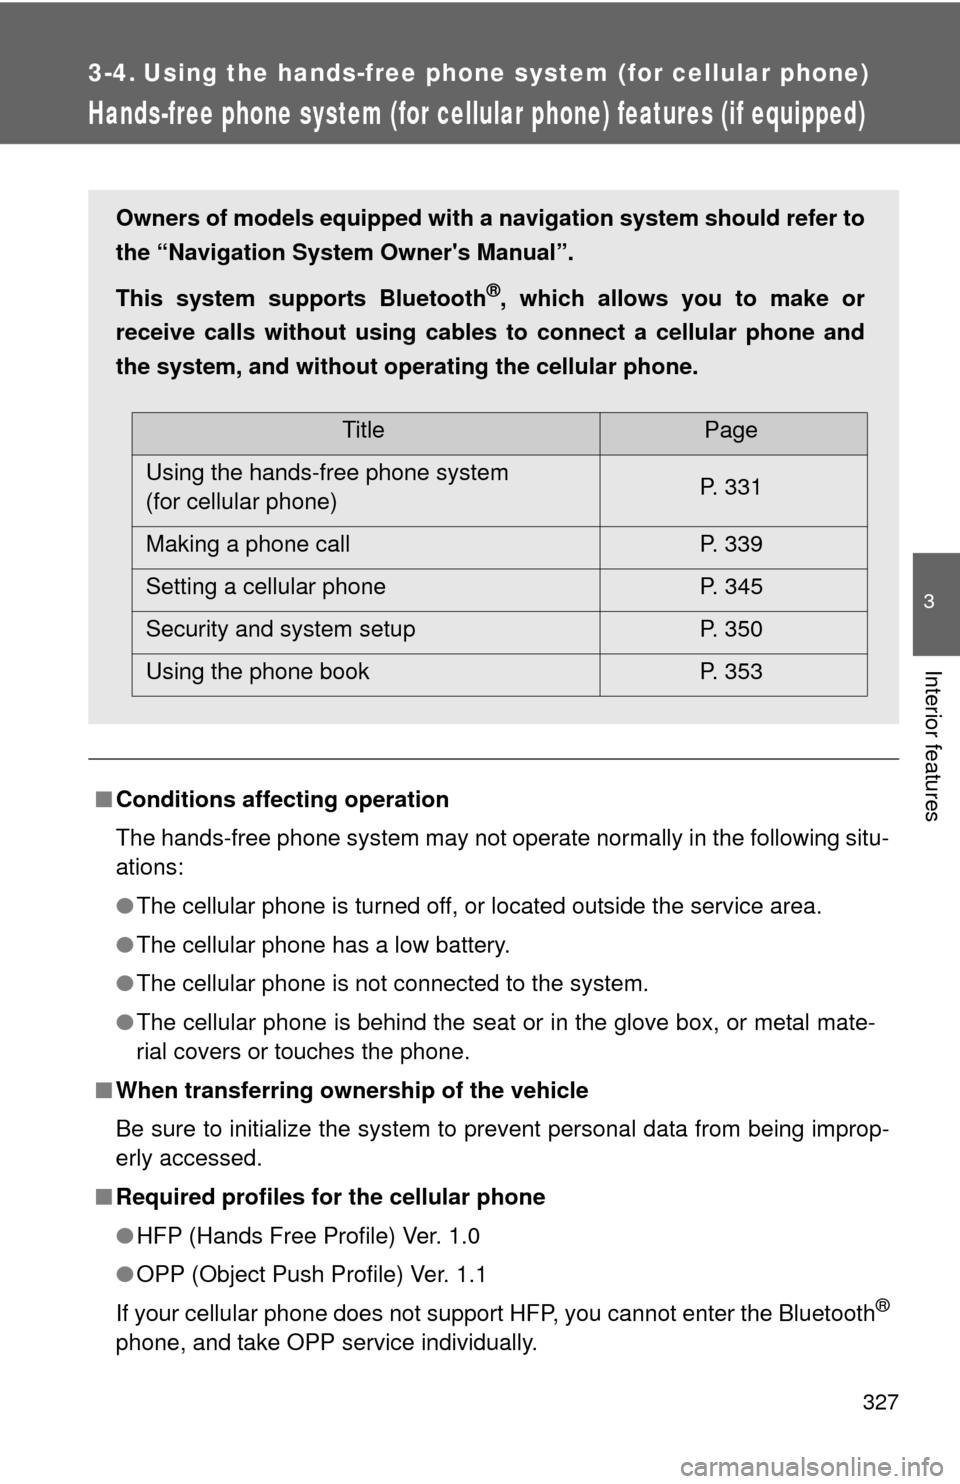
Owners of models equipped with a navigation system should refer to
the “Navigation System Owner's Manual”.
This system supports Bluetooth
®, which allows you to make or
receive calls without using cables to connect a cellular phone and
the system, and without oper ating the cellular phone.
TitlePage
Using the hands-free phone system
(for cellular phone) P. 331
Making a phone call P. 339
Setting a cellular phone P. 345
Security and system setup P. 350
Using the phone book P. 353
Page 336 of 592
336 3-4. Using the hands-free phone system (for cellular phone)
SetupSecurity
Set PIN Setting a PIN code
Phonebook
Lock
Locking the phone book
Phonebook
Unlock Unlocking the phone book
Phone
Setup Pair Phone
Registering the cellular
phone to be used
Change Name Changing a registered name
of a cellular phone
Delete Deleting a registered cellular
phone
List Phones Listing the registered cellular
phones
Select Phone Selecting a cellular phone to
be used
Set Passkey Changing the passkey
System
Setup Guidance Vol-
ume
(Guidance Vol)
Setting voice guidance vol-
ume
Initialize Initialization
First menuSecond menuThird menuOperation detail
Page 350 of 592
350
3-4. Using the hands-free phone system (for cellular phone)
Security and system setup
Setting or changing the PIN■ Setting a PIN
Select “Set PIN” using a voice command or .
Enter a PIN using a voice command or .
When using , input the code 1 digit at a time.
■Changing the PIN
Select “Set PIN” using a voice command or .
To enter the menu of each setting, follow the steps below:
■Security setting items and operation procedure
● Setting or changing t he PIN (Personal Identification Number)
1. “Setup” 2. “Security” 3. “Set PIN”
● Locking the phone book
1. “Setup” 2. “Security” 3. “Phonebook Lock”
● Unlocking the phone book
1. “Setup” 2. “Security” 3. “Phonebook Unlock”
■ System setup items and operation procedure
●Setting voice guidance volume
1. “Setup” 2. “System Setup” 3. “Guidance Vol”
● Initialization
1. “Setup” 2. “System Setup” 3. “Initialize”
can only be used for system setup operation.
STEP1
STEP2
STEP1
Page 352 of 592
352 3-4. Using the hands-free phone system (for cellular phone)
Initialization
Select “Initialize” and then “Confirm” using .
Select “Confirm” using .
■Initialization
●The following data in the system can be initialized:
• Phone book
• Outgoing and incoming call history
• Speed dials
• Registered cellular phone data
• Security code
● Once the initialization has been completed, the data cannot be restored
to its original state.
■ When the phone book is locked
The following functions cannot be used:
●Dialing by inputting a name
● Speed dialing
● Dialing a number stored in the call history memory
● Using the phone book
STEP1
STEP2
Page 368 of 592
368 3-6. Using the storage features
CAUTION
■Caution while driving
Keep the console box closed.
Injuries may result in the event of an accident or sudden braking.
■ When installing the console box (7-passenger models)
●Be careful not to catch hands or feet in or under the console box.
● Make sure that the console box is securely installed by pushing it back and
forth, upward and sideways. Failure to do so may result in serious injury in
the event of sudden braking or a collision.
■ When installing the console box between the second seats (7-passen-
ger models)
Do not install the console box by any means other than the center striker
between the second seats. Doing so may result in serious injury in the event
of sudden braking or a collision, which may lead to an accident.
Console box
Page 372 of 592
372 3-6. Using the storage features
Type F (if equipped)Press down the lever.
Type G (if equipped) Remove the console box. ( P. 366)
Pull down the cup bottom to
extend them (the cup holder is
stored in the console box). Turn
them clockwise to lock.
To install the cup holder, hook it
onto the outer edge of the con-
sole box installation base, then
push down on the opposite end
to secure it.
STEP1
STEP2
STEP3
Cup holders
Page 373 of 592

373
3-6. Using the
storage features
3
Interior features
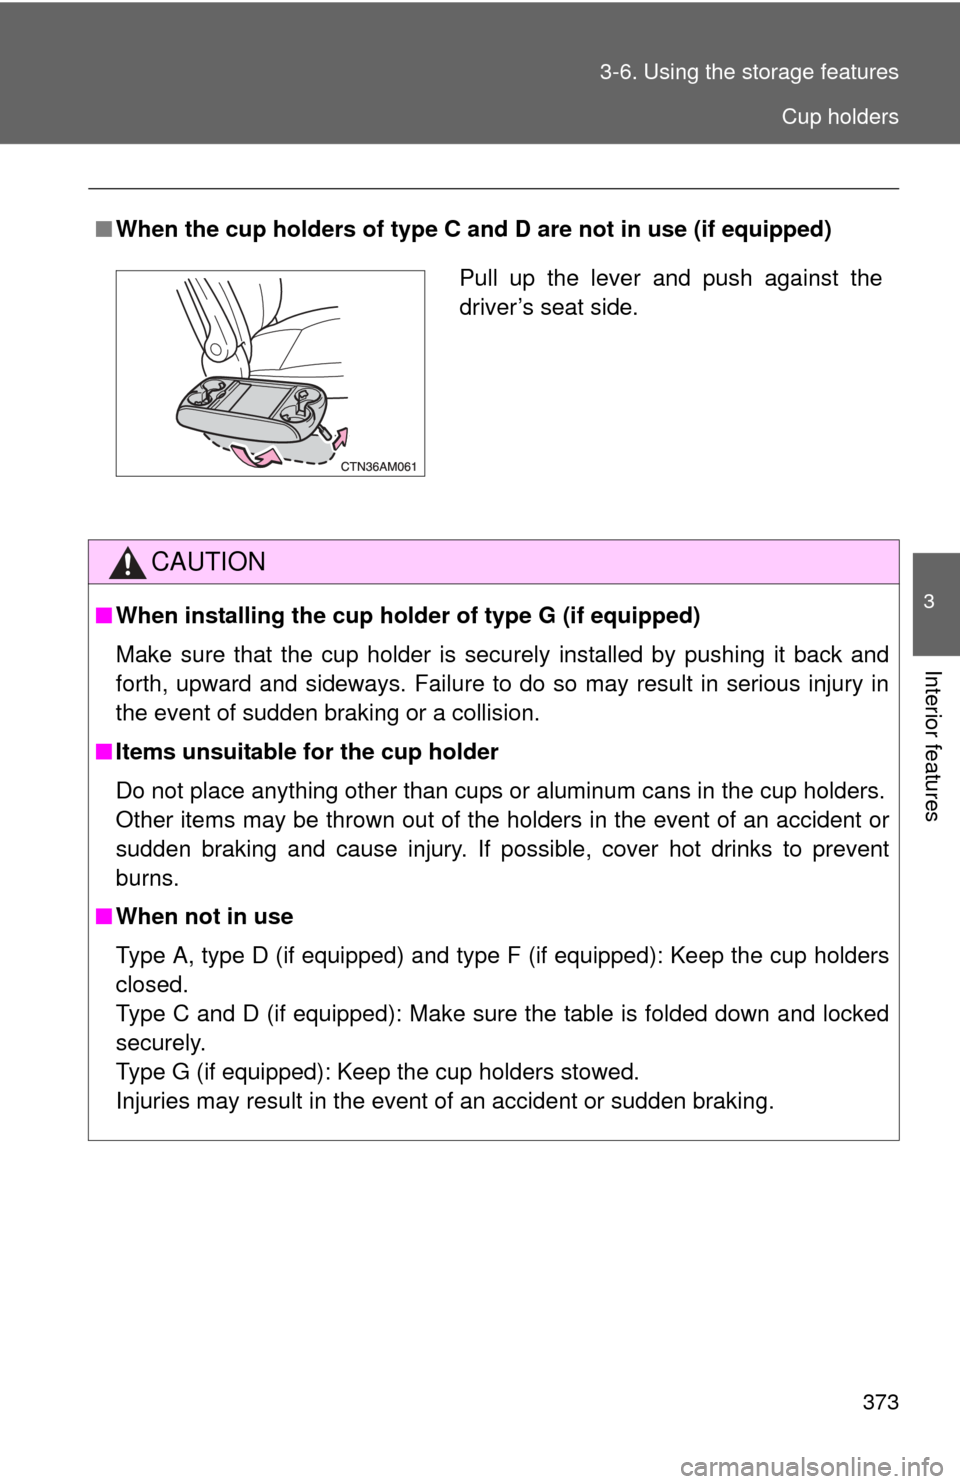
■When the cup holders of type C and D are not in use (if equipped)
CAUTION
■When installing the cup holder of type G (if equipped)
Make sure that the cup holder is securely installed by pushing it back and
forth, upward and sideways. Failure to do so may result in serious injury in
the event of sudden braking or a collision.
■ Items unsuitable for the cup holder
Do not place anything other than cups or aluminum cans in the cup holders.
Other items may be thrown out of the holders in the event of an accident or
sudden braking and cause injury. If possible, cover hot drinks to prevent
burns.
■ When not in use
Type A, type D (if equipped) and type F (if equipped): Keep the cup holders
closed.
Type C and D (if equipped): Make sure the table is folded down and locked
securely.
Type G (if equipped): Keep the cup holders stowed.
Injuries may result in the event of an accident or sudden braking.
Pull up the lever and push against the
driver’s seat side.
Cup holders