Page 177 of 295
AUDIO SYSTEM
177
Touch “Connect”.
U6033GS
When the connection is completed, this
screen is displayed. Now you can use the
portable player.
U6034GS
This screen will appear when the connec-
tion has failed.
�When the connection method is
“From Portable Player”
Operate the portable player and con-
nect it to the Bluetooth � audio system.
For the operation procedure for the
portable player, see the instruction
manual that comes with it.
Touch “Connect”.
U6035GS
Connect the portable audio player to the
Bluetooth � audio system.
U6036GS
This screen will appear when the connec-
tion has been successfully established.
Page 178 of 295

AUDIO SYSTEM
178
�
Reconnecting the portable player
Vehicles with smart key system—
If the portable player is disconnected with
a poor reception from the Bluetooth � net-
work when the “ENGINE START STOP”
switch is in ACCESSORY or IGNITION
ON mode, the system automatically re-
connects the portable player . In this case,
the connection result is not displayed.
Vehicles without smart key system—
If the portable player is disconnected with
a poor reception from the Bluetooth � net-
work when the engine switch is in the
“ACC” or “ON” position, the system auto-
matically reconnects the portable player.
In this case, the connection result is not
displayed.
If the Bluetooth� is disconnected on pur-
pose such as you turned your portable
player off, this does not happen.
Reconnect it by the following method.
�Select the portable player again.
�Enter the portable player. (b) Playing a Bluetooth�
audio
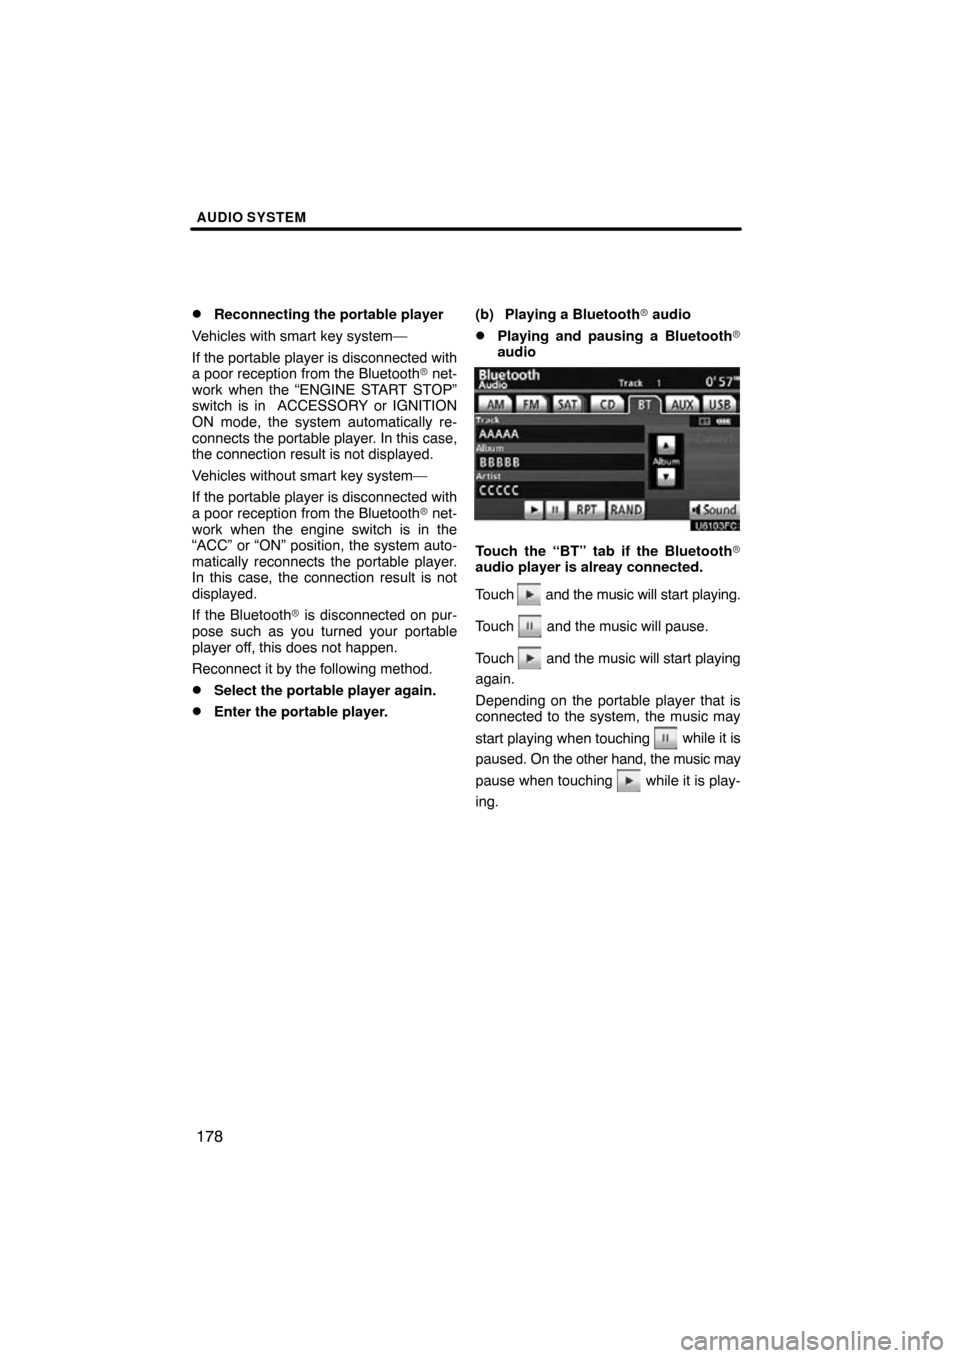
�Playing and pausing a Bluetooth �
audio
Touch the “BT” tab if the Bluetooth �
audio player is alreay connected.
Touch
and the music will start playing.
Touch
and the music will pause.
Touch
and the music will start playing
again.
Depending on the portable player that is
connected to the system, the music may
start playing when touching
while it is
paused. On the other h and, the music may
pause when touching
while it is play-
ing.
Page 189 of 295

AUDIO SYSTEM
189
2“�� ” switch
Radio
This switch has the following features—
To select a preset station:
Quickly push and release the “� ” or “ �”
side of the switch. Do this again to select
the next preset station.
To seek a station:
Push and hold the “� ” or “ �” side of the
switch until you hear a beep. Do this again
to find the next station. If you push the
switch on either side during the seek
mode, seeking will be cancelled.
To step up or down the frequency, push
and hold the switch even after you hear a
beep. When you release from the switch,
the radio will begin seeking up or down for
a station. Do this again to find the next sta-
tion.
XM � Satellite Radio—
To select a preset channel, push the “ �”
or “� ” side of the switch. Repeat until a
desired channel is found.
CD changer
Use this switch to skip up or down to a dif-
ferent track in either direction.
To select a desired track or file:
Quickly push and release the “� ” or “ �”
side of the switch until the track you want
to listen to is set. If you want to return to the
beginning of the current track, push the
“ � ” side of the switch once, quickly.
To select a desired disc:
Push and hold the “� ” or “� ” switch until
you hear a beep to change to the next or
the previous disc. Repeat this operation
until you reach the disc you want to listen
to. Bluetooth
� audio player
Use this switch to skip up or down to a dif-
ferent track or album in either direction.
To select a desired track:
Quickly push and release the “ �” or “� ”
side of the switch until the track you want
to listen to is set. If you want to return to the
beginning of the current track, push the
“ � ” side of the switch once quickly.
To select a desired album:
Push and hold “�” or “�” switch until you
hear a beep to change to the next or the
previous album. Repeat this operation un-
til you reach the album you want to listen
to.
USB memory player/iPod �
player
U
se this switch to skip up or down to a dif-
ferent file or track in either direction.
To select a desired file or track:
Push the “�” or “ �” side of the switch un-
til the file or track you want to listen to is set.
If you want to return to the beginning of the
current file or track, push the “ �” side of
the switch once quickly.
To select a desired folder (USB memory
player only): Push and hold “ �” or “� ”
switch until you hear a beep to change to
the next or the previous folder. Repeat this
operation until you reach the folder you
want to listen to.
3“MODE” switch
Push “MODE” switch to select an audio
mode. Each push changes the mode se-
quentially if the desired mode is ready to
use.
To turn the audio/video system on, push
the “MODE” switch.
To turn the audio/video system off, push
and hold the “MODE” switch until you hear
a beep.
Page 205 of 295

SECTION 8
SETUP
205
SETUP
Setup
�General settings 206 . . . . . . . . . . . . . . . . . . . . . . . . . . . . . . . . . . . . .\
.
(Used for language selection and the on/off settings of
operation sounds and automatic screen change.)
� Clock settings 211 . . . . . . . . . . . . . . . . . . . . . . . . . . . . . . . . . . . . .\
. . . .
(Used for changing time zones and the on/off settings of
daylight saving time.)
� Voice settings 212 . . . . . . . . . . . . . . . . . . . . . . . . . . . . . . . . . . . . .\
. . . .
(Voice guidance can be set.)
� Navigation settings 214 . . . . . . . . . . . . . . . . . . . . . . . . . . . . . . . . . . . .
(“Home” and “Preset Destinations” can be set and edited.)
� Detailed navigation settings 215 . . . . . . . . . . . . . . . . . . . . . . . . . . . .
(Average cruising speed, displayed screen contents,
and POI icon categories can be set.)
� Telephone settings 224 . . . . . . . . . . . . . . . . . . . . . . . . . . . . . . . . . . . .
(Bluetooth � phones can be registered.)
� Audio settings 262
. . . . . . . . . . . . . . . . . . . . . . . . . . . . . . . . . . . . .\
. . .
(Settings are available for portable audio devices and
Bluetooth � audio devices players.)
� Vehicle settings 270
. . . . . . . . . . . . . . . . . . . . . . . . . . . . . . . . . . . . .\
. .
(Vehicle information can be set.)
Page 210 of 295
SETUP
210
�
Delete personal data
The following personal data can be de-
leted or returned to their default settings:
�Maintenance conditions
�Maintenance information “off” set-
ting
�Address book
�Areas to avoid
�Previous points
�Route trace
�Phonebook data
�Call history data
�Speed dial data
�Voice tag data
�Bluetooth � phone data
�Volume setting
�Details setting
This function is available only when the ve-
hicle is not moving. 1. Push the “SETUP” button.
2. Touch “General” on the “Setup”
screen.
Then touch
to display page 2 of the
“General Settings” screen.
3. Touch “Delete Personal Data”.
4. Touch “Delete”.
5. Touch “Yes”.
Page 226 of 295
SETUP
226
“Manage phone” is accessed from the
“Connect Phone” screen.
1. Push the “SETUP” button.
2. Touch “Phone”.
3. Touch “Manage Phone”.
Please refer to the following pages for
each setting.
�Registering a Bluetooth� phone
1. Touch “(add new)” to register your
cellular phone to the system.
2. When this screen is displayed, input
the passcode displayed on the screen
into the phone.
For the operation of the phone, see the
manual that comes with your cellular
phone.
If you want to cancel it, touch “Cancel” .
— Manage phone
Page 227 of 295
SETUP
227
3. When the connection is completed,
this screen is displayed.
You do not need to enter the phone in case
of using the same one.
When this screen is displayed, follow the
guidance on the screen to try again.When another Bluetooth
� device is
connected
When another Bluetooth � device is cur-
rently connected, this screen is displayed.
If you want to disconnect it, touch “Yes”.
INFORMATION
When you register your phone,
Bluetooth � audio will disconnect. It
will reconnect automatically when
you finish registration. It will not be
reconnected depending on the phone
you are using.
Page 228 of 295
SETUP
228
You can also register a new Bluetooth�
phone in the following way.
1. Push the “SETUP” button.
2. Touch “Phone”.
3. Touch “Manage Phone”.
4. Touch “Options”.
5. Touch “New Phone”.
6. Touch “(empty)” to register your
cellular phone to the system.
The following operations are the same
as the operation after you touch “(add
new)”.