Page 5 of 148

3
For safety reasons, this manual indicates
items requiring particular attention with the
following marks.
CAUTION
This is a warning against anything
which may cause injury to people if
the warning is ignored. You are in-
formed about what you must or must
not do in order to reduce the risk of
injury to yourself and others.
NOTICE
This is a warning against anything
which may cause damage to the ve-
hicle or its equipment if the warning
is ignored. You are informed about
what you must or must not do in or-
der to avoid or reduce the risk of dam-
age to your vehicle and its equip-
ment.
INFORMATION
This provides additional information.
Initial screen
Vehicles with smart key system—
When you start the engine or when
the “ENGINE START STOP” switch is
set to the ACCESSORY mode, the
initial “TOYOTA” screen appears and
the system begins operating.
Vehicles without smart key system—
When you start the engine or when
the engine switch is set to the “ACC”
position, the initial “TOYOTA” screen
appears and the system begins
operating.
CAUTION
When the vehicle is stopped with the
engine running, always apply the
parking brake for safety.
After a few seconds, the “CAUTION”
screen appears.
Important information about
this manual
Page 18 of 148
BASIC FUNCTIONS
16
Vehicles with smart key system—
Your navigation system can be oper-
ated by the navigation controller when
the “ENGINE START STOP” switch is
set at ACCESSORY or IGNITION ON
mode.
Vehicles without smart key system—
Your navigation system can be oper-
ated by the navigation controller when
the engine switch is set at “ACC” or
“ON” position.
To access the navigation controller—
Push the lid to open.
To turn on the navigation display—
Push the
“MAP/VOICE”, “MENU”,
“DEST” or “INFO” button.
To turn off the navigation display—
Push the
“DISP” button and select the“SCREEN OFF”.
For details, see “Controller and buttons” on
page 12.
NOTICE
�To prevent the battery from being
discharged, do not leave the navi-
gation system on longer than nec-
essary when the engine is not run-
ning.
�Do not place heavy objects on the
controller.
Your navigation system
Page 22 of 148

BASIC FUNCTIONS
20
US7
Alabama
Arkansas
Louisiana
Mississippi
Tennessee
US8
Connecticut
Maine
Massachusetts
New Hampshire
New Jersey
New York
Rhode Island
Vermont
US9
Delaware
Maryland
New Jersey
Pennsylvania
Virginia
Washington, DC
West Virginia
US10
Florida
Georgia
North Carolina
South Carolina
CANADA
CAN
Alberta
British Columbia
Manitoba
New Brunswick
Newfoundland and Labrador
Nova Scotia
Ontario
Prince Edward Island
Québec
Saskatchewan
Yukon Territory
You can find your destination using various
methods. See pages 22 through 38 for the
detailed steps.
1. By “Address”: You can input the
house number and the street address by
using the input keys. See page 22 for the
detailed steps.
2. By “POI” (Point of Interest): You can
select one of the many points of interest
that have been already stored in the sys-
tem’s database. There are 54 categories
to choose from including restaurants, ho-
tels and so on. See page 26 for the detailed
steps.
3. By “Marked points”: You can select
your own favorite destinations as “Marked
points”. The system allows you to store up
100 marked points. See page 32 for the
detailed steps.
4. By “Previous destination”: You can
select a destination from any of the last 20
previously set destinations. See page 33
for the detailed steps.
Page 25 of 148

BASIC FUNCTIONS
23
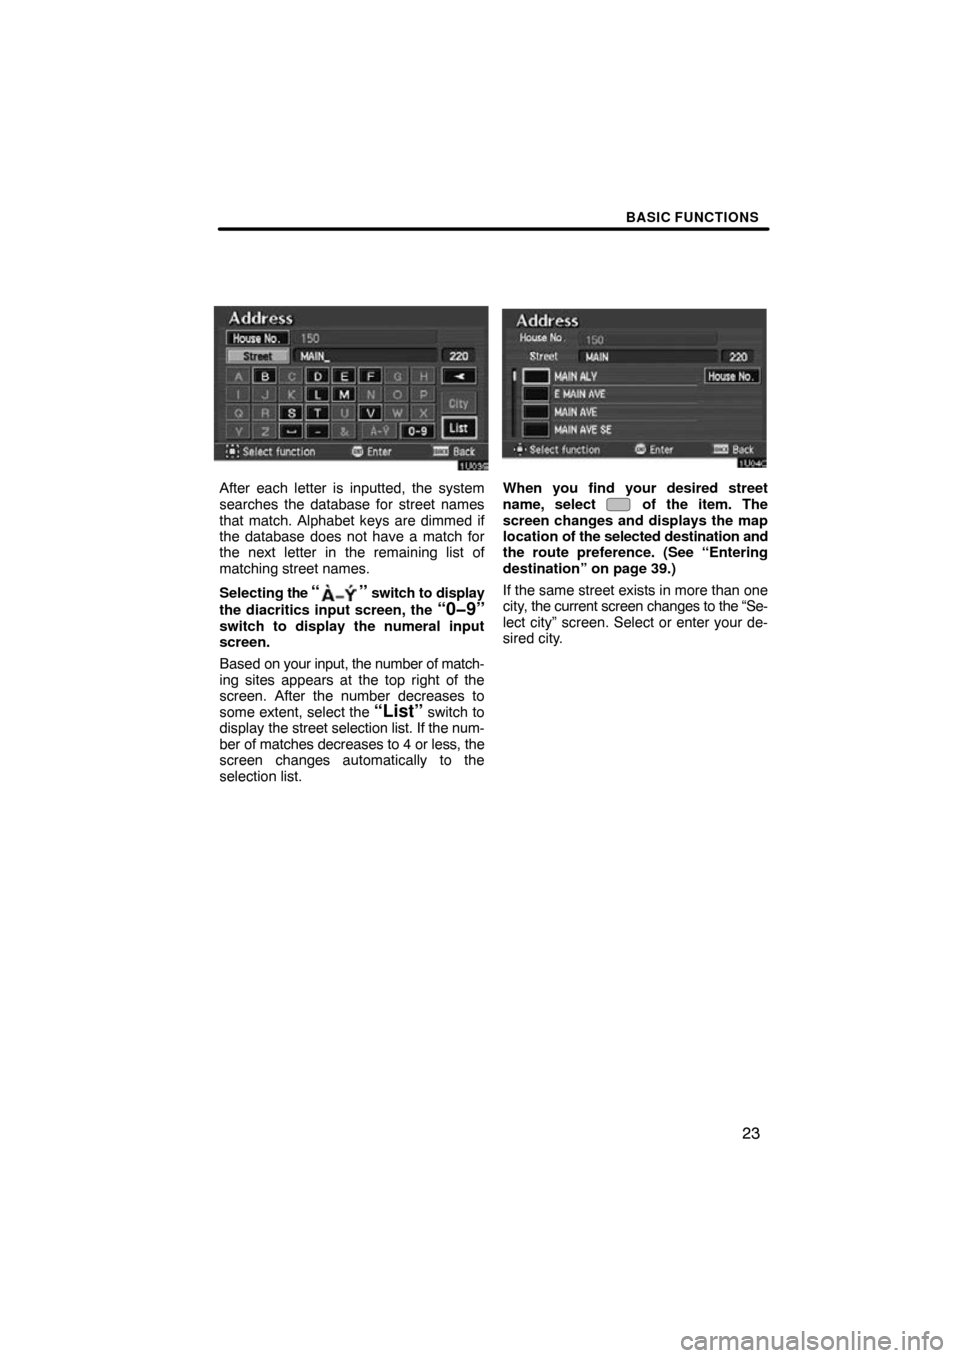
After each letter is inputted, the system
searches the database for street names
that match. Alphabet keys are dimmed if
the database does not have a match for
the next letter in the remaining list of
matching street names.
Selecting the
“” switch to display
the diacritics input screen, the
“0�9”switch to display the numeral input
screen.
Based on your input, the number of match-
ing sites appears at the top right of the
screen. After the number decreases to
some extent, select the
“List” switch to
display the street selection list. If the num-
ber of matches decreases to 4 or less, the
screen changes automatically to the
selection list.
When you find your desired street
name, select of the item. The
screen changes and displays the map
location of the selected destination and
the route preference. (See “Entering
destination” on page 39.)
If the same street exists in more than one
city, the current screen changes to the “Se-
lect city” screen. Select or enter your de-
sired city.
Page 53 of 148

BASIC FUNCTIONS
51
When you are driving while the route
guidance is operating, you can change
the route to detour around a section of
the route where a delay is caused by
road repairs, an accident, etc.
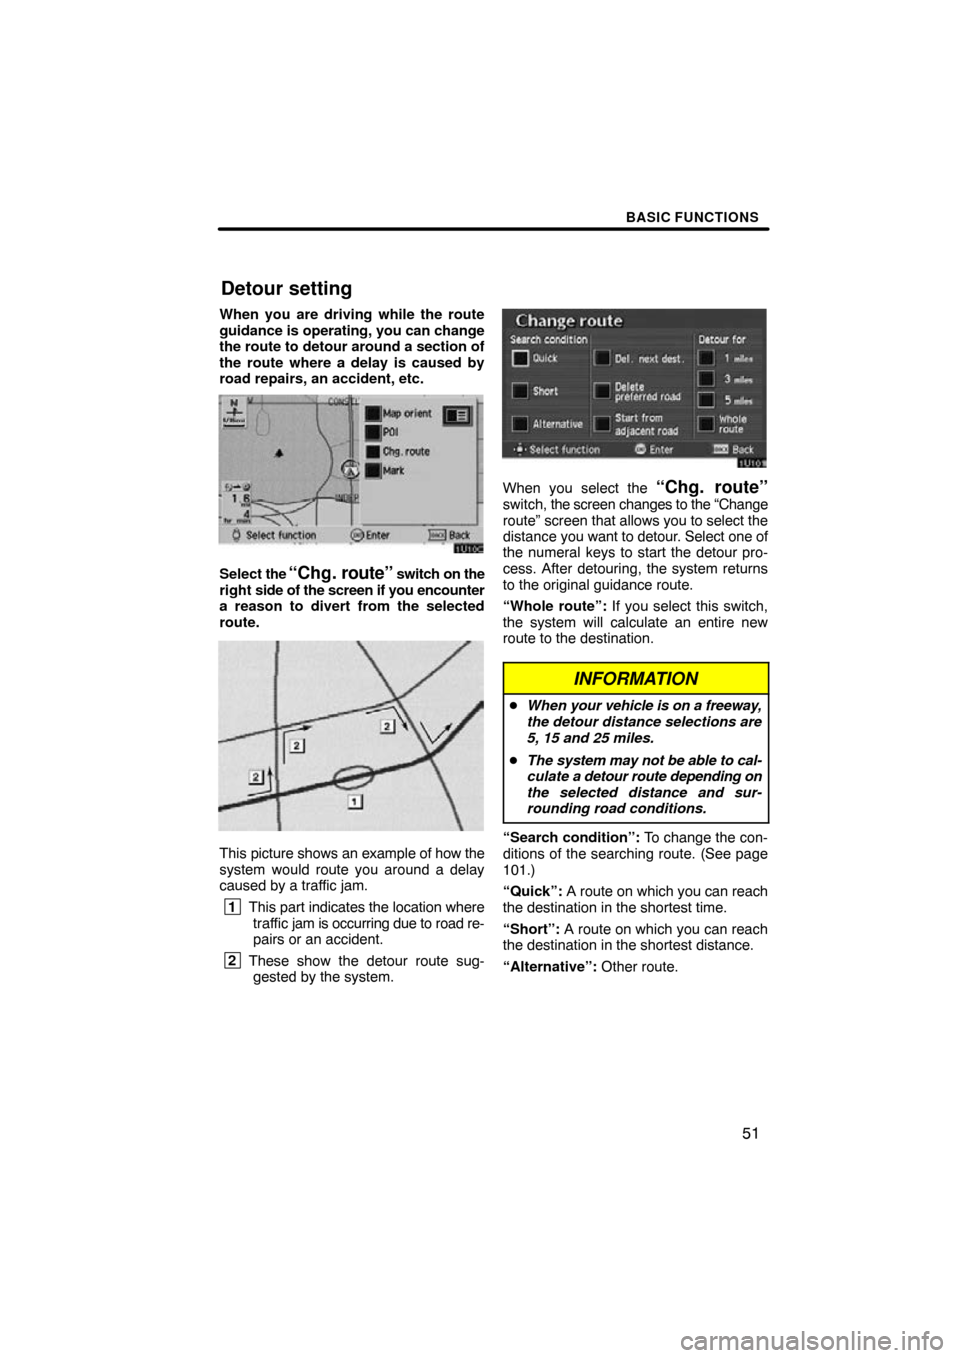
Select the “Chg. route” switch on the
right side of the screen if you encounter
a reason to divert from the selected
route.
This picture shows an example of how the
system would route you around a delay
caused by a traffic jam.
1 This part indicates the location where
traffic jam is occurring due to road re-
pairs or an accident.
2 These show the detour route sug-
gested by the system.
When you select the “Chg. route”switch, the screen changes to the “Change
route” screen that allows you to select the
distance you want to detour. Select one of
the numeral keys to start the detour pro-
cess. After detouring, the system returns
to the original guidance route.
“Whole route”: If you select this switch,
the system will calculate an entire new
route to the destination.
INFORMATION
� When your vehicle is on a freeway,
the detour distance selections are
5, 15 and 25 miles.
� The system may not be able to cal-
culate a detour route depending on
the selected distance and sur-
rounding road conditions.
“Search condition”: To change the con-
ditions of the searching route. (See page
101.)
“Quick”: A route on which you can reach
the destination in the shortest time.
“Short”: A route on which you can reach
the destination in the shortest distance.
“Alternative”: Other route.
Detour setting
Page 89 of 148
ADVANCED FUNCTIONS
87
The screen lists the marked points.
Sort by “Icon”: Select this switch to list
the marked points in order of the type of
icon.
Sort by “Date”: Select this switch to list
the marked points in order of the registered
date.
Sort by “Name”: Select this switch to list
the marked points in alphabetical order.
Select
switch of the desired marked
point to display the edit marked point
screen.
3. Select the “Change” switch which
you want to edit. CHANGING THE ICON
Select your desired icon.
CHANGING THE NAME
Select alphabet or numeral keys to in-
put the name.
After you finish your entry, select the
“OK” switch on the screen.
The previous screen will be displayed.
CHANGING THE PHONE NUMBER
Select numeral keys.
After you finish your entry, select the
“OK” switch on the screen.
The previous screen will be displayed.
Page 96 of 148
ADVANCED FUNCTIONS
94
CHANGING THE NAME
Select alphabet or numeral keys to in-
put the name.
After you finish your entry, select the
“OK” switch on the screen.
The previous screen will be displayed.
CHANGING THE LOCATION
Move the cursor to your desired point,
and push the
“ENTER” button of the
navigation controller.
CHANGING THE AREA SIZE
Select one of the “detour gau ge” on the left
side of this screen if you want to change
the area size. (c) Deleting area to avoid
1. Select the
“Delete” switch of the
“Area to avoid” to display the “Delete
area to avoid” screen.
2. Select the area you want to delete
from the list.
“Delete all”: All registered areas to avoid
in the system are deleted.
3. Messages appear depending on the
type of deletion. If you want to delete,
select the
“Yes” switch. To cancel the
deletion, select the “No” switch.
Page 117 of 148

MORE ADVANCED FUNCTIONS
11 5
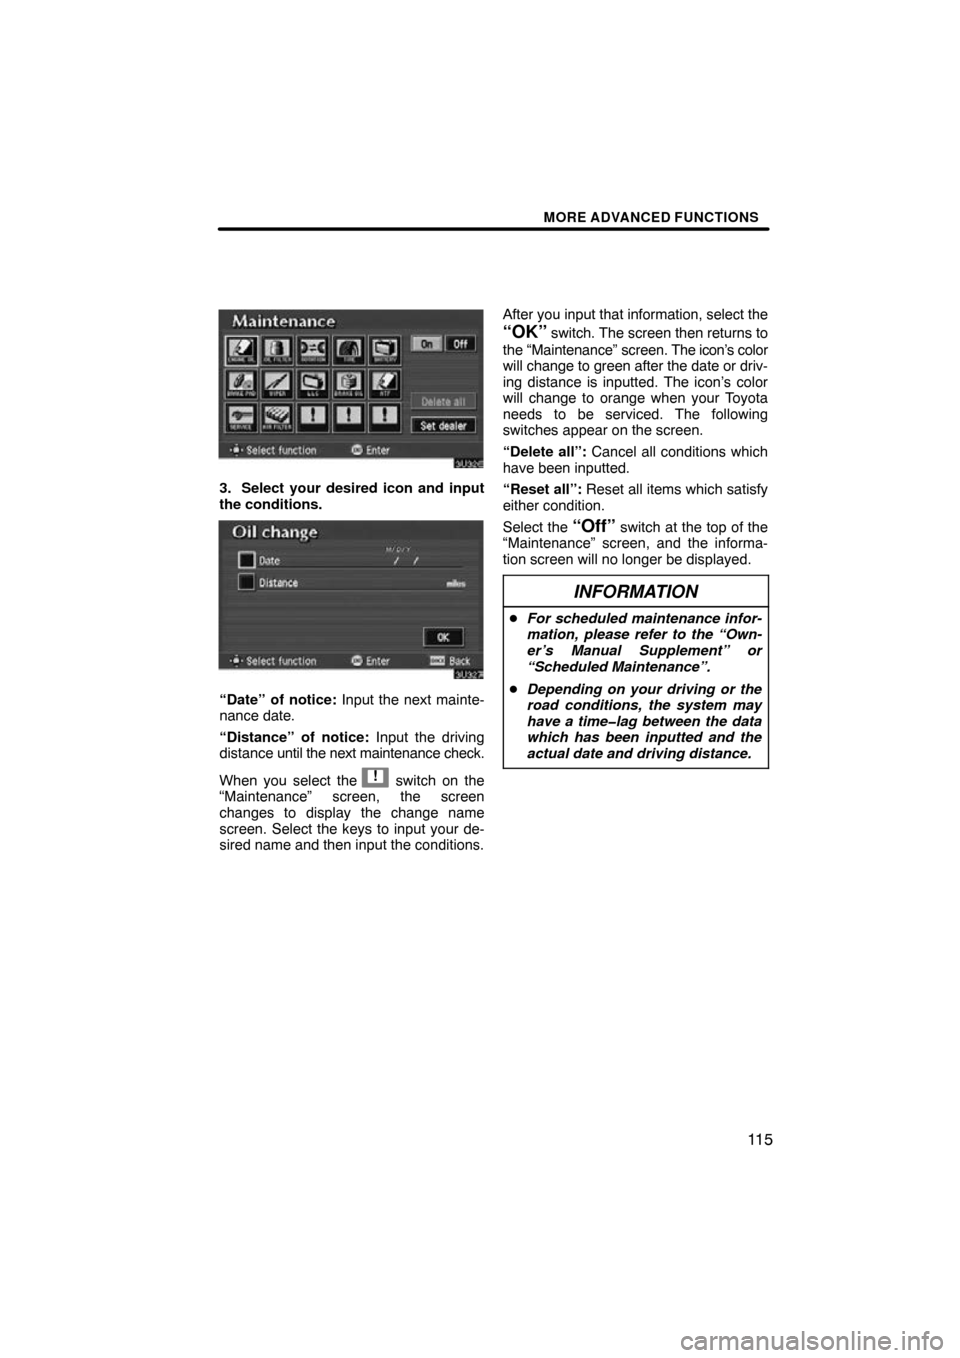
3. Select your desired icon and input
the conditions.
“Date” of notice: Input the next mainte-
nance date.
“Distance” of notice: Input the driving
distance until the next maintenance check.
When you select the
! switch on the
“Maintenance” screen, the screen
changes to display the change name
screen. Select the keys to input your de-
sired name and then input the conditions. After you input that information, select the
“OK” switch. The screen then returns to
the “Maintenance” screen. The icon’s color
will change to green after the date or driv-
ing distance is inputted. The icon’s color
will change to orange when your Toyota
needs to be serviced. The following
switches appear on the screen.
“Delete all”: Cancel all conditions which
have been inputted.
“Reset all”: Reset all items which satisfy
either condition.
Select the
“Off” switch at the top of the
“Maintenance” screen, and the informa-
tion screen will no longer be displayed.
INFORMATION
� For scheduled maintenance infor-
mation, please refer to the “Own-
er’s Manual Supplement” or
“Scheduled Maintenance”.
� Depending on your driving or the
road conditions, the system may
have a time�lag between the data
which has been inputted and the
actual date and driving distance.