2010 SUZUKI SX4 parking brake
[x] Cancel search: parking brakePage 210 of 297
7-5INSPECTION AND MAINTENANCE
80J23-03E
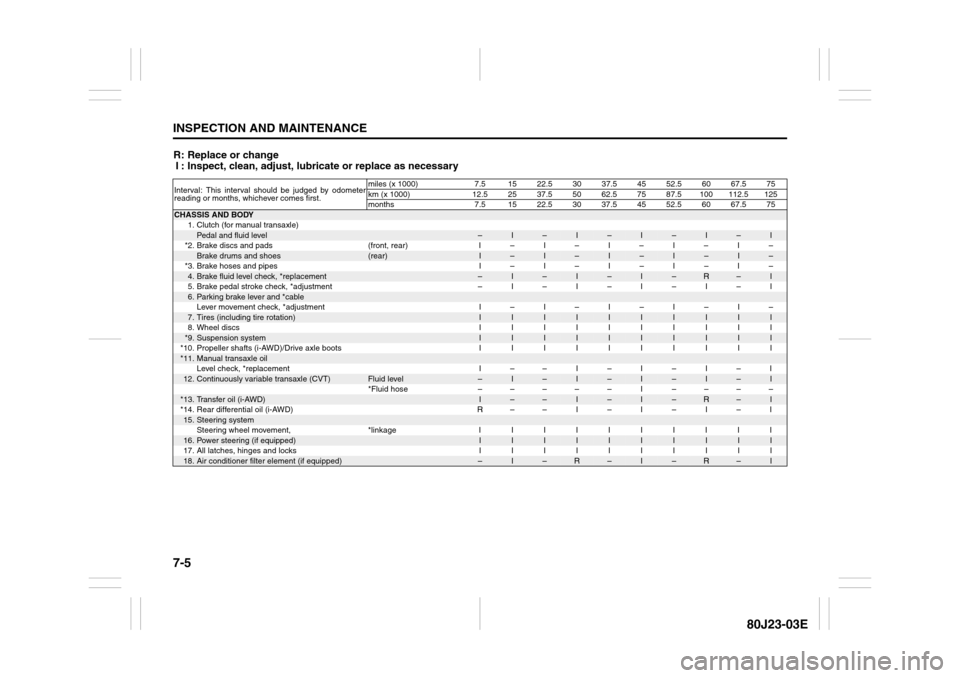
R: Replace or change
I : Inspect, clean, adjust, lubricate or replace as necessaryInterval: This interval should be judged by odometer
reading or months, whichever comes first.miles (x 1000) 7.5 15 22.5 30 37.5 45 52.5 60 67.5 75
km (x 1000) 12.5 25 37.5 50 62.5 75 87.5 100 112.5 125
months 7.5 15 22.5 30 37.5 45 52.5 60 67.5 75CHASSIS AND BODY
1. Clutch (for manual transaxle)
Pedal and fluid level
–
I
–
I
–
I
–
I
–
I
*2. Brake discs and pads (front, rear) I – I – I – I – I –
Brake drums and shoes
(rear)
I
–
I
–
I
–
I
–
I
–
*3. Brake hoses and pipes I – I – I – I – I –
4.Brake fluid level check, *replacement
–
I
–
I
–
I
–
R
–
I
5. Brake pedal stroke check, *adjustment – I – I – I – I – I
6.Parking brake lever and *cableLever movement check, *adjustment I – I – I – I – I –7.Tires (including tire rotation)
I
I
I
I
I
I
I
I
I
I
8. Wheel discs I I I I I I I I I I
*9.
Suspension system
I
I
I
I
I
I
I
I
I
I
*10. Propeller shafts (i-AWD)/Drive axle boots I I I I I I I I I I
*11.
Manual transaxle oilLevel check, *replacement I – – I – I – I – I
12.
Continuously variable transaxle (CVT)
Fluid level
–
I
–
I
–
I
–
I
–
I
*Fluid hose ––––– I ––––
*13.
Transfer oil (i-AWD)
I
–
–
I
–
I
–
R
–
I
*14. Rear differential oil (i-AWD) R – – I – I – I – I
15.
Steering systemSteering wheel movement, *linkage I I I I I I I I I I
16.
Power steering (if equipped)
I
I
I
I
I
I
I
I
I
I
17. All latches, hinges and locks I I I I I I I I I I
18.
Air conditioner filter element (if equipped)
–
I
–
R
–
I
–
R
–
I
Page 211 of 297

7-6
INSPECTION AND MAINTENANCE
80J23-03E
R: Replace or change
I : Inspect, clean, adjust, lubricate or replace as necessary
NOTE:
This table shows the service schedule up to 250000 km (150000 miles).
Beyond 250000 km (150000 miles), perform the same services at the same intervals shown in the chart.
Beyond 250000 km (150000 miles), the maintenance services enclosed with a rectangle are required.Interval: This interval should be judged by odometer
reading or months, whichever comes first.miles (x 1000) 82.5 90 97.5 105 112.5 120 127.5 135 142.5 150
km (x 1000) 137.5 150 162.5 175 187.5 200 212.5 225 237.5 250
months 82.5 90 97.5 105 112.5 120 127.5 135 142.5 150CHASSIS AND BODY
1. Clutch (for manual transaxle)
Pedal and fluid level
–
I
–
I
–
I
–
I
–
I
*2. Brake discs and pads (front, rear) I – I – I – I – I –
Brake drums and shoes
(rear)
I
–
I
–
I
–
I
–
I
–
*3. Brake hoses and pipes I – I – I – I – I –
4.Brake fluid level check, *replacement
–
I
–
I
–
R
–
I
–
I
5. Brake pedal stroke check, *adjustment – I – I – I – I – I
6.Parking brake lever and *cableLever movement check, *adjustment I – I – I – I – I –7.Tires (including tire rotation)
I
I
I
I
I
I
I
I
I
I
8. Wheel discs I I I I I I I I I I
*9.
Suspension system
I
I
I
I
I
I
I
I
I
I
*10. Propeller shafts (i-AWD)/Drive axle boots I I I I I I I I I I
*11.
Manual transaxle oilLevel check, *replacement – R – I – I – I – I
12.
Continuously variable transaxle (CVT)
Fluid level
–
I
–
I
–
I
–
I
–
I
*Fluid hose – I ––––– I ––
*13.
Transfer oil (i-AWD)
–
I
–
I
–
R
–
I
–
I
*14. Rear differential oil (i-AWD) – I – I – I – I – I
15.
Steering systemSteering wheel movement, *linkage I I I I I I I I I I
16.
Power steering (if equipped)
I
I
I
I
I
I
I
I
I
I
17. All latches, hinges and locks I I I I I I I I I I
18.
Air conditioner filter element (if equipped)
–
R
–
I
–
R
–
I
–
R
Page 214 of 297
7-9INSPECTION AND MAINTENANCE
80J23-03E
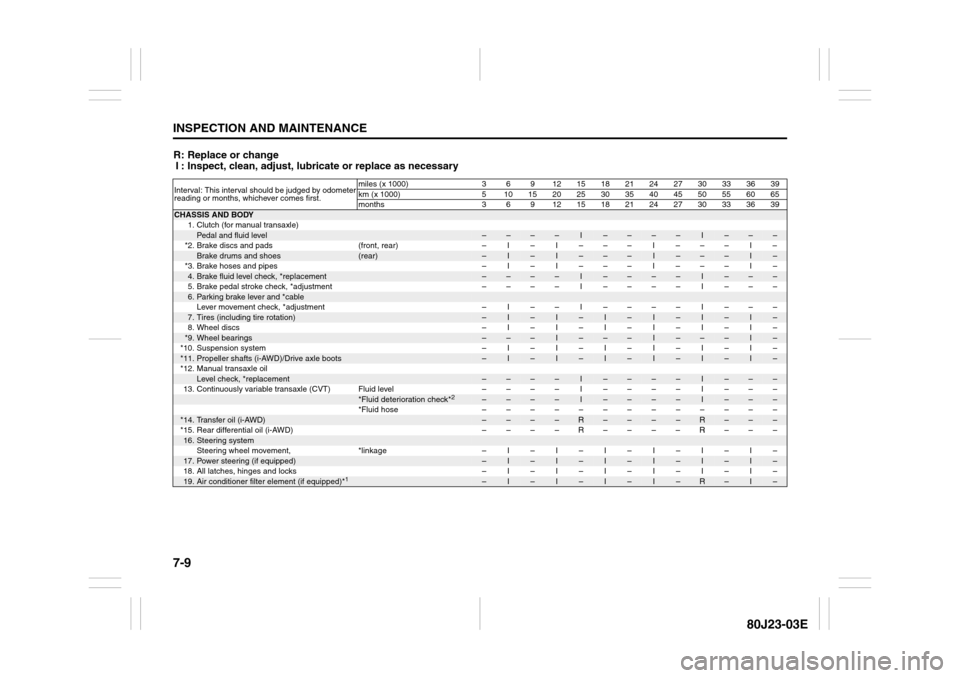
R: Replace or change
I : Inspect, clean, adjust, lubricate or replace as necessaryInterval: This interval should be judged by odometer
reading or months, whichever comes first.miles (x 1000) 3 6 9 12 15 18 21 24 27 30 33 36 39
km (x 1000) 5 101520253035404550556065
months 3 6 9 12151821242730333639CHASSIS AND BODY
1. Clutch (for manual transaxle)
Pedal and fluid level
–
–
–
–
I
–
–
–
–
I
–
–
–
*2. Brake discs and pads (front, rear) – I – I – – – I – – – I –
Brake drums and shoes
(rear)
–
I
–
I
–
–
–
I
–
–
–
I
–
*3. Brake hoses and pipes – I – I – – – I – – – I –
4.Brake fluid level check, *replacement
–
–
–
–
I
–
–
–
–
I
–
–
–
5. Brake pedal stroke check, *adjustment – – – – I – – – – I – – –
6.Parking brake lever and *cableLever movement check, *adjustment – I – – I – – – – I – – –7.Tires (including tire rotation)
–
I
–
I
–
I
–
I
–
I
–
I
–
8. Wheel discs – I – I – I – I – I – I –
*9.
Wheel bearings
–
–
–
I
–
–
–
I
–
–
–
I
–
*10. Suspension system – I – I – I – I – I – I –
*11.
Propeller shafts (i-AWD)/Drive axle boots
–
I
–
I
–
I
–
I
–
I
–
I
–
*12. Manual transaxle oil
Level check, *replacement
–
–
–
–
I
–
–
–
–
I
–
–
–
13. Continuously variable transaxle (CVT) Fluid level – – – – I – – – – I – – –
*Fluid deterioration check*
2
–
–
–
–
I
–
–
–
–
I
–
–
–
*Fluid hose –––––––––––––
*14.
Transfer oil (i-AWD)
–
–
–
–
R
–
–
–
–
R
–
–
–
*15. Rear differential oil (i-AWD) – – – – R – – – – R – – –
16.
Steering systemSteering wheel movement, *linkage – I – I – I – I – I – I –
17.
Power steering (if equipped)
–
I
–
I
–
I
–
I
–
I
–
I
–
18. All latches, hinges and locks – I – I – I – I – I – I –
19.
Air conditioner filter element (if equipped)*
1
–
I
–
I
–
I
–
I
–
R
–
I
–
Page 215 of 297
7-10
INSPECTION AND MAINTENANCE
80J23-03E
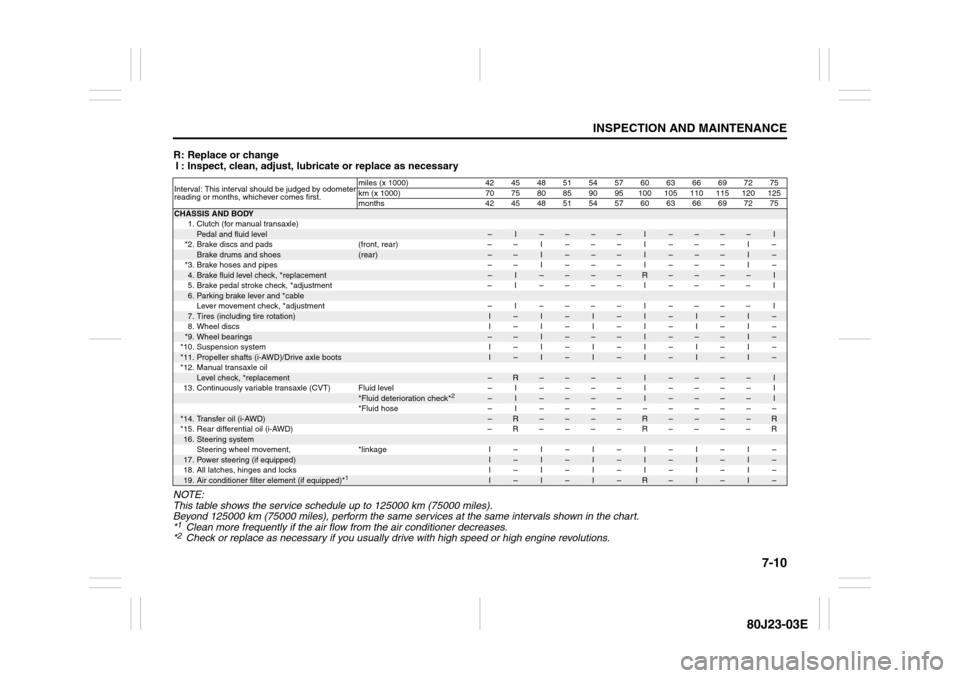
R: Replace or change
I : Inspect, clean, adjust, lubricate or replace as necessary
NOTE:
This table shows the service schedule up to 125000 km (75000 miles).
Beyond 125000 km (75000 miles), perform the same services at the same intervals shown in the chart.
*1Clean more frequently if the air flow from the air conditioner decreases.
*2Check or replace as necessary if you usually drive with high speed or high engine revolutions.
Interval: This interval should be judged by odometer
reading or months, whichever comes first.miles (x 1000) 42 45 48 51 54 57 60 63 66 69 72 75
km (x 1000) 70 75 80 85 90 95 100 105 110 115 120 125
months 42 45 48 51 54 57 60 63 66 69 72 75CHASSIS AND BODY
1. Clutch (for manual transaxle)
Pedal and fluid level
–
I
–
–
–
–
I
–
–
–
–
I
*2. Brake discs and pads (front, rear) – – I – – – I – – – I –
Brake drums and shoes
(rear)
–
–
I
–
–
–
I
–
–
–
I
–
*3. Brake hoses and pipes – – I – – – I – – – I –
4.Brake fluid level check, *replacement
–
I
–
–
–
–
R
–
–
–
–
I
5.Brake pedal stroke check, *adjustment – I –––– I –––– I
6.Parking brake lever and *cableLever movement check, *adjustment – I –––– I –––– I7.Tires (including tire rotation)
I
–
I
–
I
–
I
–
I
–
I
–
8.Wheel discs I–I–I–I–I–I–
*9.
Wheel bearings
–
–
I
–
–
–
I
–
–
–
I
–
*10. Suspension system I – I – I – I – I – I –
*11.
Propeller shafts (i-AWD)/Drive axle boots
I
–
I
–
I
–
I
–
I
–
I
–
*12. Manual transaxle oil
Level check, *replacement
–
R
–
–
–
–
I
–
–
–
–
I
13. Continuously variable transaxle (CVT) Fluid level – I–––– I –––– I
*Fluid deterioration check*
2
–
I
–
–
–
–
I
–
–
–
–
I
*Fluid hose – I ––––––––––
*14.
Transfer oil (i-AWD)
–
R
–
–
–
–
R
–
–
–
–
R
*15.Rear differential oil (i-AWD) –R––––R––––R
16.
Steering systemSteering wheel movement, *linkage I – I – I – I – I – I –
17.
Power steering (if equipped)
I
–
I
–
I
–
I
–
I
–
I
–
18. All latches, hinges and locks I – I – I – I – I – I –
19.
Air conditioner filter element (if equipped)*
1
I
–
I
–
I
–
R
–
I
–
I
–
Page 224 of 297
7-19INSPECTION AND MAINTENANCE
80J23-03E
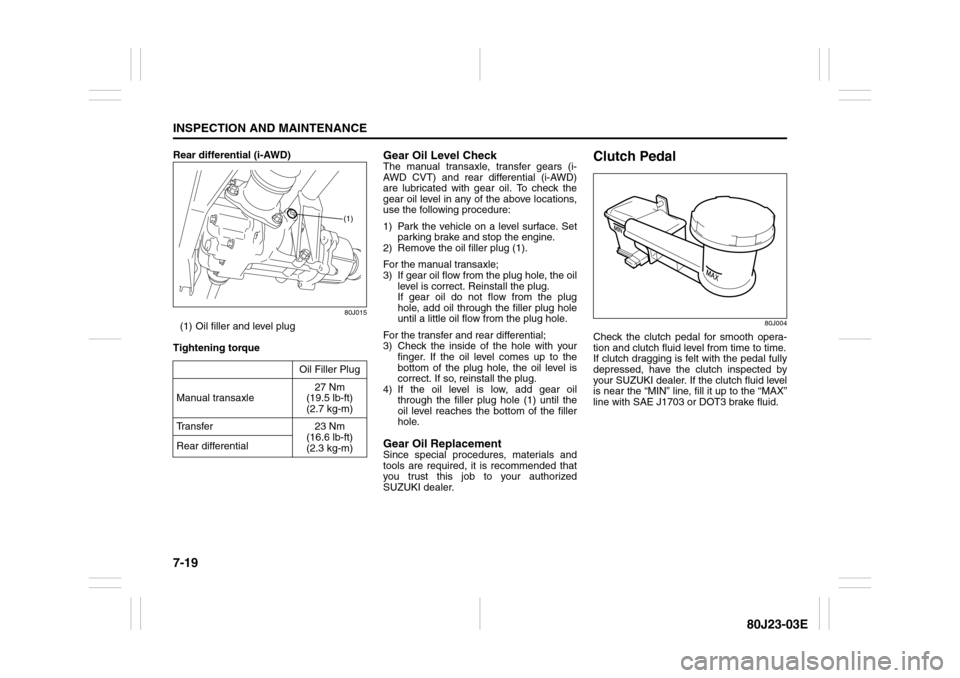
Rear differential (i-AWD)
80J015
(1) Oil filler and level plug
Tightening torque
Gear Oil Level CheckThe manual transaxle, transfer gears (i-
AWD CVT) and rear differential (i-AWD)
are lubricated with gear oil. To check the
gear oil level in any of the above locations,
use the following procedure:
1) Park the vehicle on a level surface. Set
parking brake and stop the engine.
2) Remove the oil filler plug (1).
For the manual transaxle;
3) If gear oil flow from the plug hole, the oil
level is correct. Reinstall the plug.
If gear oil do not flow from the plug
hole, add oil through the filler plug hole
until a little oil flow from the plug hole.
For the transfer and rear differential;
3) Check the inside of the hole with your
finger. If the oil level comes up to the
bottom of the plug hole, the oil level is
correct. If so, reinstall the plug.
4) If the oil level is low, add gear oil
through the filler plug hole (1) until the
oil level reaches the bottom of the filler
hole.Gear Oil ReplacementSince special procedures, materials and
tools are required, it is recommended that
you trust this job to your authorized
SUZUKI dealer.
Clutch Pedal
80J004
Check the clutch pedal for smooth opera-
tion and clutch fluid level from time to time.
If clutch dragging is felt with the pedal fully
depressed, have the clutch inspected by
your SUZUKI dealer. If the clutch fluid level
is near the “MIN” line, fill it up to the “MAX”
line with SAE J1703 or DOT3 brake fluid. Oil Filler Plug
Manual transaxle27 Nm
(19.5 lb-ft)
(2.7 kg-m)
Transfer 23 Nm
(16.6 lb-ft)
(2.3 kg-m) Rear differential
(1)
Page 225 of 297
7-20
INSPECTION AND MAINTENANCE
80J23-03E
Continuously Variable
Transaxle (CVT) FluidSpecified FluidUse a CVT fluid SUZUKI CVT FLUID
GREEN-1 or Shell GREEN-1V.Fluid Level CheckYou must check the fluid level with the CVT
fluid at normal operating temperature.
To check the fluid level:
1) To warm up the transaxle fluid, drive the
vehicle or idle the engine until the tem-
perature gauge indicates normal oper-
ating temperature.
2) Then drive for ten more minutes.
NOTE:
Do not check the fluid level if you have just
driven the vehicle for a long time at high
speed, or if you have driven in city traffic inhot weather. Wait until the fluid cools down
(about 30 minutes), or the fluid level indica-
tion will not be correct.
3) Park your vehicle on level ground.
4) Apply the parking brake and then start
the engine in “P” (Park). Let it idle for
two minutes and keep it running during
the fluid level check.
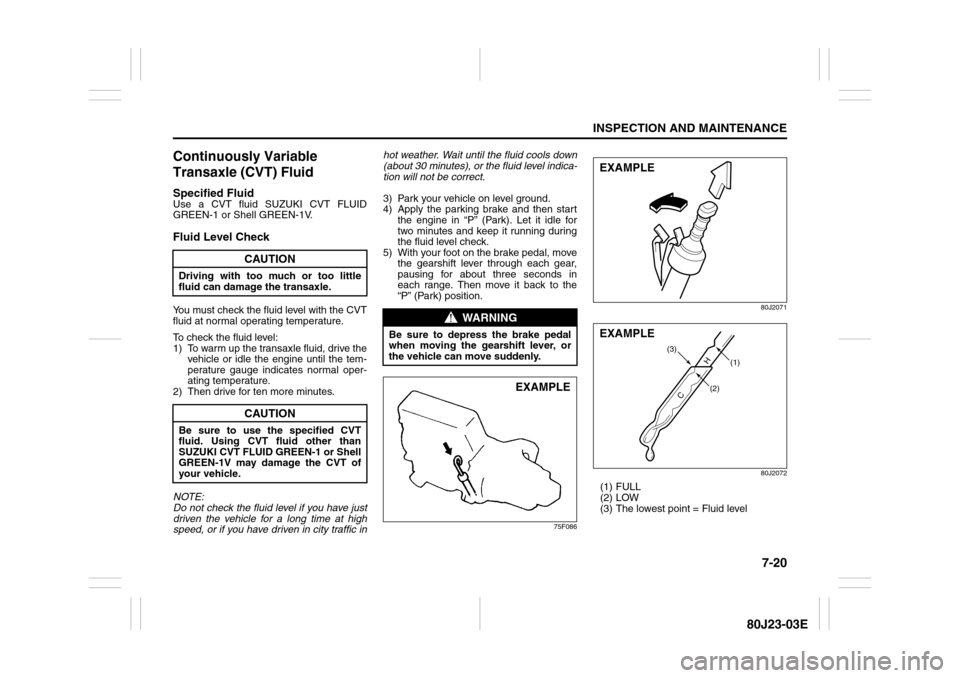
5) With your foot on the brake pedal, move
the gearshift lever through each gear,
pausing for about three seconds in
each range. Then move it back to the
“P” (Park) position.
75F08680J2071
80J2072
(1) FULL
(2) LOW
(3) The lowest point = Fluid level
CAUTION
Driving with too much or too little
fluid can damage the transaxle.
CAUTION
Be sure to use the specified CVT
fluid. Using CVT fluid other than
SUZUKI CVT FLUID GREEN-1 or Shell
GREEN-1V may damage the CVT of
your vehicle.
WARNING
Be sure to depress the brake pedal
when moving the gearshift lever, or
the vehicle can move suddenly.
EXAMPLE
EXAMPLE
(2)H
C
(1) (3)
EXAMPLE
Page 226 of 297
7-21INSPECTION AND MAINTENANCE
80J23-03E
6) The handle of the CVT fluid dipstick is
colored red or orange for easy identifi-
cation.
Remove the dipstick, clean it and push
it back in until the cap seats. Pull out
the dipstick and read the fluid level.
The fluid level should be between the
two marks in the “HOT” range on the
dipstick.
7) Add just enough specified fluid through
the dipstick hole to fill the transaxle to
the proper level. It takes only 0.6 liters
(1.27 US pt) for CVT to raise the level
from “LOW” to “FULL”.Deterioration Checking or Chang-
ing OilSince special procedures, materials and
tools are required to check the deteriora-
tion of CVT oil or change, it is recom-
mended that you trust this job to your
authorized SUZUKI dealer.
BrakesBrake Fluid
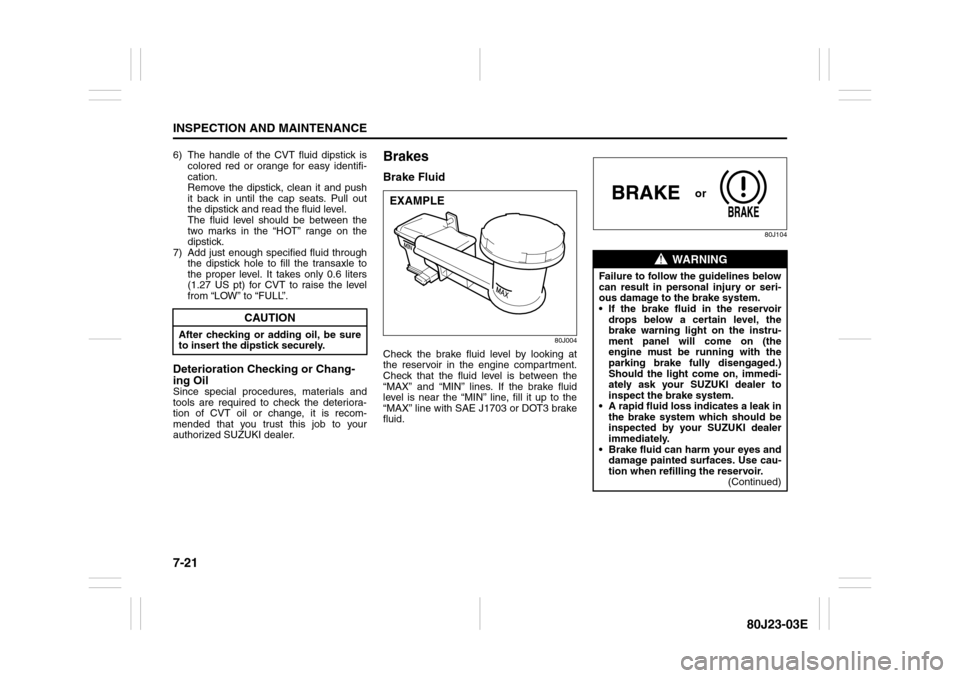
80J004
Check the brake fluid level by looking at
the reservoir in the engine compartment.
Check that the fluid level is between the
“MAX” and “MIN” lines. If the brake fluid
level is near the “MIN” line, fill it up to the
“MAX” line with SAE J1703 or DOT3 brake
fluid.
80J104
CAUTION
After checking or adding oil, be sure
to insert the dipstick securely.
EXAMPLE
WARNING
Failure to follow the guidelines below
can result in personal injury or seri-
ous damage to the brake system.
If the brake fluid in the reservoir
drops below a certain level, the
brake warning light on the instru-
ment panel will come on (the
engine must be running with the
parking brake fully disengaged.)
Should the light come on, immedi-
ately ask your SUZUKI dealer to
inspect the brake system.
A rapid fluid loss indicates a leak in
the brake system which should be
inspected by your SUZUKI dealer
immediately.
Brake fluid can harm your eyes and
damage painted surfaces. Use cau-
tion when refilling the reservoir.
(Continued)
or
Page 227 of 297
7-22
INSPECTION AND MAINTENANCE
80J23-03E
NOTE:
With disc brakes, the fluid level can be
expected to gradually fall as the brake
pads wear.Brake Pedal
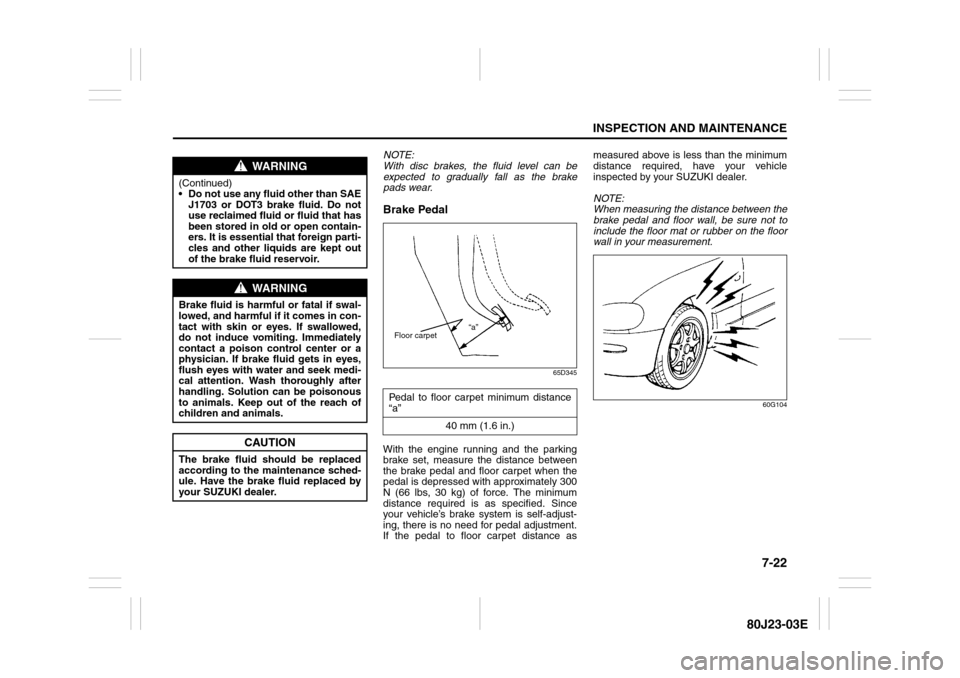
65D345
With the engine running and the parking
brake set, measure the distance between
the brake pedal and floor carpet when the
pedal is depressed with approximately 300
N (66 lbs, 30 kg) of force. The minimum
distance required is as specified. Since
your vehicle’s brake system is self-adjust-
ing, there is no need for pedal adjustment.
If the pedal to floor carpet distance asmeasured above is less than the minimum
distance required, have your vehicle
inspected by your SUZUKI dealer.
NOTE:
When measuring the distance between the
brake pedal and floor wall, be sure not to
include the floor mat or rubber on the floor
wall in your measurement.
60G104
WARNING
(Continued)
Do not use any fluid other than SAE
J1703 or DOT3 brake fluid. Do not
use reclaimed fluid or fluid that has
been stored in old or open contain-
ers. It is essential that foreign parti-
cles and other liquids are kept out
of the brake fluid reservoir.
WARNING
Brake fluid is harmful or fatal if swal-
lowed, and harmful if it comes in con-
tact with skin or eyes. If swallowed,
do not induce vomiting. Immediately
contact a poison control center or a
physician. If brake fluid gets in eyes,
flush eyes with water and seek medi-
cal attention. Wash thoroughly after
handling. Solution can be poisonous
to animals. Keep out of the reach of
children and animals.
CAUTION
The brake fluid should be replaced
according to the maintenance sched-
ule. Have the brake fluid replaced by
your SUZUKI dealer.
Pedal to floor carpet minimum distance
“a”
40 mm (1.6 in.)
“a”
Floor carpet