2010 SUZUKI SX4 change wheel
[x] Cancel search: change wheelPage 235 of 297
7-30
INSPECTION AND MAINTENANCE
80J23-03E
Temperature – A, B, C
The temperature grades are A (the
highest), B and C, representing the
tire’s resistance to the generation of
heat and its ability to dissipate heat
when tested under controlled condi-
tions on a specified indoor laboratory
test wheel. Sustained high tempera-
ture can cause the material of the tire
to degenerate and reduce tire life, and
excessive temperature can lead to
sudden tire failure. The grade C corre-
sponds to a level of performance
which all passenger car tires must
meet under the Federal Motor Vehicle
Safety Standard No. 109. Grades B
and A represent higher levels of per-
formance on the laboratory test wheel
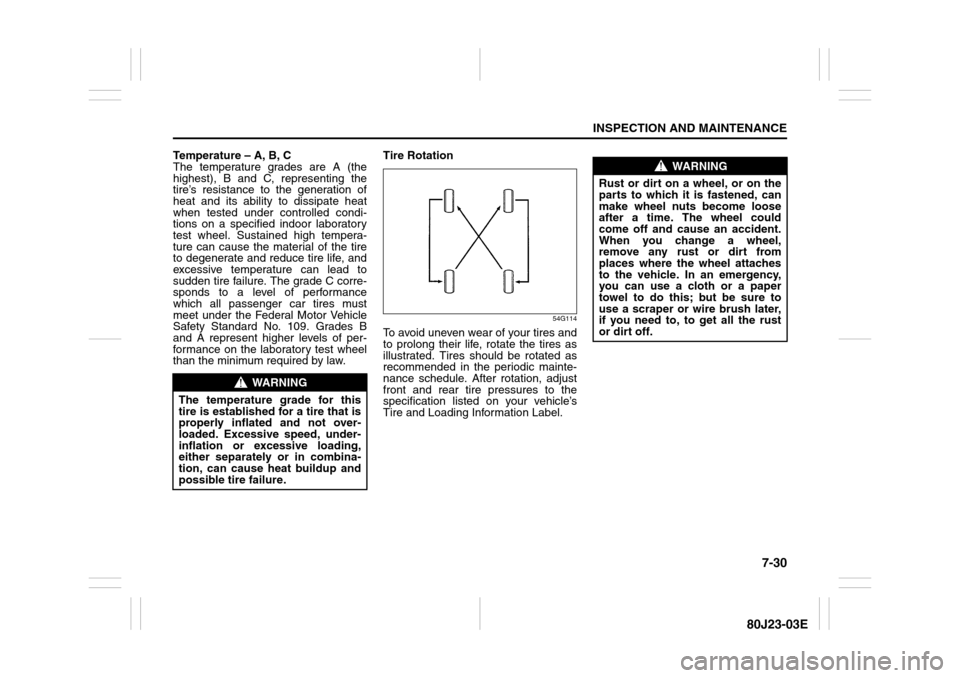
than the minimum required by law.Tire Rotation
54G114
To avoid uneven wear of your tires and
to prolong their life, rotate the tires as
illustrated. Tires should be rotated as
recommended in the periodic mainte-
nance schedule. After rotation, adjust
front and rear tire pressures to the
specification listed on your vehicle’s
Tire and Loading Information Label.
WARNING
The temperature grade for this
tire is established for a tire that is
properly inflated and not over-
loaded. Excessive speed, under-
inflation or excessive loading,
either separately or in combina-
tion, can cause heat buildup and
possible tire failure.
WARNING
Rust or dirt on a wheel, or on the
parts to which it is fastened, can
make wheel nuts become loose
after a time. The wheel could
come off and cause an accident.
When you change a wheel,
remove any rust or dirt from
places where the wheel attaches
to the vehicle. In an emergency,
you can use a cloth or a paper
towel to do this; but be sure to
use a scraper or wire brush later,
if you need to, to get all the rust
or dirt off.
Page 259 of 297
8-2
EMERGENCY SERVICE
80J23-03E
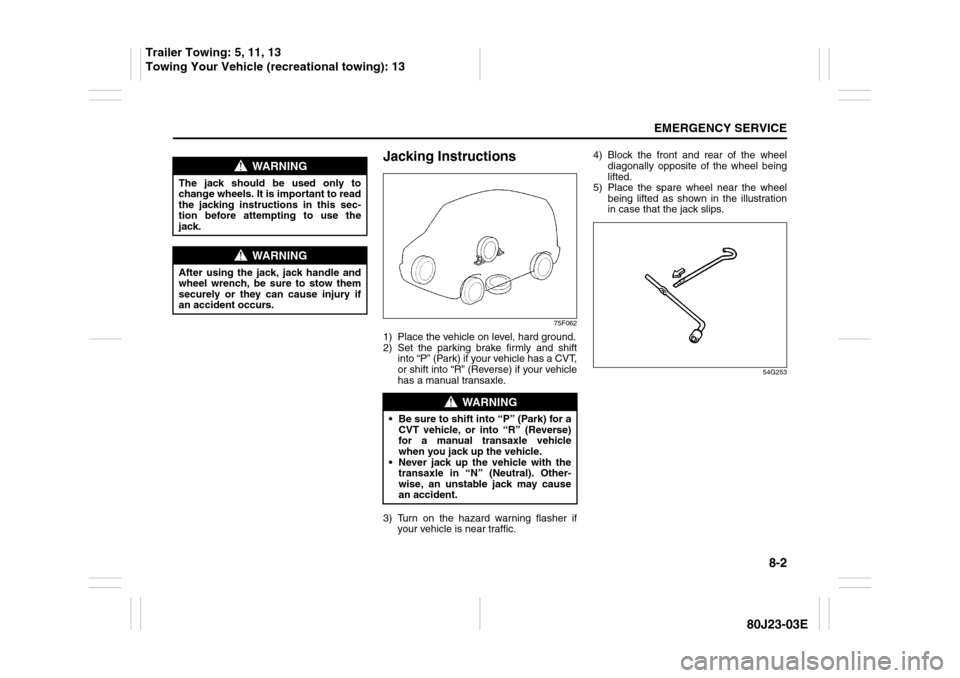
Jacking Instructions
75F062
1) Place the vehicle on level, hard ground.
2) Set the parking brake firmly and shift
into “P” (Park) if your vehicle has a CVT,
or shift into “R” (Reverse) if your vehicle
has a manual transaxle.
3) Turn on the hazard warning flasher if
your vehicle is near traffic.4) Block the front and rear of the wheel
diagonally opposite of the wheel being
lifted.
5) Place the spare wheel near the wheel
being lifted as shown in the illustration
in case that the jack slips.
54G253
WARNING
The jack should be used only to
change wheels. It is important to read
the jacking instructions in this sec-
tion before attempting to use the
jack.
WARNING
After using the jack, jack handle and
wheel wrench, be sure to stow them
securely or they can cause injury if
an accident occurs.
WARNING
Be sure to shift into “P” (Park) for a
CVT vehicle, or into “R” (Reverse)
for a manual transaxle vehicle
when you jack up the vehicle.
Never jack up the vehicle with the
transaxle in “N” (Neutral). Other-
wise, an unstable jack may cause
an accident.
Trailer Towing: 5, 11, 13
Towing Your Vehicle (recreational towing): 13
Page 260 of 297
8-3EMERGENCY SERVICE
80J23-03E
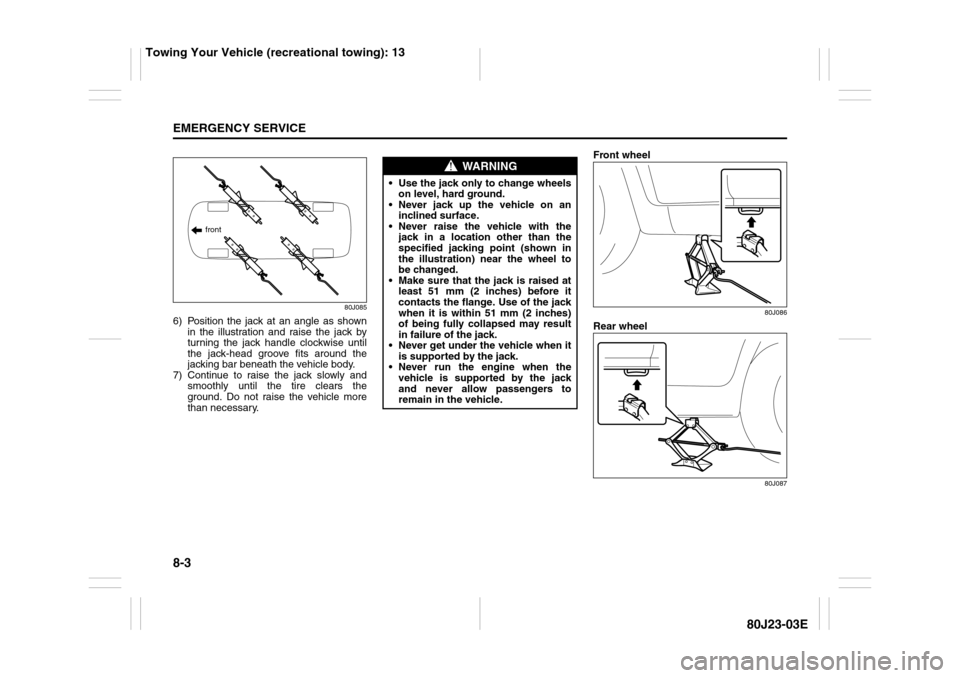
80J085
6) Position the jack at an angle as shown
in the illustration and raise the jack by
turning the jack handle clockwise until
the jack-head groove fits around the
jacking bar beneath the vehicle body.
7) Continue to raise the jack slowly and
smoothly until the tire clears the
ground. Do not raise the vehicle more
than necessary.Front wheel
80J086
Rear wheel
80J087
front
WARNING
Use the jack only to change wheels
on level, hard ground.
Never jack up the vehicle on an
inclined surface.
Never raise the vehicle with the
jack in a location other than the
specified jacking point (shown in
the illustration) near the wheel to
be changed.
Make sure that the jack is raised at
least 51 mm (2 inches) before it
contacts the flange. Use of the jack
when it is within 51 mm (2 inches)
of being fully collapsed may result
in failure of the jack.
Never get under the vehicle when it
is supported by the jack.
Never run the engine when the
vehicle is supported by the jack
and never allow passengers to
remain in the vehicle.
Towing Your Vehicle (recreational towing): 13
Page 261 of 297

8-4
EMERGENCY SERVICE
80J23-03E
Changing WheelsTo change a wheel, use the following pro-
cedure:
1) Remove the jack, tools and spare wheel
from the vehicle.
2) Loosen, but do not remove the wheel
nuts.
3) Jack up the vehicle (follow the jacking
instructions in this section).
4) Remove the wheel nuts and wheel.
5) Before installing the new wheel, clean
any mud or dirt off from the surface of
the wheel and hub with a clean cloth.
Clean the hub carefully; it may be hot
from driving.
6) Install the new wheel and replace the
wheel nuts with their cone shaped end
facing the wheel. Tighten each nut
snugly by hand until the wheel is
securely seated on the hub.
81A057
7) Lower the jack and fully tighten the nuts
in a crisscross fashion with a wrench as
shown in the illustration.
Full Wheel Cover (if equipped)
60G309
(1) or (2) Flat end tool
Your vehicle includes two tools, a wheel
brace and a jack crank, one of which has a
flat end.
Use the tool with the flat end to remove the
full wheel cap, as shown above.
54G117
When installing the cover, make sure that it
is positioned so that it does not cover or
foul the air valve.
WARNING
Be sure to shift into “P” (Park) in
CVT, or shift into “R” (Reverse) in
manual transaxle when you jack up
the vehicle.
Never jack up the vehicle with the
transaxle in “N” (Neutral). Other-
wise, unstable jack may cause an
accident.
Wheel tightening torque
85 Nm (61.5 lb-ft, 8.5 kg-m)
WARNING
Use genuine wheel nuts and tighten
them to the specified torque as soon
as possible after changing wheels.
Incorrect wheel nuts or improperly
tightened wheel nuts may come
loose or fall off, which can result in
an accident. If you do not have a
torque wrench, have the wheel nut
torque checked by an authorized
SUZUKI dealer.
EXAMPLEEXAMPLE
Towing Your Vehicle (recreational towing): 13
Page 287 of 297
12-1
SPECIFICATIONS
80J23-03E
12
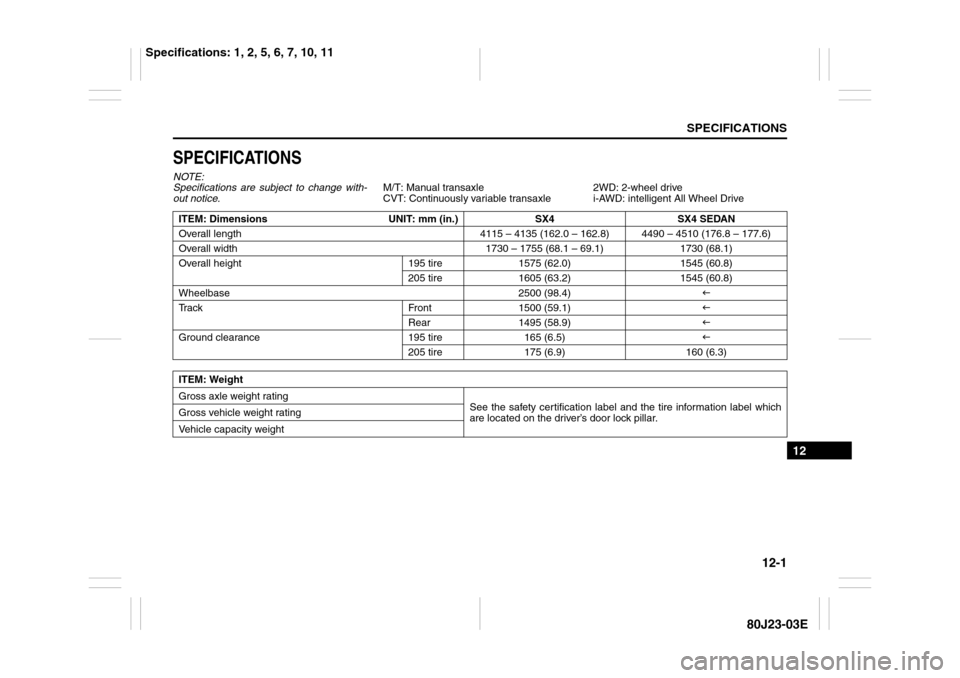
SPECIFICATIONSNOTE:
Specifications are subject to change with-
out notice.M/T: Manual transaxle
CVT: Continuously variable transaxle2WD: 2-wheel drive
i-AWD: intelligent All Wheel Drive
ITEM: Dimensions UNIT: mm (in.) SX4 SX4 SEDAN
Overall length 4115 – 4135 (162.0 – 162.8) 4490 – 4510 (176.8 – 177.6)
Overall width 1730 – 1755 (68.1 – 69.1) 1730 (68.1)
Overall height 195 tire 1575 (62.0) 1545 (60.8)
205 tire 1605 (63.2) 1545 (60.8)
Wheelbase 2500 (98.4)�I
Track Front 1500 (59.1)�I
Rear 1495 (58.9)�I
Ground clearance 195 tire 165 (6.5)�I
205 tire 175 (6.9) 160 (6.3)
ITEM: Weight
Gross axle weight rating
See the safety certification label and the tire information label which
are located on the driver’s door lock pillar. Gross vehicle weight rating
Vehicle capacity weight
Specifications: 1, 2, 5, 6, 7, 10, 11
Page 293 of 297
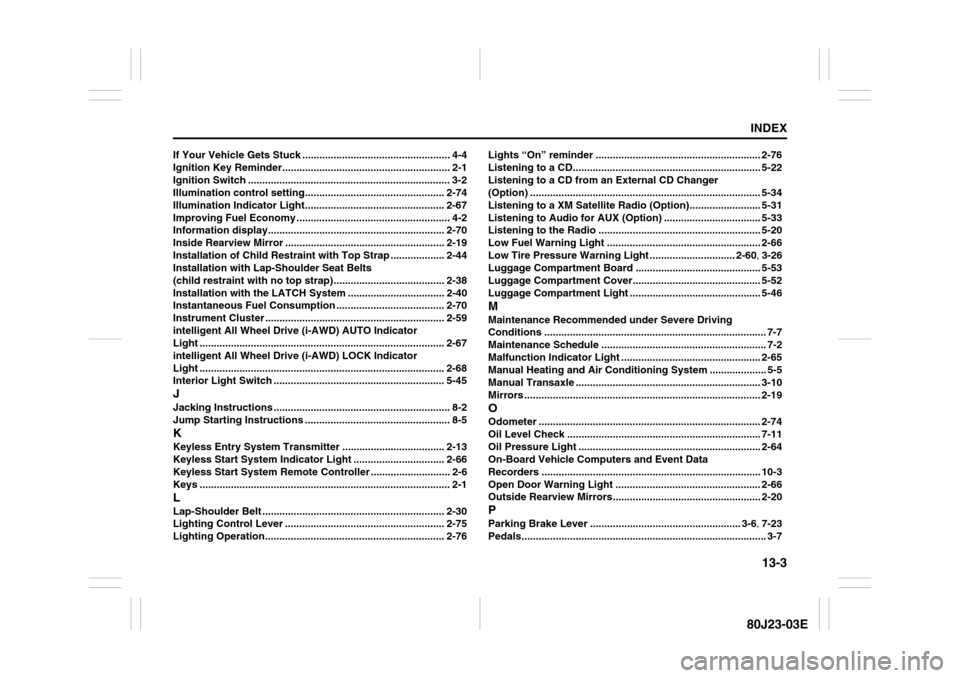
13-3
INDEX80J23-03E
If Your Vehicle Gets Stuck .................................................... 4-4
Ignition Key Reminder........................................................... 2-1
Ignition Switch ....................................................................... 3-2
Illumination control setting................................................. 2-74
Illumination Indicator Light................................................. 2-67
Improving Fuel Economy ...................................................... 4-2
Information display.............................................................. 2-70
Inside Rearview Mirror ........................................................ 2-19
Installation of Child Restraint with Top Strap ................... 2-44
Installation with Lap-Shoulder Seat Belts
(child restraint with no top strap)....................................... 2-38
Installation with the LATCH System .................................. 2-40
Instantaneous Fuel Consumption ...................................... 2-70
Instrument Cluster ............................................................... 2-59
intelligent All Wheel Drive (i-AWD) AUTO Indicator
Light ...................................................................................... 2-67
intelligent All Wheel Drive (i-AWD) LOCK Indicator
Light ...................................................................................... 2-68
Interior Light Switch ............................................................ 5-45JJacking Instructions .............................................................. 8-2
Jump Starting Instructions ................................................... 8-5KKeyless Entry System Transmitter .................................... 2-13
Keyless Start System Indicator Light ................................ 2-66
Keyless Start System Remote Controller ............................ 2-6
Keys ........................................................................................ 2-1LLap-Shoulder Belt ................................................................ 2-30
Lighting Control Lever ........................................................ 2-75
Lighting Operation............................................................... 2-76Lights “On” reminder .......................................................... 2-76
Listening to a CD.................................................................. 5-22
Listening to a CD from an External CD Changer
(Option) ................................................................................. 5-34
Listening to a XM Satellite Radio (Option)......................... 5-31
Listening to Audio for AUX (Option) .................................. 5-33
Listening to the Radio ......................................................... 5-20
Low Fuel Warning Light ...................................................... 2-66
Low Tire Pressure Warning Light .............................. 2-60, 3-26
Luggage Compartment Board ............................................ 5-53
Luggage Compartment Cover............................................. 5-52
Luggage Compartment Light .............................................. 5-46
MMaintenance Recommended under Severe Driving
Conditions .............................................................................. 7-7
Maintenance Schedule .......................................................... 7-2
Malfunction Indicator Light ................................................. 2-65
Manual Heating and Air Conditioning System .................... 5-5
Manual Transaxle ................................................................. 3-10
Mirrors ................................................................................... 2-19OOdometer .............................................................................. 2-74
Oil Level Check .................................................................... 7-11
Oil Pressure Light................................................................ 2-64
On-Board Vehicle Computers and Event Data
Recorders ............................................................................. 10-3
Open Door Warning Light ................................................... 2-66
Outside Rearview Mirrors.................................................... 2-20PParking Brake Lever ..................................................... 3-6, 7-23
Pedals...................................................................................... 3-7