2010 SUZUKI SX4 Gear
[x] Cancel search: GearPage 136 of 297
4-3DRIVING TIPS
80J23-03E
60A183S
Keep the air cleaner clean
If the air cleaner is clogged with dust, there
will be greater intake resistance, resulting
in decreased power output and increased
fuel consumption.
Keep weight to a minimum
The heavier the load, the more fuel the
vehicle consumes. Take out any luggage
or cargo when it is not necessary.
Keep tire pressure correct
Underinflation of the tires can waste fuel
due to increased running resistance of the
tires. Keep your tires inflated to the correct
pressure shown on the label located below
the driver’s side door latch striker.
Highway DrivingWhen driving at highway speeds, pay
attention to the following:
Stopping distance progressively
increases with vehicle speed. Apply the
brakes far enough ahead of the stopping
point to allow for the extra stopping dis-
tance.
On rainy days, “Hydroplaning” can occur.
“Hydroplaning” is the loss of direct con-
tact between the road surface and the
vehicle’s tires due to a water film forming
between them. Steering or braking the
vehicle while “Hydroplaning” can be very
difficult, and loss of control can occur.
Keep speed down when the road surface
is wet.
At high speeds, the vehicle may be
affected by side winds. Therefore,
reduce speed and be prepared for unex-
pected buffeting, which can occur at the
exits of tunnels, when passing by a cut of
a hill, or when being overtaken by large
vehicles, etc.
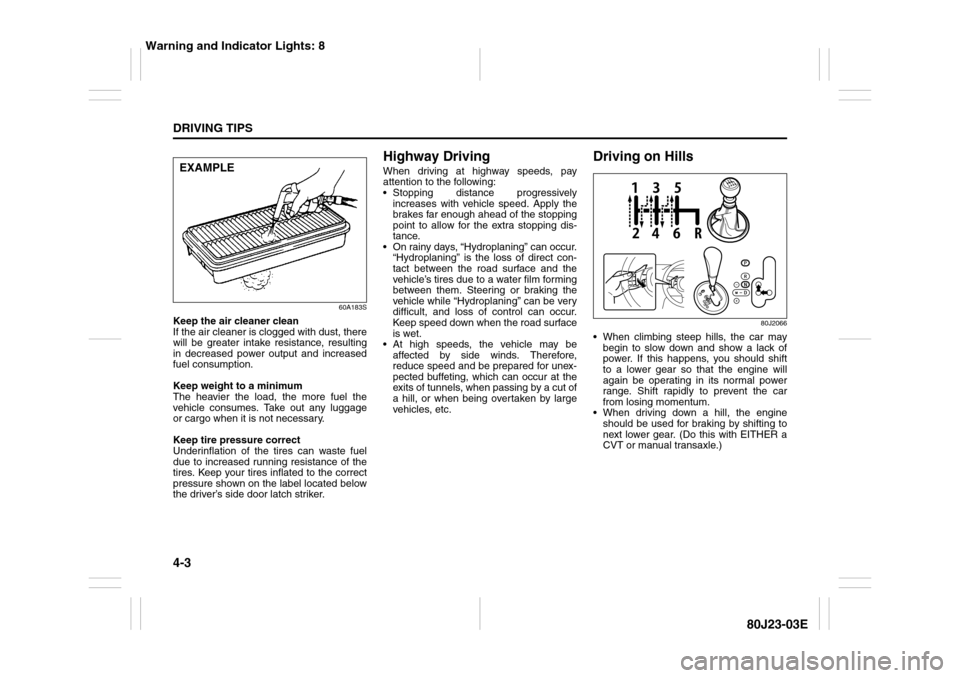
Driving on Hills
80J2066
When climbing steep hills, the car may
begin to slow down and show a lack of
power. If this happens, you should shift
to a lower gear so that the engine will
again be operating in its normal power
range. Shift rapidly to prevent the car
from losing momentum.
When driving down a hill, the engine
should be used for braking by shifting to
next lower gear. (Do this with EITHER a
CVT or manual transaxle.)
EXAMPLE
Warning and Indicator Lights: 8
Page 137 of 297
4-4
DRIVING TIPS
80J23-03E
Driving on Slippery Roads
60G089S
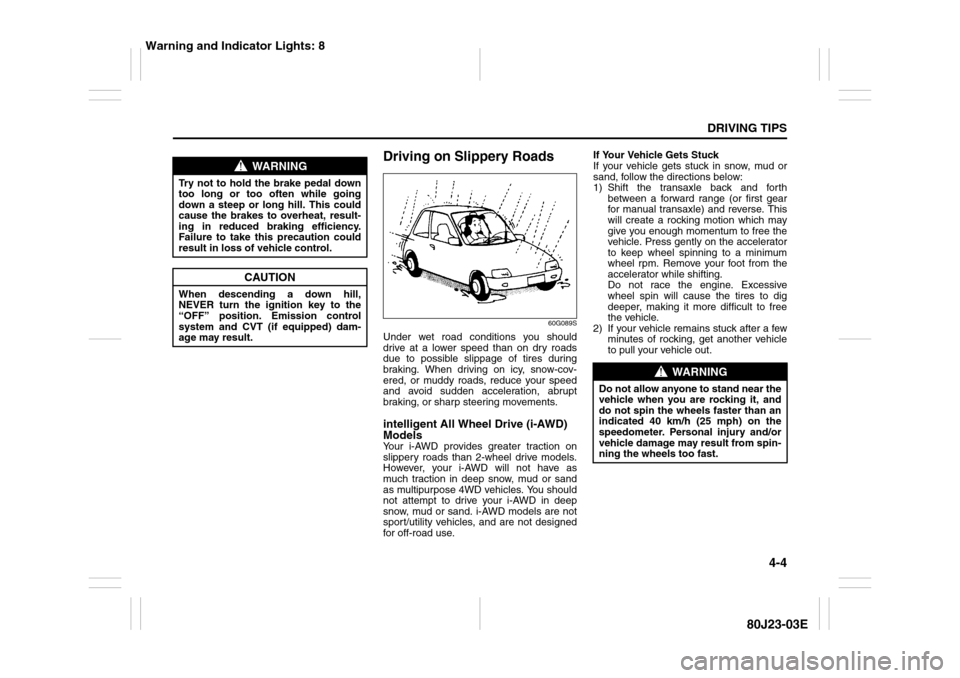
Under wet road conditions you should
drive at a lower speed than on dry roads
due to possible slippage of tires during
braking. When driving on icy, snow-cov-
ered, or muddy roads, reduce your speed
and avoid sudden acceleration, abrupt
braking, or sharp steering movements.intelligent All Wheel Drive (i-AWD)
ModelsYour i-AWD provides greater traction on
slippery roads than 2-wheel drive models.
However, your i-AWD will not have as
much traction in deep snow, mud or sand
as multipurpose 4WD vehicles. You should
not attempt to drive your i-AWD in deep
snow, mud or sand. i-AWD models are not
sport/utility vehicles, and are not designed
for off-road use.If Your Vehicle Gets Stuck
If your vehicle gets stuck in snow, mud or
sand, follow the directions below:
1) Shift the transaxle back and forth
between a forward range (or first gear
for manual transaxle) and reverse. This
will create a rocking motion which may
give you enough momentum to free the
vehicle. Press gently on the accelerator
to keep wheel spinning to a minimum
wheel rpm. Remove your foot from the
accelerator while shifting.
Do not race the engine. Excessive
wheel spin will cause the tires to dig
deeper, making it more difficult to free
the vehicle.
2) If your vehicle remains stuck after a few
minutes of rocking, get another vehicle
to pull your vehicle out.
WARNING
Try not to hold the brake pedal down
too long or too often while going
down a steep or long hill. This could
cause the brakes to overheat, result-
ing in reduced braking efficiency.
Failure to take this precaution could
result in loss of vehicle control.
CAUTION
When descending a down hill,
NEVER turn the ignition key to the
“OFF” position. Emission control
system and CVT (if equipped) dam-
age may result.
WARNING
Do not allow anyone to stand near the
vehicle when you are rocking it, and
do not spin the wheels faster than an
indicated 40 km/h (25 mph) on the
speedometer. Personal injury and/or
vehicle damage may result from spin-
ning the wheels too fast.
Warning and Indicator Lights: 8
Page 143 of 297
5-2
OTHER CONTROLS AND EQUIPMENT
80J23-03E
Side outlet
63J045
When “Open”, air comes out regardless of
the air flow selector position.
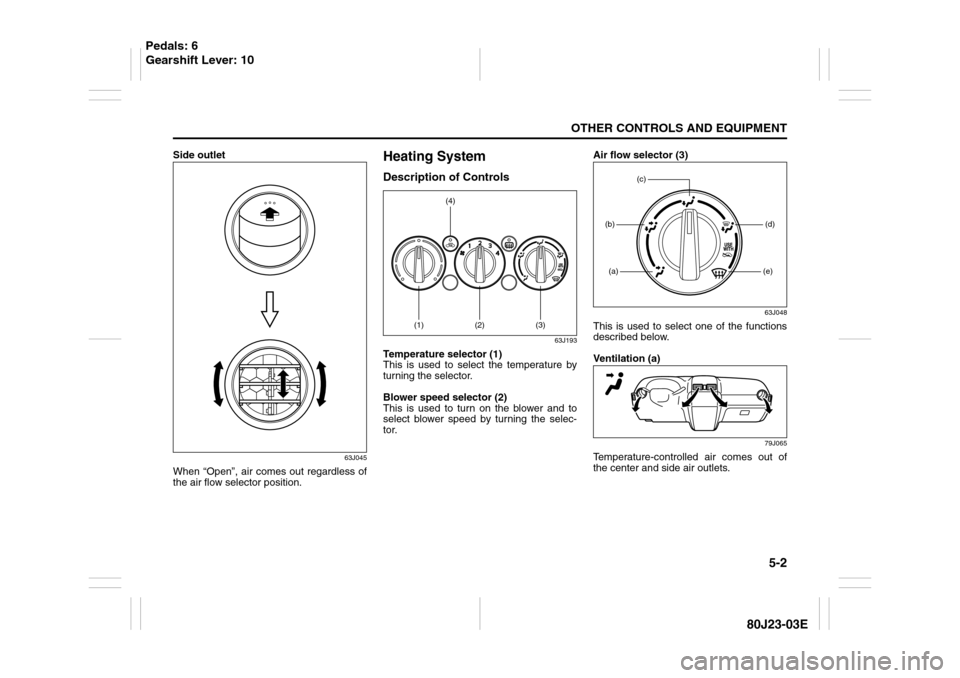
Heating SystemDescription of Controls
63J193
Temperature selector (1)
This is used to select the temperature by
turning the selector.
Blower speed selector (2)
This is used to turn on the blower and to
select blower speed by turning the selec-
tor.Air flow selector (3)
63J048
This is used to select one of the functions
described below.
Ventilation (a)
79J065
Temperature-controlled air comes out of
the center and side air outlets.
(1)
(2)
(3)
(4)
(a)(b)
(e)(d)
(c)
Pedals: 6
Gearshift Lever: 10
Page 144 of 297
5-3OTHER CONTROLS AND EQUIPMENT
80J23-03E
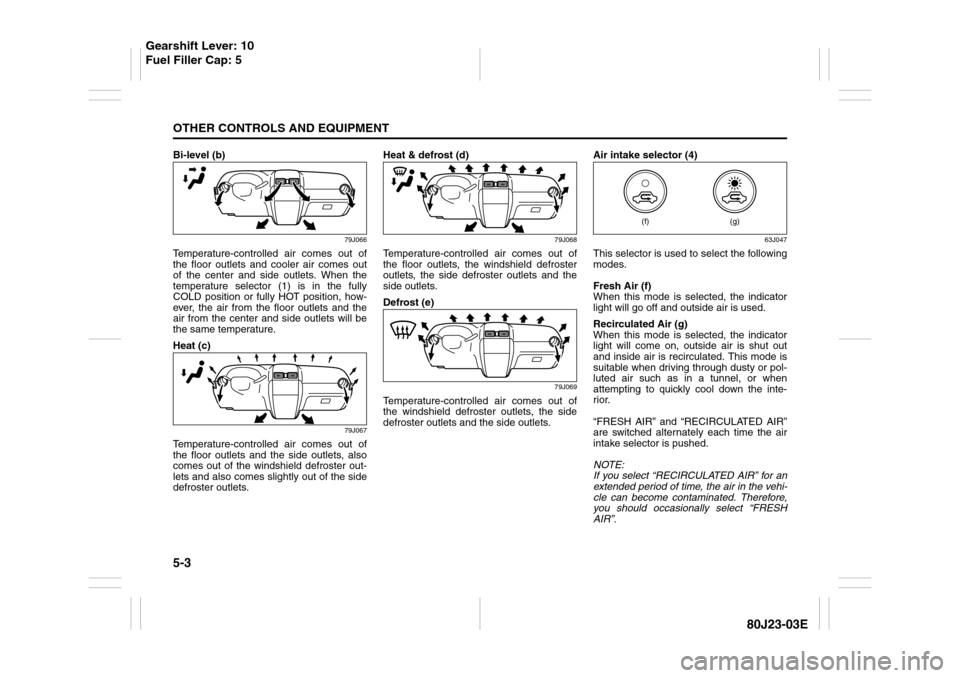
Bi-level (b)
79J066
Temperature-controlled air comes out of
the floor outlets and cooler air comes out
of the center and side outlets. When the
temperature selector (1) is in the fully
COLD position or fully HOT position, how-
ever, the air from the floor outlets and the
air from the center and side outlets will be
the same temperature.
Heat (c)
79J067
Temperature-controlled air comes out of
the floor outlets and the side outlets, also
comes out of the windshield defroster out-
lets and also comes slightly out of the side
defroster outlets.Heat & defrost (d)
79J068
Temperature-controlled air comes out of
the floor outlets, the windshield defroster
outlets, the side defroster outlets and the
side outlets.
Defrost (e)
79J069
Temperature-controlled air comes out of
the windshield defroster outlets, the side
defroster outlets and the side outlets.Air intake selector (4)
63J047
This selector is used to select the following
modes.
Fresh Air (f)
When this mode is selected, the indicator
light will go off and outside air is used.
Recirculated Air (g)
When this mode is selected, the indicator
light will come on, outside air is shut out
and inside air is recirculated. This mode is
suitable when driving through dusty or pol-
luted air such as in a tunnel, or when
attempting to quickly cool down the inte-
rior.
“FRESH AIR” and “RECIRCULATED AIR”
are switched alternately each time the air
intake selector is pushed.
NOTE:
If you select “RECIRCULATED AIR” for an
extended period of time, the air in the vehi-
cle can become contaminated. Therefore,
you should occasionally select “FRESH
AIR”.
(g)
(f)
Gearshift Lever: 10
Fuel Filler Cap: 5
Page 205 of 297

INSPECTION AND MAINTENANCE
7
80J23-03E
60G410
INSPECTION AND MAINTENANCEMaintenance Schedule ....................................................... 7-2
Periodic Maintenance Schedule ........................................ 7-3
Maintenance Recommended under Severe Driving
Conditions ........................................................................... 7-7
Drive Belt ............................................................................. 7-11
Engine Oil and Filter ........................................................... 7-11
Engine Coolant .................................................................... 7-14
Air Cleaner ........................................................................... 7-16
Spark Plugs ......................................................................... 7-16
Gear Oil ................................................................................ 7-18
Clutch Pedal ........................................................................ 7-19
Continuously Variable Transaxle (CVT) Fluid .................. 7-20
Brakes .................................................................................. 7-21
Steering Wheel .................................................................... 7-23
Tires ...................................................................................... 7-24
Battery .................................................................................. 7-35
Fuses .................................................................................... 7-36
Headlight Aiming ................................................................. 7-39
Bulb Replacement ............................................................... 7-40
Wiper Blades ....................................................................... 7-46
Windshield Washer Fluid ................................................... 7-50
Air Conditioning System .................................................... 7-50
Page 223 of 297
7-18
INSPECTION AND MAINTENANCE
80J23-03E
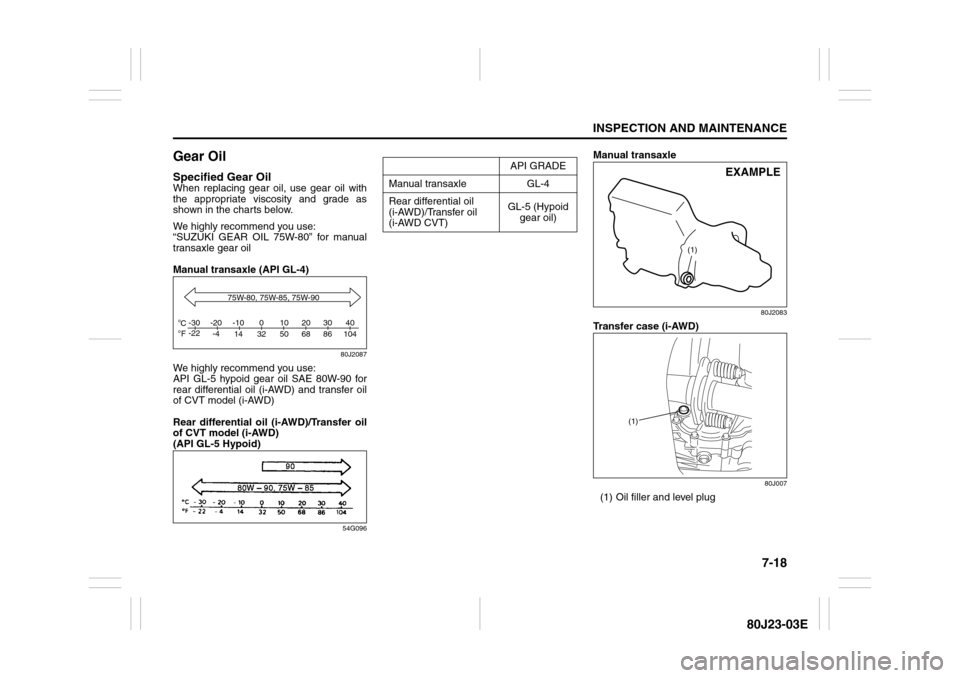
Gear OilSpecified Gear OilWhen replacing gear oil, use gear oil with
the appropriate viscosity and grade as
shown in the charts below.
We highly recommend you use:
“SUZUKI GEAR OIL 75W-80” for manual
transaxle gear oil
Manual transaxle (API GL-4)
80J2087
We highly recommend you use:
API GL-5 hypoid gear oil SAE 80W-90 for
rear differential oil (i-AWD) and transfer oil
of CVT model (i-AWD)
Rear differential oil (i-AWD)/Transfer oil
of CVT model (i-AWD)
(API GL-5 Hypoid)
54G096
Manual transaxle
80J2083
Transfer case (i-AWD)
80J007
(1) Oil filler and level plug
C
Fo o-30
-22-20
-4-10
14 32 50 68 86 104010203040
75W-80, 75W-85, 75W-90
API GRADE
Manual transaxle GL-4
Rear differential oil
(i-AWD)/Transfer oil
(i-AWD CVT)GL-5 (Hypoid
gear oil)
(1)
EXAMPLE
(1)
Page 224 of 297
7-19INSPECTION AND MAINTENANCE
80J23-03E
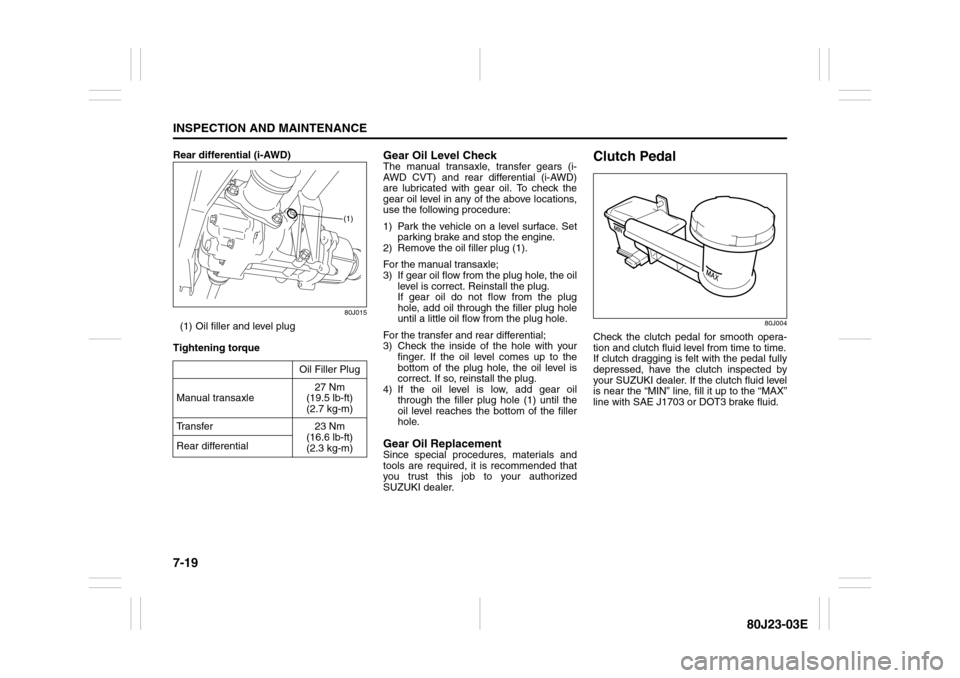
Rear differential (i-AWD)
80J015
(1) Oil filler and level plug
Tightening torque
Gear Oil Level CheckThe manual transaxle, transfer gears (i-
AWD CVT) and rear differential (i-AWD)
are lubricated with gear oil. To check the
gear oil level in any of the above locations,
use the following procedure:
1) Park the vehicle on a level surface. Set
parking brake and stop the engine.
2) Remove the oil filler plug (1).
For the manual transaxle;
3) If gear oil flow from the plug hole, the oil
level is correct. Reinstall the plug.
If gear oil do not flow from the plug
hole, add oil through the filler plug hole
until a little oil flow from the plug hole.
For the transfer and rear differential;
3) Check the inside of the hole with your
finger. If the oil level comes up to the
bottom of the plug hole, the oil level is
correct. If so, reinstall the plug.
4) If the oil level is low, add gear oil
through the filler plug hole (1) until the
oil level reaches the bottom of the filler
hole.Gear Oil ReplacementSince special procedures, materials and
tools are required, it is recommended that
you trust this job to your authorized
SUZUKI dealer.
Clutch Pedal
80J004
Check the clutch pedal for smooth opera-
tion and clutch fluid level from time to time.
If clutch dragging is felt with the pedal fully
depressed, have the clutch inspected by
your SUZUKI dealer. If the clutch fluid level
is near the “MIN” line, fill it up to the “MAX”
line with SAE J1703 or DOT3 brake fluid. Oil Filler Plug
Manual transaxle27 Nm
(19.5 lb-ft)
(2.7 kg-m)
Transfer 23 Nm
(16.6 lb-ft)
(2.3 kg-m) Rear differential
(1)
Page 225 of 297
7-20
INSPECTION AND MAINTENANCE
80J23-03E
Continuously Variable
Transaxle (CVT) FluidSpecified FluidUse a CVT fluid SUZUKI CVT FLUID
GREEN-1 or Shell GREEN-1V.Fluid Level CheckYou must check the fluid level with the CVT
fluid at normal operating temperature.
To check the fluid level:
1) To warm up the transaxle fluid, drive the
vehicle or idle the engine until the tem-
perature gauge indicates normal oper-
ating temperature.
2) Then drive for ten more minutes.
NOTE:
Do not check the fluid level if you have just
driven the vehicle for a long time at high
speed, or if you have driven in city traffic inhot weather. Wait until the fluid cools down
(about 30 minutes), or the fluid level indica-
tion will not be correct.
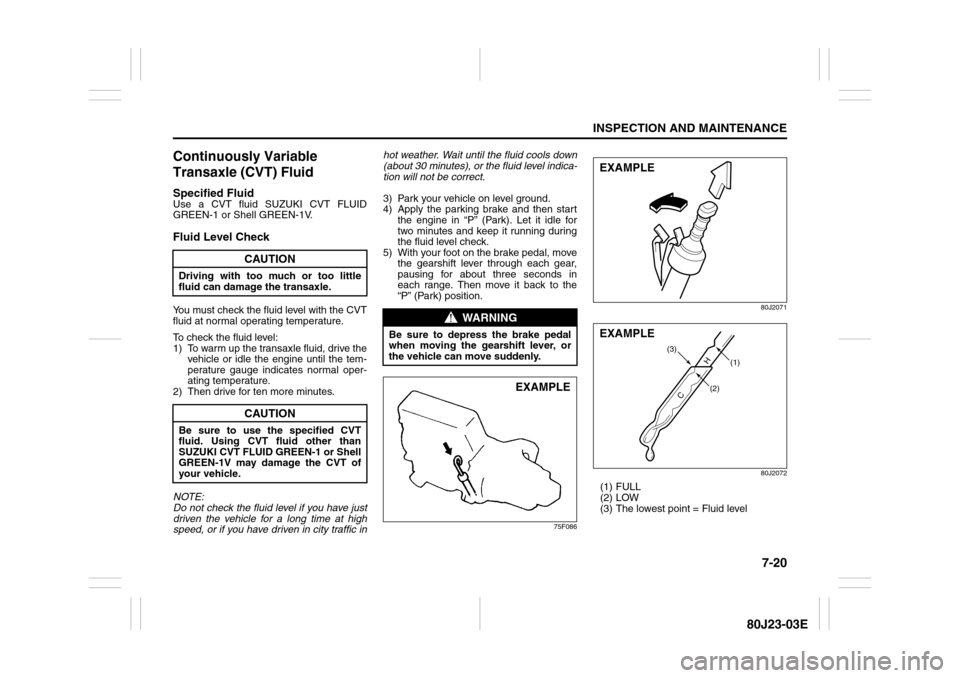
3) Park your vehicle on level ground.
4) Apply the parking brake and then start
the engine in “P” (Park). Let it idle for
two minutes and keep it running during
the fluid level check.
5) With your foot on the brake pedal, move
the gearshift lever through each gear,
pausing for about three seconds in
each range. Then move it back to the
“P” (Park) position.
75F08680J2071
80J2072
(1) FULL
(2) LOW
(3) The lowest point = Fluid level
CAUTION
Driving with too much or too little
fluid can damage the transaxle.
CAUTION
Be sure to use the specified CVT
fluid. Using CVT fluid other than
SUZUKI CVT FLUID GREEN-1 or Shell
GREEN-1V may damage the CVT of
your vehicle.
WARNING
Be sure to depress the brake pedal
when moving the gearshift lever, or
the vehicle can move suddenly.
EXAMPLE
EXAMPLE
(2)H
C
(1) (3)
EXAMPLE