2010 SUZUKI SX4 instrument panel
[x] Cancel search: instrument panelPage 105 of 297
3-4
OPERATING YOUR VEHICLE
80J23-03E
Vehicle With Keyless Start System
56KN076
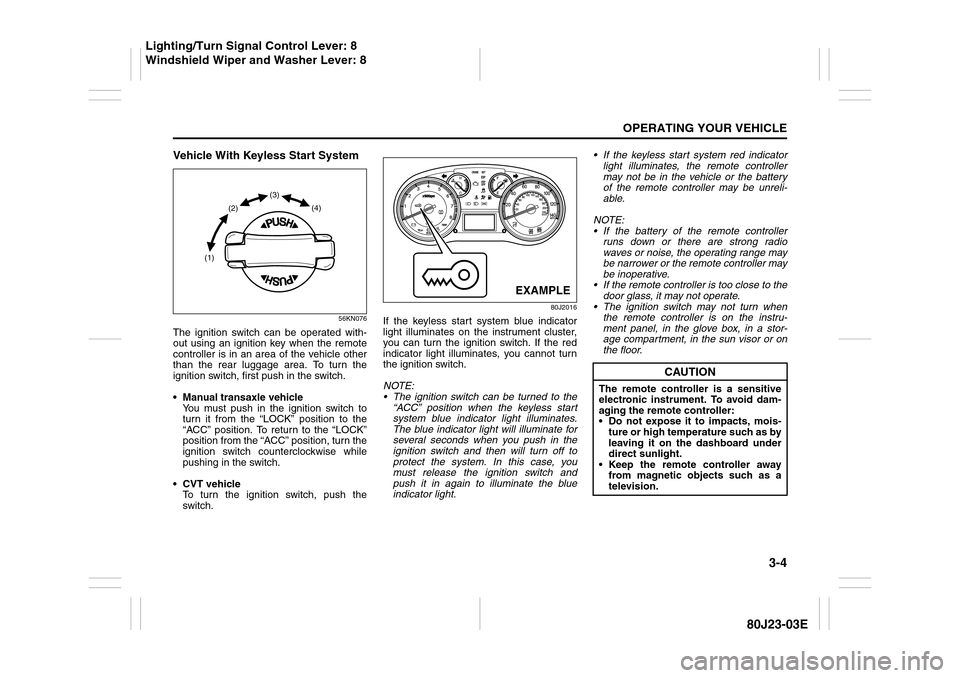
The ignition switch can be operated with-
out using an ignition key when the remote
controller is in an area of the vehicle other
than the rear luggage area. To turn the
ignition switch, first push in the switch.
Manual transaxle vehicle
You must push in the ignition switch to
turn it from the “LOCK” position to the
“ACC” position. To return to the “LOCK”
position from the “ACC” position, turn the
ignition switch counterclockwise while
pushing in the switch.
CVT vehicle
To turn the ignition switch, push the
switch.
80J2016
If the keyless start system blue indicator
light illuminates on the instrument cluster,
you can turn the ignition switch. If the red
indicator light illuminates, you cannot turn
the ignition switch.
NOTE:
The ignition switch can be turned to the
“ACC” position when the keyless start
system blue indicator light illuminates.
The blue indicator light will illuminate for
several seconds when you push in the
ignition switch and then will turn off to
protect the system. In this case, you
must release the ignition switch and
push it in again to illuminate the blue
indicator light. If the keyless start system red indicator
light illuminates, the remote controller
may not be in the vehicle or the battery
of the remote controller may be unreli-
able.
NOTE:
If the battery of the remote controller
runs down or there are strong radio
waves or noise, the operating range may
be narrower or the remote controller may
be inoperative.
If the remote controller is too close to the
door glass, it may not operate.
The ignition switch may not turn when
the remote controller is on the instru-
ment panel, in the glove box, in a stor-
age compartment, in the sun visor or on
the floor.
(1)(2)(3)
(4)
EXAMPLE
CAUTION
The remote controller is a sensitive
electronic instrument. To avoid dam-
aging the remote controller:
Do not expose it to impacts, mois-
ture or high temperature such as by
leaving it on the dashboard under
direct sunlight.
Keep the remote controller away
from magnetic objects such as a
television.
Lighting/Turn Signal Control Lever: 8
Windshield Wiper and Washer Lever: 8
Page 123 of 297
3-22
OPERATING YOUR VEHICLE
80J23-03E
65D451
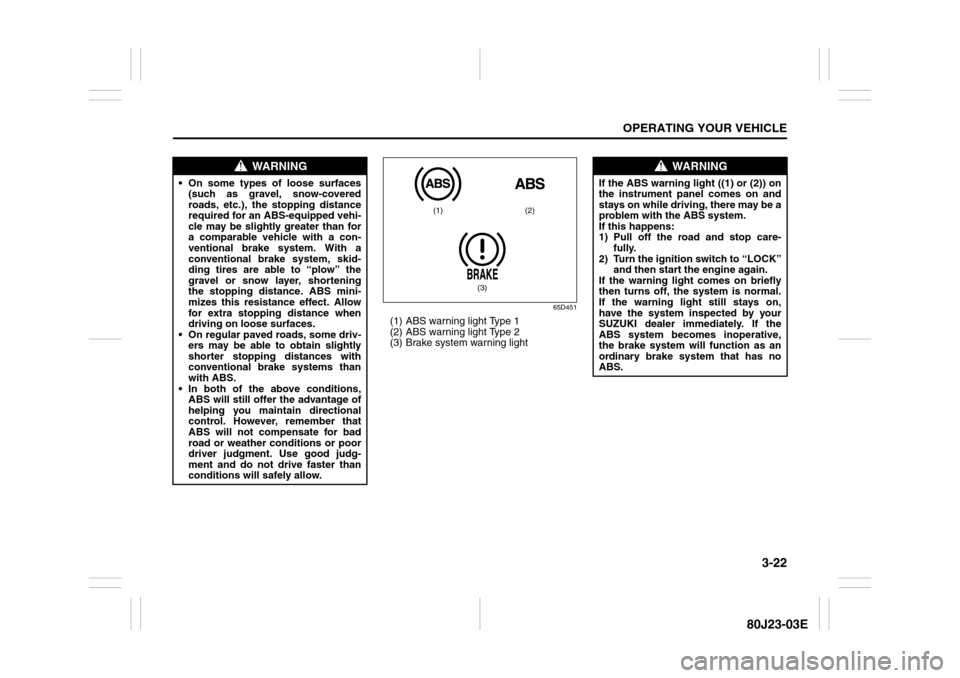
(1) ABS warning light Type 1
(2) ABS warning light Type 2
(3) Brake system warning light
WARNING
On some types of loose surfaces
(such as gravel, snow-covered
roads, etc.), the stopping distance
required for an ABS-equipped vehi-
cle may be slightly greater than for
a comparable vehicle with a con-
ventional brake system. With a
conventional brake system, skid-
ding tires are able to “plow” the
gravel or snow layer, shortening
the stopping distance. ABS mini-
mizes this resistance effect. Allow
for extra stopping distance when
driving on loose surfaces.
On regular paved roads, some driv-
ers may be able to obtain slightly
shorter stopping distances with
conventional brake systems than
with ABS.
In both of the above conditions,
ABS will still offer the advantage of
helping you maintain directional
control. However, remember that
ABS will not compensate for bad
road or weather conditions or poor
driver judgment. Use good judg-
ment and do not drive faster than
conditions will safely allow.
(1) (2)
(3)
WARNING
If the ABS warning light ((1) or (2)) on
the instrument panel comes on and
stays on while driving, there may be a
problem with the ABS system.
If this happens:
1) Pull off the road and stop care-
fully.
2) Turn the ignition switch to “LOCK”
and then start the engine again.
If the warning light comes on briefly
then turns off, the system is normal.
If the warning light still stays on,
have the system inspected by your
SUZUKI dealer immediately. If the
ABS system becomes inoperative,
the brake system will function as an
ordinary brake system that has no
ABS.
Page 124 of 297
3-23OPERATING YOUR VEHICLE
80J23-03E
How the ABS WorksA computer continuously monitors wheel
speed. The computer compares the
changes in wheel speed when braking. If
the wheels slow suddenly, indicating a
skidding situation, the computer will
change braking pressure several times
each second to prevent the wheels from
locking. When you start your vehicle or
when you accelerate after a hard stop, you
may hear a momentary motor or clicking
noise as the system resets or checks itself.
Electronic Stability Program
(ESP
®) (if equipped)
ESP
® is a registered trademark of Daimler
AG.
The Electronic Stability Program (ESP
®)
helps to control the vehicle during corner-
ing if front wheels or rear wheels skid. It
also assists you in maintaining traction
while accelerating on loose or slippery
road surfaces. It does this by regulating the
engine’s output, and by selectively apply-
ing the brakes. In addition, ESP
® helps to
avoid skidding by controlling braking pres-
sure.
WARNING
If the ABS warning light ((1) or (2))
and the Brake system warning light
(3) on the instrument panel simulta-
neously stay on or come on when
driving, both anti-lock function and
rear brake force control function (pro-
portioning valve function) of the ABS
system may have failed. This could
cause the rear wheels to skid or the
vehicle to spin during braking on a
slippery road or hard braking on a
dry paved road. If both warning lights
come on, drive carefully, avoiding
hard braking as much as possible,
and ask your SUZUKI dealer to
inspect the ABS system immediately.
WARNING
The ABS may not work properly if
tires or wheels other than those
specified in the owner’s manual are
used. This is because the ABS works
by comparing changes in wheel
speed. When replacing tires or
wheels, use only the size and type
specified in this owner’s manual.
WARNING
The ESP
® cannot enhance the vehi-
cle’s driving stability in all situations
and does not control your vehicle’s
entire braking system. The ESP
® can-
not prevent accidents, including
those resulting from excessive speed
in turns, or hydroplaning. Only a safe
and attentive driver can prevent acci-
dents. The capabilities of an ESP
®-
equipped vehicle must never be used
as a substitute for careful driving.
Page 134 of 297
4-1DRIVING TIPS
80J23-03E
52D078S
Break-In Catalytic Converter
68KM085
The purpose of the catalytic converter is to
minimize the amount of harmful pollutants
in your vehicle’s exhaust. Use of leaded
fuel in vehicles equipped with catalytic
converters is prohibited by federal law,
because lead deactivates the pollutant-
reducing components of the catalyst sys-
tem.
The converter is designed to last the life of
the vehicle under normal usage and when
unleaded fuel is used. No special mainte-
nance is required on the converter. How-
ever, it is very important to keep the engine
properly tuned. Engine misfiring, which
can result from an improperly tuned
engine, may cause overheating of the cat-
alyst. This may result in permanent heat
damage to the catalyst and other vehicle
components.
WARNING
Wear Your Seat Belts at All Times.
Even though air bags are equipped
at the front seating positions, the
driver and all passengers should
be properly restrained at all times,
using the seat belts provided. Refer
to the “Seat Belts and Child
Restraint Systems” section for
instructions on proper use of the
seat belts.
Never drive while under the influ-
ence of alcohol or other drugs.
Alcohol and drugs can seriously
impair your ability to drive safely,
greatly increasing the risk of injury
to yourself and others. You should
also avoid driving when you are
tired, sick, irritated or under stress.
CAUTION
The future performance and reliabil-
ity of the engine depends on the care
and restraint exercised during its
early life. It is especially important to
observe the following precautions
during the initial 960 km (600 miles)
of vehicle operation.
After starting, do not race the
engine. Warm it up gradually.
Avoid prolonged vehicle operation
at a constant speed. Moving parts
will break in better if you vary your
speed.
Start off from a stop slowly. Avoid
full throttle starts.
Avoid hard stopping, especially
during the first 320 km (200 miles)
of driving.
Do not drive slowly with the tran-
saxle in a high gear.
Drive the vehicle at moderate
engine speeds.
Instrument Panel: 3, 8
Page 185 of 297
5-44
OTHER CONTROLS AND EQUIPMENT
80J23-03E
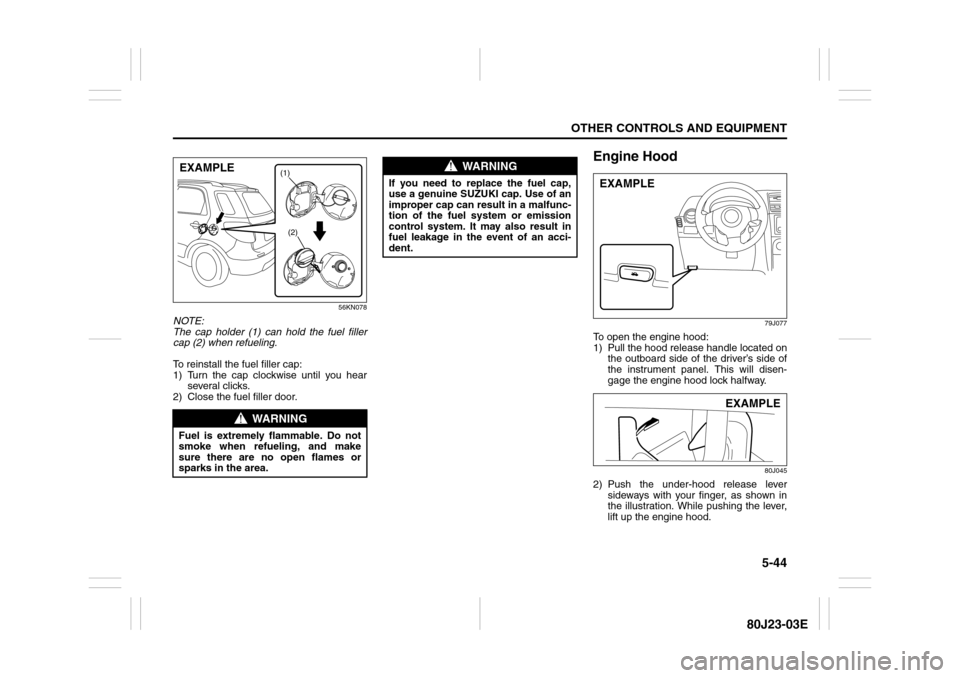
56KN078
NOTE:
The cap holder (1) can hold the fuel filler
cap (2) when refueling.
To reinstall the fuel filler cap:
1) Turn the cap clockwise until you hear
several clicks.
2) Close the fuel filler door.
Engine Hood
79J077
To open the engine hood:
1) Pull the hood release handle located on
the outboard side of the driver’s side of
the instrument panel. This will disen-
gage the engine hood lock halfway.
80J045
2) Push the under-hood release lever
sideways with your finger, as shown in
the illustration. While pushing the lever,
lift up the engine hood.
WARNING
Fuel is extremely flammable. Do not
smoke when refueling, and make
sure there are no open flames or
sparks in the area.
(1)
(2)
EXAMPLE
WARNING
If you need to replace the fuel cap,
use a genuine SUZUKI cap. Use of an
improper cap can result in a malfunc-
tion of the fuel system or emission
control system. It may also result in
fuel leakage in the event of an acci-
dent.
EXAMPLE
EXAMPLE