Page 246 of 297
7-41INSPECTION AND MAINTENANCE
80J23-03E
Headlights
80J2084
Open the engine food. Disconnect the cou-
pler (1). Then remove the socket cover (2)
and replace the bulb. Install a new bulb in
the reverse order of removal.
Other General LightsBulb holder
54G123
(1) Removal
(2) Installation
To remove a bulb holder from a light hous-
ing, turn the holder counterclockwise and
pull it out. To install the holder, push the
holder in and turn it clockwise.Bulb
54G124
(3) Removal
(4) Installation
There are two types of bulb, “Full glass
type” (1) and “Glass/metal type” (2).
To remove and install a full glass type bulb
(1), simply pull out or push in the bulb.
To remove a glass metal type bulb (2) from
a bulb holder, push in the bulb and turn it
counterclockwise. To install a new bulb,
push it in and turn it clockwise.
You can access the individual bulb or bulb
holders as follows.
(1)(2)
(1)
(1) (2)(2)
EXAMPLE
(1)
(2) (3)
(4)EXAMPLE
Page 247 of 297
7-42
INSPECTION AND MAINTENANCE
80J23-03E
Front turn signal light (1)
Front position light (2)
80JM123
Front fog light (if equipped)
1) Start the engine. Turn the steering
wheel to the opposite side of the replac-
ing fog light to replace the bulb easily.
Then turn off the engine.
80JM114
2) Insert a flat blade screwdriver into the
hole (2) and remove the clips (1) by
twist the driver as shown in the illustra-
tion.
80JM115
3) Remove the bolts (3).
(1)
(2)
(1)
(2)
EXAMPLE
(3)
EXAMPLE
Page 248 of 297
7-43INSPECTION AND MAINTENANCE
80J23-03E
SX4
80JM116
4) Open the fender cover. Disconnect the
coupler by pushing the lock release.
Pinch both side of the clips (4) and (5),
and push them in.
80JM117
5) Remove the front fog light. Turn the
bulb holder counterclockwise and
remove it.
SX4 SEDAN
80JM071
4) Open the fender cover. Disconnect the
coupler with pushing the lock release.
Turn the bulb holder counterclockwise
and remove it.Rear combination light
(tail, stop, turn signal, etc.)
SX4
80JM131
SX4 SEDAN
80JM072
(4)
(5)
EXAMPLE
(2)
(1)
Page 249 of 297
7-44
INSPECTION AND MAINTENANCE
80J23-03E
To open the trim (1), insert a flat blade
screwdriver between the trim and the clips
(2) and remove the clips by twist the driver
as shown in the illustration.
80JM073
License plate light
SX4
80JM079
SX4 SEDAN
80JM074
To open the trim (1), insert a flat blade
screwdriver into the hole (3) and remove
the clips (2) by twist the driver as shown in
the illustration.
80JM075
(3)
(1)
(2)
Page 250 of 297
7-45INSPECTION AND MAINTENANCE
80J23-03E
Luggage compartment light (SX4)
79J015
Trunk room light (SX4 SEDAN)
56KN004
High-mount stop light (if equipped)
SX4
80J100
To remove a high-mounted stop light hous-
ing the following procedure:
1) Open the tailgate, and remove the nuts
(1) as shown in the illustration.
63J127
2) Close the tailgate. Remove a high-
mounted stop light housing (2) from the
tailgate.
(1)
(2)
Page 251 of 297
7-46
INSPECTION AND MAINTENANCE
80J23-03E
80JM076
3) Pushing the unguiform prongs (3)
toward inside and remove the bulb
holder (4).
4) Replace the bulbs.
To install a high-mounted stop light
housing in the reverse order of removal.SX4 SEDAN
80JM132
To remove the high-mounted stop light
housing, pinch both side of the clip (1) and
push it in.
Wiper Blades
80G083
If the wiper blades become brittle or dam-
aged, or make streaks when wiping,
replace the wiper blades.
To install new wiper blades, follow the pro-
cedures below.
NOTE:
Some wiper blades may be different from
the ones described here depending on
vehicle specifications. If so, consult your
SUZUKI dealer for proper replacement
method.
(3) (3)
(4)
(1)
CAUTION
To avoid scratching or breaking the
window, do not let the wiper arm
strike the window while replacing the
wiper blade.
Page 262 of 297

8-5EMERGENCY SERVICE
80J23-03E
Jump Starting Instructions
When jump starting your vehicle, use
the following procedure:
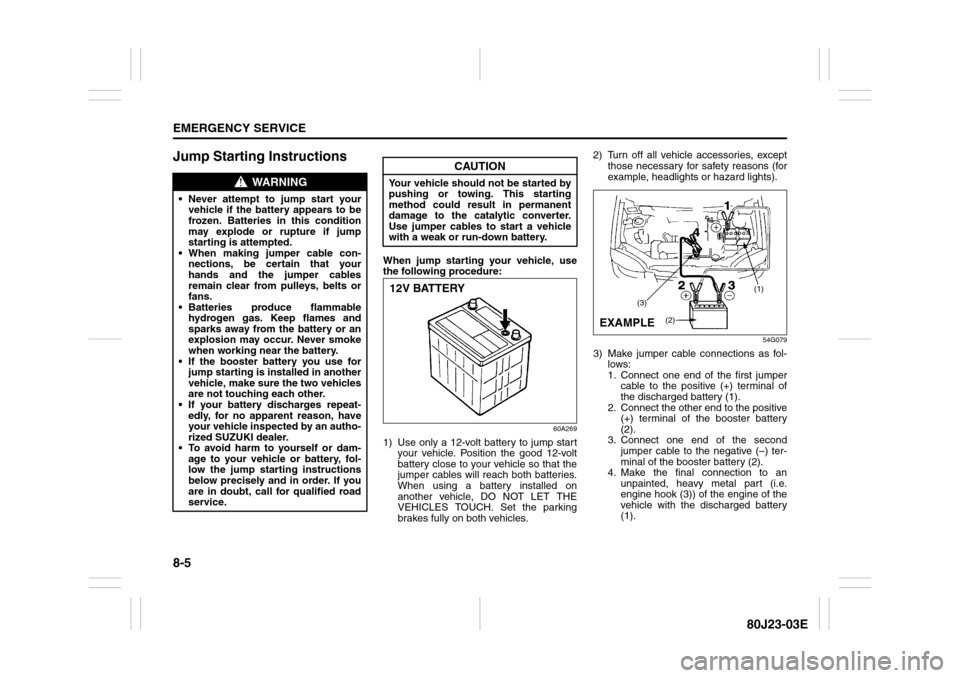
60A269
1) Use only a 12-volt battery to jump start
your vehicle. Position the good 12-volt
battery close to your vehicle so that the
jumper cables will reach both batteries.
When using a battery installed on
another vehicle, DO NOT LET THE
VEHICLES TOUCH. Set the parking
brakes fully on both vehicles.2) Turn off all vehicle accessories, except
those necessary for safety reasons (for
example, headlights or hazard lights).
54G079
3) Make jumper cable connections as fol-
lows:
1. Connect one end of the first jumper
cable to the positive (+) terminal of
the discharged battery (1).
2. Connect the other end to the positive
(+) terminal of the booster battery
(2).
3. Connect one end of the second
jumper cable to the negative (–) ter-
minal of the booster battery (2).
4. Make the final connection to an
unpainted, heavy metal part (i.e.
engine hook (3)) of the engine of the
vehicle with the discharged battery
(1).
WARNING
Never attempt to jump start your
vehicle if the battery appears to be
frozen. Batteries in this condition
may explode or rupture if jump
starting is attempted.
When making jumper cable con-
nections, be certain that your
hands and the jumper cables
remain clear from pulleys, belts or
fans.
Batteries produce flammable
hydrogen gas. Keep flames and
sparks away from the battery or an
explosion may occur. Never smoke
when working near the battery.
If the booster battery you use for
jump starting is installed in another
vehicle, make sure the two vehicles
are not touching each other.
If your battery discharges repeat-
edly, for no apparent reason, have
your vehicle inspected by an autho-
rized SUZUKI dealer.
To avoid harm to yourself or dam-
age to your vehicle or battery, fol-
low the jump starting instructions
below precisely and in order. If you
are in doubt, call for qualified road
service.
CAUTION
Your vehicle should not be started by
pushing or towing. This starting
method could result in permanent
damage to the catalytic converter.
Use jumper cables to start a vehicle
with a weak or run-down battery.12V BATTERY
(1)
(3)
(2)
EXAMPLE
Page 263 of 297

8-6
EMERGENCY SERVICE
80J23-03E
4) If the booster battery you are using is
installed on another vehicle, start the
engine of the vehicle with the booster
battery. Run the engine at moderate
speed.
5) Start the engine of the vehicle with the
discharged battery.
6) Remove the jumper cables in the exact
reverse order in which you connected
them.
Towing a Disabled VehicleEmergency TowingIf your vehicle is disabled, it may be towed
by a tow truck using one of the following
methods:
1) Tow the vehicle with two wheels lifted
by the tow truck and the other two
wheels on a towing dolly.
2) Use the appropriate towing method
specified for your vehicle in the “Towing
Your Vehicle (recreational towing)” sec-
tion, but with the wheels lifted by the
tow truck instead of on a towing dolly.
Be sure to carefully follow the specific
instructions provided in the “Towing
Your Vehicle (recreational towing)” sec-
tion.
If the Starter Does Not
Operate1) Try turning the ignition switch to the
“START” position with the headlights
turned on to determine the battery con-
dition. If the headlights go excessively
dim or go off, it usually means that
either the battery has run down or bat-
tery terminal contact is poor. Recharge
the battery or correct battery terminal
contact if necessary.
2) If the headlights remain bright, check
the fuses. If the reason for failure of the
starter is not obvious, there may be a
major electrical problem. Have the vehi-
cle inspected by your authorized
SUZUKI dealer.
WARNING
Never connect the jumper cable
directly to the negative (–) terminal of
the discharged battery, or an explo-
sion may occur.
CAUTION
If vehicle damage (such as steering
or drivetrain damage, etc.) prevents
normal use of the towing procedures
for your vehicle described in the
“Towing Your Vehicle (recreational
towing)” section, have your vehicle
towed with two wheels lifted by the
tow truck and the other two wheels
on a towing dolly.