2010 SUZUKI KIZASHI trunk
[x] Cancel search: trunkPage 258 of 388

5-79OTHER CONTROLS AND EQUIPMENT
57L20-03E
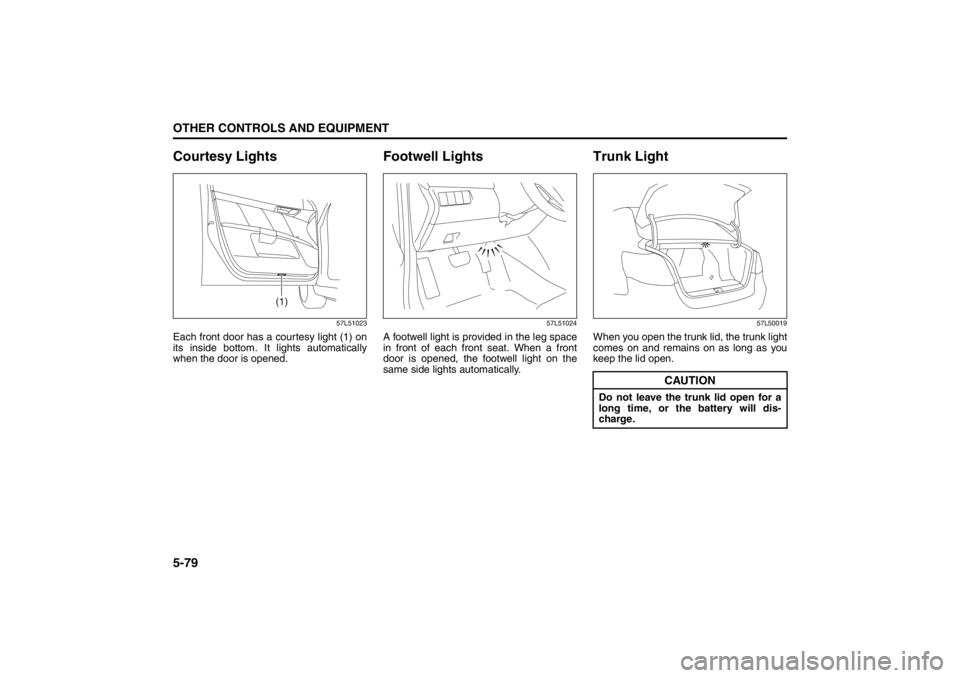
Courtesy Lights
57L51023
Each front door has a courtesy light (1) on
its inside bottom. It lights automatically
when the door is opened.
Footwell Lights
57L51024
A footwell light is provided in the leg space
in front of each front seat. When a front
door is opened, the footwell light on the
same side lights automatically.
Trunk Light
57L50019
When you open the trunk lid, the trunk light
comes on and remains on as long as you
keep the lid open.
(1)
CAUTION
Do not leave the trunk lid open for a
long time, or the battery will dis-
charge.
Page 271 of 388

5-92
OTHER CONTROLS AND EQUIPMENT
57L20-03E
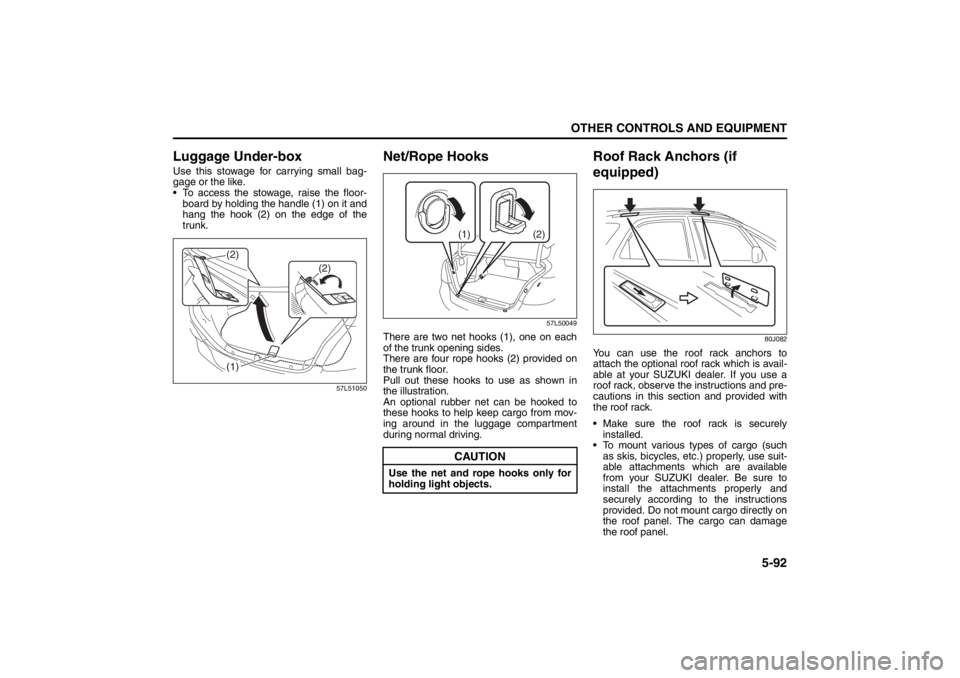
Luggage Under-boxUse this stowage for carrying small bag-
gage or the like.
To access the stowage, raise the floor-
board by holding the handle (1) on it and
hang the hook (2) on the edge of the
trunk.
57L51050
Net/Rope Hooks
57L50049
There are two net hooks (1), one on each
of the trunk opening sides.
There are four rope hooks (2) provided on
the trunk floor.
Pull out these hooks to use as shown in
the illustration.
An optional rubber net can be hooked to
these hooks to help keep cargo from mov-
ing around in the luggage compartment
during normal driving.
Roof Rack Anchors (if
equipped)
80J082
You can use the roof rack anchors to
attach the optional roof rack which is avail-
able at your SUZUKI dealer. If you use a
roof rack, observe the instructions and pre-
cautions in this section and provided with
the roof rack.
Make sure the roof rack is securely
installed.
To mount various types of cargo (such
as skis, bicycles, etc.) properly, use suit-
able attachments which are available
from your SUZUKI dealer. Be sure to
install the attachments properly and
securely according to the instructions
provided. Do not mount cargo directly on
the roof panel. The cargo can damage
the roof panel.
(1) (2)
(2)
CAUTION
Use the net and rope hooks only for
holding light objects.
(2) (1)
Page 280 of 388

6-1VEHICLE LOADING AND TOWING
57L20-03E
Vehicle Loading
57L61001
Your vehicle was designed for specific
weight capacities. The weight capacities of
your vehicle are indicated by the Gross
Vehicle Weight Rating (GVWR), the Gross
Axle Weight Rating (GAWR, front and rear)
and the Vehicle Capacity Weight. The
GVWR and GAWR (front and rear) are
listed on the Safety Certification Label
which is located below the driver’s side
door latch striker. The Vehicle Capacity
Weight is listed on the Tire Information
Label which is located below the Safety
Certification Label.
GVWR – Maximum permissible overall
weight of the fully loaded vehicle (including
all the occupants, accessories and cargo).
GAWR – (Front and Rear) Maximum per-
missible weight on an individual axle.Vehicle Capacity Weight – Maximum per-
missible load weight a vehicle can carry
including the weight of all the occupants,
accessories and cargo.
The weight of any accessories already
installed on your vehicle at the time of pur-
chase, or that you or the dealer install after
purchase, must be subtracted from the
Vehicle Capacity Weight to determine how
much capacity remains available for occu-
pants and cargo. Contact your dealer for
further information.
Actual weight of the loaded vehicle and
actual loads at the front and rear axles can
only be determined by weighing the vehicle
using a vehicle scale. To measure the
weight and load, try taking your vehicle to
a highway weighing station, shipping com-
pany or inspection station for trucks, etc.
Compare these weights to the GVWR and
GAWR (front and rear) listed on the Safety
Certification Label. If the gross vehicle
weight or the load on either axle exceeds
these ratings, you must remove enough
weight to bring the load down to the rated
capacity.
WARNING
Never overload your vehicle. The
gross vehicle weight (sum of the
weights of the loaded vehicle, driver
and passengers) must never exceed
the Gross Vehicle Weight Rating
(GVWR) listed on the Safety Certifica-
tion Label. In addition, never distrib-
ute a load so that the weight on either
the front or rear axle exceeds the
Gross Axle Weight Rating (GAWR)
listed on the Safety Certification
Label.
WARNING
Always distribute cargo evenly.
To avoid personal injury or damage
to your vehicle, always secure
cargo to prevent it from shifting if
the vehicle moves suddenly.
Place heavier objects on the floor
and as far forward in the trunk or in
the cargo area as possible.
Never pile cargo higher than the
top of the seat backs.
Exhaust Gas Warning: NO
Daily Inspection Checklist: NO
Page 338 of 388

7-53INSPECTION AND MAINTENANCE
57L20-03E
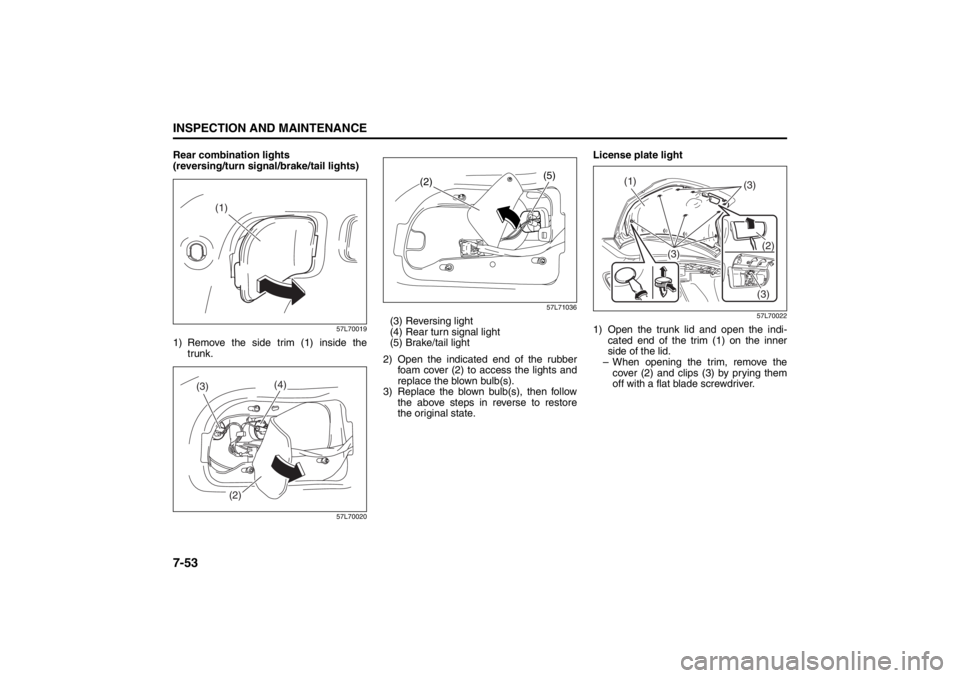
Rear combination lights
(reversing/turn signal/brake/tail lights)
57L70019
1) Remove the side trim (1) inside the
trunk.
57L7002057L71036
(3) Reversing light
(4) Rear turn signal light
(5) Brake/tail light
2) Open the indicated end of the rubber
foam cover (2) to access the lights and
replace the blown bulb(s).
3) Replace the blown bulb(s), then follow
the above steps in reverse to restore
the original state.License plate light
57L70022
1) Open the trunk lid and open the indi-
cated end of the trim (1) on the inner
side of the lid.
– When opening the trim, remove the
cover (2) and clips (3) by prying them
off with a flat blade screwdriver.
(1)
(4)
(3)
(2)
(5)
(2)
(1)
(3)
(3)(2)
(3)
Page 339 of 388

7-54
INSPECTION AND MAINTENANCE
57L20-03E
57L70035
2) Disconnect the coupler (4) with pushing
the lock release.
3) Remove the cover (5).4) Replace the bulb (6), then perform the
operations in 1) in the reverse order to
restore the original state.
NOTE:
Make sure that the bulb is fitted correctly
in the holder.
The right-side cover is marked “R” while
the left-side cover is marked “L”.
Trunk room light
57L71033
1) Open the trunk lid and remove the lens
by turning it counterclockwise.
2) Replace the bulb, then perform the
operations in 1) in the reverse order to
restore the original state.
Wiper Blades
80G083
If the wiper blades become brittle or dam-
aged, or make streaks when wiping,
replace the wiper blades.
To install new wiper blades, follow the pro-
cedures below.
NOTE:
Some wiper blades may be different from
the ones described here depending on
vehicle specifications. If so, consult your
SUZUKI dealer for proper replacement
method.
(6)
(5)
(4)
CAUTION
To avoid scratching or breaking the
window, do not let the wiper arm
strike the window while replacing the
wiper blade.
Page 344 of 388

8-1EMERGENCY SERVICE
57L20-03E
Tire Changing Tool
57L81001
The jack wheel brace and jack handle are
stowed in the luggage under-box (2) under
the trunk floorboard (1). The floorboard
can be kept raised using the hook (3).
57L81002
To remove the spare tire, remove the lug-
gage under-box (2) and turn the bolt (4)
counterclockwise.
57L81003
(1)
(2)
(3)
WARNING
The jack should be used only to
change wheels. It is important to read
the jacking instructions in this sec-
tion before attempting to use the
jack.
WARNING
After using the jack, jack handle and
wheel brace, be sure to stow them
securely or they can cause injury if
an accident occurs.
(4)
CAUTION
Do not remove the spacer (5) under
the spare tire. The spare tire cannot
be held firmly without the spacer in
position.
(5)
Vehicle Loading: 11
Page 379 of 388

12-3
SPECIFICATIONS
57L20-03E
ITEM: Light WATTAGE BULB No.
Headlight 12V 55W H7
Front fog light 12V 55W H11
Front turn signal light 12V 27W 2357A
Rear turn signal light 12V 21W PY21W
Parking light 12V 5W W5W
Brake/tail light 12V 21/5W P21/5W
License plate light 12V 5W C5W
Reversing light 12V 21W P21W
Front dome light 12V 8W –
Rear dome light 12V 10W –
Glove box light 12V 1.4W –
Footwell lights LED –
Trunk room light 12V 5W W5W
Spot light 12V 8W –
High mount stop light LED –
Front side marker light 12V 5W 168
Curtsey light 12V 5W –
Vanity mirror light 12V 2W –
Specifications: 1, 2, 5, 6, 7, 10, 11
Page 383 of 388

13-3
INDEX57L20-03E
Head Restraints .......................................................... 2-27, 2-29
Headlight Aiming ................................................................. 7-44
Heated Rear Window and Heated Outside Rearview
Mirrors (if equipped) Switch ............................................. 2-111
High Beam Indicator Light .................................................. 2-75
Highway Driving..................................................................... 4-3
Hill Hold Control System..................................................... 3-34
HomeLink
®........................................................................... 5-93
Horn .................................................................................... 2-111
How the ABS Works ............................................................ 3-30
IIdentification Numbers ........................................................ 10-1
If the Engine is Flooded ........................................................ 8-8
If the Engine Overheats......................................................... 8-8
If the Starter Does Not Operate ............................................ 8-7
If You Cannot Shift CVT Gearshift Lever Out of
“P” (PARK) ............. .............................................................. 3-18
If Your Vehicle Gets Stuck .................................................... 4-4
Illumination Indicator Light................................................. 2-75
Immobilizer System ........................................................ 2-2 , 3-4
Immobilizer/Keyless Start System Warning Light ............ 2-76
Improving Fuel Economy ............... ....................................... 4-2
Information Display ............................................................. 2-80
Inside Rearview Mirror ........................................................ 2-20
Installation of Child Restraint with Top Strap ................... 2-52
Installation with Lap-Shoulder Seat Belts
(child restraint with no top strap)....................................... 2-46
Installation with the LATCH System .................................. 2-49
Instantaneous fuel consumption ....................................... 2-82
Instrument Cluster ............................................................... 2-68
intelligent All Wheel Drive (i-AWD) Indicator Light .......... 2-76 Interior Light Switch ............................................................ 5-78
Interior Workable Area for Engine Starting, Power
Supply Mode Selection
and “Remote Controller
Outside” Warning................................................................... 3-6
Internal Trunk Release........................................................... 2-6
JJacking Instructions .............................................................. 8-2
Jump Starting Instructions ................................................... 8-6KKeyless Push Start System ................................................... 3-4
Keyless Start System Remote Controller ............................ 2-6
Keys......................................................................................... 2-1LLap-Shoulder Belt ................................................................ 2-36
Lidded Instrument Panel Box ............................................. 5-87
Light Reminder Buzzer ...................................................... 2-104
Lighting Control Lever....................................................... 2-100
Lighting Operation ............................................................. 2-100
Locking Rear Seatback........................................................ 2-34
Low Fuel Warning Light ...................................................... 2-74
Low Tire Pressure Warning Light .............................. 2-69 , 3-35
Luggage Under-box ............................................................. 5-92MMaintenance Recommended under Severe Driving
Conditions ..................................................................... 7-7 , 7-11
Maintenance Schedule ................. ......................................... 7-2
Malfunction Indicator Light ................................................. 2-74
Manual Transaxle ................................................................. 3-13
Master Warning Indicator Light .......................................... 2-77
Mirrors ................................................................................... 2-20