2010 SUZUKI KIZASHI light
[x] Cancel search: lightPage 337 of 388
7-52
INSPECTION AND MAINTENANCE
57L20-03E
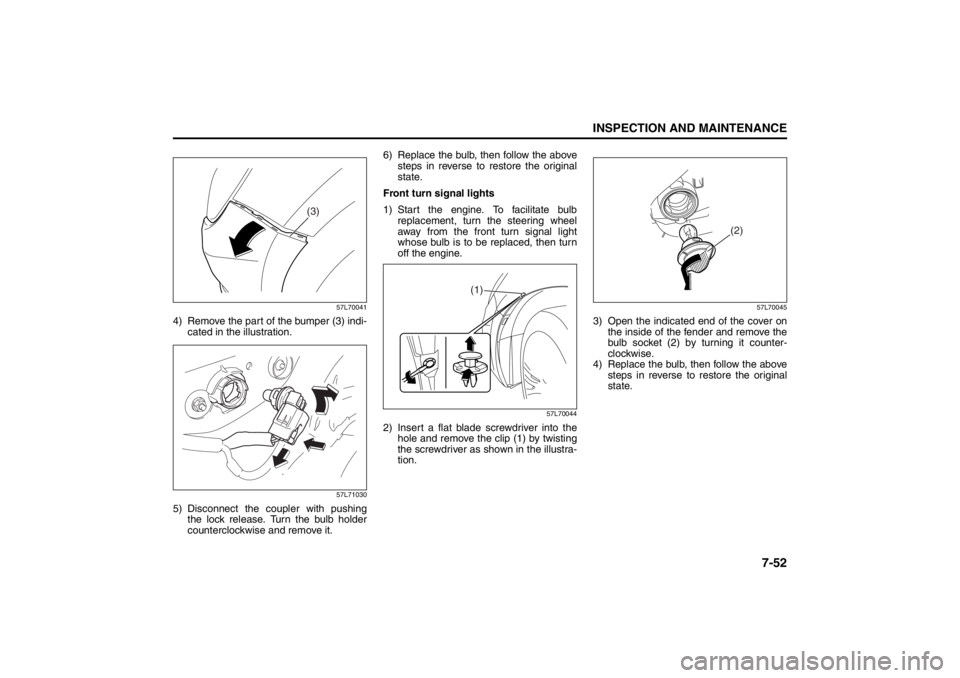
57L70041
4) Remove the part of the bumper (3) indi-
cated in the illustration.
57L71030
5) Disconnect the coupler with pushing
the lock release. Turn the bulb holder
counterclockwise and remove it.6) Replace the bulb, then follow the above
steps in reverse to restore the original
state.
Front turn signal lights
1) Start the engine. To facilitate bulb
replacement, turn the steering wheel
away from the front turn signal light
whose bulb is to be replaced, then turn
off the engine.
57L70044
2) Insert a flat blade screwdriver into the
hole and remove the clip (1) by twisting
the screwdriver as shown in the illustra-
tion.
57L70045
3) Open the indicated end of the cover on
the inside of the fender and remove the
bulb socket (2) by turning it counter-
clockwise.
4) Replace the bulb, then follow the above
steps in reverse to restore the original
state.
(3)
(1)
(2)
Page 338 of 388
7-53INSPECTION AND MAINTENANCE
57L20-03E
Rear combination lights
(reversing/turn signal/brake/tail lights)
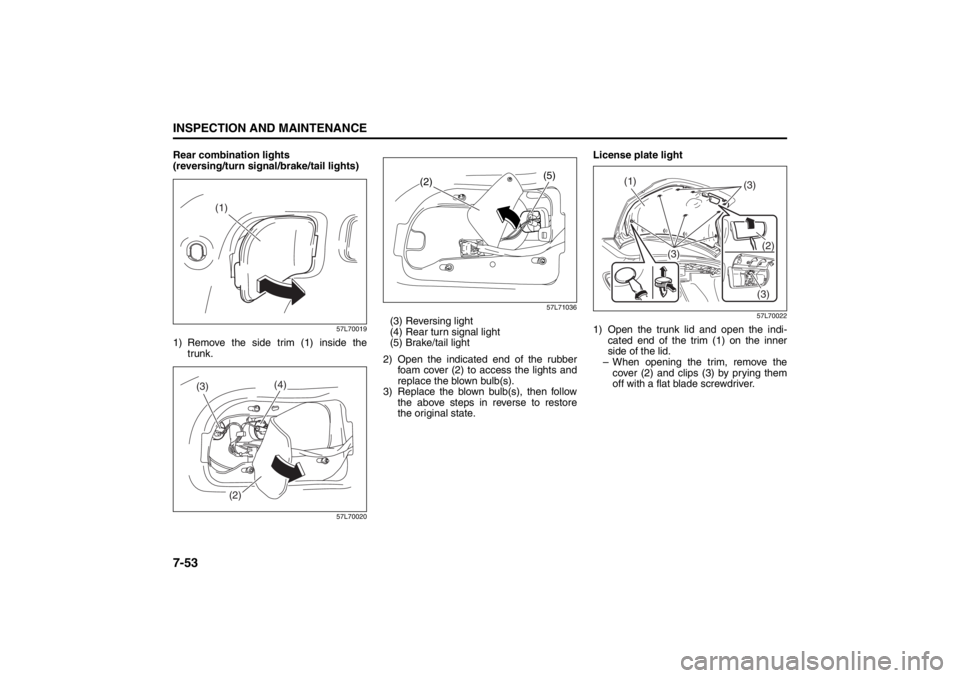
57L70019
1) Remove the side trim (1) inside the
trunk.
57L7002057L71036
(3) Reversing light
(4) Rear turn signal light
(5) Brake/tail light
2) Open the indicated end of the rubber
foam cover (2) to access the lights and
replace the blown bulb(s).
3) Replace the blown bulb(s), then follow
the above steps in reverse to restore
the original state.License plate light
57L70022
1) Open the trunk lid and open the indi-
cated end of the trim (1) on the inner
side of the lid.
– When opening the trim, remove the
cover (2) and clips (3) by prying them
off with a flat blade screwdriver.
(1)
(4)
(3)
(2)
(5)
(2)
(1)
(3)
(3)(2)
(3)
Page 339 of 388

7-54
INSPECTION AND MAINTENANCE
57L20-03E
57L70035
2) Disconnect the coupler (4) with pushing
the lock release.
3) Remove the cover (5).4) Replace the bulb (6), then perform the
operations in 1) in the reverse order to
restore the original state.
NOTE:
Make sure that the bulb is fitted correctly
in the holder.
The right-side cover is marked “R” while
the left-side cover is marked “L”.
Trunk room light
57L71033
1) Open the trunk lid and remove the lens
by turning it counterclockwise.
2) Replace the bulb, then perform the
operations in 1) in the reverse order to
restore the original state.
Wiper Blades
80G083
If the wiper blades become brittle or dam-
aged, or make streaks when wiping,
replace the wiper blades.
To install new wiper blades, follow the pro-
cedures below.
NOTE:
Some wiper blades may be different from
the ones described here depending on
vehicle specifications. If so, consult your
SUZUKI dealer for proper replacement
method.
(6)
(5)
(4)
CAUTION
To avoid scratching or breaking the
window, do not let the wiper arm
strike the window while replacing the
wiper blade.
Page 349 of 388

8-6
EMERGENCY SERVICE
57L20-03E
Jump Starting Instructions
When jump starting your vehicle, use
the following procedure:
60A269
1) Use only a 12-volt battery to jump startyour vehicle. Position the good 12-volt
battery close to your vehicle so that the
jumper cables will reach both batteries.
When using a battery installed on
another vehicle, DO NOT LET THE
VEHICLES TOUCH. Set the parking
brakes fully on both vehicles. 2) Turn off all vehicle accessories, except
those necessary for safety reasons (for
example, headlights or hazard lights).
57L81004
3) Make jumper cable connections as fol-lows:
1. Connect one end of the first jumper
cable to the positive (+) terminal of
the discharged battery (1).
2. Connect the other end to the positive (+) terminal of the booster battery
(2).
3. Connect one end of the second
jumper cable to the negative (–) ter-
minal of the booster battery (2).
WARNING
• Never attempt to jump start yourvehicle if the battery appears to be
frozen. Batteries in this condition
may explode or rupture if jump
starting is attempted.
When making jumper cable con- nections, be certain that your
hands and the jumper cables
remain clear from pulleys, belts or
fans.
Batteries produce flammable
hydrogen gas. Keep flames and
sparks away from the battery or an
explosion may occur. Never smoke
when working near the battery.
If the booster battery you use for jump starting is installed in another
vehicle, make sure the two vehicles
are not touching each other.
If your battery discharges repeat- edly, for no apparent reason, have
your vehicle inspected by an autho-
rized SUZUKI dealer.
To avoid harm to yourself or dam- age to your vehicle or battery, fol-
low the jump starting instructions
below precisely and in order. If you
are in doubt, call for qualified road
service.
CAUTION
Your vehicle should not be started by
pushing or towing. This starting
method could result in permanent
damage to the catalytic converter.
Use jumper cables to start a vehicle
with a weak or run-down battery.12V BATTERY
(3)
(2)
(1)
1
4
23
EXAMPLE
Page 350 of 388

8-7EMERGENCY SERVICE
57L20-03E
4. Make the final connection to an
unpainted, heavy metal part (i.e.
engine hook (3)) of the engine of the
vehicle with the discharged battery
(1).
4) If the booster battery you are using is
installed on another vehicle, start the
engine of the vehicle with the booster
battery. Run the engine at moderate
speed.
5) Start the engine of the vehicle with the
discharged battery.
6) Remove the jumper cables in the exact
reverse order in which you connected
them.
Towing a Disabled VehicleEmergency TowingIf your vehicle is disabled, it may be towed
by a tow truck using one of the following
methods:
1) Tow the vehicle with two wheels lifted
by the tow truck and the other two
wheels on a towing dolly.
2) Use the appropriate towing method
specified for your vehicle in the “Towing
Your Vehicle (recreational towing)” sec-
tion, but with the wheels lifted by the
tow truck instead of on a towing dolly.
Be sure to carefully follow the specific
instructions provided in the “Towing
Your Vehicle (recreational towing)” sec-
tion.
If the Starter Does Not
Operate1) While bringing the remote controller
with you, place the gearshift lever in the
“P” position and depress the brake
pedal.
2) Try pressing the engine switch to
change the ignition mode to “START”
with the headlights turned on to deter-
mine the battery condition. If the head-
lights go excessively dim or go off, it
usually means that either the battery
has run down or battery terminal con-
tact is poor. Recharge the battery or
correct battery terminal contact if nec-
essary.
3) If the headlights remain bright, check
the fuses. If the reason for failure of the
starter is not obvious, there may be a
major electrical problem. Have the vehi-
cle inspected by your authorized
SUZUKI dealer.
WARNING
Never connect the jumper cable
directly to the negative (–) terminal of
the discharged battery, or an explo-
sion may occur.
CAUTION
If vehicle damage (such as steering
or drivetrain damage, etc.) prevents
normal use of the towing procedures
for your vehicle described in the
“Towing Your Vehicle (recreational
towing)” section, have your vehicle
towed with two wheels lifted by the
tow truck and the other two wheels
on a towing dolly.
Page 355 of 388
9-2
APPEARANCE CARE
57L20-03E
Keep passenger and cargo compart-
ments clean
Moisture, dirt or mud can accumulate
under the floor mats and may cause corro-
sion. Occasionally, check under these
mats to ensure that this area is clean and
dry. More frequent checks are necessary if
the vehicle is used off road or in wet
weather.
Certain cargo such as chemicals, fertiliz-
ers, cleaners, salts, etc. are extremely cor-
rosive by nature. These products should
be transported in sealed containers. If a
spill or leak does occur, clean and dry the
area immediately.
Use the body trim
The use of the body trim will help protect
your vehicle, especially if you frequently
drive on gravel or salted roads. The fittings
for such guards should also be corrosion
resistant. Please check with your autho-
rized SUZUKI dealer for information on
these guards.
Store your vehicle in a dry, well-venti-
lated area
Do not park your vehicle in a damp, poorly
ventilated area. If you often wash your
vehicle in the garage or if you frequently
drive it in when wet, your garage may be
damp. The high humidity in the garage
may cause or accelerate corrosion. A wet
vehicle may corrode even in a heated
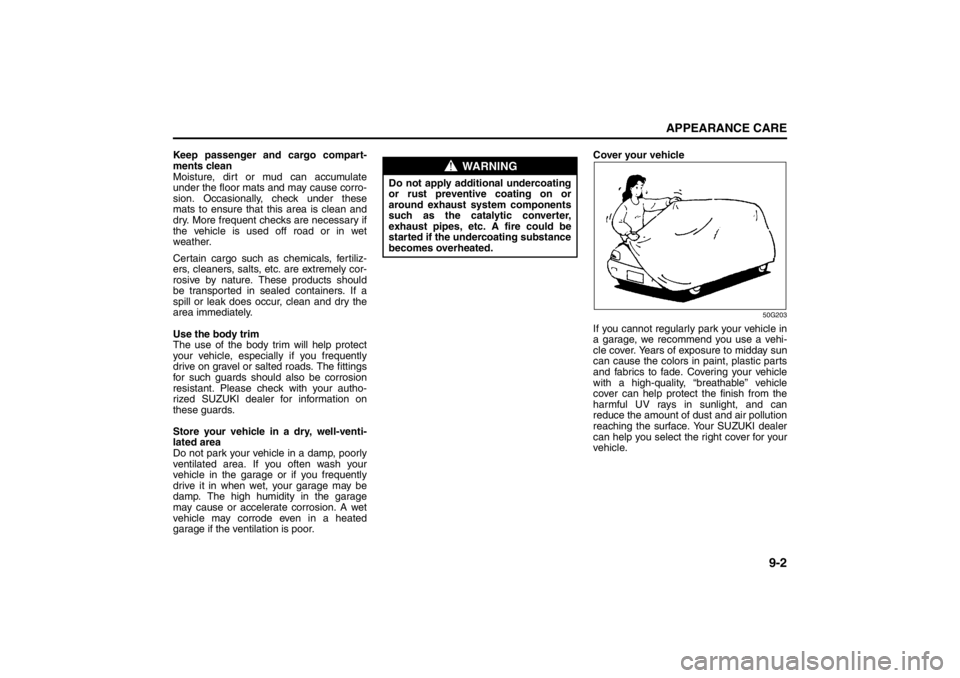
garage if the ventilation is poor.Cover your vehicle
50G203
If you cannot regularly park your vehicle in
a garage, we recommend you use a vehi-
cle cover. Years of exposure to midday sun
can cause the colors in paint, plastic parts
and fabrics to fade. Covering your vehicle
with a high-quality, “breathable” vehicle
cover can help protect the finish from the
harmful UV rays in sunlight, and can
reduce the amount of dust and air pollution
reaching the surface. Your SUZUKI dealer
can help you select the right cover for your
vehicle.
WARNING
Do not apply additional undercoating
or rust preventive coating on or
around exhaust system components
such as the catalytic converter,
exhaust pipes, etc. A fire could be
started if the undercoating substance
becomes overheated.
Maintenance Schedule: 1, 2, 3, 4, 5, 6, 9, 10
Page 356 of 388
9-3APPEARANCE CARE
57L20-03E
Vehicle Cleaning
76G044S
Cleaning InteriorVinyl upholstery
Prepare a solution of soap or mild deter-
gent mixed with warm water. Apply the
solution to the vinyl with a sponge or soft
cloth and let it soak for a few minutes to
loosen dirt. Rub the surface with a clean,damp cloth to remove dirt and the soap
solution. If some dirt still remains on the
surface, repeat this procedure.
Fabric upholstery
Remove loose dirt with a vacuum cleaner.
Using a mild soap solution, rub stained
areas with a clean damp cloth. To remove
soap, rub the areas again with a cloth
dampened with water. Repeat this until the
stain is removed, or use a commercial fab-
ric cleaner for tougher stains. If you use a
fabric cleaner, carefully follow the manu-
facturer’s instructions and precautions.
Leather upholstery
Remove loose dirt with a vacuum cleaner.
Using a mild soap or saddle soap solution,
wipe dirt off with a clean damp soft cloth.
To remove soap, wipe the areas again with
a soft cloth dampened with water. Wipe the
areas dry with a soft dry cloth. Repeat this
until the dirt or stain is removed, or use a
commercial leather cleaner for tougher dirt
or stains. If you use a leather cleaner, care-
fully follow the manufacture’s instructions
and precautions. Do not use solvent type
cleaners or abrasive cleaners.
NOTE:
In order to keep leather upholstery look-
ing good, it should be cleaned at least
twice a year.
If leather upholstery becomes wet,
immediately wipe it dry with tissue paperor a soft cloth. Water may cause leather
to harden and shrink if it is not wiped off.
When parking on sunny days, select a
shady place or use a sunshade. If
leather upholstery is exposed to direct
sunlight for a long time, it may discolor
and shrink.
As is common with natural materials,
leather is inherently irregular in grain and
cowhide has spots in its natural state.
These do not affect the performance of
the leather in any way.
Seat belts
Clean seat belts with a mild soap and
water. Do not use bleach or dye on the
belts. They may weaken the fabric in the
belts.
Vinyl floor mats
Ordinary dirt can be removed from vinyl
with water or mild soap. Use a brush to
help loosen dirt. After dirt is loosened,
rinse the mat thoroughly with water and
dry it in the shade.
Carpets
Remove dirt and soil as much as possible
with a vacuum cleaner. Using a mild soap
solution, rub stained areas with a clean
damp cloth. To remove soap, rub the areas
again with a cloth dampened with water.
Repeat this until the stain is removed, or
use a commercial carpet cleaner for
tougher stains. If you use a carpet cleaner,
WARNING
When cleaning the interior or exterior
of the vehicle, NEVER USE flammable
solvents such lacquer thinners, gas-
oline, benzene or cleaning materials
such as bleaches and strong house-
hold detergents. The materials could
cause personal injury or damage to
the vehicle.
Periodic Maintenance Schedule: 1, 2, 3, 4, 5, 6, 9, 10
Page 357 of 388
9-4
APPEARANCE CARE
57L20-03E
carefully follow the manufacturer’s instruc-
tions and precautions.
Instrument panel and console
NOTE:
Wipe up spills containing chemicals, alco-
hol, etc., immediately with a soft, damp
cloth. Use a mild soap solution if neces-
sary. Do not use cleaners or polishes con-
taining strong solvents or acidic solutions.
These chemicals may stain and discolor
the instrument panel and console.Cleaning the Exterior
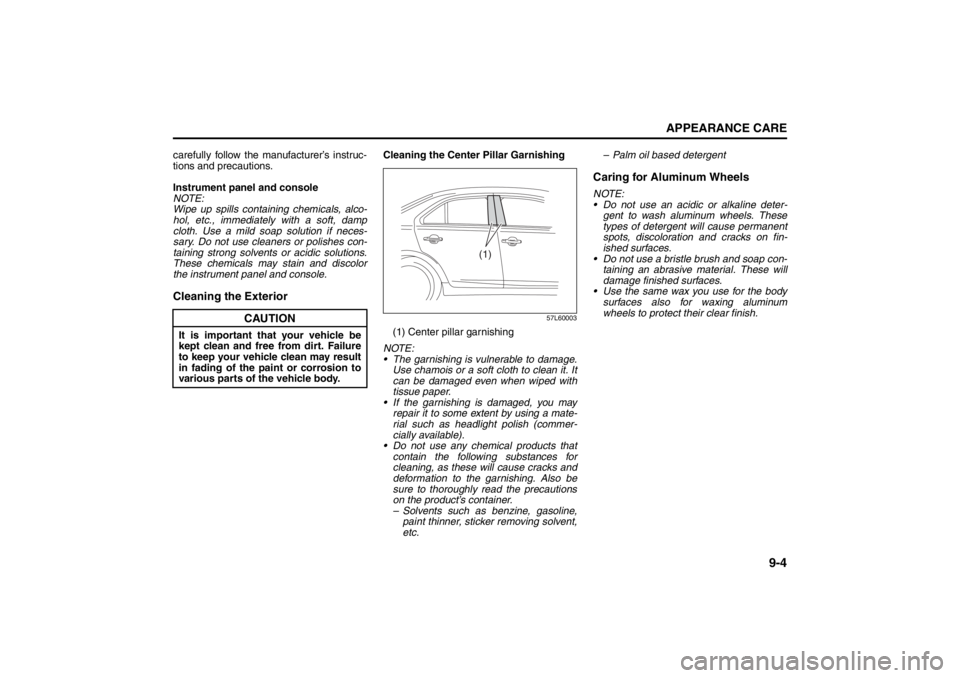
Cleaning the Center Pillar Garnishing
57L60003
(1) Center pillar garnishing
NOTE:
The garnishing is vulnerable to damage.
Use chamois or a soft cloth to clean it. It
can be damaged even when wiped with
tissue paper.
If the garnishing is damaged, you may
repair it to some extent by using a mate-
rial such as headlight polish (commer-
cially available).
Do not use any chemical products that
contain the following substances for
cleaning, as these will cause cracks and
deformation to the garnishing. Also be
sure to thoroughly read the precautions
on the product’s container.
– Solvents such as benzine, gasoline,
paint thinner, sticker removing solvent,
etc.– Palm oil based detergent
Caring for Aluminum WheelsNOTE:
Do not use an acidic or alkaline deter-
gent to wash aluminum wheels. These
types of detergent will cause permanent
spots, discoloration and cracks on fin-
ished surfaces.
Do not use a bristle brush and soap con-
taining an abrasive material. These will
damage finished surfaces.
Use the same wax you use for the body
surfaces also for waxing aluminum
wheels to protect their clear finish.
CAUTION
It is important that your vehicle be
kept clean and free from dirt. Failure
to keep your vehicle clean may result
in fading of the paint or corrosion to
various parts of the vehicle body.
(1)
Periodic Maintenance Schedule: 1, 2, 3, 4, 5, 6, 9, 10