Page 211 of 448

“TUNE/TRACK/CH ”dial.
4. Select “Pair phone ”by operating the
“ TUNE/TRACK/CH ”dial.
5. Press the talk switch. Refer to “Voice
command system ”F 5-40.
6. Say the name to be registered.
7. Select “Confirm ”by operating the
“ TUNE/TRACK/CH ”dial or say “Confirm ”.
Then a pass key is displayed.
8. Input the displayed pass key into the
cell phone while “PASS KEY: **** ”is
displayed. If you input the correct pass
key, “Paired ”is displayed and the register-
ing procedure is finished. If you input an
incorrect pass key, “Failed ”is displayed
and the registering procedure was not successful. ! Inputting the phone number
1. Press the OFF hook switch.
2. Select “Phonebook ”by operating the
“ TUNE/TRACK/CH ”dial.
3. Select “Add Entry ”by operating the
“ TUNE/TRACK/CH ”dial.
4. Select “Manual Input ”by operating the
“ TUNE/TRACK/CH ”dial.
5. Input the phone number to be regis- tered. NOTE
While inputting the phone numbers, if “
Go Back ”is chosen using the “TUNE/
TRACK/CH ”dial, the character that was
input last is deleted. ! Registering the phonebook data.
1. Input the phone number to be regis-
tered. Refer to “Inputting the phone
number ”F 5-35.
2. Say the name to be registered. 3. “Confirm ”is displayed.
4. Press the “TUNE/TRACK/CH ”dial.
5. “Stored ”is displayed.
6. Select “Speed Dial ”by operating the
“ TUNE/TRACK/CH ”dial.
7. Select the phone number to be regis- tered.
Preset buttons
8. Press the preset button in which you
want to register the number. The number
is then registered. ! Page scroll
Audio 5-35
– CONTINUED –
Page 215 of 448
First menu Second menu Third menuDetails
Setup Security Set Pin Setting a PIN code
Phbk Lock Locking the phonebook*
Phbk Unlock Unlocking the phonebook*
Go Back
Phone setup Pair Phone Registering a new cell phone
Select Phone Selecting a cell phone to be used
Change Name Changing the registered name of the cell phone
List Phones Showing the list of the registered cell phones
Set Passkey Changing the pass key
Delete Deleting the registered cell phone
Go Back
System setup Guidance Vol Setting the volume of the voice guidance
Initialize Initialization
Go Back
Go Back —
*: If a PIN code is not registered, the menu described in the chart is not available. Audio
5-39
– CONTINUED –
Page 217 of 448
45 set pass key
46 list phone
47 add entry
48 delete entry
49 delete speed dial
50 by voice
51 voice
52 by phone
53 phone
54 call history
55 by call history
56 set speed dial
57 next
58 incoming
59 outgoing
60 list names
61 set PIN
62 phone book lock
63 PIN setup 64send Audio
5-41
Page 220 of 448

6-2Interior equipment
Interior light
When leaving your vehicle, make sure the
light is turned off to avoid battery dis-charge. &Dome light
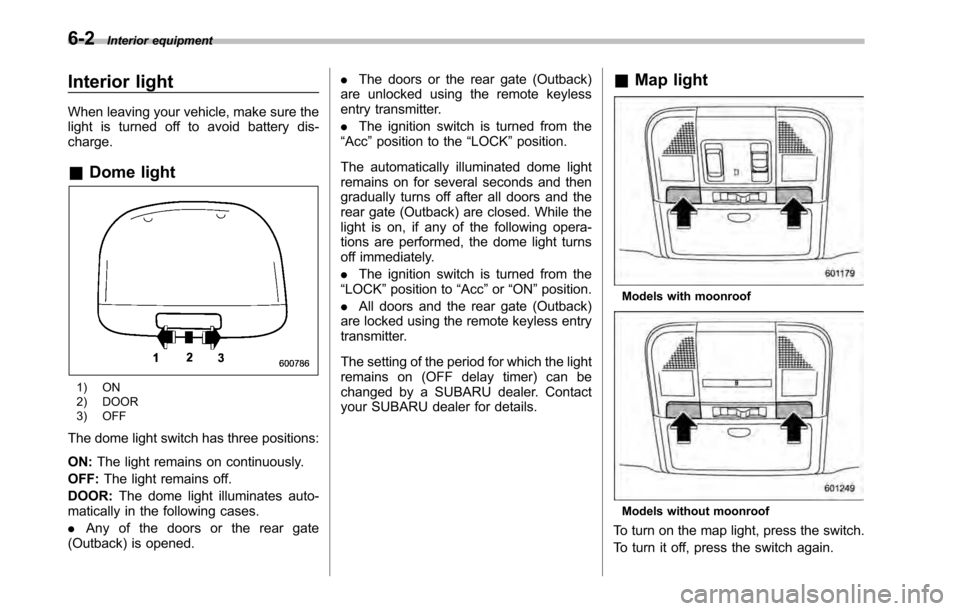
1) ON
2) DOOR
3) OFF
The dome light switch has three positions: ON: The light remains on continuously.
OFF: The light remains off.
DOOR: The dome light illuminates auto-
matically in the following cases. . Any of the doors or the rear gate
(Outback) is opened. .
The doors or the rear gate (Outback)
are unlocked using the remote keyless
entry transmitter. . The ignition switch is turned from the
“ Acc ”position to the “LOCK ”position.
The automatically illuminated dome light
remains on for several seconds and then
gradually turns off after all doors and the
rear gate (Outback) are closed. While the
light is on, if any of the following opera-
tions are performed, the dome light turns
off immediately. . The ignition switch is turned from the
“ LOCK ”position to “Acc ”or “ON ”position.
. All doors and the rear gate (Outback)
are locked using the remote keyless entry
transmitter.
The setting of the period for which the light
remains on (OFF delay timer) can be
changed by a SUBARU dealer. Contact
your SUBARU dealer for details. &
Map light
Models with moonroof
Models without moonroof
To turn on the map light, press the switch.
To turn it off, press the switch again.
Page 221 of 448

When leaving the vehicle, make sure the
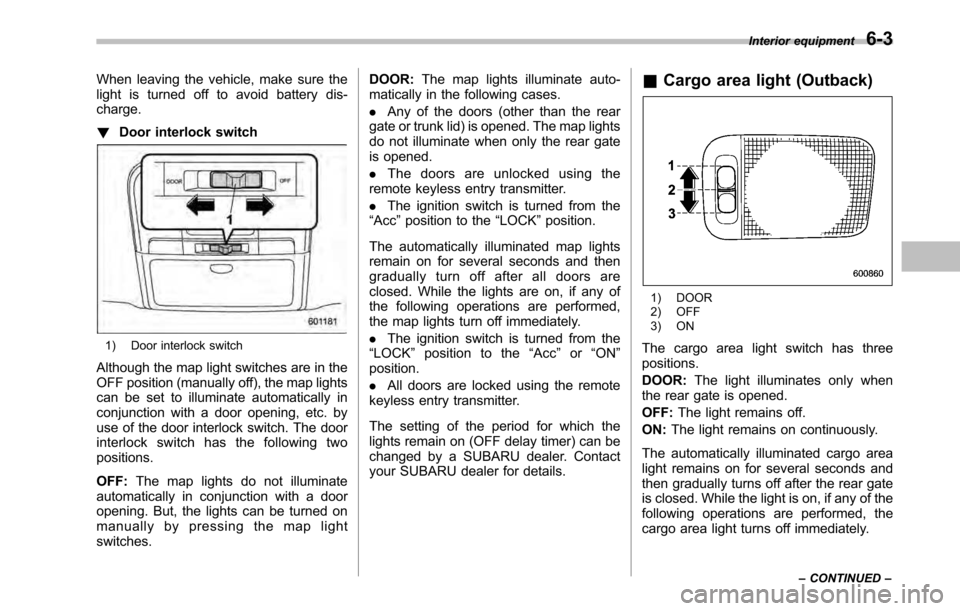
light is turned off to avoid battery dis-charge. !Door interlock switch
1) Door interlock switch
Although the map light switches are in the
OFF position (manually off), the map lights
can be set to illuminate automatically in
conjunction with a door opening, etc. by
use of the door interlock switch. The door
interlock switch has the following twopositions. OFF: The map lights do not illuminate
automatically in conjunction with a door
opening. But, the lights can be turned on
manually by pressing the map lightswitches. DOOR:
The map lights illuminate auto-
matically in the following cases. . Any of the doors (other than the rear
gate or trunk lid) is opened. The map lights
do not illuminate when only the rear gate
is opened. . The doors are unlocked using the
remote keyless entry transmitter.. The ignition switch is turned from the
“ Acc ”position to the “LOCK ”position.
The automatically illuminated map lights
remain on for several seconds and then
gradually turn off after all doors are
closed. While the lights are on, if any of
the following operations are performed,
the map lights turn off immediately. . The ignition switch is turned from the
“ LOCK ”position to the “Acc ”or “ON ”
position. . All doors are locked using the remote
keyless entry transmitter.
The setting of the period for which the
lights remain on (OFF delay timer) can be
changed by a SUBARU dealer. Contact
your SUBARU dealer for details. &
Cargo area light (Outback)
1) DOOR
2) OFF
3) ON
The cargo area light switch has three positions. DOOR: The light illuminates only when
the rear gate is opened.OFF: The light remains off.
ON: The light remains on continuously.
The automatically illuminated cargo area
light remains on for several seconds and
then gradually turns off after the rear gate
is closed. While the light is on, if any of the
following operations are performed, the
cargo area light turns off immediately. Interior equipment
6-3
– CONTINUED –
Page 222 of 448
6-4Interior equipment
.The ignition switch is turned from the
“ LOCK ”position to the “Acc ”or “ON ”
position. . The rear gate is locked using the
remote keyless entry transmitter.
The setting of the period for which the
lights remain on (OFF delay timer) can be
changed by a SUBARU dealer. Contact
your SUBARU dealer for details. Sun visors
To block out glare, swing down the visors.
To use the sun visor at a side window,
swing it down and move it sideways.&
Sun visor extension plateWith the sun visor positioned over the side
window, you can use the sun visor
extension plate to prevent glare through
the gap between the sun visor and center
pillar. To use the extension plate, pull it
toward the rear of the vehicle. When you
have finished using it, stow it by pushing it
toward the front of the vehicle.
Page 224 of 448
6-6Interior equipment
& Glove box
1) Lock
2) Unlock
To open the glove box, pull the handle. To
close it, push the lid firmly upward.
To lock the glove box, insert the key and
turn it clockwise. To unlock the glove box,
insert the key and turn it counterclockwise. &
Center console box
! Center console box (front)
If you remove the divider plate from the
dual cup holders, you can use the center
console box as a storage space. To use as storage space:
Pull out the divider plate of the dual cup
holder.
Page 250 of 448

7-8Starting and operating
NOTE
Engine oil, engine coolant, brake fluid,
washer fluid and other fluid levels
should be checked daily, weekly or at
fuel stops. Starting the engine &
MT models
1. Apply the parking brake.
2. Turn off unnecessary lights and ac- cessories.
3. Depress the clutch pedal to the floor
and shift the shift lever into neutral. Hold
the clutch pedal to the floor while starting
the engine. The starter motor will only
operate when the clutch pedal is de-
pressed fully to the floor.
4. Turn the ignition switch to the “ON ”
position and check the operation of the
warning and indicator lights. Refer to“ Warning and indicator lights ”F 3-9.
CAUTION
Do not operate the starter motor
continuously for more than 10 sec-
onds. If the engine fails to start after
operating the starter for 5 to 10
seconds, wait for 10 seconds or
more before trying again.
5. Turn the ignition switch to the “START ”
position without depressing the accelera-
tor pedal. Release the key immediately
after the engine has started.
If the engine does not start, perform the
following procedure. (1) Turn the ignition switch to the“
LOCK ”position and wait for at least
10 seconds. After checking that the
parking brake is firmly applied, turn the
ignition switch to the “START ”position
while depressing the accelerator pedal
slightly (approximately a quarter of the
full stroke). Release the accelerator
pedal as soon as the engine starts.
(2) If this fails to start the engine, turn
the ignition switch back to the “LOCK ”
position and wait for at least 10
seconds. Then fully depress the accel-
erator pedal and turn the ignition
switch to the “START ”position. If the
engine starts, quickly release the
accelerator pedal.
(3) If this does not start the engine,
turn the ignition switch again to the“ LOCK ”position. After waiting for 10
seconds or longer, turn the ignition
switch to the “START ”position without
depressing the accelerator pedal.
(4) If the engine still refuses to start,
contact your nearest SUBARU dealer
for assistance.