2010 SKODA SUPERB fog light
[x] Cancel search: fog lightPage 13 of 287

The brief instruction
12
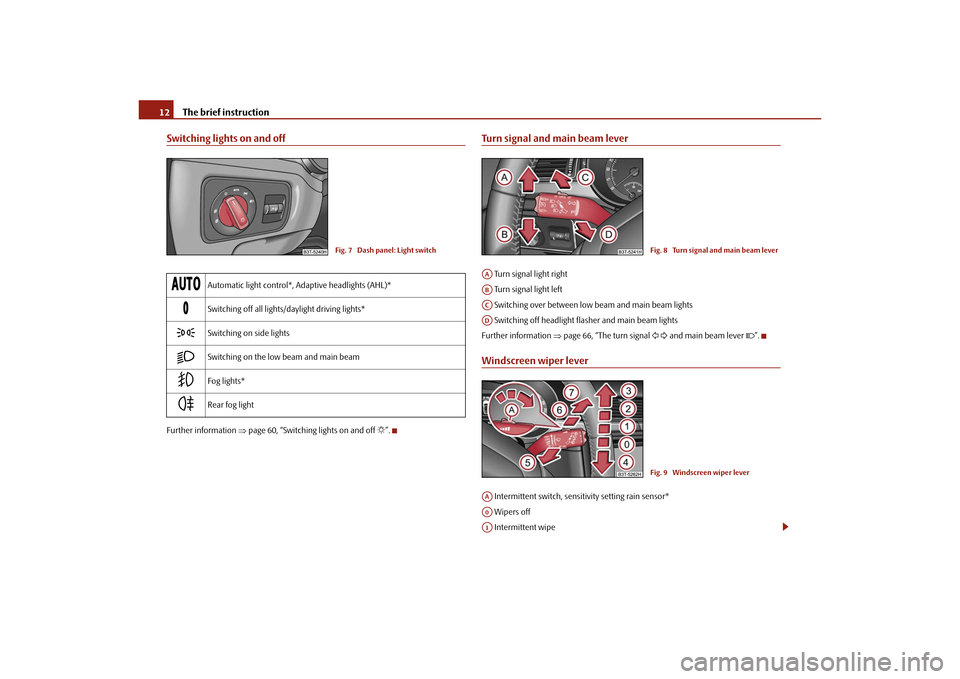
Switching lights on and offFurther information page 60, “Switching lights on and off ”.
Turn signal and main beam lever Turn signal light right
Turn signal light left
Switching over between low beam and main beam lights
Switching off headlight fl asher and main beam lights
Further information page 66, “The turn signal and main beam lever ”.Windscreen wiper lever Intermittent switch, sensitivity setting rain sensor*
Wipers off
Intermittent wipe
Automatic light control*, Adaptive headlights (AHL)*
Switching off all lights/daylight driving lights*
Switching on side lights
Switching on the low beam and main beam
Fog lights*
Rear fog light
Fig. 7 Dash panel: Light switch
Fig. 8 Turn signal and main beam lever
AAABACAD
Fig. 9 Windscreen wiper lever
AAA0A1
s3fg.2.book Page 12 Friday, April 30, 2010 12:17 PM
Page 29 of 287

Instruments and warning lights
28
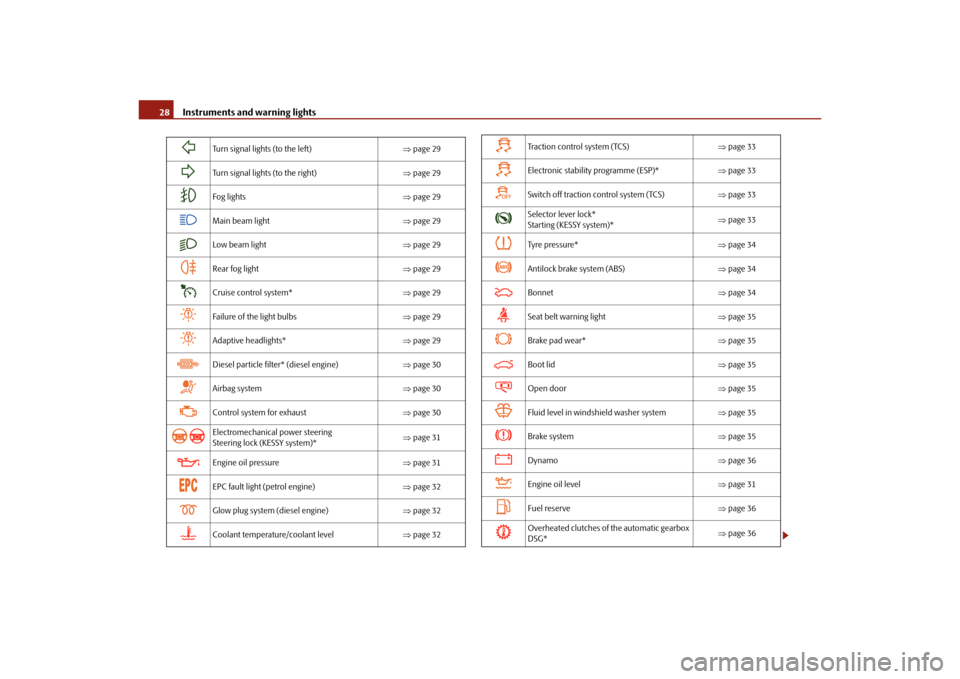
Turn signal lights (to the left) page 29
Turn signal lights (to the right) page 29
Fog lights page 29
Main beam light page 29
Low beam light page 29
Rear fog light page 29
Cruise control system* page 29
Failure of the light bulbs page 29
Adaptive headlights* page 29
Diesel particle filter* (diesel engine) page 30
Airbag system page 30
Control system for exhaust page 30
Electromechanical power steering
Steering lock (KESSY system)*
page 31
Engine oil pressure page 31
EPC fault light (petrol engine) page 32
Glow plug system (diesel engine) page 32
Coolant temperature/coolant level page 32
Tra c t i o n c o n t r o l s y s t e m ( TC S ) page 33
Electronic stability programme (ESP)* page 33
Switch off traction control system (TCS) page 33
Selector lever lock*
Starting (KESSY system)*
page 33
Tyre pressure* page 34
Antilock brake system (ABS) page 34
Bonnet page 34
Seat belt warning light page 35
Brake pad wear* page 35
Boot lid page 35
Open door page 35
Fluid level in windshield washer system page 35
Brake system page 35
Dynamo page 36
Engine oil level page 31
Fuel reserve page 36
Overheated clutches of the automatic gearbox
DSG*
page 36
s3fg.2.book Page 28 Friday, April 30, 2010 12:17 PM
Page 30 of 287

Instruments and warning lights29
Using the system
Safety
Driving Tips
General Maintenance
Breakdown assistance
Technical Data
WARNING
If you do not pay attention to the warning lights coming on and the corre-
sponding descriptions and warning notes, this may result in severe body inju-
ries or major vehicle damage.
The engine compartment of your car is a hazardous area. There is a risk of
injuries, scalding, accident s and fire when working in the engine compartment,
e.g. inspecting and replenishing oil and other fluids. It is also essential to
observe all warnings page 216, “Working in the engine compartment”.Note
The arrangement of the indicator lights depends on the model version. The
symbols shown in the following functional description are to be found as indicator
lights in the instrument cluster.
Operational faults are shown in the instrument cluster as red symbols (priority 1 -
danger) or yellow symbols (priority 2 - warning).
Turn signal system
Either the left
or right
indicator light flashes depending on the position of the turn
signal lever.
The indicator light flashes at twice its normal rate if a turn signal light fails.
Switching off the hazard warning light system is switched on will cause all of the turn
signal lights as well as both indicator lights to flash.
Further information about the turn signal system page 66.
Fog lights
The warning light
comes on when the fog lights are operating page 64.
Main beam
The indicator light
comes on when the main beam is selected or also when the
headlight flasher is operated. Further information about the main beam
page 66.
Low beam
The warning light
comes on when low beam is selected page 60.
Rear fog light
The warning light
comes on when the rear fog lights are operating page 65.
Cruise control system*
The warning light
lights up, when operating the speed regulating system.
Bulb failure
The warning light
comes on if a bulb is faulty:
up to 2 seconds after the ignition is switched on,
when switching on the defective light bulb.
The following text e.g will be displayed in the information display*: Check front right dipped beam!
The rear side lights and the licence plate lighting require several light bulbs. The indi-
cator light
only lights up if all light bulbs of the licence plate lighting or the parking
light (in one rear light unit) are defective. Check regularly the function of the light
bulbs.
Adaptive headlights*
If the warning light
flashes for 1 minute while driving or after switching on the igni-
tion and a warning signal sounds, a fault of the adaptive headlights is confirmed.
Further information page 63.
s3fg.2.book Page 29 Friday, April 30, 2010 12:17 PM
Page 62 of 287

Lights and Visibility61
Using the system
Safety
Driving Tips
General Maintenance
Breakdown assistance
Technical Data
Daylight driving lightsSwitching on daylight driving lights– Switch on the ignition without turning the light switch out of the position 0.Deactivating the function daylight driving lights– Pull the turn signal light lever towards the steering wheel up to 3 seconds after
switching on the ignition and at the same time, slide it to the bottom and hold it in
this position for at least 3 seconds.Activating the function daylight driving lights– Pull the turn signal light lever towards the steering wheel up to 3 seconds after
switching on the ignition and at the same time, slide it to the top and hold it in this
position for at least 3 seconds.
In some countries, the national legal provisions require that the rear parking lights
come on together with the bulbs for daylight driving lights when activating the function
daylight driving lights.
On vehicles which are fitted with bulbs for daylight driving lights in the fog lights, the
parking lights do not come on when activa ting the function daylight driving lights.
When the daylight driving lights are switched on, the lighting of the instrument cluster
is switched on as well.
On vehicles fitted with an information displa y*, you can also activate or deactivate in
the menu the function da ylight driving lights:
SETUP
Lights & Vision (Lights & Vision)
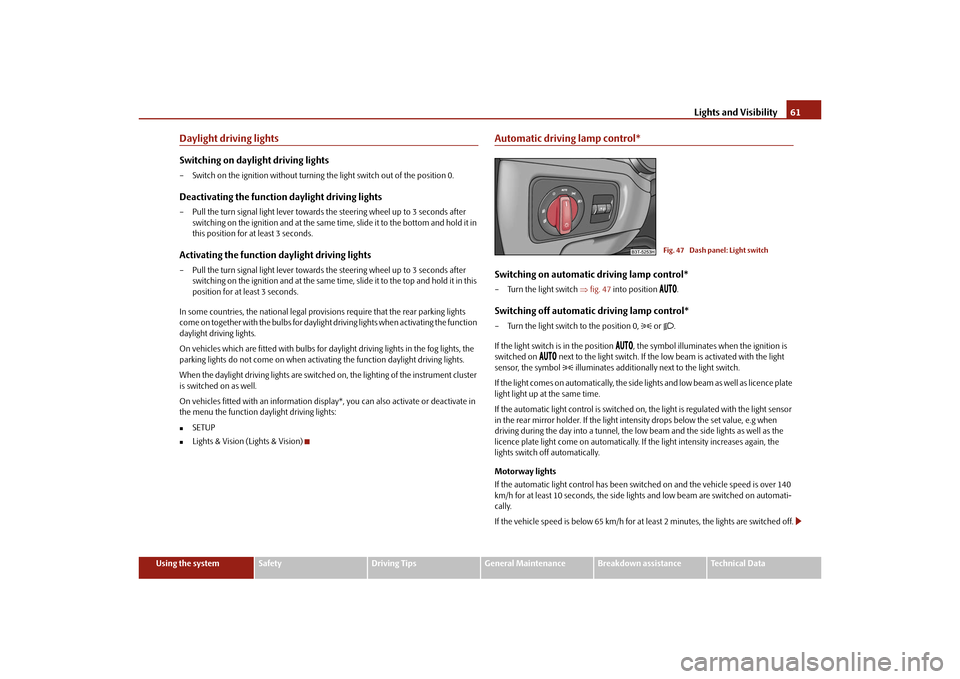
Automatic driving lamp control*Switching on automatic driving lamp control*– Turn the light switch fig. 47 into position
.
Switching off automatic driving lamp control*– Turn the light switch to the position 0,
or .
If the light switch is in the position
, the symbol illuminates when the ignition is
switched on
next to the light switch. If the low beam is activated with the light
sensor, the symbol illuminates additionally next to the light switch.
If the light comes on automatically, the side lights and low beam as well as licence plate
light light up at the same time.
If the automatic light control is switched on, the light is regulated with the light sensor
in the rear mirror holder. If the light intensity drops below the set value, e.g when
driving during the day into a tunnel, the low beam and the side lights as well as the
licence plate light come on automatically. If the light intensity increases again, the
lights switch off automatically.
Motorway lights
If the automatic light control has been swit ched on and the vehicle speed is over 140
km/h for at least 10 seconds, the side ligh ts and low beam are switched on automati-
cally.
If the vehicle speed is below 65 km/h for at least 2 minutes, the lights are switched off.
Fig. 47 Dash panel: Light switch
s3fg.2.book Page 61 Friday, April 30, 2010 12:17 PM
Page 65 of 287

Lights and Visibility
64
Mode motorway
In the mode “motorway” the dispersion of the co ne of light is so widespread, that it illu-
minates also the left (and right)
7) lane of the motorway, so that the driver can react in
time to an obstacle or any other danger. The mode is activated stepwise as of a speed
of 90 km/h. It gains its greatest effectiveness at speeds above 120 km/h.
Tourist light
This mode makes it possible to drive in countries with opposing traffic system, driving
on the left/right, without dazzling the oncoming vehicles. When the mode “tourist
light” is active, the above mentioned modes and the side to side swivel of the headlight
is deactivated.
The mode “tourist light” is activated / deac tivated via the information display* in the
menu:
SETUP
Tr a v e l m o d e
Off
On
Cornering lights
The cornering lights are used to illuminate the curves by means of the cone of light
swiveling together with the front headlight with Xenon lights*. This function is active
when the speed of the car increases to more than 10km/h.
The swiveling function of the headlights ca n be switched off / on via the menu point
Assistants in the main menu of the information display* page 23.WARNING
If the cornering ligh ts are defective, the headlights are automatically lowered to
the emergency position, whic h prevents a possible dazzling of oncoming traffic.
Thus the illuminated length of the road is shortened. Drive carefully and have
the car inspected immediatel y by a specialist garage.
Note
The AHL system* complements the functions of the fog lights with the function
“CORNER” page 64 and the function of the dy namic headlamp beam adjustment*.
The System AHL* is solely delivered with Bi-Xenon gas discharge bulbs for low
beam and main beam lights.
Fog lights
Switching on the fog lights– First of all turn the light switch into position
or fig. 48 .
– Pull the light switch into position .
The warning light
lights up in the instrument cluste r when the fog lights are switched
on page 27.
Fog lights with turning light “CORNER”* function
The fog lights with the function “CORNER” are designed for a better illu-
mination of the surrounding area near the vehicle when corning,
parking etc.The fog lights with the function “CORNER” ar e adjusted according to the steering angle
or after switching on the turn signal light
8) in the following circumstances:
the vehicle is stationary and the engine is running or it moves with a speed of
maximum 40 km/h,
7)It is valid for vehicles which are designed for driving on the left.
Fig. 48 Dash panel: Light switch
A1
s3fg.2.book Page 64 Friday, April 30, 2010 12:17 PM
Page 66 of 287

Lights and Visibility65
Using the system
Safety
Driving Tips
General Maintenance
Breakdown assistance
Technical Data
the daylight driving lights are not switched on,
the low beam is switched on or th e light switch is in the position
and the
intensity of the ambient light causes the low beam to be switched on,
the fog lights are not switched on,
no reverse gear is engaged.Note
If you engage the reverse gear during the active function “CORNER”, both fog lights
illuminate.Rear fog light
Switching on the rear fog light– First of all turn the light switch into position
or page 64, fig. 48 .
– Pull the switch into position .
The warning light
lights up in the instrument cluster when the rear fog light is
switched on page 27.
Only the rear fog light of the trailer lights up automatically when you are towing a trailer
using a factory-fitted towing device from Škoda original accessories which is
fitted with the rear fog light.
The rear fog light is located in the rear light array on the driver's side.
Caution
The rear fog light should only be switched on if visibility is particularly poor (conform
with any varying legal provisions) to avoi d dazzling vehicles behind your vehicle.
Instrument lighting
You can adjust the brightness of the instrument lighting.Instrument lighting– Switch on the light.
– Turn the control dial fig. 49 to the desired intensity of the instrument lighting.
For the information display* page 23 the intensity of the lighting is automatically
set. It is only possible to adjust the instrume nt lighting with the control dial if the light
intensity drops below the set value of the light sensor.Headlamp range adjustment*
Once the low beam is switched on you can then adapt the range of the
headlights to the load of the vehicle.
8)If both switch on versions are conflicting, for ex ample if the steering wheel is turned to the left
and the right turn signal light is switched on, the turn signal light has the higher priority.
A2
Fig. 49 Dash panel: Instrument lightingFig. 50 Dash panel: Lights and Visibility
s3fg.2.book Page 65 Friday, April 30, 2010 12:17 PM
Page 252 of 287

Fuses and light bulbs251
Using the system
Safety
Driving Tips
General Maintenance
Breakdown assistance
Technical Data
Electrically adjustable seats are protected by
automatic circuit breakers, which
switch on again automatically after a few seconds after the overload has been
eliminated.
BulbsChanging bulbsThe relevant lamp must always be switch ed off before a light bulb is replaced.
Defect light bulbs should only be replaced with light bulbs of the same type. The desig-
nation is located on the ligh t socket or the glass bulb.
Changing certain bulbs is not something whic h you can do yourself, but requires to be
done by a specialist. Other parts of the vehicle must be removed in order to change the
light bulbs. This applies, in particular, to bulbs which can only be reached from the
engine compartment.
We therefore recommend that you have an y bulbs changed by an authorised Škoda
Service Partner or, in exceptional cases, by calling on other professional assistance.
Please note that the engine compartment is a hazardous area page 216, “Working
in the engine compartment”.
We recommend that you always have a small box of replacement bulbs in your vehicle.
You can purchase replacement bulbs from th e range of the Škoda original accessories 18). A stowage place for the bulbs is located in the box in the spare wheel.
Fitted with a xenon headlight
Change of bulbs on vehicles with Xenon lights (low beam lights, parking lights and
main beam lights) should be undertaken by a specialist garage.
Bulb - Overview43
Control unit for trailer detection
15
44
Control unit for trailer detection
20
45
Control unit for trailer detection
15
46
Heatable washing nozzles, switch for seat heating
5
47
Not assigned
48
Not assigned
49
Not assigned
No.
Power consumer
Amperes
18)The small box with replacement bulbs is part of
the basic equipping of the vehicle in some coun-
tries.Front headlight
Halogen headlight
Xenon headlight
Low beam light
H7
D1S
Main beam light
H3
D1S, H3
Parking lights
W5W
Turn signals
PY 24W
Fog lights
H8
Rear light unit
Bulb
Reversing light
W16W
Turn signals
PY21W
Light bulb for the brake lights and tail
lights
W16W
Parking lights
W5W
Fog lights
P21W SLL
Others
Bulb
Licence plate light
C5W
front interior lighting
W5W
3. Brake light
LED
Rear interior lighting
W5W
s3fg.2.book Page 251 Friday, April 30, 2010 12:17 PM
Page 254 of 287

Fuses and light bulbs253
Using the system
Safety
Driving Tips
General Maintenance
Breakdown assistance
Technical Data
– Remove the socket
page 252, fig. 211.
– Take the faulty bulb out of the fixture and insert a new one.
Removing the light bulb for the main beam light– Switch the ignition and all lights off.
– Open the bonnet.
– Remove the protective cap page 252, fig. 210 .
– Press the sprung wire clamps page 252, fig. 211 together and hang them to
the side.
– Remove the socket page 252, fig. 211.
– Take the faulty bulb out of the fixture and insert a new one.
Installation takes place in the reverse order.
Note
We recommend that you have the headlight setting checked by a Skoda Service
Partner after replacing the light bulb.Low beam light– Switch the ignition and all lights off.
– Open the bonnet.
– Remove the protective cap page 252, fig. 210 . – Turn the connector with the light bulb up
to the stop towards the left and remove
fig. 212 .
– Replace the lamp, insert the connector with the new lamp and turn to the right up to the stop.
– Insert the protective cap.
Note
We recommend that you have the headli ght setting checked by a Skoda Service
Partner after replacing the light bulb.Fog lightsFig. 213 Front bumper: Cover / fog lights with daylight driving lightsReplacing bulbs– Switch the ignition and all lights off.
– Grasp the cover at the points marked with the arrows fig. 213 - left and take it
out.
– Guide your hand into the opening, in which the cover was located, and press the
spring bolt fig. 213 .
– Take out the fog light.
– Turn the socket or with the bulb to the left up to the stop and take it out.
– Replace the lamp, insert the connector with the new lamp and turn to the right up to the stop.
AA
AAAB
AC
Fig. 212 Removing the light bulb for the
low beam light
AB
AC
AA
AB
s3fg.2.book Page 253 Friday, April 30, 2010 12:17 PM