2010 SKODA OCTAVIA TOUR child lock
[x] Cancel search: child lockPage 55 of 199
Seats and Stowage
54
Middle rear head restraint*In certain countries national legal provisions also require the equipment of the rear
seat with fixing eyes for child seat using the “Top Tether” system page 109. For vehi-
cles, which are equipped with such fixing eyes, a deviating sequence for removing the
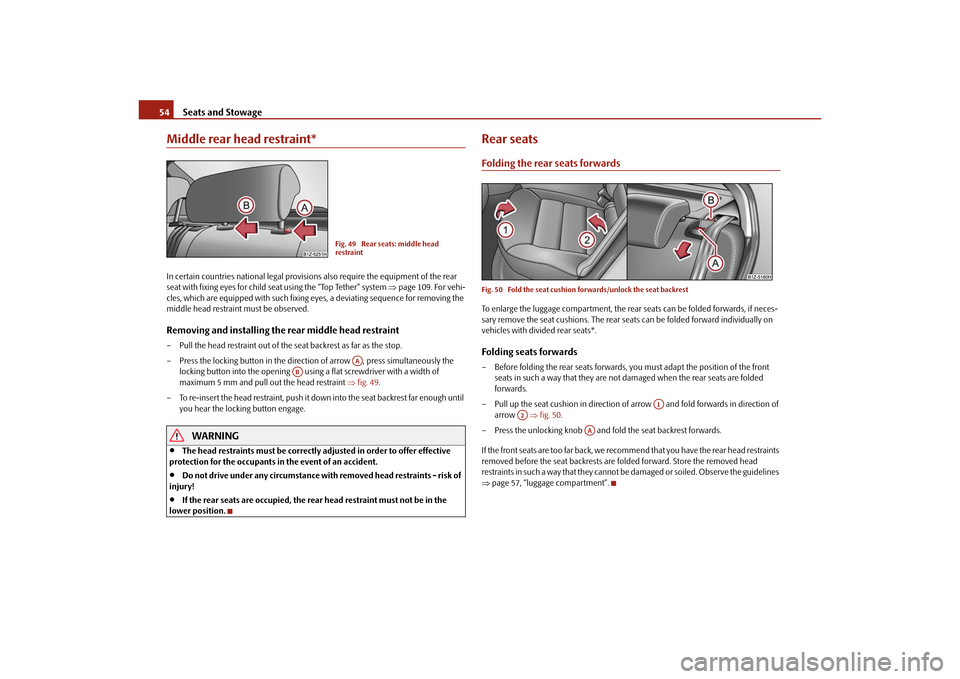
middle head restraint must be observed.Removing and installing the rear middle head restraint– Pull the head restraint out of the seat backrest as far as the stop.
– Press the locking button in the direct ion of arrow , press simultaneously the
locking button into the opening using a flat screwdriver with a width of
maximum 5 mm and pull out the head restraint fig. 49 .
– To re-insert the head restraint, push it down into the seat backrest far enough until you hear the locking button engage.
WARNING
The head restraints must be correctly adjusted in order to offer effective
protection for the occupants in the event of an accident.
Do not drive under any circumstance with removed head restraints - risk of
injury!
If the rear seats are occupied, the rear head restraint must not be in the
lower position.
Rear seatsFolding the rear seats forwardsFig. 50 Fold the seat cushion forwards/unlock the seat backrestTo enlarge the luggage compartment, the rear seats can be folded forwards, if neces-
sary remove the seat cushions. The rear se ats can be folded forward individually on
vehicles with divided rear seats*.Folding seats forwards– Before folding the rear seats forwards, you must adapt the position of the front seats in such a way that they are not damaged when the rear seats are folded
forwards.
– Pull up the seat cushion in direction of arrow and fold forwards in direction of arrow fig. 50 .
– Press the unlocking knob and fold the seat backrest forwards.
If the front seats are too far back, we recomme nd that you have the rear head restraints
removed before the seat backrests are folded forward. Store the removed head
restraints in such a way that they cannot be damaged or soiled. Observe the guidelines
page 57, “luggage compartment”.
Fig. 49 Rear seats: middle head
restraint
AA
AB
A1
A2
AA
s2bs.2.book Page 54 Monday, September 27, 2010 9:53 AM
Page 79 of 199

Starting-off and Driving
78
You should not switch on any major elec trical components during the heating
period. Otherwise the ve hicle battery will be drained unnecessarily.
- start engine
Applies to all models:
Position
To lock the steering , with the ignition key withdrawn, turn the steering wheel until the
steering locking pin is heard to engage. You should always lock the steering as a general
rule if you leave your vehicle. This acts as a deterrent against possible theft of your
vehicle .
Position
Move the steering wheel back and forward a little if the ignition key cannot, or cannot
easily be turned into this position, in order to release the steering lock.
Position
The engine is started in this position. At the same time any switched on low beam or
main beam or other electrical components with major electrical consumers are briefly
switched off. The ignition key moves back into position after being released.
The ignition key must be turned back into position each time before starting the
engine again. The starter repeat lock in th e ignition lock prevents the starter being
engaged when the engine is r unning and thus getting damaged.
WARNING
When driving, the ignition key must always be in the position (ignition
switched on) without the engine running. This position is indicated by the
warning lights coming on. If this is not the case, it could result in unexpected
locking of the steering wh eel - risk of accident!
Do not withdraw the ignition key from the lock until the vehicle has come to
a stop. The steering lock can engage immediately - risk of accident!
Always withdraw the ignition key if you are going to leave the vehicle, even
for a short time. This is particularly important if children are left in the vehicle.
Children might otherwise st art the engine or switch on electrical equipment
(e.g. power windows) - risk of accident or injury!
Starting the engineGeneral
You can only start the engine only using an original ignition key.
Place the gearshift lever into neutral and put on the handbrake firmly before
starting the engine.
Before starting, it is necessary to depres s the clutch pedal and to keep it pressed
down until the engine starts. If you try and start the engine without pressing the clutch
pedal, the engine will not start. A message in the information display of the instrument
cluster will also appear indicate th e need to press the clutch pedal.
Let go of the ignition key as soon as the engine starts otherwise you may damage
the starter.
The engine running noises may louder at first be louder for a short time after starting
the cold engine until oil pressure can be built up in the hydraulic valve clearance
compensation. This is quite normal and is not an operating problem.
If the engine does not start ...
You can use the battery of anothe r vehicle as a jump-start aid page 165.
It is only possible to tow-start vehicles fi tted with a manual gearbox. The tow-starting
distance must not be more than 50 metres. Observe the following
guidelines page 167, “Tow-starting and towing vehicle”.
WARNING
Never run the engine in non ventilated or enclosed areas. The exhaust gases
of the engine contain besides the odou rless and colourless carbon monoxide a
poisonous gas - hazard! Carbon mono xide can cause unconsciousness and
death.
Never leave your vehicle unattended with the engine running.Caution
The starter may only be operated (ignitio n key position ), if the engine is not
running. If the starter is imme diately operated after switchin g off the engine, the starter
or the engine can be damaged.
A3
A1A2A3
A2
A1
A2
A3
s2bs.2.book Page 78 Monday, September 27, 2010 9:53 AM
Page 88 of 199

Passive Safety87
Using the system
Safety
Driving Tips
General Maintenance
Breakdown assistance
Technical Data
correctly fastened in order to provide an optimal protection for you and your
occupants.
The driver must maintain a distance of
at least 25 cm to the steering wheel
page 86, fig. 89 - left. Not maintaining this minimum distance will mean that
the airbag system will not be able to properly protect you - hazard!
When driving, hold the st eering wheel with both hands firmly on the outer
edge in the 9 o'clock and 3 o'clock po sition. Never hold the steering wheel
firmly in the 12 o'clock position or in another way (e.g. in the middle of the
steering wheel or at the inner steering wheel edge). In such cases, injuries to the
arms, the hands and the head can occur when the driver airbag is deployed.
The seat backrests must not be angled too far back when driving otherwise
this will affect proper operation of the se at belts and of the airbag system - risk
of injury!
Ensure that there are no objects in the footwell as any objects may get
behind the pedals during a driving or braking manoeuvre. You would then no
longer be able to operate the clutch, to brake or accelerate.
Correct seated position for the front passenger
The fro n t p assen ger must mai n tai n a d i stan ce of a t l ea st 25 c m from th e
dash panel so that the airbag offers him the greatest possible safety it is
deployed.For the safety of the front passenger and to reduce the risk of injury in the event of an
accident, we recommend the following setting:
Adjust the front passenger seat as far as possible to the rear.
Adjust the head restraint so that the top edge of the head restraint is at the same
level as the upper part of your head page 86, fig. 89 - right.
Fasten the seat belt correctly page 91, “How are seat belts correctly fastened?”.
In exceptional cases the front pass enger airbag can be deactivated page 101,
“Deactivating an airbag”.
Manual front passenger adjustment page 11, “Adjusting the front seats”.
WARNING
The front seats and the head restraints must always be adjusted to match
the body size of the seat occupant as well as the seat belts must always be
correctly fastened in order to provide an optimal protection for you and your
occupants.
The front passenger must maintain a distance of at least 25 cm to the dash
panel. Not maintaining this minimum distance will mean that the airbag
system will not be able to properly protect you - hazard!
Keep your feet in the footwell at all times while driving. Never place your
feet on the dash panel, out of the window or on the seats. You will be exposed
to increased risk of injury if it becomes necessary to apply the brake or in the
event of an accident. If an airbag is de ployed, you may suffer fatal injuries when
adopting an incorrect seated position!
The seat backrests must not be angled too far back when driving otherwise
this will affect proper operation of the se at belts and of the airbag system - risk
of injury!
Correct seated position for the occupants on the rear seats
Occupants on the rear seats must sit upright, keep the feet in the foot-
well and must have their se at belts correctly fastened.To reduce the risk of injury in the event of a sudden braking manoeuvre or an accident,
the occupants on the rear seats must observe the following:
Adjust the head restraints so that the top edge of the head restraints is at the same
level as the upper part of your head page 86, fig. 89 - on the right.
Fasten the seat belt correctly page 91, “How are seat belts correctly fastened?”.
If you are transporting page 103, “Transporting children safely” children in the
vehicle, please use a suitable child restraint system.
WARNING
The head restraints must always be adjusted to match the body size, in order
to offer an optimal protection for you and your occupants.
WARNING (continued)
s2bs.2.book Page 87 Monday, September 27, 2010 9:53 AM
Page 91 of 199

Seat belts
90
The speed of the vehicle is, nevertheless, the most important factor. Doubling the
speed of the vehicle from 25 km/h up to 50 km/hour increases the kinetic energy four
times.
The common opinion that it is possible to su pport your body in a minor accident with
your hands, is incorrect. Even in a collision at only a low speed, the forces acting on the
body are such that it is no longer possible to support your body.
Even if you only drive at a speed within the range from 30 km/hour to 50 km/hour, the
forces which are produced on your body in the event of an accident can easily exceed
10.000 N (Newton). This equals a weight of one tonne (1 000 kg).
In the event of a frontal collision, occupants of the vehicle not wearing a seat belt, are
thrown forward and strike in an uncontrolled way parts of the interior of the vehicle,
such as steering wheel, dash panel, windscreen, page 89, fig. 91 - left. The occu-
pants of a vehicle who have not fastened their seat belts may even be thrown out of
the vehicle. This can result in fatal injuries.
It is also important that rear seat occupants fasten their seat belts as they will otherwise
be thrown through the vehicle in an uncontr olled manner in the event of an accident
A rear seat passenger who has not fastened the s eat bel t i s a dang er not o nl y to hims elf
but also for those seated at the front page 89, fig. 91 - right.Important safety information regarding the use of seat beltsThe correct use of the seat belts cons iderably reduces the risk of injury!
WARNING
The belt webbing must not be jammed in-between at any point or twisted,
or chafe against any sharp edges.
It is important that the belt webbing is properly routed if the seat belts are
to offer their maximum protection page 91.
No two persons (also not children) should ever use a single seat belt
together.
The maximum protection which seat belts can offer is only achieved if you
are correctly seated page 86, “Correct seated position”.
The belt webbing must not run across solid or fragile objects (e.g. specta-
cles, ball-point pens, keys etc.) as this may be a cause of injuries.
Bulky, loose clothing (e.g. a winter coat over a jacket) does not allow you to
be correctly seated and impairs proper operation of the seat belts.
It is prohibited to use clamps or other objects to adjust seat belts (e.g. for
shortening the belts for smaller persons).
The lock tongue should only be inserted into the lock which is the correct
one for your seat. Wrong use of the safety belt will reduce its capacity to protect
and the risk of injury increases.
The seat backrests of the front seats must not be tilted too far to the rear
otherwise the seatbelts can lose their effectiveness.
The belt webbing must always be kept clean. A soiled belt webbing may
impair proper operation of the inertia reel page 135, “Seat belts”.
The slot of the belt tongue must not be blocked by paper or similar objects
otherwise the belt tongue will not lock in place properly.
Inspect the seat belts regula rly to ensure they are in good condition. If you
find seat belts which have damage to the seat belt webbing, seat belt connec-
tions, to the inertia reels or to the lock, the relevant safety belt must be replaced
by a specialist garage.
The seat belts must not be removed or changed in any way. Do not make an
attempt to repair the seat belts yourself.
Damaged seat belts which have been subjected to stress in an accident and
were therefore stretched, must be replaced - this is best done by a specialist
garage. The anchorage points of the belts must also be inspected. The
anchorage points for the belts should also be checked.
In certain countries it is possible to use seat belts which differ in terms of
their operation from the seat belts which are described on the pages which
follow.WARNING (continued)
s2bs.2.book Page 90 Monday, September 27, 2010 9:53 AM
Page 109 of 199
Transporting children safely
108
The shoulder part of the seat belt mu st run approximately across the middle
of the shoulder and fit snugly against the chest. It must on no account run
across the neck. The lap part of the seat belt must run across the pelvis and fits
snugly; it must not run over the belly. Tighten the belt webbing over your hip if
necessary.
Please comply with any differing nati onal legal regulations regarding the
use of child safety seats.
Child safety seats in Group 3For children of about 7 years of age weighing between 22 and 36 kg and of a height of
less than 150 cm, the optimal solution is a ch ild safety seat (seat bolster) in combina-
tion with the three-point seat belt fig. 108 .
Children of more than 150 cm in height may use the seat belts fitted to the vehicle
without a seat bolster.
WARNING
When transporting a child on the front passenger seat, please comply with
the appropriate national regu lations regarding the use of child safety seats. If
required, the front passenger ai rbag has to be deactivated,
in a specialist garage
or by using the key-operated swit ch for the front passenger airbag*
page 101, “Switch for switching off the front passenger airbag*”.
The shoulder part of the seat belt mu st run approximately across the middle
of the shoulder and fit snugly against the chest. It must on no account run
across the neck. The lap part of the seat belt must run across the pelvis and fits
snugly; it must not run over the belly. Tighten the belt webbing over your hip if
necessary.
Please comply with any differing nati onal legal regulations regarding the
use of child safety seats.
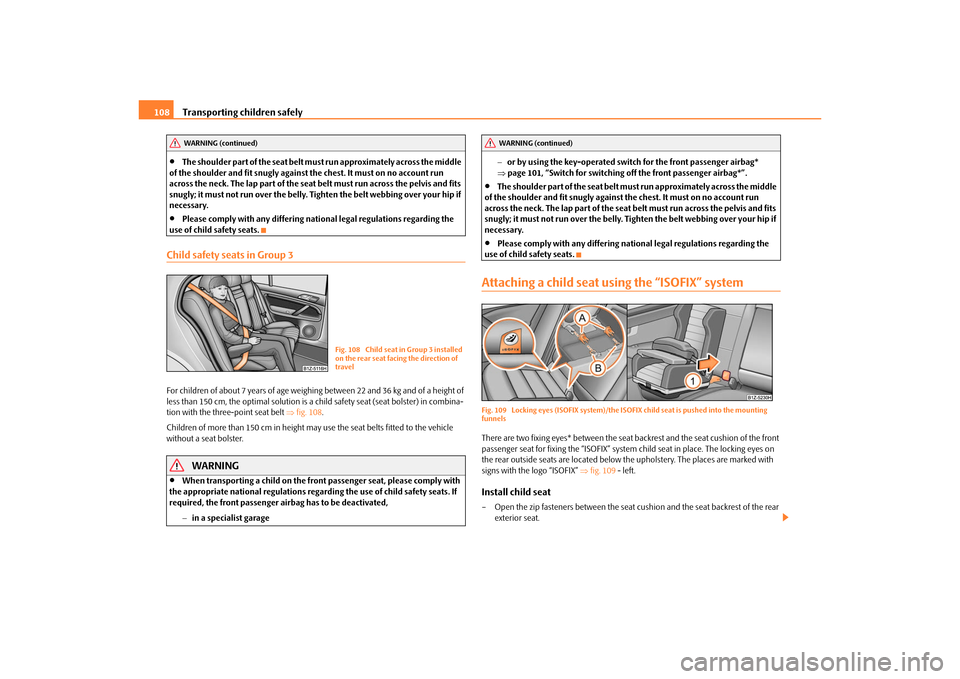
Attaching a child seat using the “ISOFIX” systemFig. 109 Locking eyes (ISOFIX system)/the ISOF IX child seat is pushed into the mounting
funnelsThere are two fixing eyes* between the seat backrest and the seat cushion of the front
passenger seat for fixing the “ISOFIX” system child seat in place. The locking eyes on
the rear outside seats are located below th e upholstery. The places are marked with
signs with the logo “ISOFIX” fig. 109 - left.Install child seat– Open the zip fasteners between the seat cushion and the seat backrest of the rear
exterior seat.
WARNING (continued)
Fig. 108 Child seat in Group 3 installed
on the rear seat facing the direction of
travel
WARNING (continued)
s2bs.2.book Page 108 Monday, September 27, 2010 9:53 AM
Page 110 of 199
Transporting children safely109
Using the system
Safety
Driving Tips
General Maintenance
Breakdown assistance
Technical Data
– Insert the mounting funnels onto the
locking eyes between the seat back-
rest and the seat cushion fig. 109 .
– Push the notched arms of the child seat in to the locking eyes in direction of arrow
, until they are heard to lock in place fig. 109 .
– Pull on both sides of the child seat!
One can mount a child safety seat using the “I SOFIX” system quickly, easily and reliably.
Please pay close attention to instructions from the manufacturer of the child safety
seat when installing and removing the seat.
Child seats fitted with the “ISOFIX” system can only be mounted and fixed in a vehicle
fitted with an “ISOFIX” system when these child seats have been released for this type
of vehicle according to the ECE-R 44 standard.
You can obtain child seats with the “ISOFIX” attachment system from specialist garages
who will also installed it as well.
Complete installation instructions are enclosed with the child safety seat.
WARNING
The locking eyes have just been deve loped for child safety seats which use
the “ISOFIX” system. You should therefore never attach other child safety seats,
seat belts or objects to the locking eyes - hazard!
Ask an authorised Škoda Service Part ner whether a child seat which you
bought for another vehicle is recommended for use in a Škoda before using an
“ISOFIX” system.
Certain child seats which use the “ISO FIX” system can be attached with
standard three-point seat belts. Please pay close attention to instructions from
the manufacturer of the child safety seat when installing and removing the seat.Note
Child seats which use the “ISOFIX” system are currently available for children
weighing from 9 up to 18 kg. This correspond s to an age range of from 9 months to 4
years.
The child seats can also be fitted with the “Top Tether” system page 109.
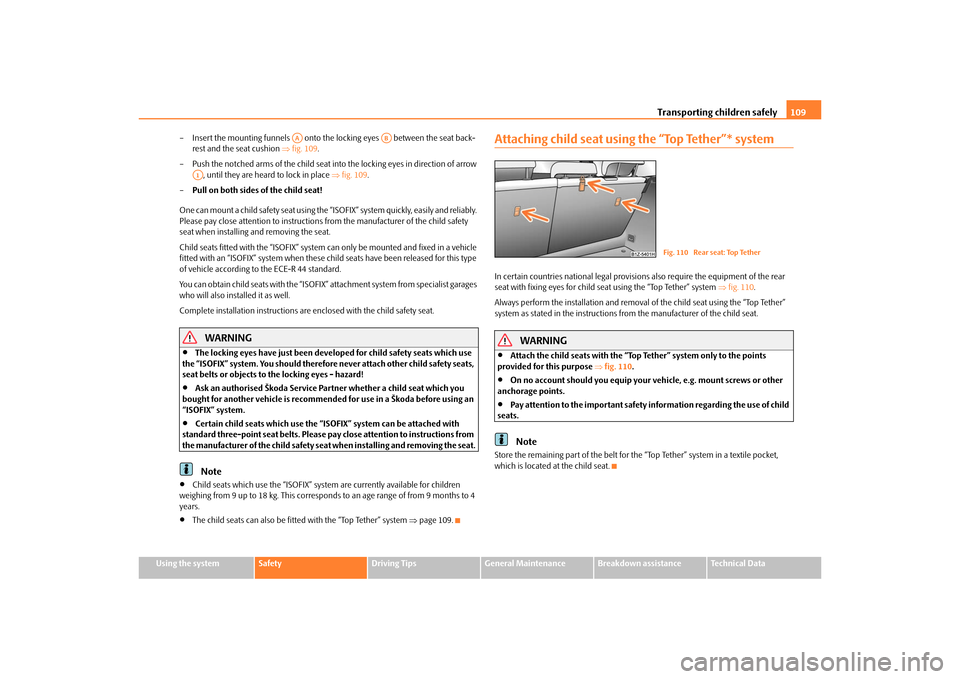
Attaching child seat using the “Top Tether”* systemIn certain countries national legal provisions also require the equipment of the rear
seat with fixing eyes for child seat using the “Top Tether” system fig. 110 .
Always perform the installation and removal of the child seat using the “Top Tether”
system as stated in the instructions from the manufacturer of the child seat.
WARNING
Attach the child seats with the “Top Tether” system only to the points
provided for this purpose fig. 110 .
On no account should you equip your vehicle, e.g. mount screws or other
anchorage points.
Pay attention to the important safety information regarding the use of child
seats.Note
Store the remaining part of the belt for the “Top Tether” system in a textile pocket,
which is located at the child seat.
AA
AB
A1
Fig. 110 Rear seat: Top Tether
s2bs.2.book Page 109 Monday, September 27, 2010 9:53 AM
Page 141 of 199

Inspecting and replenishing
140
Working in the engine compartment
Particular care is required when carrying out any work in the engine
compartment!There is a risk of injuries, scalding, acci dents and fire when working in the engine
compartment, e.g. inspecting and replenishing oil and other fluids. For this
reason, it is essential to comply with the warning instructions stated below and
with the general applicable rules of safe ty. The engine compartment of your car
is a hazardous area .
WARNING
Never open the bonnet if you see that steam or coolant is flowing out of the
engine compartment - risk of scalding! Wait long enough until the steam or
coolant has stopped escaping.
Switch off the engine and pull out the ignition key.
Apply the handbrake firmly.
Move the gear lever into the Neutral position.
Allow the engine to cool down.
Keep children clear of the engine compartment.
Never spill oil and other fluids over the hot engine. Such fluids (e.g. the anti-
freeze contained in the coolant) may ignite!
Avoid short circuits in the electrical system - particularly on the battery.
Never place your hand into the radiator fan as long as the engine is still
warm. The fan might suddenly start running!
Never open the cap of the coolant expans ion bottle as long as the engine is
still warm. The cooling system is pressurized!
Cover over the cap of the coolant expansion reservoir with a large cloth
when opening it as protection for your face, hands and arms from hot steam or
hot coolant.
Do not let objects, such as e.g. cleaning cloth or tools lie in the engine
compartment.
If you wish to work under the vehicl e, you must secure the vehicle from
rolling away and support it with suitable supporting blocks; the lifting jack* is
not sufficient for this - risk of injury!
In cases where it be necessary to carry out inspection work when the engine
is running there is an additional risk fr om rotating parts (e.g. the V-ribbed belt,
alternator, radiator fan) and from the high-voltage ignition system. Please
observe in addition the following:
Never touch the electrical cabl es of the ignition system.
Absolutely avoid any jewellery, loose it ems of clothing or long hair from
getting into the rotating parts of the engine - Hazard! Therefore remove any
jewellery beforehand, tie up your hair and wear tight fitting clothing.
Please also comply with the warnin g instructions stated below when
carrying out any essential work on the fu el system or on the electrical system:
Always separate the car battery from the electrical system.
Do not smoke.
Never carry out any work close to naked flames.
Always keep a working fire extinguisher at hand.Caution
When replenishing fluids in the engine, always ensure that the fluids are on no account
mixed up. This may result in major oper ating problems and also vehicle damage!
WARNING (continued)
s2bs.2.book Page 140 Monday, September 27, 2010 9:53 AM
Page 145 of 199

Inspecting and replenishing
144
– Open the bonnet page 139.
– Check the level of coolant in the coolant expansion bottle page 143, fig. 124 .
The coolant level when the engine is cold must lie between the (MIN) and
(MAX) markings. The level may also rise slightly above the (MAX) marking when
the engine is warm.
If the coolant level in the reservoir is too lo w, this is indicated by the warning light in
the instrument cluster page 25, “Coolant temperature/coolant level ”. We never-
theless recommend inspecting the coolant leve l directly at the reservoir from time to
time.
Loss of coolant
A loss of coolant is first and foremost an indication of a leak in the system. You should
not merely top up the coolant in the reservoir. It is also important to have the cooling
system inspected without delay by a specialist garage.
Losses can only occur through the pressure relief in the cap of the coolant expansion
bottle which is completely free of leaks if the coolant boils as a result of overheating
and is forced out of the cooling system.
WARNING
Read and observe the warning notes page 140, “Working in the engine
compartment” before working in the engine compartment.
Caution
One should contact a specialist garage as soon as possible if the source of overheating
itself cannot be determined and removed, since there may be grave damage to the
engine.Replenishing the coolant– Switch the engine off.
– Allow the engine to cool down.
– Place a cloth over the cap of the coolant expansion reservoir page 143, fig. 124
and unscrew the cap carefully by turning it to the left . –Top up the coolant.
– Screw the cap tight until it is heard to lock.
The coolant which you use for replenishing the system, must comply with one specific
specification
page 143. Do not use an alternative additive if the coolant additive
G13 is not available in an emergency. Just to p up the system with water and as soon as
possible arrange adjustment to correct the mixing ratio of water and coolant additive
again by a specialist garage.
Only use fresh coolant for topping up the system.
Do not fill up over the “MAX” marking! Excess coolant which is heated up is forced out
of the cooling system through the pressure relief valve in the cap of the coolant
compensation bottle.
Wait until the engine has cooled down for a system which has suffered a major loss of
coolant before pouring in coolant. This is necessary to avoid engine damage.
WARNING
The cooling system is pressurized! Do not open the cap of the coolant
expansion bottle if the engine is still hot - risk of scalding!
The coolant additive and thus all of the coolant is harmful to your health.
Avoid contact with the coolant. Coolant vapours are also harmful to the health.
It is important, therefore, to always safely store any coolant additive in its orig-
inal container out of the reach of children - risk of poisoning!
If any splashes of coolant get into yo ur eyes, rinse out your eyes immedi-
ately with clear water and contact a doctor as soon as possible.
You should also consult a doctor without delay if you have inadvertently
swallowed coolant.Caution
Do not continue your journey if for some reason it is not possible under the
conditions prevailing to top up with coolant. Switch the engine off and obtain
professional assistance from a specialist garage, otherwise it could lead to severe
engine damage.
Ab
Aa
Aa
s2bs.2.book Page 144 Monday, September 27, 2010 9:53 AM