Page 86 of 325

Cockpit
84
Clearing the speed limit
– Drive the vehicle at a minimum of 5 km/h.
– Press the CHECK button for at least two seconds.The speed warning symbol
lights up briefly in the display when the button
is released to confirm that the selected speed has been stored. The speed
limit that has been selected remains st ored until another speed is selected
with a brief push of the button, or until the memory is cleared with a long
push of the button.
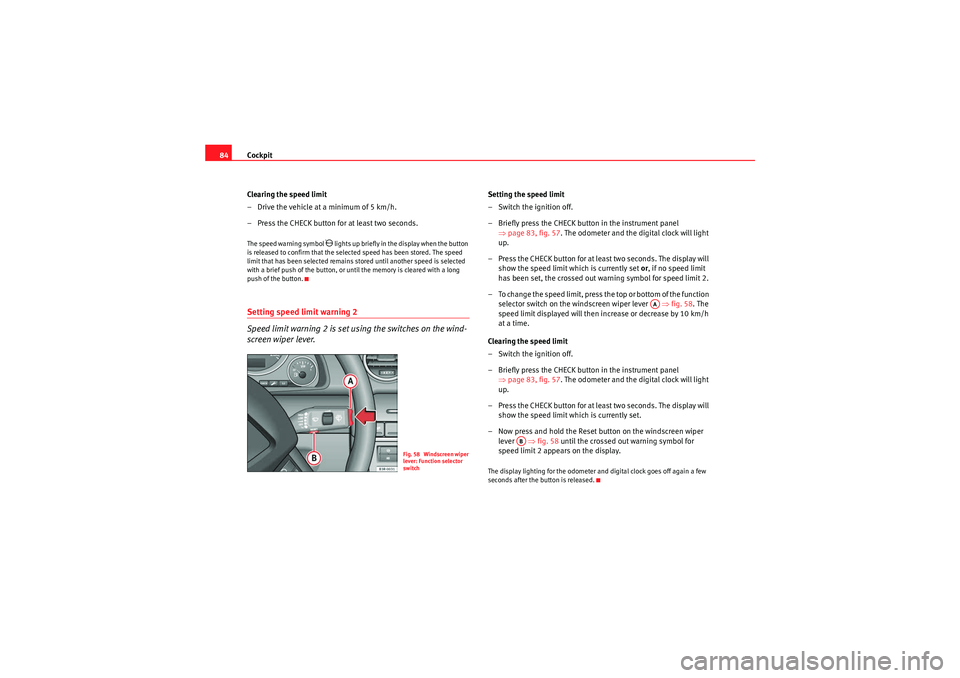
Setting speed limit warning 2
Speed limit warning 2 is set using the switches on the wind-
screen wiper lever.
Setting the speed limit
– Switch the ignition off.
– Briefly press the CHECK button in the instrument panel ⇒page 83, fig. 57 . The odometer and the digital clock will light
up.
– Press the CHECK button for at least two seconds. The display will show the speed limit which is currently set or, if no speed limit
has been set, the cr ossed out warning symbol for speed limit 2.
– To change the speed limit, press the top or bottom of the function selector switch on the windscreen wiper lever ⇒fig. 58 . The
speed limit displayed will then in crease or decrease by 10 km/h
at a time.
Clearing the speed limit
– Switch the ignition off.
– Briefly press the CHECK button in the instrument panel ⇒page 83, fig. 57 . The odometer and the digital clock will light
up.
– Press the CHECK button for at least two seconds. The display will show the speed limit which is currently set.
– Now press and hold the Reset button on the windscreen wiper lever ⇒fig. 58 until the crossed out warning symbol for
speed limit 2 appears on the display.The display lighting for the odometer and digital clock goes off again a few
seconds after the button is released.
Fig. 58 Windscreen wiper
lever: Function selector
switch
AA
AB
ExeoST_EN.book Seite 84 Freitag, 3. September 2010 11:41 11
Page 88 of 325

Cockpit
86Driving time warning
After 2 hours of continuous driving, the display automatically switches over
to the driving time display of 2:00 . At the same time the driving time display
starts flashing. This is to remind the driver to take a break.
The driving time warning can be switched off by briefly pressing the function
selector switch or the button ⇒fig. 60 .
If you continue driving or take a break for less than 10 minutes, the driving
time warning will switch on once again when the total driving time is 4:00
hours, 6:00 h o u r s , e t c . H o w e v e r, i f yo u ta ke a b r e a k f o r m o r e t ha n 1 0 m i n u te s ,
the driving time warning clock will be erased.
Distance covered
This display shows the distance you have covered since the memory was last
cancelled. The longest possible distance which can be recorded is
9999.9 km.
Note
•The displays for fuel consumption (average and instantaneous), distance
to empty and speed are shown in metric units.•The information in the memory is lost if the battery is disconnected.
Operation
The onboard computer is controlled by means of two switches
on the windscreen wiper lever.Activating the onboard computer
– Press the reset button repeatedly until the onboard computer (memory 1 or 2) ⇒ page 85, fig. 59 is displayed.
Selecting the function
– Press the top or bottom of the function selector switch ⇒fig. 60 . This displays the functions of the onboard computer in
sequence.
Resetting to zero
– Press and hold the Reset button for at least two seconds.The following values can be reset to zero using the Reset button:
Reset
Fig. 60 Windscreen wiper
lever: Onboard computer
controls
AB
AA
AB
ExeoST_EN.book Seite 86 Freitag, 3. September 2010 11:41 11
Page 90 of 325

Cockpit
88Some of your vehicle's functions can be adjusted, activated and controlled by
menus . With the aid of the menus you can then also select the information
you wish to see displayed on the DIS display. This is only possible when the
ignition is on. The menu is enabled using the button on the wind-
screen wiper lever ⇒ page 87, fig. 61.
The main menu lists the different display types (or basic commands):
Programming
Check
Menu off
Help
The main menu options have the following submenus:
Controlling the menu
The menu display is called up via the button and the
rocker switch on the windscreen wiper lever. Use these
controls to make checks and adjust the settings.Functions of the ⇒fig. 63 and the rocker switch :
Activating the menu
– Press the button until the menu display ⇒page 87,
fig. 62 appears.
Selecting and setting
– Press the rocker switch to select one of the menus. Press "up" or "down" on the switch to select the options accordingly.
Entering and confirming
–Press the button.
Programming
Clock
⇒ page 88
Computer
⇒page 88
Speed warning
⇒page 82
Radio info (on/off)Units (measuring distance,
fuel consumption, tempera-
ture)
⇒page 88
Language: you can select
one of 6 languages.
⇒page 88
Check
Service
⇒page 74
Menu off
When the menu is switched off, the display shows the
same information as in vehicles without the menu func-
tion.
Help
The help function may be used to understand the meaning
of symbols that can appear on different menus.
Reset
Reset
Fig. 63 Windscreen wiper
lever: Reset button and
rocker switch
Reset
AB
AA
ResetReset
ExeoST_EN.book Seite 88 Freitag, 3. September 2010 11:41 11