2010 Seat Exeo clock
[x] Cancel search: clockPage 222 of 319

Checking and refilling levels
220Checking and refilling levelsRefuellingThe tank flap is released manually. The tank holds approxi-
mately 70 litres.The flap that covers the tank cap is unlocked and locked automati-
cally by the central locking.
Unscrewing the tank cap
– Press the right side of the flap to open it.
– Unscrew the fuel tank cap anti-clockwise.
– Hook the cap onto the support fitted to the open tank flap
⇒fig. 163 . Closing the tank cap
– Screw the tank cap clockwise into the filler opening until it you
hear it click into position.
– Close the tank flap.
The tank flap is at the rear of the vehicle on the right.
If the automatic filler nozzle is operated correctly, it will switch itself off as
soon as the tank is “full”. Never attempt to fill beyond this point, as this will
fill the expansion chamber. Fuel may leak out if ambient conditions are warm.
T he co rr ec t fu el g rad e fo r you r v eh icle is giv en on a sti cker o n th e i nsid e of the
fuel tank flap. Here you will find further information on fuel.
WARNING
•Fuel is highly flammable and can cause serious burns and other inju-
ries.
−Never smoke or use an open flame when filling the fuel tank of the
vehicle, or a spare fuel canister, with fuel. This is an explosion hazard.
− Follow legal requirements for the use of spare fuel canisters.
− For safety reasons we do not recommend carrying a spare fuel
canister in the vehicle. The canister could be damaged in an accident
and leak.•If, in exceptional circumstances, you have to carry a spare fuel canister,
please observe the following points:
−Never fill the spare fuel canister inside the vehicle or on it. An elec-
trostatic charge could build up during filling, causing the fuel fumes to
ignite. This could cause an explosion. Always place the canister on the
ground to fill it.
Fig. 163 Fuel tank flap
with tank cap attached
exeo_EN.book Seite 220 Montag, 30. August 2010 4:45 16
Page 231 of 319

Checking and refilling levels229
Safety First
Operating Instructions
Practical Tips
Technical Specifications
tion. The damage caused by the use of these antifreezes may lead to a loss of
coolant fluid, causing serious damage to the engine.
•G12++ antifreeze can be mixed only with antifreeze additives G11, G12
and G12+.Checking the coolant level
The coolant level can be checked visually.– Switch the ignition off.
– Check the coolant level on coolant fluid expansion tank ⇒fig. 168 . When the engine is cold, it should be between the
“min” and “max” marks. When the engine is hot, it may be
slightly above the “max” mark.Its location is shown in the corresponding general overview of the engine
compartment. The coolant level should be checked with the engine switched off.
The coolant level is monitored by a warning lamp on the instrument panel
display
⇒page 78. However, we recommend that it should be checked occa-
sionally.
Coolant fluid loss
Any loss of coolant fluid normally indicates a leak in the cooling system. In
this case the cooling system should be inspected by a qualified workshop
without delay. It is not sufficient merely to top up the coolant fluid.
If there are no leaks in the system, a loss of coolant fluid can only occur if the
coolant boils and is forced out of the system as a result of overheating.
Caution
Radiator sealants must not be added to the coolant fluid. Such additives
could seriously impair the function of the cooling system.To p p i n g u p t h e c o o l a n t f l u i d
Be careful when topping up with coolant fluid.– Switch the engine off.
– Wait for the engine to cool down.
– Cover the cap on the expansion tank ⇒fig. 168 with a cloth, and
carefully unscrew the cap anti-clockwise ⇒.
– Add coolant fluid.
– Screw on the cap tightly.
Fig. 168 Engine compart-
ment: Coolant fluid
deposit
exeo_EN.book Seite 229 Montag, 30. August 2010 4:45 16
Page 250 of 319

If and when
248Tyre mobility system
The tyre mobility system is stor ed under the floor panel in the
luggage compartment.– Take hold of the handle and fold back the floor panel in the
luggage compartment.
– Take out the tyre mobility system.Your vehicle is equipped with a Tyre Mobility System in case of a puncture.
The tyre mobility system consists of a container with sealing compound and
a compressor to generate the required tyre pressure.
Instructions for using the sealant compound and the compressor are
included with the sealant can.
Spare steel rim wheel
The spare steel rim wheel is carried in the wheel well under
the floor panel in the luggage compartment. It is only
intended for temporary use over short distances.Taking out the spare wheel
–Turn the plastic knob ⇒fig. 178 anti-clockwise.
– Take out the spare wheel.
Securing the defective wheel in the spare wheel well
– Place wheel in spare wheel well in the luggage compartment.
– Secure the wheel by turning plastic knob clockwise.
– Replace the floor panel before closing the tailgate.
Fig. 177 Tyre Mobility
System under floor panel
in luggage compartment
Fig. 178 Spare steel rim
wheel
exeo_EN.book Seite 248 Montag, 30. August 2010 4:45 16
Page 253 of 319

If and when251
Safety First
Operating Instructions
Practical Tips
Technical Specifications
Loosening and tightening the wheel bolts
The wheel bolts must be loosened before raising the vehicle.Loosening
–Fit the box spanner as far as it will go over the wheel bolt
4).
– Grip the box spanner as close to the end as possible and turn the
wheel bolts about one turn anti-clockwise ⇒ fig. 179 -arrow- .
Tightening
– Fit the box spanner as far as it will go over the wheel bolt4).
– Grip the box spanner as close to the end as possible and tighten
the bolt firmly by turning clockwise.
WARNING
Loosen the wheel bolts only about one turn before raising the vehicle with
the jack. Failure to do so could result in an accident.
Note
•Do not use the hexagonal socket in the screwdriver handle to loosen or
tighten the wheel bolts.•If the wheel bolt does not come loose, it may be possible to release it by
pushing down the end of the spanner carefully with your foot. Hold on to the
vehicle for support and take care not to slip.
4)An adapter is required to unscrew or tighten the anti-theft wheel bolts* ⇒page 253.
Fig. 179 Changing the
wheel: Loosen the wheel
bolts
exeo_EN.book Seite 251 Montag, 30. August 2010 4:45 16
Page 265 of 319

If and when263
Safety First
Operating Instructions
Practical Tips
Technical Specifications
Changing the turn signal bulb
The procedure for changing the bulb is the same on both
sides.– Switch off the ignition and the lights.
– Raise the bonnet.
– Turn the bulb holder anti-clockwise, pulling it by the grip
⇒fig. 191 and removing the bulb holder and the bulb.
– Replace the blown bulb in the bulb holder (press and turn anti- clockwise to remove) with a new bulb (press and turn clockwise
to insert).
– Installation is done in the reverse order.
– Check whether the new bulb is working. Note
Although it is not necessary, previously remove the rigid cover
⇒page 265,
fig. 194 for easier turn signal bulb changes.
Fig. 191 Turn signal
exeo_EN.book Seite 263 Montag, 30. August 2010 4:45 16
Page 267 of 319

If and when265
Safety First
Operating Instructions
Practical Tips
Technical Specifications
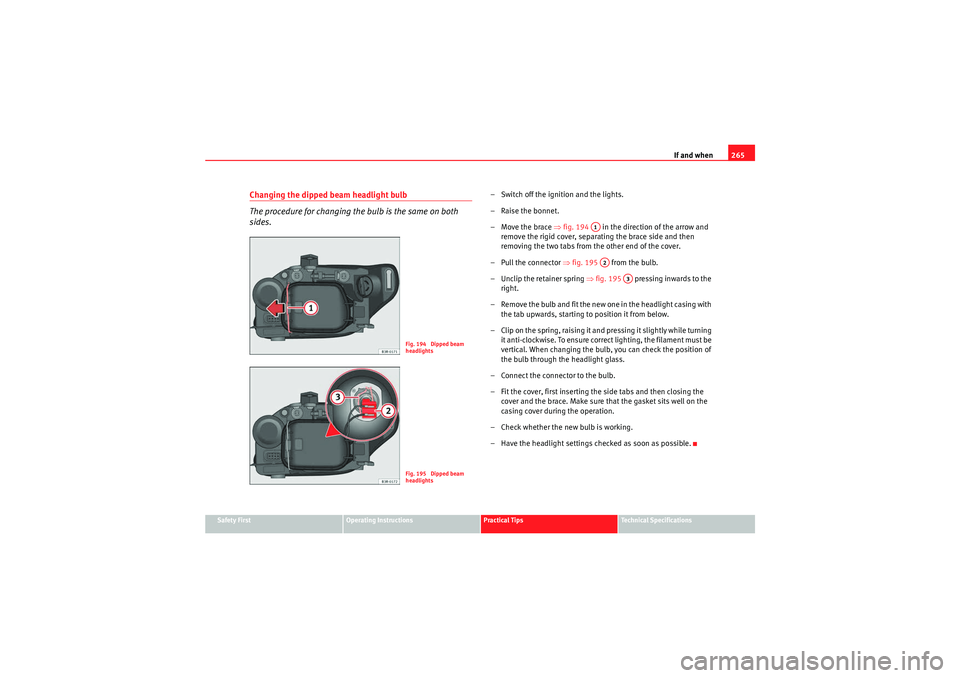
Changing the dipped beam headlight bulb
The procedure for changing the bulb is the same on both
sides.
– Switch off the ignition and the lights.
– Raise the bonnet.
– Move the brace ⇒fig. 194 in the direction of the arrow and
remove the rigid cover, separating the brace side and then
removing the two tabs from the other end of the cover.
– Pull the connector ⇒fig. 195 from the bulb.
– Unclip the retainer spring ⇒fig. 195 pressing inwards to the
right.
– Remove the bulb and fit the new one in the headlight casing with the tab upwards, starting to position it from below.
– Clip on the spring, raising it and pressing it slightly while turning
it anti-clockwise. To ensure correct lighting, the filament must be
vertical. When changing the bulb, you can check the position of
the bulb through the headlight glass.
– Connect the connector to the bulb.
– Fit the cover, first inserting the side tabs and then closing the cover and the brace. Make sure that the gasket sits well on the
casing cover during the operation.
– Check whether the new bulb is working.
– Have the headlight settings checked as soon as possible.
Fig. 194 Dipped beam
headlightsFig. 195 Dipped beam
headlights
A1A2
A3
exeo_EN.book Seite 265 Montag, 30. August 2010 4:45 16
Page 268 of 319

If and when
266Changing the side light bulb (outside of vehicle)
The procedure for changing the bulb is the same on both
sides.
– Switch off the ignition and the lights.
– Raise the bonnet.
– Move the brace ⇒ fig. 196 in the direction of the arrow and
remove the rigid cover, separating the brace side and then
removing the two tabs from the other end of the cover.
– Gently press on the bulb holder tabs ⇒fig. 197 and pull the
cover upwards (it can also be removed by pulling on the bulb
holder wires).
– Separate the bulb from the bulb holder by pulling both pieces anti-clockwise.
– Fit the new bulb by pressing on the bulb holder.
– Insert the bulb into the socket and press on the bulb holder. Fit the cover, first inserting the side tabs and then closing the cover
and the brace. Make sure that the gasket sits well on the casing
cover during the operation.
– Check whether the new bulb is working.
Fig. 196 Side light bulb
(outside of vehicle)Fig. 197 Side light bulb
(outside of vehicle)
A1
exeo_EN.book Seite 266 Montag, 30. August 2010 4:45 16
Page 269 of 319

If and when267
Safety First
Operating Instructions
Practical Tips
Technical Specifications
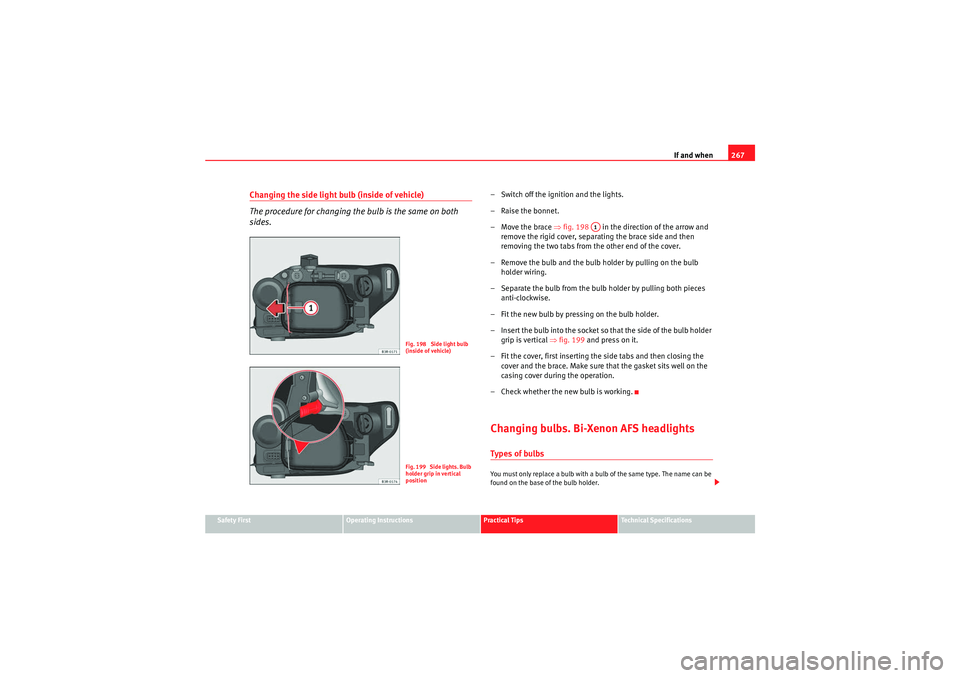
Changing the side light bulb (inside of vehicle)
The procedure for changing the bulb is the same on both
sides.
– Switch off the ignition and the lights.
– Raise the bonnet.
– Move the brace ⇒fig. 198 in the direction of the arrow and
remove the rigid cover, separating the brace side and then
removing the two tabs from the other end of the cover.
– Remove the bulb and the bulb holder by pulling on the bulb holder wiring.
– Separate the bulb from the bulb holder by pulling both pieces anti-clockwise.
– Fit the new bulb by pressing on the bulb holder.
– Insert the bulb into the socket so that the side of the bulb holder grip is vertical ⇒fig. 199 and press on it.
– Fit the cover, first inserting the side tabs and then closing the cover and the brace. Make sure that the gasket sits well on the
casing cover during the operation.
– Check whether the new bulb is working.Changing bulbs. Bi-Xenon AFS headlightsTypes of bulbsYou must only replace a bulb with a bulb of the same type. The name can be
found on the base of the bulb holder.
Fig. 198 Side light bulb
(inside of vehicle)Fig. 199 Side lights. Bulb
holder grip in vertical
position
A1
exeo_EN.book Seite 267 Montag, 30. August 2010 4:45 16