Page 113 of 167
*
112
– Press the control knob to switch to the map side menu ⇒page 125.
– Change the map scale if required ⇒page 126.
– Activate the cursor in the active side menu by rotat")
Navigation (NAV)*
112
– Press the control knob to switch to the map side menu ⇒page 125.
– Change the map scale if required ⇒page 126.
– Activate the cursor in the active side menu by rotating and pressing the control knob ⇒page 129.
– Use the cursor to find the corresponding destination on the map.
– Press the button to disable the cursor.
– Select the third legend option (destination flag) ⇒page 111,
fig. 130 using the rotary pushbutton.
– Select Set as destination ⇒ page 111, fig. 131 .
– Enter stopover(s) if desired ⇒page 120.
– Select Start route guidance ⇒ page 112.If you enter a town in the destination input menu ⇒page 104, fig. 121 before
you press the control button Map, the map display will switch to the centre of
the town you have selected.
Select Detail info
If additional information is available for the selected point on the map, you
can display it by selecting the Detail info function. If the “Detail info” function
is greyed out, no details are available on the navigation DVD.
Select Set as stopover
You can set additional stopovers via the map display if the mode rou te with
stopover ⇒ page 120 is activated.
If you have not activated the mode route with stopover , this option cannot be
selected (it is greyed out). Option Store in directory
You can also store the selected point on the map in the directory ⇒
page 117.
This position can be assigned to an existing entry or to a new entry in the
directory. If you are creating a new entry, first enter a name using the
keyboard. You can then enter additional information for the entry. Should you
wish to have the entry listed in the destination input menu ⇒page 104,
fig. 121, select the option Display as top destination ⇒ page 115.
Note
•You can also select a destination from the map in the town and street
submenus ⇒page 104.•You can also set a point on the map as the destination using the cursor,
even if the destination is not located on a street (e.g. via position coordi-
nates). In such cases, the system attempts to bring you as close as possible
to your destination using digitalised streets.Starting route guidance
RETURN
A1
Fig. 132 Navigation
system: Start route guid-
ance
media_systemE_EN.book Seite 112 Montag, 21. September 2009 1:48 13
Page 114 of 167
*113
Operating
RADIO, MEDIA (audiovisual
systems)
NAME, TEL
NAV, INFO
CAR, SETUP
– Enter all required information fo r the route guidance. To do so,
you can use any of the various")
Navigation (NAV)*113
Operating
RADIO, MEDIA (audiovisual
systems)
NAME, TEL
NAV, INFO
CAR, SETUP
– Enter all required information fo r the route guidance. To do so,
you can use any of the various options described on
⇒ page 104.
–Select Start route guidance ⇒ page 112, fig. 132 ; the route will
be calculated and the map will be automatically displayed.
– Using the rotary pushbutton, select one of the available routes shown on the map (applies only to route without stopover)
⇒page 113, or
– Press the rotary pushbutton to select the suggested route on the map ⇒page 114.After the route has been calculated the navigation system will automatically
switch to the map display mode. Route guidance is shown in simplified form
on the instrument panel display ⇒page 101. You will also receive spoken
navigation information ⇒page 100.
When you have entered a single destination ⇒page 104 and started route
guidance, you will be offered up to three different routes to reach your desti-
nation ⇒page 113.
Once you have entered a route plan and started route guidance an overview
map will be displayed showing all stopovers and various information
regarding the route ⇒ page 114.
Entered destinations can be saved ⇒page 117 and ⇒page 118.
Route criteria ⇒page 121 can be changed at any time during guidance and
the route will be recalculated.
If you start a route guidance, but do not complete it, this guidance will be
continued automatically when you start driving again. This also applies to
entered destinations that were not reached due to unexpected circumstances
(e.g. change of plans). To end route guidance, select Stop route guidance
⇒ page 115.
Note
Calculated destinations can also be changed on the map display by moving
the cursor ⇒page 129.Single destination navigation: Information before route guidanceOnce you have entered the destination ⇒page 104 you will be
offered up to three alternative routes ⇒fig. 133 .
– Select one of the possible routes by turning the rotary push- button.
– Press the rotary pushbutton to start the route guidance for the selected route.When you select a route by rotating the control knob, you are shown different
information about this route. The information pertaining to the selected route
is highlighted in white.
Fig. 133 Navigation:
Example of map display
after route has been calcu-
lated.
media_systemE_EN.book Seite 113 Montag, 21. September 2009 1:48 13
Page 115 of 167
*
114The following information for individual routes can be displayed ⇒page 113,
fig. 133:
Route includes motorway sections
Calculated motorway kilometres/miles
Route includes toll")
Navigation (NAV)*
114The following information for individual routes can be displayed ⇒page 113,
fig. 133:
Route includes motorway sections
Calculated motorway kilometres/miles
Route includes toll road sections with indication of length of section
Route includes ferry connection(s)
Route includes motorrail section(s)
Route includes season-restricted roads
Route includes time-restricted roads
Estimated distance to destination
Estimated time of arrival at destination
Destination on the map
Possible route 1
Suggested route 2
Suggested route 3
Starting point highlighted (arrow)
Orientation
Map scale
Once you have entered a single destination in the system and started route
guidance, the route selection display will automatically appear.
In the route selection display the route which was calculated on the basis of
your criteria ⇒ page 121 is highlighted. For example: If you set fast in “Route
criteria”, the route with the shortest estimated time of arrival is highlighted
after switching automatically to the map display. You will also be offered a
second fastest route and a shortest route if they are available.
Should you not select one of the routes, the highlighted route will automati-
cally be set soon after you begin driving. During this time you can still decide
to select one of the other route options.
Note
The time required by the system for calculating the route plans depends on
the possible route options. Once the system has finished calculating the
routes they will be displayed on the map. The routes shown may overlap,
making it difficult to differentiate between them. In this case, please refer to
the mileage and estimated arrival time.Route plan information before starting route guidance– Press the rotary pushbutton to start the route guidance for the selected route with stopovers.When using the route with stopover mode the system will not calculate alter-
native routes. The route shown in the display corresponds to the selected
route criteria ⇒page 121.
The following information can be viewed before beginning route guidance
⇒ fig. 134 :
Route includes motorway sections
Calculated motorway kilometres/miles
A1A2A3A4A5A6A7A8A9A10A11A12A13A14A15A16
Fig. 134 Navigation
system: Example of route
map overview
A1A2
media_systemE_EN.book Seite 114 Montag, 21. September 2009 1:48 13
Page 116 of 167
*115
Operating
RADIO, MEDIA (audiovisual
systems)
NAME, TEL
NAV, INFO
CAR, SETUP
Route includes toll road sections with indication of length of section
Route includes ferry connection")
Navigation (NAV)*115
Operating
RADIO, MEDIA (audiovisual
systems)
NAME, TEL
NAV, INFO
CAR, SETUP
Route includes toll road sections with indication of length of section
Route includes ferry connection(s)
Route includes motorrail section(s)
Route includes season-restricted roads
Route includes time-restricted roads
Estimated distance to destination
Estimated time of arrival at destination
Starting point highlighted (arrow)
Stopover 1 on the map
Stopover 2 on the map
Stopover 3 on the map
Final destination on the map
Orientation
Map scale
Changing/Interrupting route guidance– Press the button or the button.
–Select
Stop route guidance .
– Change the information if necessary.
–Select Start route guidance .The previously entered data and settings remain unchanged even when you
cancel the route guidance. This means you can change e.g. the route criteria
⇒page 121 and then re-calculate the route.
If you start a route guidance, but do not complete it, this guidance will be
continued automatically when you start driving again. This also applies to
entered destinations that were not reached due to unexpected circumstances (e.g. change of plans). To end route guidance, select Stop route guidance
⇒ page 115.
Note
Calculated destinations can also be changed on the map display by moving
the cursor ⇒page 129.To p d e s t i n a t i o n s
A3A4A5A6A7A8A9A10A11A12A13A14A15A16
NAV
RETURN
Fig. 135 Navigation
system: Set entry as top
destinationFig. 136 Navigation
system: Map display of a
top destination (push pin)
media_systemE_EN.book Seite 115 Montag, 21. September 2009 1:48 13
Page 117 of 167
*
116
– In the main navigation menu ⇒ page 104, fig. 121, select the
top destination from the “Start route guidance” list.
– Select Start route guidance ⇒ page 112.If you")
Navigation (NAV)*
116
– In the main navigation menu ⇒ page 104, fig. 121, select the
top destination from the “Start route guidance” list.
– Select Start route guidance ⇒ page 112.If you have activated the Display as top destination function when making
entries in the directory ( ⇒page 117 or ⇒page 66) ⇒page 115, fig. 135 ,
they are listed in a destination entry menu ⇒page 104, fig. 121 under the
menu item “Start route guidance” ⇒page 118.
You can choose to have entries which are stored in the directory as top desti-
nations displayed with a “push pin” on the map ⇒ page 115, fig. 136; to
activate this function, call up the “Map contents” submenu and place a
checkmark
next to Top destinations ⇒ page 134.
"Memory" MenuLast destinations
The last entered destinations are stored and can be loaded
directly as a new destination.
–Press the Memory control button in the navigation menu.
– Select Last destinations ⇒ fig. 137 . You will see a list of the most
recently entered destinations. This list is updated automatically.
– Select the desired station from the list of radio stations.
– Select Start route guidance ⇒ page 112.
Note•There are sometimes destination entries in the list that cannot be
displayed completely because they are too long (too many characters). If you
select one of these entries using the control knob, a second window will open
up after a few seconds. This screen will show more information about the
selected entry.•You can delete the list of last destinations in the Setup Navigation menu
⇒ page 135.To p c a te g o r i e s
Fig. 137 Navigation:
Select last destinations
Fig. 138 Navigation: Top
categories
media_systemE_EN.book Seite 116 Montag, 21. September 2009 1:48 13
Page 118 of 167
*117
Operating
RADIO, MEDIA (audiovisual
systems)
NAME, TEL
NAV, INFO
CAR, SETUP
– Press the Memory control button in the navigation menu.
–Select To p c a t e g o r i e s ⇒")
Navigation (NAV)*117
Operating
RADIO, MEDIA (audiovisual
systems)
NAME, TEL
NAV, INFO
CAR, SETUP
– Press the Memory control button in the navigation menu.
–Select To p c a t e g o r i e s ⇒ page 116, fig. 137 . You receive a list of
the top categories of the specia l destinations in the immediate
vicinity which are stored on the navigation DVD.
– Select the desired category (e.g. petrol station) ⇒ page 116,
fig. 138 . A list of the special dest inations for the category
selected will then be displayed.
– Select a destination from the list.
–Select Set as destination . The data will be uploaded to the desti-
nation entry menu automatically.
–Select Start route guidance .The special destinations are sorted according to the distance from your
current location.
The following top categories are available:•Car park•Parking garage•Petrol station•HospitalNote
If no top destination can be found for the category you have chosen, this indi-
cates that there is no matching entry for the selected criteria in your imme-
diate vicinity.
Storing a destination in the directory
The current destination can be stored in the directory.– Enter a single destination ⇒page 104.
–Press the Memory control button.
– Select Store in directory .
– Select New directory entry ⇒ fig. 139 and complete the direc-
tory card or
– Select Find entry to file the destination under an existing direc-
tory card.
– Select Display as top destination ⇒ page 115, fig. 135 and
press the control knob. A check appears after the option
.
– Select Store entry .
Use the option Store in directory to assign an entry in your directory to a
destination ⇒page 104.
Fig. 139 Navigation:
Storing current destina-
tion in directory
media_systemE_EN.book Seite 117 Montag, 21. September 2009 1:48 13
Page 119 of 167
*
118You must first enter a Surname for a new directory entry. Once you have
entered a surname the remaining entry fields can be selected.
If you would like to assign a new address t")
Navigation (NAV)*
118You must first enter a Surname for a new directory entry. Once you have
entered a surname the remaining entry fields can be selected.
If you would like to assign a new address to an existing directory entry, first
enter the new address into the navigation menu. Then select Store in
directory ; select the directory entry to which you want to assign the new
address and store the entry again. The destination currently entered will be
stored in the directory. If there was already a destination assigned to this
directory entry it will be overwritten.
Addresses that have been marked as top destinations will be listed in the
destination entry menu and can be selected directly from there ⇒page 115.
Note
•Route plans (routes with stopovers) can be stored using the function
Store route ⇒page 118.•Use the button to access and edit your directory data
⇒ page 63.Loading a destination from the directory
–Press the Memory control button in the navigation menu.
– Select Load from directory ⇒ page 116, fig. 137 .
– Select a destination from the list or
– Select Find entry ⇒ fig. 140 .
– Enter the name using the alphanumeric keyboard.
– Select Start route guidance ⇒ page 115.You can edit an existing address. The current address will then be replaced.
Note
Administration of the directory data is handled through the NAME function
⇒page 63.Storing a route
Calculated routes with specific criteria can be stored and
loaded later as a new navigation destination
NAME
Fig. 140 Navigation:
Load an entry from direc-
tory
Fig. 141 Navigation
system: Route planned
media_systemE_EN.book Seite 118 Montag, 21. September 2009 1:48 13
Page 120 of 167
*119
Operating
RADIO, MEDIA (audiovisual
systems)
NAME, TEL
NAV, INFO
CAR, SETUP
– Enter a route plan ⇒page 118, fig. 141 .
– Press the Memory control button.
–Select Store")
Navigation (NAV)*119
Operating
RADIO, MEDIA (audiovisual
systems)
NAME, TEL
NAV, INFO
CAR, SETUP
– Enter a route plan ⇒page 118, fig. 141 .
– Press the Memory control button.
–Select Store route .
– Use the keyboard to enter a name for the route you want to store.
–Select OK in the alphanumeric keyboard. The route plan you
entered will be stored.You can store a destination and up to three stopovers in the route plan
⇒ page 106. You can then drive to these destinations in the order that you
set.
The route entered will be saved with the final destination and stopovers and
can be loaded again as a new destination ⇒page 119.
You can edit the route plan at any time as necessary. To do so, select one of
the destinations and press the control knob. You can then select Edit, Move ,
Delete or Drive to now as desired ⇒ page 119.
If you have selected Drive to now and do not wish to edit the route the system
will use the existing route plan and the current start position once you have
confirmed Start route guidance .
If the option Store route is greyed out this indicates that the route memory is
full or that the mode Route without stopover is activated. Delete routes not
needed from the route memory ⇒page 120. Or select the Route with
stopover function ⇒page 120.
Note
You can store individual destinations to the directory ⇒page 117.
Loading a route–Press the Memory control button in the navigation menu.
– Select Load route ⇒ page 116, fig. 137 .
– Select the route you would like to load from the list.
– Select Start route guidance .Route plans that have been stored ⇒page 118 can be loaded again quickly
and conveniently.
You can change the route plan at any time. To do so, select one of the desti-
nations and press the control knob. You can then select Edit, Move , Delete or
Drive to now as desired.
Modifying
To enter new information for the final destination or stopover.
Moving
To change the order of destinations in the route plan.
Deleting
To delete the selected final destination or stopover. If you delete the final
destination, a stopover will automatically be set as the new destination.
Driving to now
You can drive directly to the selected final destination or stopover.
If you do not want to edit the stored route, the route plan will be loaded upon
selecting Start route guidance and the starting point will be the current posi-
tion of the vehicle.
media_systemE_EN.book Seite 119 Montag, 21. September 2009 1:48 13
 1
1 2
2 3
3 4
4 5
5 6
6 7
7 8
8 9
9 10
10 11
11 12
12 13
13 14
14 15
15 16
16 17
17 18
18 19
19 20
20 21
21 22
22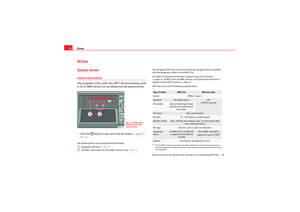 23
23 24
24 25
25 26
26 27
27 28
28 29
29 30
30 31
31 32
32 33
33 34
34 35
35 36
36 37
37 38
38 39
39 40
40 41
41 42
42 43
43 44
44 45
45 46
46 47
47 48
48 49
49 50
50 51
51 52
52 53
53 54
54 55
55 56
56 57
57 58
58 59
59 60
60 61
61 62
62 63
63 64
64 65
65 66
66 67
67 68
68 69
69 70
70 71
71 72
72 73
73 74
74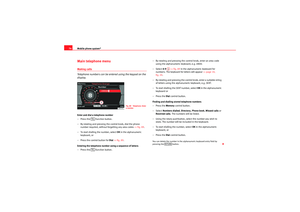 75
75 76
76 77
77 78
78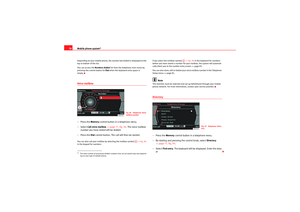 79
79 80
80 81
81 82
82 83
83 84
84 85
85 86
86 87
87 88
88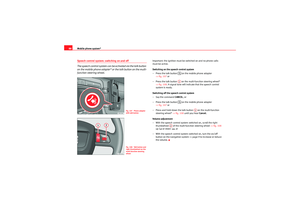 89
89 90
90 91
91 92
92 93
93 94
94 95
95 96
96 97
97 98
98 99
99 100
100 101
101 102
102 103
103 104
104 105
105 106
106 107
107 108
108 109
109 110
110 111
111 112
112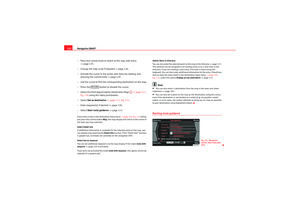 113
113 114
114 115
115 116
116 117
117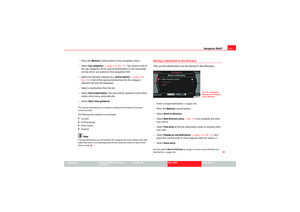 118
118 119
119 120
120 121
121 122
122 123
123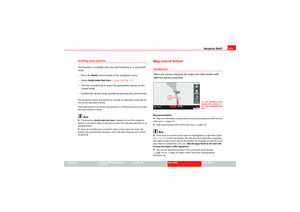 124
124 125
125 126
126 127
127 128
128 129
129 130
130 131
131 132
132 133
133 134
134 135
135 136
136 137
137 138
138 139
139 140
140 141
141 142
142 143
143 144
144 145
145 146
146 147
147 148
148 149
149 150
150 151
151 152
152 153
153 154
154 155
155 156
156 157
157 158
158 159
159 160
160 161
161 162
162 163
163 164
164 165
165 166
166