Page 231 of 294

Practical Tips, Emergency Service
229
Parking at the curb
Warning!
Hard impacts against curbs (or traffic
islands) are dangerous and may cause hid-
den tire damage which is not noticeable until
later. Such damage can result in accidents at
high speeds causing serious personal injury
or death.
Depending on the force of impact, the edge
of the rim can also be damaged.
f If you are in doubt, have the wheel checked by
an expert, particularly if you suspect damage
on the inside.
f If you must drive over a curb or other obstacle,
drive slowly and at an obtuse angle. Exercise care when parking along curbs.
Wheel alignment, wheel balancing As a precaution, have wheels with summer tires
balanced in the spring, and those with mud and
snow tires before winter.
Unbalanced wheels may affect car handling and
tire life.
Only the specified weight s may be used for wheel
balancing.
Self-adhesive weights must not come into contact
with cleaning agents, since they could drop off.
Uneven tread wear indicates wheel imbalance. In
this event, the vehicle should be checked at an au-
thorized Porsche dealer.
Warning!
If, during a trip, uneven running or vibrations
occur that could be caused by damage to
tires or the car, the speed must be reduced
immediately, but without braking sharply.
If you continue your trip without having the
cause of the fault reme died, you might lose
control of your vehicle which could cause se-
rious personal injury or death.
f Stop the vehicle and check the tires.
f If no cause for the fault can be found, drive
carefully to the nearest authorized Porsche dealer.
Wheels with Tire Pressure Monitoring
(TPM) sensorsBefore changing wheels, make sure that the
wheels are compatible with your vehicle's TPM.
f Check this with your authorized Porsche
dealer.Removing and storing tires fAfter changing, adjust tire pressure and torque
wheel bolts diagonally to 94 ftlb (130 Nm).
Tires must always remain on the same side of
the vehicle.
When wheels are removed, the direction of
rotation and position of each wheel should be
marked.
Example
FR (front right), FL, RR and RL.
Wheels must always be fitted in accordance with
their marking.
The perception that tire durability and perform-
ance are immune to the effects of storage and
age is unfounded.
Chemical additives, whic h make the rubber elas-
tic, lose their effectivene ss in the course of time
and the rubber becomes brittle and cracks.
Therefore, the tires should be inspected from
time to time.
Page 238 of 294

236
Practical Tips, Emergency Service
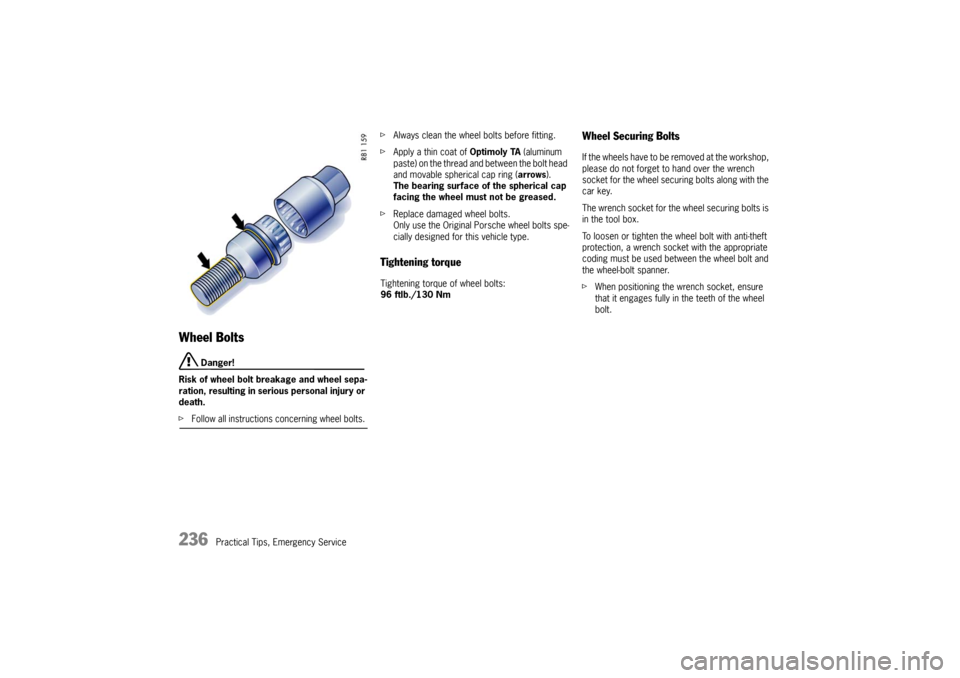
Wheel Bolts
Danger!
Risk of wheel bolt breakage and wheel sepa-
ration, resulting in serious personal injury or
death.
f Follow all instructions concerning wheel bolts. f
Always clean the wheel bolts before fitting.
f Apply a thin coat of Optimoly TA (aluminum
paste) on the thread and between the bolt head
and movable spherical cap ring ( arrows).
The bearing surface of the spherical cap
facing the wheel must not be greased.
f Replace damaged wheel bolts.
Only use the Original Porsche wheel bolts spe-
cially designed for this vehicle type.
Tightening torque Tightening torque of wheel bolts:
96 ftlb./130 Nm
Wheel Securing Bolts If the wheels have to be removed at the workshop,
please do not forget to hand over the wrench
socket for the wheel securing bolts along with the
car key.
The wrench socket for the wheel securing bolts is
in the tool box.
To loosen or tighten the wheel bolt with anti-theft
protection, a wrench sock et with the appropriate
coding must be used be tween the wheel bolt and
the wheel-bolt spanner.
f When positioning the wr ench socket, ensure
that it engages fully in the teeth of the wheel
bolt.
Page 240 of 294

238
Practical Tips, Emergency Service
Screw in two assembly aids for
cars
with Porsche
Ceramic Composite Brake
10.Take the wheel off and put a new wheel on.
Please see the chapter “WHEEL BOLTS” on
Page 236.
11.Insert wheel bolts and tighten by hand.
12.Remove assembly aids, screw in remaining wheel bolts.
Initially tighten bolts only slightly in diagonally
opposite sequence so that the wheel
is centred.
13.Inflate the tire if necessary. Please see the chapter “TIRE PRESSURE FOR
COLD TIRES (68 °F/20 °C)” on Page 277.
14.Lower the car fully and remove the jack.
15.Tighten wheel bolts in diagonally opposite sequence.
f Immediately after changing a wheel, use
a torque wrench to check the prescribed
tightening torque (96 ftlb./130 Nm).
Note on operation for vehicles with Tire Pressure
Monitoring
f On vehicles with Tire Pressure Monitoring, the
settings on the on-board computer must be
updated after the wheel change.
f Please see the chapter “TPM TIRE PRESSURE
MONITORING” on Page 147.
Checking tire pressure with a
pressure gage1. Remove the valve stem cap from the tire.
2. Press the pressure gage onto the valve stem.
Note on operation
fDo not press too hard or force the valve stem
sideways, or air will escape.
If the sound of air escaping from the tire is
heard, reposition the pressure gage.
3. Read the tire pressure on the gage stem and compare it to the permissble tire pressure.
This information can be found on the tire pres-
sure plate or in the chapter Technical Data.
Please see the chapter “TIRE PRESSURE FOR
COLD TIRES (68 °F/20 °C)” on Page 277.
4. Remove the pressure gage.
f Please see the chapter “TPM TIRE PRESSURE
MONITORING” on Page 147.
Page 245 of 294

Practical Tips, Emergency Service
243
SpacersfUse the spacers only together with wheels and
fastening parts approved by Porsche.
Before having spacers fitted, find out about the
current approval status.
Mounting an emergency spare wheel
If 5 mm spacers are mounted, these must not be
removed to mount an emergency spare wheel.
Fitting snow chains
The use of snow chains is not permitted when
5 mm spacers are mounted.
Caution!
Risk of damage to the wheel housings if the
5 mm spacers are not removed before fitting
snow chains.
f To permit the fitting of snow chains, have the 5 mm spacers removed on all 4 wheels.Note on operation
f
To fit/remove the spacers:
Please consult an authorized Porsche dealer.
f Please see the chapter “CHANGING A WHEEL”
on Page 237.
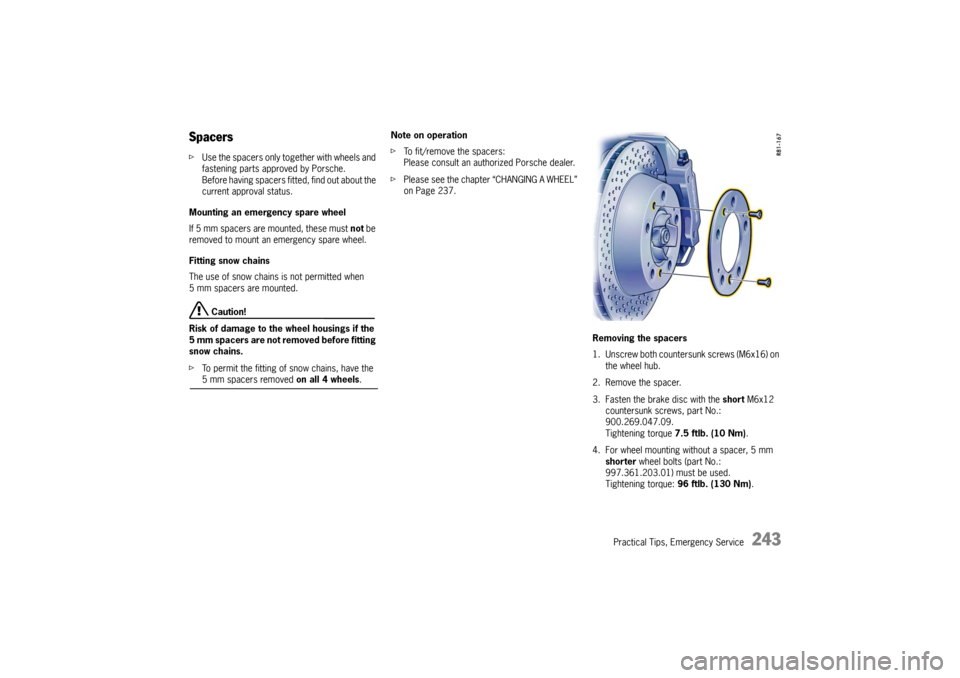
Removing the spacers
1. Unscrew both countersunk screws (M6x16) on the wheel hub.
2. Remove the spacer.
3. Fasten the brake disc with the short M6x12
countersunk screws, part No.:
900.269.047.09.
Tightening torque 7.5 ftlb. (10 Nm) .
4. For wheel mounting without a spacer, 5 mm
shorter wheel bolts (part No.:
997.361.203.01 ) must be used.
Tightening torque: 96 ftlb. (130 Nm) .
Page 246 of 294

244
Practical Tips, Emergency Service
Mounting the spacers
1. Remove wheel.
2. Unscrew both countersunk screws (M6x12) on
the break disc.
3. Fasten the spacer with the long M6x16
countersunk screws.
Tightening torque 7.5 ftlb. (10 Nm) .
4. Fit wheel. To do this use the longer wheel
bolts for fastening the wheels.
Tightening torque: 96 ftlb. (130 Nm) .
f Please see the chapter “CHANGING A WHEEL”
on Page 237.
Required scope of parts if the spacers are
removed
Short countersunk screws (M6x12)
Part No: 900.269.047.09
1 set short wheel bolts
Part No: 997.361.203.01
Short anti-theft protection
Part No: 996.361.057.01
f For information on the spacers: Please see the
chapter “SPACERS” on Page 243.
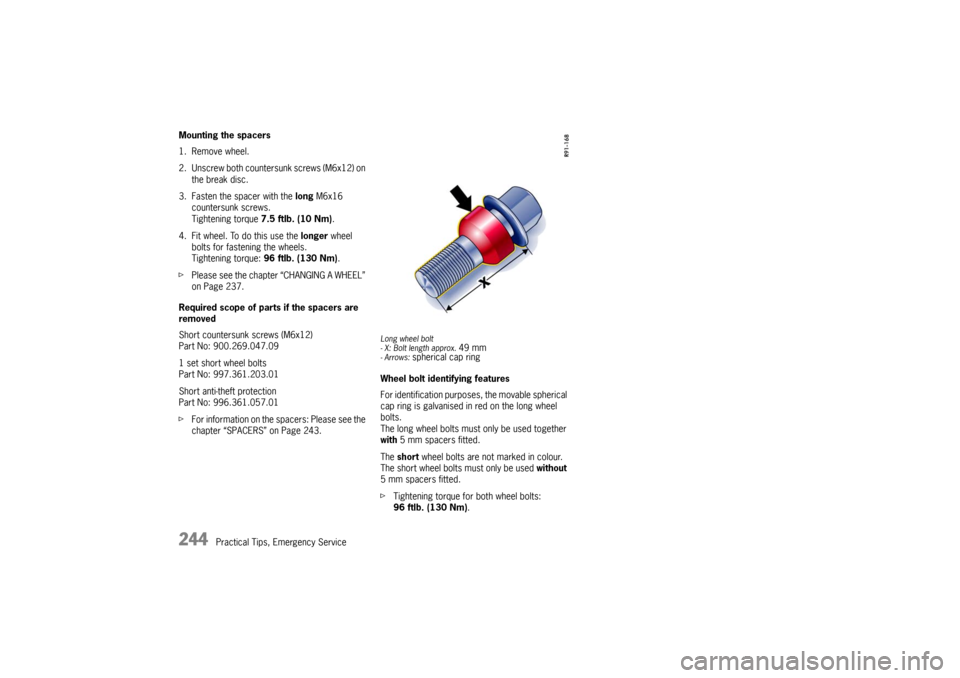
Long wheel bolt
- X: Bolt length approx.
49 mm
- Arrows:
spherical cap ring
Wheel bolt identifying features
For identification purposes, the movable spherical
cap ring is galvanised in red on the long wheel
bolts.
The long wheel bolts must only be used together
with 5 mm spacers fitted.
The short wheel bolts are not marked in colour.
The short wheel bolts must only be used without
5 mm spacers fitted.
f Tightening torque for both wheel bolts:
96 ftlb. (130 Nm) .