2010 PORSCHE BOXSTER S check engine
[x] Cancel search: check enginePage 131 of 294

Instruments, On-Board Computer, Warnings
129
Check Engine
(Emission Control)The emission control system detects malfunctions
early that could, for example, cause increased
pollutant emissions or consequential damage.
Faults are indicated by a continuously lit or
flashing instrument panel warning light.
The faults are recorded in the control unit's fault
memory.
The warning light in the instrument panel lights up
when the ignition is switched on as a bulb check
and goes out approx. 4 seconds after the engine
starts. If the warning light does not light up, have
the bulb replaced promptly.
The warning light in the instrument panel flashes to
indicate operating states (e.g. engine misfiring)
which might cause damage to certain parts of the
emission control system.
fIn this case, immediately reduce the engine
load by easing off the accelerator.
f In order to avoid consequential damage to the
engine or emission control system (e.g. cata-
lytic converter), have the fault diagnosed and
rectified immediately at the nearest authorized
Porsche dealer. If the warning light in the
instrument panel lights up
permanently without flashing before and remains
on while driving, it suggests:
– a potential engine control problem and the need for system service or
– an improperly fastened tank cap or
– the vehicle was refueled while the engine was running.
f Stop immediately at a suitable and secure
place and check tank cap for proper fastening.
If tank cap was fastened correctly, see your au-
thorized Porsche dealer for service as soon as
possible.
Caution!
If the check engine warning light in the in-
strument panel is flashing, serious catalytic
converter damage and power loss will soon
occur.
Prolonged driving with the check engine war-
ning light on could cause damage to the
emission control system. It also could affect
fuel economy and driveability.
f Have the fault remedied at the nearest authorized Porsche dealer immediately.
Warning Light
Page 159 of 294

Instruments, On-Board Computer, Warnings
157
OIL
Display and measurement of the engine
oil level
Caution!
Risk of engine damage.
f Regularly check the oil level each time before
refueling.
f Do not allow the oil level to fall below the minimum mark.
Conditions for measuring the oil level
1. Vehicle stationary.
2. It is important to ensure that the vehicle is horizontal for correct oil level measurement
to occur.
3. Engine must be at operating temperature (at least 140 °F/60 °C).
4. Engine must be idling. Initiating oil level measurement
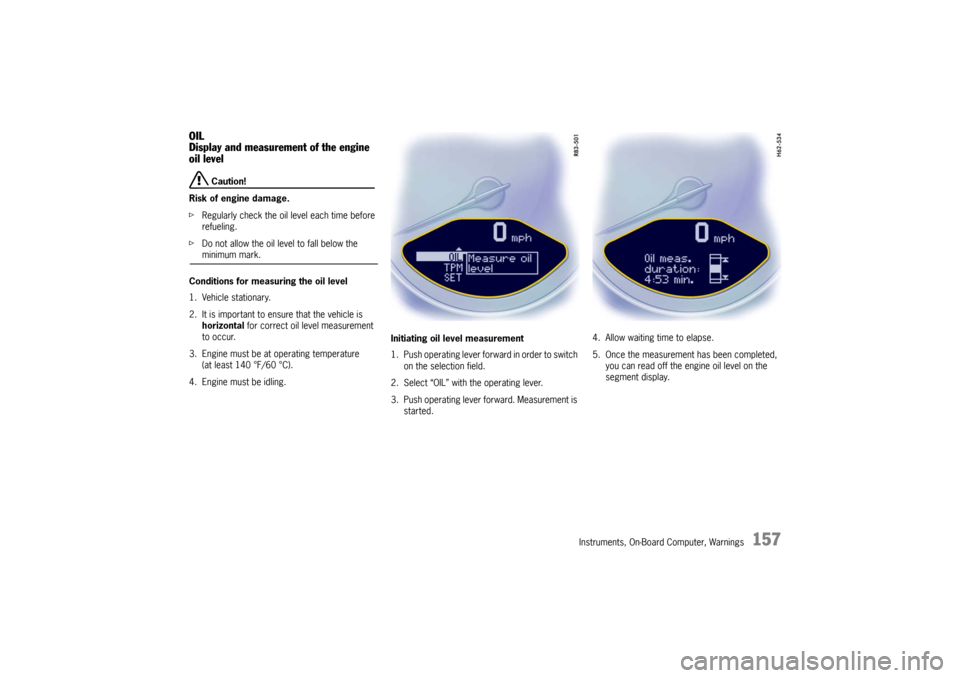
1. Push operating lever forward in order to switch
on the selection field.
2. Select “OIL” with the operating lever.
3. Push operating lever forward. Measurement is started. 4. Allow waiting time to elapse.
5. Once the measurement has been completed,
you can read off the engine oil level on the
segment display.
Page 160 of 294

158
Instruments, On-Board Computer, Warnings
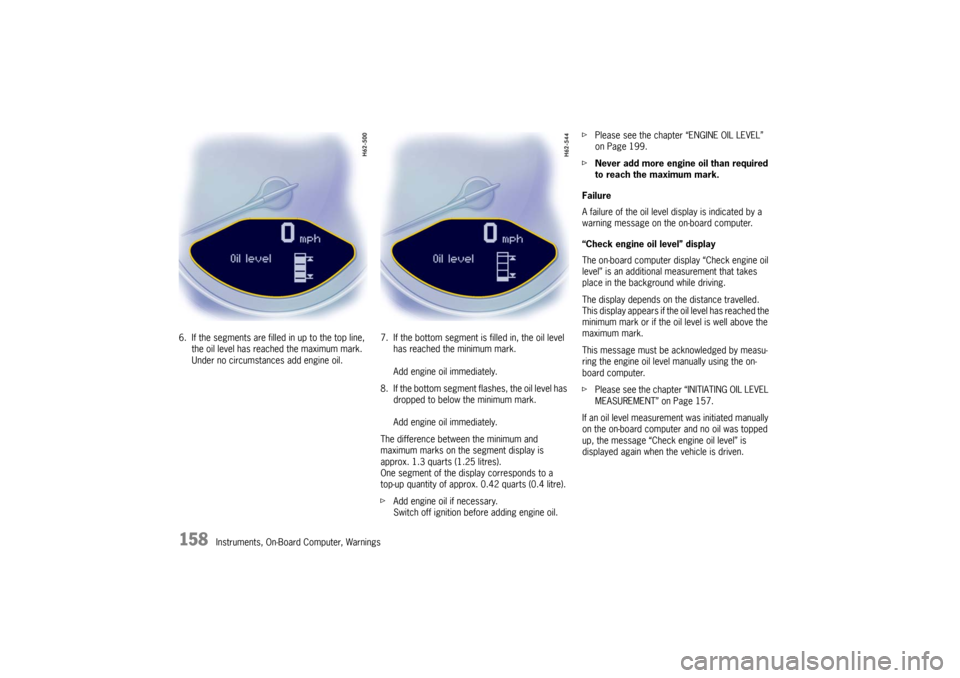
6. If the segments are fille
d in up to the top line,
the oil level has reached the maximum mark.
Under no circumstances add engine oil. 7. If the bottom segment is filled in, the oil level
has reached the minimum mark.
Add engine oil immediately.
8. If the bottom segment fl ashes, the oil level has
dropped to below the minimum mark.
Add engine oil immediately.
The difference between the minimum and
maximum marks on the segment display is
approx. 1.3 quarts (1.25 litres).
One segment of the display corresponds to a
top-up quantity of approx. 0.42 quarts (0.4 litre).
f Add engine oil if necessary.
Switch off ignition before adding engine oil. f
Please see the chapter “ENGINE OIL LEVEL”
on Page 199.
f Never add more engine oil than required
to reach the maximum mark.
Failure
A failure of the oil level display is indicated by a
warning message on the on-board computer.
“Check engine oil level” display
The on-board computer display “Check engine oil
level” is an additional measurement that takes
place in the background while driving.
The display depends on the distance travelled.
This display appears if th e oil level has reached the
minimum mark or if the o il level is well above the
maximum mark.
This message must be acknowledged by measu-
ring the engine oil leve l manually using the on-
board computer.
f Please see the chapter “INITIATING OIL LEVEL
MEASUREMENT” on Page 157.
If an oil level measurement was initiated manually
on the on-board computer and no oil was topped
up, the message “Check engine oil level” is
displayed again when the vehicle is driven.
Page 166 of 294

164
Warnings
LIMIT
30Selected speed limit (e.g. 30 mph) for the
acoustic warning signal has been exceeded.
Adjust your speed if necessary.
Fuel gage warning
light Consider remaining range Refuel at next opportunity.
Check engine oil level Start engi
ne oil level measurement in the
on-board computer.
Engine oil pressure too low Stop immediately at a suitable place, measure oil level with the on-board computer and, if nec-
essary, add engine oil.
Warning light
Temperature gage Engine temperature too high Switch
engine off and let it cool.
Check coolant level and, if necessary,
add coolant.
Temperature gage
warning light flash-
es Check coolant level Switch en
gine off and let it cool.
Check coolant level and, if necessary, add cool-
ant.
Engine diagnostics – workshop Stop imme diately at a suitale place and check
tank cap for proper fastening. If the tank cap
was fastened correctly, consult your authorized
Porsche dealer.
Reduced engine power Consult yo ur authorized Porsche dealer.
Temperature gage
warning light flash-
es Failure of
engine compartment blower
Consult your authorized Porsche dealer.
Warning Battery/generator Stop at a safe place and switch the engine off.
Do not continue driving.
Have the fault remedied at an authorized
Porsche dealer.
Instrument
panel On-board
computerText display on on-board
computer Meaning/measure
Page 167 of 294

Warnings
165
Oil pressure gage faultyHave the fault remedied at an authorized
Porsche dealer.
Oil level display faulty Have the fault remedied at an authorized
Porsche dealer.
Oil temperature gage faulty Have the fault remedied at an authorized
Porsche dealer.
Oil temperature
too high Switch engine off and let
it cool. Check oil level
and, if necessary, add oil.
Please observe the chapter “OIL DISPLAY AND
MEASUREMENT OF THE ENGINE OIL LEVEL“.
Indicator faulty Coolant indicator failed.
Have the fault remedied at an authorized
Porsche dealer.
Brake pad wear Have the brake pads changed immediately at an
authorized Porsche dealer.
Warning – Brake fluid level Stop immediately in a suitable place.
Do not continue driving. Have the fault remedied
at an authorized Porsche dealer.
Warning – Brake circuit division Stop immediately in a suitable place. Do not continue driving. Have the fault remedied
at an authorized Porsche dealer.
ABS failure Have the fault remedied at an authorized
Porsche dealer.
PSM off Porsche Stability Management has been
switched off.
Instrument
panel On-board
computerText display on on-board
computer Meaning/measure
Page 199 of 294

Maintenance, Car Care
197
Coolant LevelfPlease see the chapter “EXERCISE EXTREME
CAUTION WHEN WORKING ON YOUR VEHICLE”
on Page 196.
The cooling system is filled at the factory with a
permanent coolant.
It provides year-round protection from corrosion
and freezing down to –31 °F/–35 °C .
f Only use antifreeze authorized by Porsche. Checking coolant level The expansion tank with its filler orifice is located
in the rear luggage comp artment under the serv-
ice flap.
f Check the coolant level regularly.
When the engine is cold and the car is level the
fluid level must lie between the “MIN” and “MAX”
markings.
Topping off coolant
Warning!
Danger of serious personal injury or death
from scalding. Coolant is hazardous to your
health, and may be fatal if swallowed.
f Do not open the cap of the expansion tank
while the engine is hot.
f Allow the engine to cool down before opening
the cap and protect your hands, arms and face
from any possible escape of hot coolant.
f Keep coolant out of children’s reach.
f Also, keep coolant away from your pets.
They can be attracted to it should there be a
spill, or to used coolant left in an open contai-
ner. Coolant can be deadly to pets if consu-
med.
Risk of damage from overflowing coolant.
f Take care while topping off coolant not to soil the luggage compartment or items of luggage.
1. Switch engine off and let it cool. Please see the chapter “COOLING SYSTEM” on
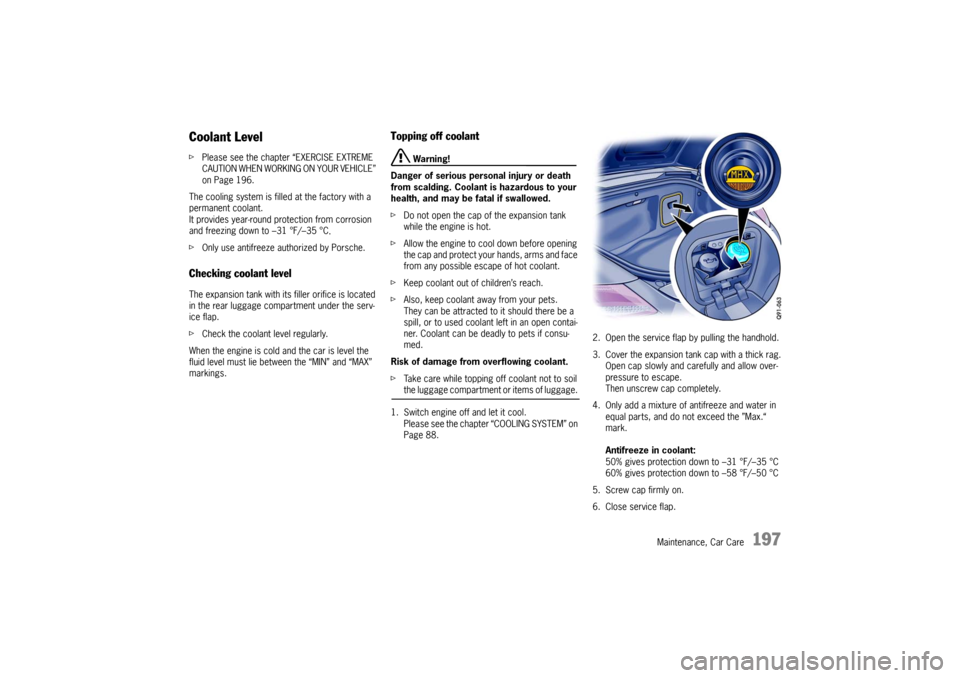
Page 88. 2. Open the service flap by pulling the handhold.
3. Cover the expansion tank cap with a thick rag.
Open cap slowly and ca refully and allow over-
pressure to escape.
Then unscrew cap completely.
4. Only add a mixture of antifreeze and water in
equal parts, and do not exceed the ”Max.“
mark.
Antifreeze in coolant:
50% gives protection down to –31 °F/–35 °C
60% gives protection down to –58 °F/–50 °C
5. Screw cap firmly on.
6. Close service flap.
Page 201 of 294

Maintenance, Car Care
199
Engine Oil It is important to perform oil changes regularly in
accordance with the intervals specified in the
“Maintenance” booklet.
Engine oil consumption
It is normal for your engine to consume oil.
The rate of oil consumption depends on the quality
and viscosity of oil, the speed at which the engine
is operated, the climate, road conditions as well
as the amount of dilution and oxidation of the
lubricant.
If the vehicle is used for repeated short trips, and
consumes a normal amount of oil, the engine oil
measurement may not show any drop in the oil
level at all, even after 600 miles (1,000 km) or
more. This is because the oil is gradually becom-
ing diluted with fuel or mo isture, making it appear
that the oil level has not changed.
The diluting ingredients evaporate out when the
vehicle is driven at high speeds, as on an express-
way, making it then appear that oil is excessively
consumed after driving at high speeds.
If the conditions you drive your vehicle in are
dusty, humid, or hot, the frequency of the oil
change intervals should be greater. If the vehicle is driven at a high rate of speed,
climatic conditions are warm, and the load is high,
the oil should be checked more frequently, as
driving conditions will determine the rate of oil
consumption.
– The engine in your vehicle depends on oil to
lubricate and cool all of its moving parts.
Therefore, the engine oil should be checked
regularly and kept at the required level.
– Make it a habit to have the engine oil level checked at every fuel filling.
– The oil pressure warning light is not an oil level indicator.
The oil pressure warning light indicates serious
engine damage may be occuring when lit, if en-
gine rpm is above idle speed.
Engine Oil Level f Please see the chapter “EXERCISE EXTREME
CAUTION WHEN WORKING ON YOUR VEHICLE”
on Page 196.
f Regularly check the oil level using the on-board
computer after the vehicle is refuelled.
Please see the chapter “OIL DISPLAY AND
MEASUREMENT OF THE ENGINE OIL LEVEL”
on Page 157.
The difference between the minimum and maxi-
mum marks on the segment display is approx.
1.3 quarts (1.25 liters).
Each segment of the display corresponds to ap-
prox. 0.42 quart (0.4 liter).
Page 202 of 294

200
Maintenance, Car Care
Topping off engine oil
Warning!
Engine oil is hazardous to your health and
may be fatal if swallowed.
f Keep engine oil out of children’s reach.
Used engine oil contains chemicals that have
caused cancer in laboratory animals.
f Always protect your skin by washing thorough-ly with soap and water. Caution!
Risk of damage from overflowing engine oil.
f Take care while checking and topping up
engine oil not to soil the luggage compartment or items of luggage.
Note
The Check Engine warning light may light up if the
cap of the oil filler open ing is opened while the
engine is running.
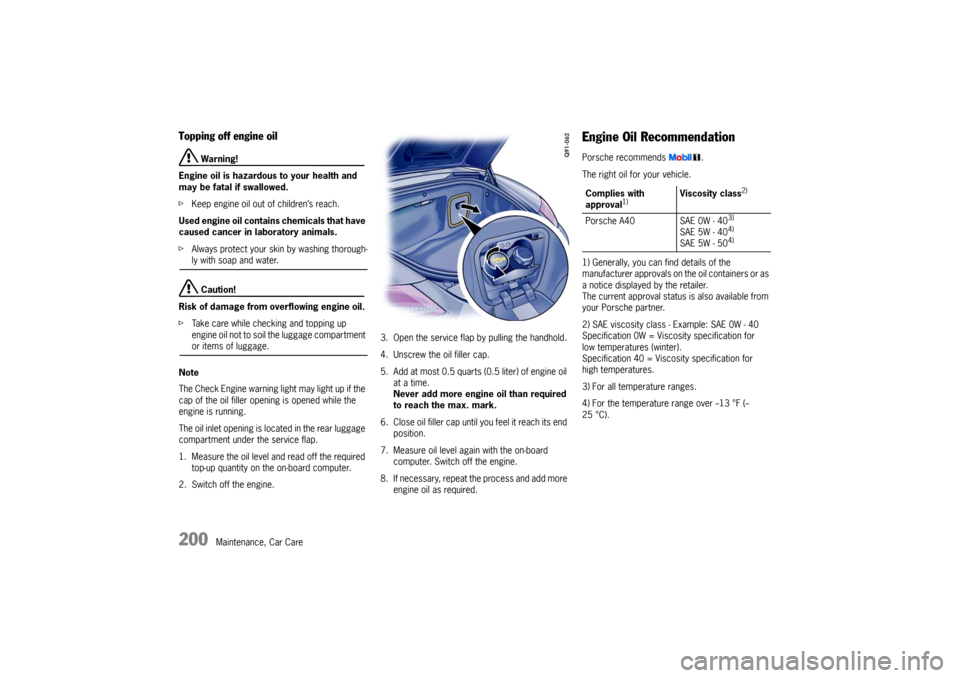
The oil inlet opening is lo cated in the rear luggage
compartment under the service flap.
1. Measure the oil level and read off the required top-up quantity on the on-board computer.
2. Switch off the engine. 3. Open the service flap by pulling the handhold.
4. Unscrew the oil filler cap.
5. Add at most 0.5 quar ts (0.5 liter) of engine oil
at a time.
Never add more engine oil than required
to reach the max. mark.
6. Close oil filler cap until you feel it reach its end
position.
7. Measure oil level again with the on-board computer. Switch off the engine.
8. If necessary, repeat the process and add more engine oil as required.
Engine Oil RecommendationPorsche recommends .
The right oil for your vehicle.
1) Generally, you can find details of the
manufacturer approvals on the oil containers or as
a notice displayed by the retailer.
The current approval status is also available from
your Porsche partner.
2) SAE viscosity class - Example: SAE 0W - 40
Specification 0W = Viscosity specification for
low temperatures (winter).
Specification 40 = Viscosity specification for
high temperatures.
3) For all temperature ranges.
4) For the temperature range over --13 °F (--
25 °C).Complies with
approval
1)
Viscosity class
2)
Porsche A40 SAE 0W - 40
3)
SAE 5W - 40
4)
SAE 5W - 50
4)