Page 74 of 294

72
Operation, Safety
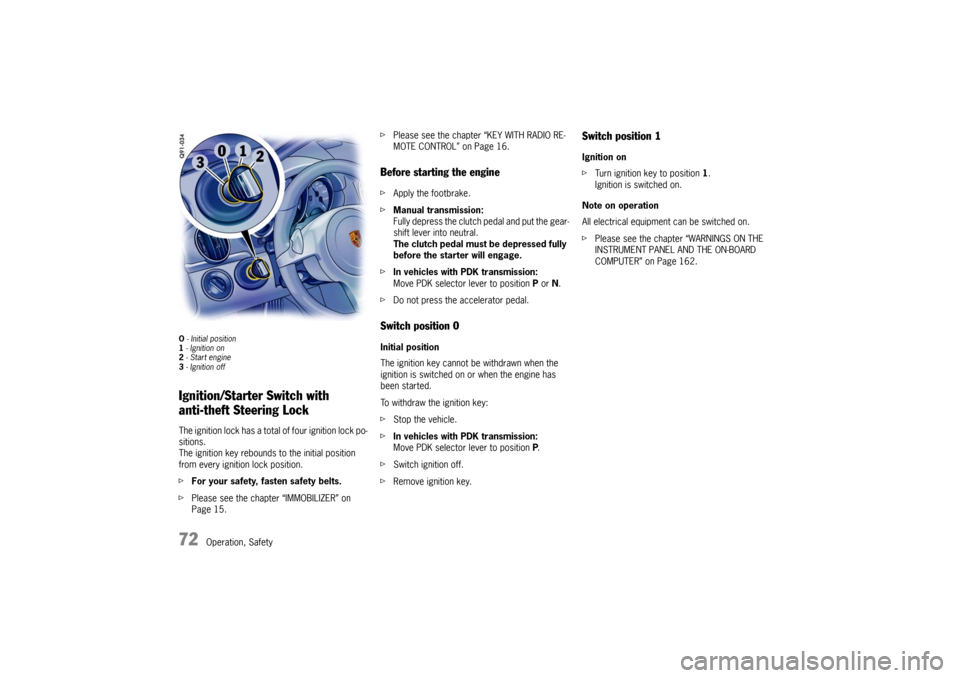
O - Initial position
1 - Ignition on
2 - Start engine
3 - Ignition offIgnition/Starter Switch with
anti-theft Steering LockThe ignition lock has a total of four ignition lock po-
sitions.
The ignition key rebounds to the initial position
from every ignition lock position.
f For your safety, fasten safety belts.
f Please see the chapter “IMMOBILIZER” on
Page 15. f
Please see the chapter “KEY WITH RADIO RE-
MOTE CONTROL” on Page 16.
Before starting the enginefApply the footbrake.
f Manual transmission:
Fully depress the clutch pedal and put the gear-
shift lever into neutral.
The clutch pedal must be depressed fully
before the starte r will engage.
f In vehicles with PDK transmission:
Move PDK selector lever to position P or N.
f Do not press the accelerator pedal.Switch position 0 Initial position
The ignition key cannot be withdrawn when the
ignition is switched on or when the engine has
been started.
To withdraw the ignition key:
f Stop the vehicle.
f In vehicles with PDK transmission:
Move PDK selector lever to position P.
f Switch ignition off.
f Remove ignition key.
Switch position 1 Ignition on
fTurn ignition key to position 1.
Ignition is switched on.
Note on operation
All electrical equipme nt can be switched on.
f Please see the chapter “WARNINGS ON THE
INSTRUMENT PANEL AND THE ON-BOARD
COMPUTER” on Page 162.
Page 78 of 294

76
Operation, Safety
Stopping Engine fTurn key back to position 3.
f Do not stop engine immediately after hard or
extended driving.
Keep engine running at increased idle for
about two minutes to prevent excessive heat
build-up before turning off engine.
f To avoid discharging the battery, always re-
move the ignition key from the ignition lock.
f When leaving the car, always remove the igniti-
on key, apply the parking brake and engage
1st gear or reverse gear on vehicles with ma-
nual transmission or move the selector lever to
position P on vehicles with PDK transmission.
f Engage the steering lock by moving the steer-
ing wheel to the left or right.
Turn the steering wheel to the locking position
before you switch off the engine so that you
don’t have to exert your self when locking or
unlocking the steering.
Warning!
Danger of injury. Hot engine compartment
components can burn skin on contact.
f Before working on any part in the engine
compartment, turn the engine off and let it cool
down sufficiently. Risk of burn injury when standing near or
coming into contact with the exhaust pipe.
The exhaust pipe is hot wh
en the vehicle is running
and remains hot for some time after the vehicle is
turned off.
f To prevent injury, make a point of noting where
your vehicle’s exhaust pipe is, avoid placing
your legs near the exhaust pipe, and closely
supervise children around the vehicle when the
exhaust pipe could be hot.
A hot exhaust pipe can cause serious burns.
Engine-compartment blower,
radiator fan The radiator and radiator fans are in the front of
the car.
The engine-compartment bl ower is mounted in the
engine compartment.
Warning!
Risk of injury.
After the engine is switched off, the engine-
compartment temperature is monitored for
approx. 30 minutes.
During this period, and depending on tem-
perature, the engine-compartment blower
may continue to run or start to run.
f Carry out work in these areas only with the en-
gine off, the ignition off, and exercise extreme
caution. Risk of injury. The radiator fans in the front
end of the car may be operating or
unexpectedly start operating when the
engine is switched on.
f
Carry out work in these areas only with the en-
gine switched off.
Automatic garage door The ignition system in your Porsche may interfere
with your electronically operated garage door.
fTo check this, drive your Porsche close to the
garage door. Make sure not to interfere with
the operating range of the door.
f Run the engine at different speeds.
f If the garage door opens or closes without you
operating the garage door unit in your car,
contact the dealer who installed the automatic
garage door to have the frequency and/or
coding of the garage door signal changed or
modified.
Page 131 of 294

Instruments, On-Board Computer, Warnings
129
Check Engine
(Emission Control)The emission control system detects malfunctions
early that could, for example, cause increased
pollutant emissions or consequential damage.
Faults are indicated by a continuously lit or
flashing instrument panel warning light.
The faults are recorded in the control unit's fault
memory.
The warning light in the instrument panel lights up
when the ignition is switched on as a bulb check
and goes out approx. 4 seconds after the engine
starts. If the warning light does not light up, have
the bulb replaced promptly.
The warning light in the instrument panel flashes to
indicate operating states (e.g. engine misfiring)
which might cause damage to certain parts of the
emission control system.
fIn this case, immediately reduce the engine
load by easing off the accelerator.
f In order to avoid consequential damage to the
engine or emission control system (e.g. cata-
lytic converter), have the fault diagnosed and
rectified immediately at the nearest authorized
Porsche dealer. If the warning light in the
instrument panel lights up
permanently without flashing before and remains
on while driving, it suggests:
– a potential engine control problem and the need for system service or
– an improperly fastened tank cap or
– the vehicle was refueled while the engine was running.
f Stop immediately at a suitable and secure
place and check tank cap for proper fastening.
If tank cap was fastened correctly, see your au-
thorized Porsche dealer for service as soon as
possible.
Caution!
If the check engine warning light in the in-
strument panel is flashing, serious catalytic
converter damage and power loss will soon
occur.
Prolonged driving with the check engine war-
ning light on could cause damage to the
emission control system. It also could affect
fuel economy and driveability.
f Have the fault remedied at the nearest authorized Porsche dealer immediately.
Warning Light
Page 142 of 294

140
Instruments, On-Board Computer, Warnings
CHRONO
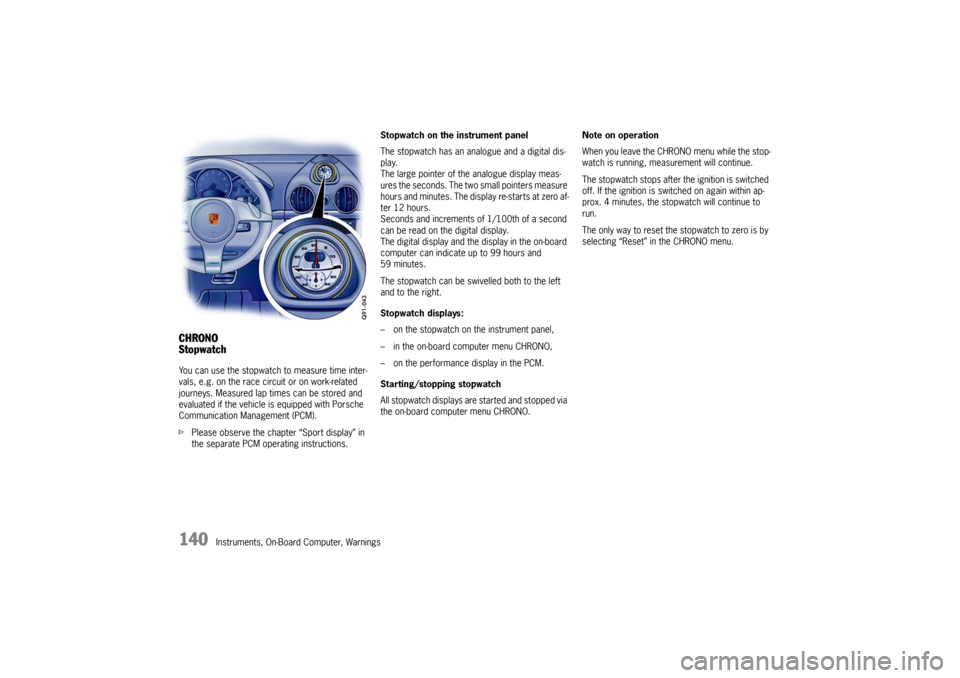
StopwatchYou can use the stopwatch to measure time inter-
vals, e.g. on the race circuit or on work-related
journeys. Measured lap times can be stored and
evaluated if the vehicle is equipped with Porsche
Communication Management (PCM).
fPlease observe the chapte r “Sport display” in
the separate PCM operating instructions. Stopwatch on the instrument panel
The stopwatch has an analogue and a digital dis-
play.
The large pointer of the analogue display meas-
ures the seconds. The two small pointers measure
hours and minutes. The display re-starts at zero af-
ter 12 hours.
Seconds and increments of
1/100th of a second
can be read on the digital display.
The digital display and the display in the on-board
computer can indicate up to 99 hours and
59 minutes.
The stopwatch can be swiv elled both to the left
and to the right.
Stopwatch displays:
– on the stopwatch on the instrument panel,
– in the on-board computer menu CHRONO,
– on the performance display in the PCM.
Starting/stopping stopwatch
All stopwatch displays are started and stopped via
the on-board computer menu CHRONO. Note on operation
When you leave the CHRONO menu while the stop-
watch is running, meas
urement will continue.
The stopwatch stops after the ignition is switched
off. If the ignition is sw itched on again within ap-
prox. 4 minutes, the stopwatch will continue to
run.
The only way to reset the stopwatch to zero is by
selecting “Reset” in the CHRONO menu.
Page 143 of 294
Instruments, On-Board Computer, Warnings
141
Starting the timing
fPush operating lever forward.
The selection field is switched on.
f Select CHRONO with the operating lever. f
Push operating lever forward. fPush operating lever forward.
The time runs on all stopwatch displays.
The on-board computer display changes to the
“Stop timing/Intermediate time” selection.
Page 144 of 294
142
Instruments, On-Board Computer, Warnings
Stopping the timing
After time measurement is started, the on-board
computer display changes
to the “Stop timing/In-
termediate time”.
f Select “Stop timing” with the operating lever. f
Push lever forward.
The time is stopped in all stopwatch displays,
and the on-board computer display changes to
the “Continue/Reset” selection.
The timing can be continued or reset to zero. Continue timing
After timing has been stopped, the on-board com-
puter display changes to the “Continue/Reset” se-
lection.
Page 145 of 294
Instruments, On-Board Computer, Warnings
143
fPush operating lever forward.
The stopwatch displays continue the timing.
The on-board computer display returns to the
“Stop timing/Intermediate time” selection. You
can stop the stopwatch or measure an inter-
mediate time. Resetting the time
After timing has been stopped, the on-board com-
puter display changes to the “Continue/Reset” se-
lection.
f
Select “Reset” with the operating lever. f
Push operating lever forward.
The display returns to the “Start timing”
selection.
The stopwatch displays in the instrument panel
and the on-board computer are reset to zero.
Page 146 of 294
144
Instruments, On-Board Computer, Warnings
A-Lap
B - Intermediate timeDisplaying intermediate times
Several intermediate time s can be displayed for a
route or for a lap on the race circuit. The interme-
diate times B are for your information.
Measured lap times A can be stored and evaluat-
ed if the vehicle is equipped with Porsche Commu-
nication Management (PCM). After timing has been started, the on-board com-
puter display changes to the “Stop timing/Inter-
mediate time” selection.
f
Select “Intermediate time” with the operating
lever and push the operating lever forwards.
The intermediate time will be displayed for
approx. 5 seconds.