2010 PONTIAC VIBE wheel
[x] Cancel search: wheelPage 251 of 318
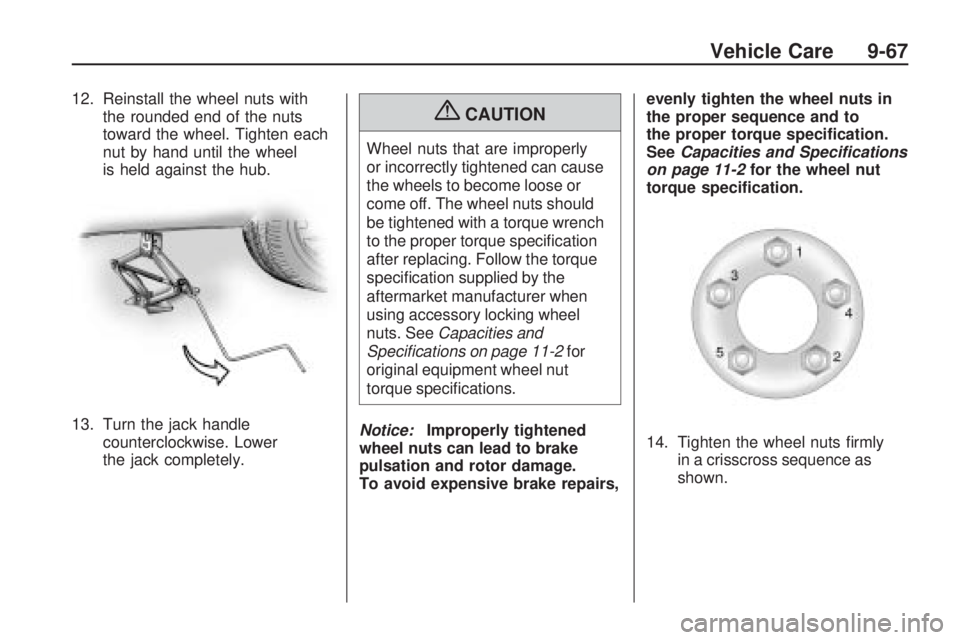
12. Reinstall the wheel nuts withthe rounded end of the nuts
toward the wheel. Tighten each
nut by hand until the wheel
is held against the hub.
13. Turn the jack handle counterclockwise. Lower
the jack completely.{CAUTION
Wheel nuts that are improperly
or incorrectly tightened can cause
the wheels to become loose or
come off. The wheel nuts should
be tightened with a torque wrench
to the proper torque specification
after replacing. Follow the torque
specification supplied by the
aftermarket manufacturer when
using accessory locking wheel
nuts. See Capacities and
Speci�cations on page 11-2 for
original equipment wheel nut
torque specifications.
Notice: Improperly tightened
wheel nuts can lead to brake
pulsation and rotor damage.
To avoid expensive brake repairs, evenly tighten the wheel nuts in
the proper sequence and to
the proper torque speci�cation.
See
Capacities and Specifications
on page 11-2 for the wheel nut
torque speci�cation.
14. Tighten the wheel nuts firmly in a crisscross sequence as
shown.
Vehicle Care 9-67
Page 252 of 318
Storing the Compact
Spare Tire
{CAUTION
Storing a jack, a tire, or other
equipment in the passenger
compartment of the vehicle could
cause injury. In a sudden stop or
collision, loose equipment could
strike someone. Store all these
in the proper place.
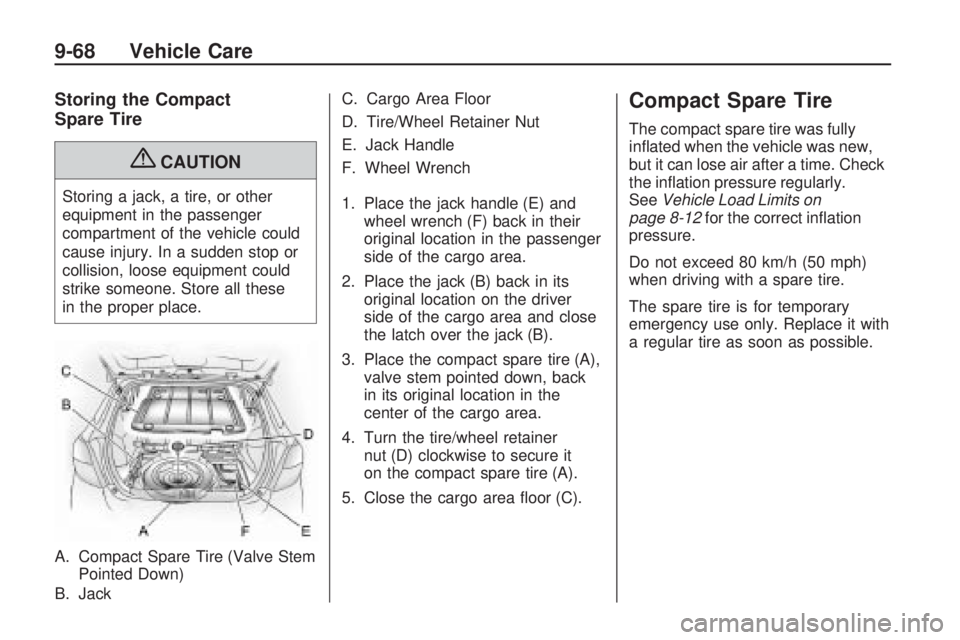
A. Compact Spare Tire (Valve Stem Pointed Down)
B. Jack C. Cargo Area Floor
D. Tire/Wheel Retainer Nut
E. Jack Handle
F. Wheel Wrench
1. Place the jack handle (E) and
wheel wrench (F) back in their
original location in the passenger
side of the cargo area.
2. Place the jack (B) back in its original location on the driver
side of the cargo area and close
the latch over the jack (B).
3. Place the compact spare tire (A), valve stem pointed down, back
in its original location in the
center of the cargo area.
4. Turn the tire/wheel retainer nut (D) clockwise to secure it
on the compact spare tire (A).
5. Close the cargo area floor (C).
Compact Spare Tire
The compact spare tire was fully
inflated when the vehicle was new,
but it can lose air after a time. Check
the inflation pressure regularly.
See Vehicle Load Limits on
page 8-12 for the correct inflation
pressure.
Do not exceed 80 km/h (50 mph)
when driving with a spare tire.
The spare tire is for temporary
emergency use only. Replace it with
a regular tire as soon as possible.
9-68 Vehicle Care
Page 253 of 318

Notice:When the compact spare
is installed, do not take the vehicle
through an automatic car wash
with guide rails. The compact
spare can get caught on the rails
which can damage the tire, wheel
and other parts of the vehicle.
Do not use the temporary spare on
other vehicles.
Do not mix the temporary spare
tire or wheel with other wheels or
tires. They will not fit. Keep the
spare tire and its wheel together.
Notice: Tire chains will not �t
the compact spare. Using them
can damage the vehicle and can
damage the chains too. Do not use
tire chains on the compact spare.Jump Starting
If your vehicle’s battery has run
down, you may want to use another
vehicle and some jumper cables
to start your vehicle. Be sure to use
the following steps to do it safely.
{CAUTION
Batteries can hurt you. They can
be dangerous because:
•They contain acid that can
burn you.
•They contain gas that can
explode or ignite.
•They contain enough
electricity to burn you.
If you do not follow these steps
exactly, some or all of these
things can hurt you.
Notice: Ignoring these steps
could result in costly damage to
the vehicle that would not be
covered by the warranty. Trying to start the vehicle by
pushing or pulling it will not work,
and it could damage the vehicle.
1. Check the other vehicle. It must
have a 12-volt battery with a
negative ground system.
Notice: If the other vehicle’s
system is not a 12-volt system
with a negative ground, both
vehicles can be damaged. Only
use vehicles with 12-volt systems
with negative grounds to jump
start your vehicle.
2. Get the vehicles close enough so the jumper cables can reach,
but be sure the vehicles are not
touching each other. If they are, it
could cause a ground connection
you do not want. You would not
be able to start your vehicle, and
the bad grounding could damage
the electrical systems.
Vehicle Care 9-69
Page 257 of 318
To disconnect the jumper cables
from both vehicles, do the following:
1. Disconnect the black negative (−)
cable from the vehicle that had
the dead battery.
2. Disconnect the black negative ( −)
cable from the vehicle with the
good battery.
3. Disconnect the red positive (+) cable from the vehicle with the
good battery.
4. Disconnect the red positive (+) cable from the other vehicle.Towing
Towing the Vehicle
To avoid damage, the disabled
vehicle should be towed with all
four wheels off the ground. Consult
your dealer/retailer or a professional
towing service if the disabled vehicle
must be towed. See Roadside
Assistance Program on page 12-6 .
To tow the vehicle behind
another vehicle for recreational
purposes — such as behind
a motorhome, see Recreational
Vehicle Towing following.
Recreational Vehicle
Towing
Recreational vehicle towing means
towing the vehicle behind another
vehicle – such as behind a
motorhome. The two most common
types of recreational vehicle towing
are known as dinghy towing and
dolly towing. Dinghy towing is towing
the vehicle with all four wheels on
the ground. Dolly towing is towing
the vehicle with two wheels on the
ground and two wheels up on a
device known as a dolly.
Vehicle Care 9-73
Page 258 of 318

Here are some important things
to consider before recreational
vehicle towing:
•What is the towing capacity of the
towing vehicle? Be sure to read
the tow vehicle manufacturer’s
recommendations.
•What is the distance that will be
travelled? Some vehicles have
restrictions on how far and how
long they can tow.
•Is the proper equipment going to
be used? See your dealer/retailer
or trailering professional for
additional advice and equipment
recommendations.
•Is the vehicle ready to be towed?
Just as preparing the vehicle for a
long trip, make sure the vehicle is
prepared to be towed.
Dinghy Towing
If the vehicle has an automatic
transmission, it cannot be dinghy
towed. See “Dolly Towing” for more
information regarding towing the
vehicle.If the vehicle has a manual
transmission, it can be dinghy
towed.
When dinghy towing, be sure to
follow the posted legal speed limit.
1. Put the shift lever in Neutral.
2. Turn the ignition to
ACC/ACCESSORY to avoid
locking the steering wheel.
Make sure the audio system
is turned off and that nothing is
plugged into the power outlets.
3. Release the parking brake. After dinghy towing, let the engine
idle for more than three minutes
before driving the vehicle.
Do not tow the vehicle from the
rear. The vehicle could be badly
damaged and the repairs would
not be covered by the warranty.
Dolly Towing (All-Wheel-Drive
Vehicles)
All-wheel-drive vehicles must not
be towed with two wheels on the
ground. To properly tow these
vehicles, they should be placed on a
platform trailer with all four wheels off
of the ground.
9-74 Vehicle Care
Page 259 of 318
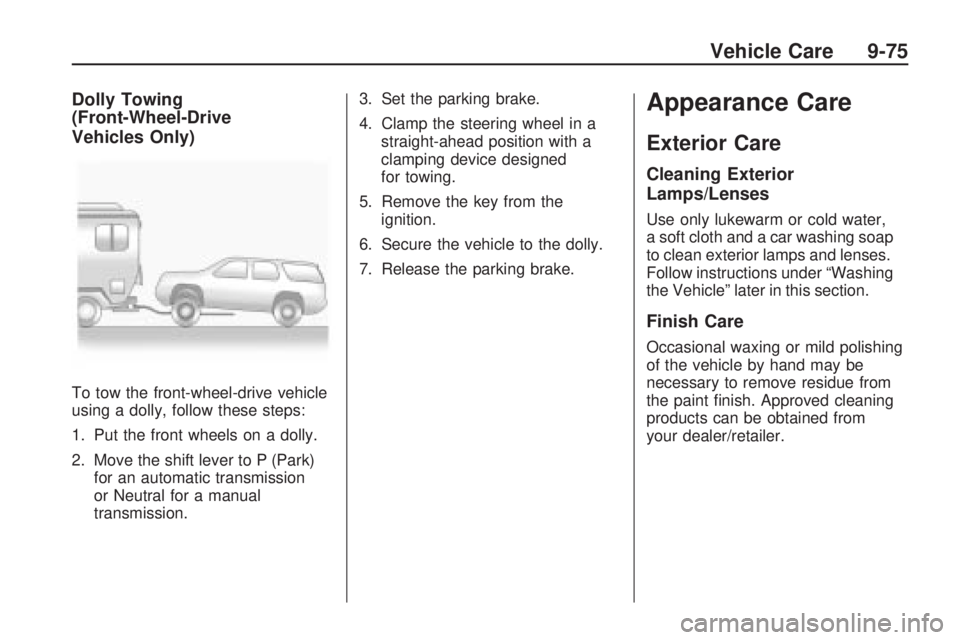
Dolly Towing
(Front-Wheel-Drive
Vehicles Only)
To tow the front-wheel-drive vehicle
using a dolly, follow these steps:
1. Put the front wheels on a dolly.
2. Move the shift lever to P (Park)for an automatic transmission
or Neutral for a manual
transmission. 3. Set the parking brake.
4. Clamp the steering wheel in a
straight-ahead position with a
clamping device designed
for towing.
5. Remove the key from the ignition.
6. Secure the vehicle to the dolly.
7. Release the parking brake.
Appearance Care
Exterior Care
Cleaning Exterior
Lamps/Lenses
Use only lukewarm or cold water,
a soft cloth and a car washing soap
to clean exterior lamps and lenses.
Follow instructions under “Washing
the Vehicle” later in this section.
Finish Care
Occasional waxing or mild polishing
of the vehicle by hand may be
necessary to remove residue from
the paint finish. Approved cleaning
products can be obtained from
your dealer/retailer.
Vehicle Care 9-75
Page 262 of 318
Wheels and Trim — Aluminum
or Chrome
The vehicle may have either
aluminum or chrome-plated wheels.
Keep the wheels clean using a
soft clean cloth with mild soap
and water. Rinse with clean water.
After rinsing thoroughly, dry with
a soft clean towel. A wax may
then be applied.
Notice:Chrome wheels and
other chrome trim may be
damaged if the vehicle is not
washed after driving on roads
that have been sprayed with
magnesium, calcium or sodium
chloride. These chlorides are
used on roads for conditions
such as ice and dust. Always
wash the vehicle’s chrome with
soap and water after exposure. Notice:
Using strong soaps,
chemicals, abrasive polishes,
cleaners, brushes, or cleaners
that contain acid on aluminum
or chrome-plated wheels,
could damage the surface of the
wheel(s). The repairs would
not be covered by the vehicle
warranty. Use only approved
cleaners on aluminum or
chrome-plated wheels.
The surface of these wheels is
similar to the painted surface of the
vehicle. Do not use strong soaps,
chemicals, abrasive polishes,
abrasive cleaners, cleaners with
acid, or abrasive cleaning brushes
on them because the surface could
be damaged. Do not use chrome
polish on aluminum wheels. Notice:
Using chrome polish on
aluminum wheels could damage
the wheels. The repairs would
not be covered by the vehicle
warranty. Use chrome polish
on chrome wheels only.
Use chrome polish only on
chrome-plated wheels, but avoid
any painted surface of the wheel,
and buff off immediately after
application.
Notice: Driving the vehicle
through an automatic car wash
that has silicone carbide tire
cleaning brushes, could damage
the aluminum or chrome-plated
wheels. The repairs would not be
covered by the vehicle warranty.
Never drive a vehicle that has
aluminum or chrome-plated
wheels through an automatic car
wash that uses silicone carbide
tire cleaning brushes.
9-78 Vehicle Care
Page 284 of 318
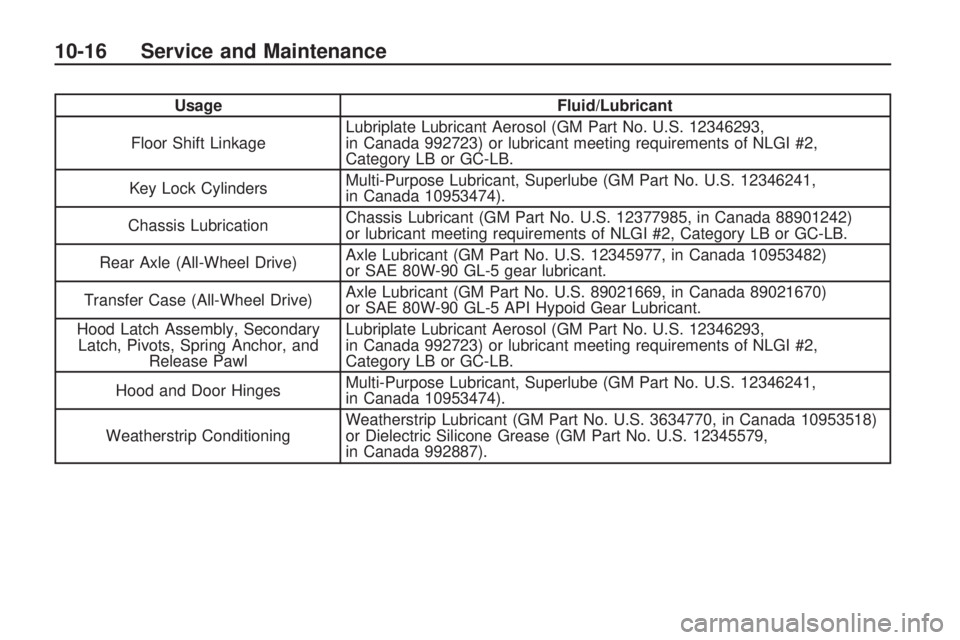
UsageFluid/Lubricant
Floor Shift Linkage Lubriplate Lubricant Aerosol (GM Part No. U.S. 12346293,
in Canada 992723) or lubricant meeting requirements of NLGI #2,
Category LB or GC-LB.
Key Lock Cylinders Multi-Purpose Lubricant, Superlube (GM Part No. U.S. 12346241,
in Canada 10953474).
Chassis Lubrication Chassis Lubricant (GM Part No. U.S. 12377985, in Canada 88901242)
or lubricant meeting requirements of NLGI #2, Category LB or GC-LB.
Rear Axle (All-Wheel Drive) Axle Lubricant (GM Part No. U.S. 12345977, in Canada 10953482)
or SAE 80W-90 GL-5 gear lubricant.
Transfer Case (All-Wheel Drive) Axle Lubricant (GM Part No. U.S. 89021669, in Canada 89021670)
or SAE 80W-90 GL-5 API Hypoid Gear Lubricant.
Hood Latch Assembly, Secondary Latch, Pivots, Spring Anchor, and Release Pawl Lubriplate Lubricant Aerosol (GM Part No. U.S. 12346293,
in Canada 992723) or lubricant meeting requirements of NLGI #2,
Category LB or GC-LB.
Hood and Door Hinges Multi-Purpose Lubricant, Superlube (GM Part No. U.S. 12346241,
in Canada 10953474).
Weatherstrip Conditioning Weatherstrip Lubricant (GM Part No. U.S. 3634770, in Canada 10953518)
or Dielectric Silicone Grease (GM Part No. U.S. 12345579,
in Canada 992887).
10-16 Service and Maintenance