Page 109 of 330

499
!
Driving
Emergency braking
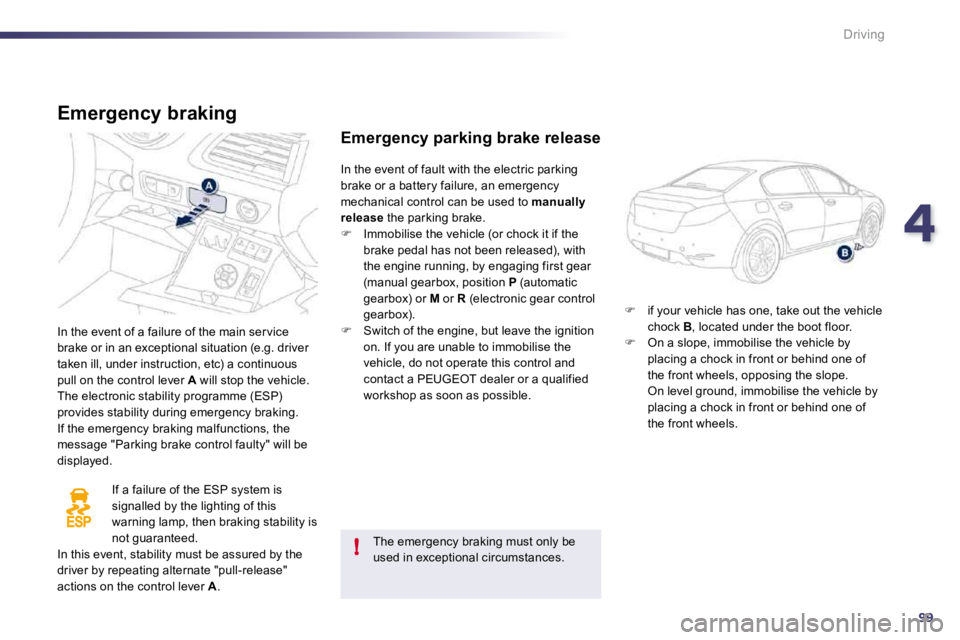
In the event of a failure of the main ser vice brake or in an exceptional situation (e.g. driver taken ill, under instruction, etc) a continuous pull on the control lever A will stop the vehicle. The electronic stability programme (ESP) provides stability during emergency braking. If the emergency braking malfunctions, the message "Parking brake control faulty" will be displayed.
If a failure of the ESP system is signalled by the lighting of this warning lamp, then braking stability is
not guaranteed. In this event, stability must be assured by the driver by repeating alternate "pull-release" actions on the control lever A .
Emergency parking brake release
� if your vehicle has one, take out the vehicle chock B , located under the boot floor. � On a slope, immobilise the vehicle by placing a chock in front or behind one of the front wheels, opposing the slope. On level ground, immobilise the vehicle by placing a chock in front or behind one of the front wheels.
In the event of fault with the electric parking brake or a battery failure, an emergency mechanical control can be used to manually release the parking brake. � Immobilise the vehicle (or chock it if the brake pedal has not been released), with the engine running, by engaging first gear (manual gearbox, position P (automatic gearbox) or M or R (electronic gear control gearbox). � Switch of the engine, but leave the ignition on. If you are unable to immobilise the vehicle, do not operate this control and contact a PEUGEOT dealer or a qualified workshop as soon as possible.
The emergency braking must only be used in exceptional circumstances.
Page 113 of 330

499
!
Driving
Emergency braking
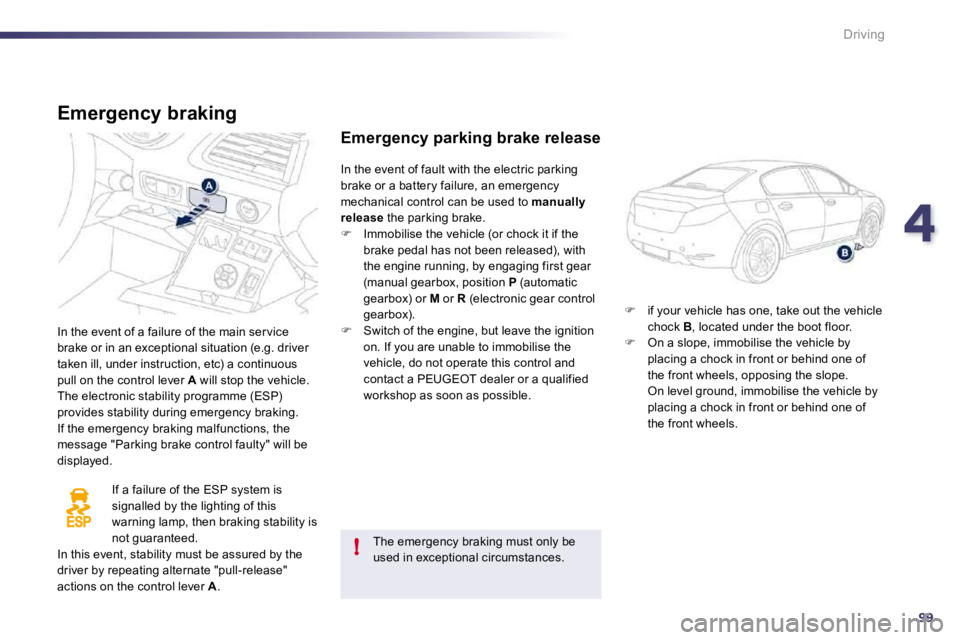
In the event of a failure of the main ser vice brake or in an exceptional situation (e.g. driver taken ill, under instruction, etc) a continuous pull on the control lever A will stop the vehicle. The electronic stability programme (ESP) provides stability during emergency braking. If the emergency braking malfunctions, the message "Parking brake control faulty" will be displayed.
If a failure of the ESP system is signalled by the lighting of this warning lamp, then braking stability is
not guaranteed. In this event, stability must be assured by the driver by repeating alternate "pull-release" actions on the control lever A .
Emergency parking brake release
� if your vehicle has one, take out the vehicle chock B , located under the boot floor. � On a slope, immobilise the vehicle by placing a chock in front or behind one of the front wheels, opposing the slope. On level ground, immobilise the vehicle by placing a chock in front or behind one of the front wheels.
In the event of fault with the electric parking brake or a battery failure, an emergency mechanical control can be used to manually release the parking brake. � Immobilise the vehicle (or chock it if the brake pedal has not been released), with the engine running, by engaging first gear (manual gearbox, position P (automatic gearbox) or M or R (electronic gear control gearbox). � Switch of the engine, but leave the ignition on. If you are unable to immobilise the vehicle, do not operate this control and contact a PEUGEOT dealer or a qualified workshop as soon as possible.
The emergency braking must only be used in exceptional circumstances.
Page 153 of 330

5
141
!
Visibility
Rear wiper
If a significant accumulation of snow or ice is present, or when using a bicycle
carrier on the boot, deactivate the automatic rear wiper via the instrument panel screen configuration menu.
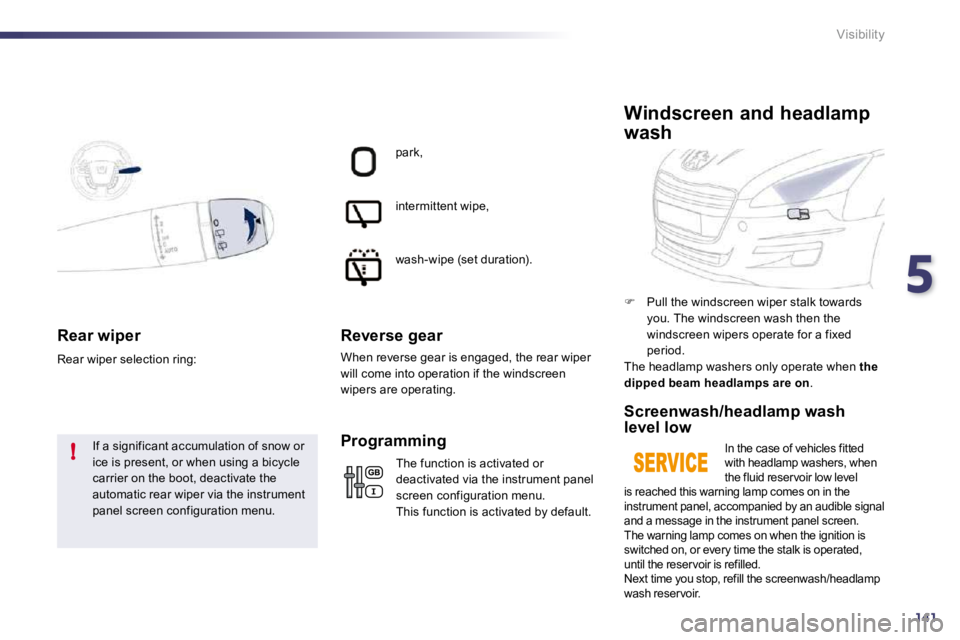
Rear wiper selection ring:
park,
intermittent wipe,
wash-wipe (set duration).
Reverse gear
When reverse gear is engaged, the rear wiper will come into operation if the windscreen wipers are operating.
The function is activated or deactivated via the instrument panel screen configuration menu. This function is activated by default.
Programming
� Pull the windscreen wiper stalk towards you. The windscreen wash then the windscreen wipers operate for a fixed period. The headlamp washers only operate when the dipped beam headlamps are on .
Windscreen and headlamp
wash
Screenwash/headlamp wash level low
In the case of vehicles fitted with headlamp washers, when the fluid reservoir low level is reached this warning lamp comes on in the instrument panel, accompanied by an audible signal and a message in the instrument panel screen. The warning lamp comes on when the ignition is switched on, or every time the stalk is operated, until the reservoir is refilled. Next time you stop, refill the screenwash/headlamp wash reservoir.
Page 184 of 330
170
Practical information
boot floor.
Complete system consisting of a compressor and a sealant car tridge which permits temporar y repair of a tyre so that you can pairdrive to the nearest garage. It is designed to repair most punctures which could affect the tyre, located on the tyre tread or shoulder.
Temporary puncture repair kit
Access to the kit
List of tools
All of these tools are specific to your vehicle and can vary according to equipment. Do not use them for other purposes. 1. 12 V compressor. Contains a sealant car tridge for the
temporary repair of a tyre and can also be used for adjusting tyre pressures. 2. One chock * to block one of the front wheels of the vehicle. 3. Removable towing eye. See "Towing the vehicle".
* Depending on destination country or equipment.
Page 190 of 330
176
Practical information
Changing a wheel
Procedure for changing a faulty wheel for the spare wheel using the tools provided with the vehicle.
The tools are installed in the boot under the floor. To gain access to them: � open the boot, � position the floor ver tically (SW: in its guide) for access to the tools.
Access to the tools
List of tools
All of these tools are specific to your vehicle and can vary according to the level of equipment. Do not use them for other purposes. 1. Wheelbrace. For removing the wheel trim and removing the wheel bolts. 2. Jack with integral handle. For raising the vehicle.
3. "Bolt cover" tool. For removing the bolt protectors (covers) on alloy wheels. 4. Socket for the security bolts (located in the glove box).
For adapting the wheelbrace to the special "security" bolts. 5. One wheel chock for immobilising the vehicle. 6. Towing eye. See "Towing the vehicle".
Page 191 of 330
8177
i
Practical information
Wheel with trim
When refitting the wheel , refit the trim star ting by placing its notch facing the valve and press around its edge with the palm of your hand.
The spare wheel is installed in the boot under the floor. According to country, the spare wheel may be steel, alloy or of the "space-saver" type. To gain access to it, refer to the paragraph
"Access to the tools" on the previous page.
Access to the spare wheel
Taking out the wheel
� Unscrew the yellow central bolt. � Raise the spare wheel towards you from the rear. � Take the wheel out of the boot.
Depending on your vehicle's equipment, the spare wheel is secured either by a strap or a central bolt. For the bolt, the procedure is given below.
Page 192 of 330
8177
i
Practical information
Wheel with trim
When refitting the wheel , refit the trim star ting by placing its notch facing the valve and press around its edge with the palm of your hand.
The spare wheel is installed in the boot under the floor. According to country, the spare wheel may be steel, alloy or of the "space-saver" type. To gain access to it, refer to the paragraph
"Access to the tools" on the previous page.
Access to the spare wheel
Taking out the wheel
� Unscrew the yellow central bolt. � Raise the spare wheel towards you from the rear. � Take the wheel out of the boot.
Depending on your vehicle's equipment, the spare wheel is secured either by a strap or a central bolt. For the bolt, the procedure is given below.
Page 196 of 330
8181
i
Practical information
Fitting a wheel
Fitting the "space-saver" spare wheel
If your vehicle is fitted with alloy wheels, when tightening the bolts on fitting, it is normal to notice that the washers
do not come into contact with the "space-saver" spare wheel. The wheel is secured by the conical sur face of each bolt.
After changing a wheel
To store the punctured wheel in the boot correctly, first remove the central cover. When using the "space-saver" type spare wheel, do not exceed 50 mph (80 km/h). Have the tightening of the bolts and the pressure of the spare wheel checked by a PEUGEOT dealer or a qualified workshop without delay. Have the punctured wheel repaired and refitted to the vehicle as soon as possible.
List of operations
� Put the wheel in place on the hub. � Screw in the bolts fully by hand. � Pre-tighten the security bolt using the wheelbrace 1 fitted with the security socket 4 . � Pre-tighten the other bolts using the wheelbrace 1 only.