Page 63 of 336

ii
61
COMFORT
When the engine is cold, to prevent
too great a distribution of cold air,
the air fl ow will reach its optimum
level gradually.
In cold weather, it favours the dis-
tribution of warm air to the wind-
screen, side windows and footwells
only. On entering the vehicle, if the in-
terior temperature is much colder
or warmer than the comfort value,
there is no need to change the val-
ue displayed in order to obtain the
comfort required. The system cor-
rects the difference in temperature
automatically and as quickly as
possible.
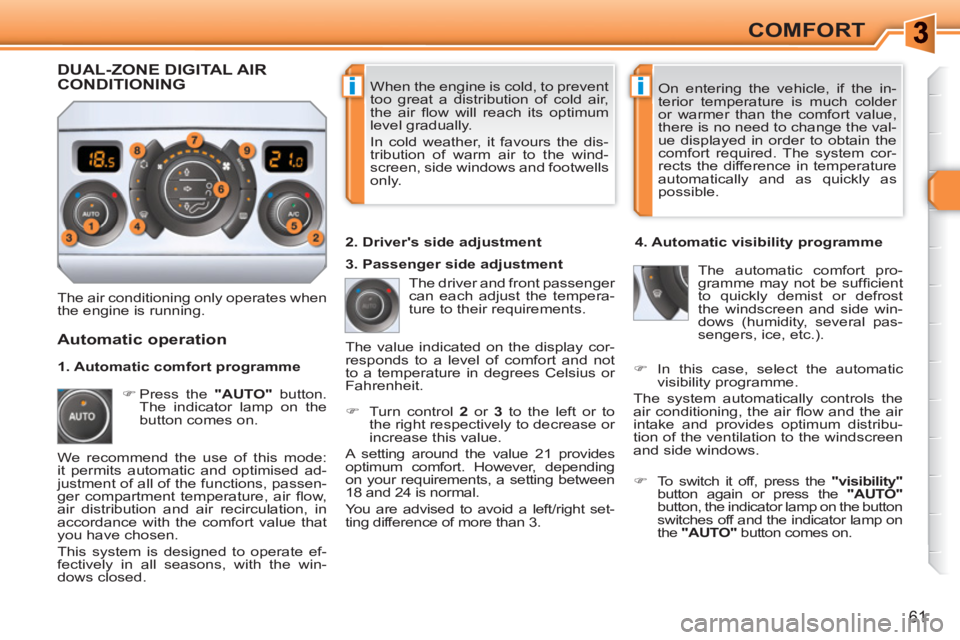
The air conditioning only operates when
the engine is running. The driver and front passenger
can each adjust the tempera-
ture to their requirements.
�)
Turn control 2
or 3
to the left or to
the right respectively to decrease or
increase this value.
A setting around the value 21 provides
optimum comfort. However, depending
on your requirements, a setting between
18 and 24 is normal.
You are advised to avoid a left/right set-
ting difference of more than 3.
4. Automatic visibility programme
The automatic comfort pro-
gramme may not be suffi cient
to quickly demist or defrost
the windscreen and side win-
dows (humidity, several pas-
sengers, ice, etc.).
Automatic operation
�)
Press the "AUTO"
button.
The indicator lamp on the
button comes on.
2. Driver's side adjustment
DUAL-ZONE DIGITAL AIRCONDITIONING
We recommend the use of this mode:
it permits automatic and optimised ad-
justment of all of the functions, passen-
ger compartment temperature, air fl ow,
air distribution and air recirculation, in
accordance with the comfort value that
you have chosen.
This system is designed to operate ef-
fectively in all seasons, with the win-
dows closed. The value indicated on the display cor-
responds to a level of comfort and not
to a temperature in degrees Celsius or
Fahrenheit.
�)
To switch it off, press the "visibility"
button again or press the "AUTO"
button, the indicator lamp on the button
switches off and the indicator lamp on
the "AUTO"
button comes on.
1. Automatic comfort programme
3. Passenger side adjustment
�)
In this case, select the automatic
visibility programme.
The system automatically controls the
air conditioning, the air fl ow and the air
intake and provides optimum distribu-
tion of the ventilation to the windscreen
and side windows.
Page 68 of 336

i
!
66
COMFORT
Storing driving positions
System which takes into account the
electrical settings of the driver's seat
and door mirrors. It enables you to store
up to two positions using the buttons on
the side of the driver's seat.
Ignition on or engine running
�)
Briefl y press button 1
or 2
to recall
the corresponding position.
An audible signal is heard indicating the
end of the adjustment.
Storing a position Storing a new position cancels the
previous position.
Do not try to store a driving position
while driving.
Recalling a stored position
Vehicle moving
�)
Press and hold button 1
or 2
until
the audible signal is heard indicating
the end of the adjustment.
Using buttons M/1/2
�)
Switch on the ignition.
�)
Adjust your seat and the door
mirrors.
�)
Press button M
, then press button 1
or 2
within four seconds.
An audible signal is heard indicating
that the position has been stored. When the ignition is on, after a few
consecutive position recalls, the
function will be deactivated until
the engine is started, to prevent
discharging of the battery.
Heated seats control
With the engine running, the front seats
can be heated separately.
�)
Use the adjustment dial, placed on
the side of each front seat, to switch
on and select the level of heating
required:
0:
Off.
1
:
Low.
2
:
Medium.
3
:
High.
Page 69 of 336
!
67
COMFORT
REAR SEATS
Never drive with the head restraints
removed; they must be in place
and in the high position when pas-
sengers are seated in the rear.
Rear head restraints
These have a high position (comfort
and safety) and a low position (rear visi-
bility).
They can also be removed.
To remove a head restraint:
�)
pull the head restraint fully forwards
and upwards at the same time,
�)
then, press the lug A
.
Removing the seat cushion
�)
Move the corresponding front seat
forwards if necessary.
�)
Raise the seat cushion 1
lifting it
with a hand from the rear.
�)
Tilt the seat cushion 1
fully against
the front seat.
�)
Remove the seat cushion 1
from its
fi xings by pulling upwards.
Refitting the seat cushion
�)
Position the seat cushion 1
vertically in
its fi xings.
�)
Fold down the seat cushion 1
.
�)
Press on the seat cushion to secure it.
Bench seat, the left-hand (2/3) or right-
hand (1/3) section of which can be folded
to adapt the boot load space.
Page 70 of 336

!
i
68
COMFORT
Folding the seat
In order to fold a rear seat without any
risk of damage, always start with the
seat cushion,
never with the seat
back:
�)
move the corresponding front seat
forwards if necessary,
�)
raise the seat cushion 1
lifting it with
a hand from the rear,
�)
tilt the seat cushion 1
fully against
the front seat,
Returning the seat back to its
original position
When returning the rear seat back to its
original position:
�)
put the seat back 3
in the upright
position and secure it,
�)
fold the seat cushion 1
,
�)
refi t the head restraints or put them
back in place.
�)
check that the seat belt is positioned
correctly on the side of the seat back,
�)
lower or remove the head restraints
if necessary,
�)
pull the control 2
forwards to release
the seat back 3
,
�)
tilt the seat back 3
.
When returning the rear seat back
to its original position, take care not
to trap the seat belts and ensure
that their buckles are positioned
correctly. The seat cushion 1
can be removed
to increase the loading volume.
Page 72 of 336

!
70
COMFORT
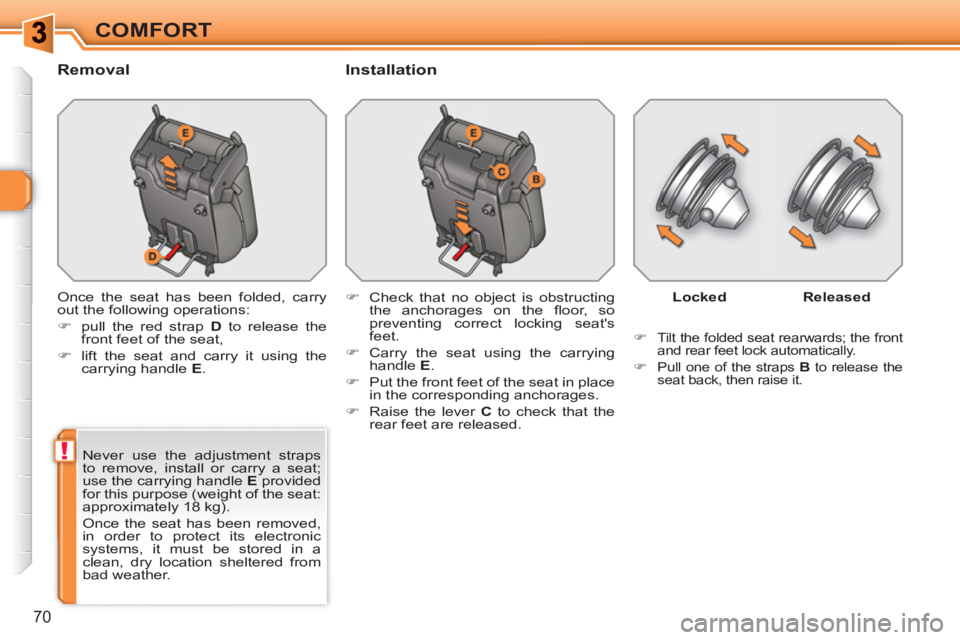
Removal
Installation
Once the seat has been folded, carry
out the following operations:
�)
pull the red strap D
to release the
front feet of the seat,
�)
lift the seat and carry it using the
carrying handle E
.
Never use the adjustment straps
to remove, install or carry a seat;
use the carrying handle E
provided
for this purpose (weight of the seat:
approximately 18 kg).
Once the seat has been removed,
in order to protect its electronic
systems, it must be stored in a
clean, dry location sheltered from
bad weather. Locked
Released
�)
Tilt the folded seat rearwards; the front
and rear feet lock automatically.
�)
Pull one of the straps B
to release the
seat back, then raise it.
�)
Check that no object is obstructing
the anchorages on the fl oor, so
preventing correct locking seat's
feet.
�)
Carry the seat using the carrying
handle E
.
�)
Put the front feet of the seat in place
in the corresponding anchorages.
�)
Raise the lever C
to check that the
rear feet are released.
Page 74 of 336
72
COMFORT
Installation
�)
First remove the anchorage covers
on the fl oor.
�)
Carry the seat using the carrying
handle E
.
�)
Put the seat's front feet in place in
the corresponding anchorages.
�)
Raise the bar B
to check that the
rear feet are released.
�)
Tilt the folded seat rearwards; the
front and rear feet lock automatically.
�)
Raise the seat back.
Page 77 of 336

!
i
i
75
COMFORT
The objects observed are, in real-
ity, closer than they appear.
Take this into account in order to
correctly judge the distance of ve-
hicles approaching from behind.
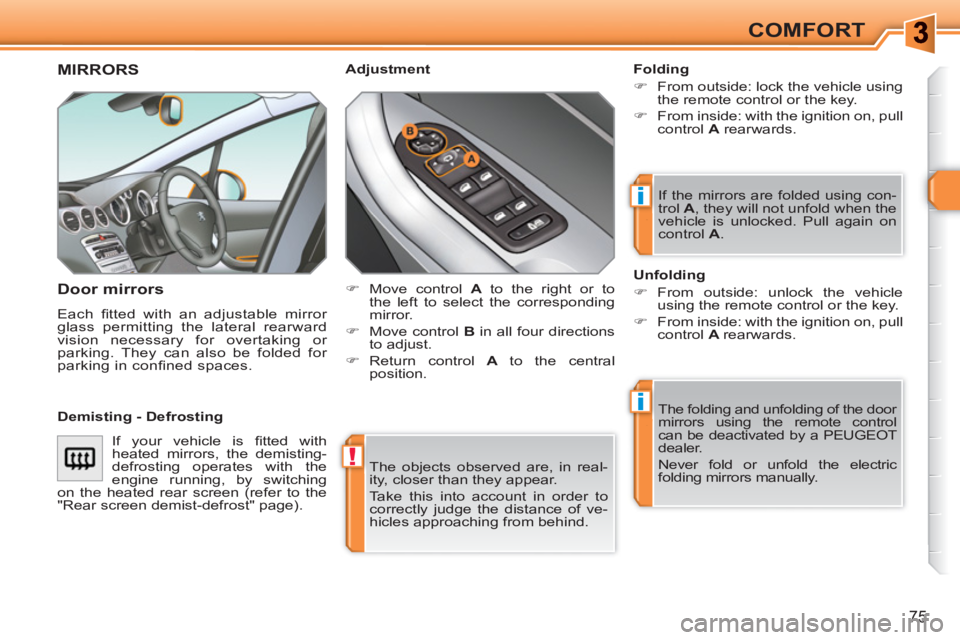
MIRRORS
Door mirrors
Each fi tted with an adjustable mirror
glass permitting the lateral rearward
vision necessary for overtaking or
parking. They can also be folded for
parking in confi ned spaces.
Folding
�)
From outside: lock the vehicle using
the remote control or the key.
�)
From inside: with the ignition on, pull
control A
rearwards.
The folding and unfolding of the door
mirrors using the remote control
can be deactivated by a PEUGEOT
dealer.
Never fold or unfold the electric
folding mirrors manually.
Adjustment
Unfolding
�)
From outside: unlock the vehicle
using the remote control or the key.
�)
From inside: with the ignition on, pull
control A
rearwards. If the mirrors are folded using con-
trol A
, they will not unfold when the
vehicle is unlocked. Pull again on
control A
.
�)
Move control A
to the right or to
the left to select the corresponding
mirror.
�)
Move control B
in all four directions
to adjust.
�)
Return control A
to the central
position.
Demisting - Defrosting
If your vehicle is fi tted with
heated mirrors, the demisting-
defrosting operates with the
engine running, by switching
on the heated rear screen (refer to the
"Rear screen demist-defrost" page).
Page 78 of 336

!
76
COMFORT
Adjustment
�)
Adjust the mirror so that the glass
is directed correctly in the "day"
position.
As a safety precaution, the mirrors
must be adjusted to reduce the
"blind spot".
Manual day/night model
Day/night position
�)
Pull the lever to change to the "night"
anti-dazzle position.
�)
Push the lever to change to the
normal "day" position.
Automatic tilting in reverse gear
System which provides a view of the
ground during parking manoeuvres in
reverse gear.
Switching on
�)
With the engine running, engage
reverse gear.
�)
Move control A
to the right or to
the left to select the corresponding
mirror.
The glass of the mirror selected tilts
downwards, in accordance with its pro-
gramming.
Programming
�)
With the engine running, engage
reverse gear.
�)
Select and adjust the left-hand and
right-hand mirrors in succession.
The adjustment is stored immediately.
Switching off
�)
Exit reverse gear and wait ten seconds.
or
�)
Return control A
to the central
position.
The mirror glass returns to its initial po-
sition.
The mirror glass also returns to its initial
position:
-
if the speed exceeds 6 mph (10 km/h),
- if the engine is switched off.
Rear view mirror
Adjustable mirror providing a central
rearward view.
Equipped with an anti-dazzle system,
useful in poor light.