Page 139 of 338
WARNING
The rear hatch must be closed securely
before driving. An open rear hatch could
allow dangerous exhaust gases to be
drawn inside the vehicle. See “Exhaust
gas” in the “Starting and driving” section
of this manual.
OPENING THE REAR HATCH
To open the rear hatch, unlock it with one of the
following operations, then push the opener
switch
�A.
● Push the power door lock switch to the
unlock position.
● Unlock all doors using the key.
● Press the
button on the keyfob (if
equipped) twice. See “Remote keyless entry
system” earlier in this section. ●
Push the rear hatch request switch or door
handle request switch (if equipped) twice.
See “NISSAN Intelligent Key™” earlier in this
section.
● Press the
button on the Intelligent Key
(if equipped) twice. See “NISSAN Intelligent
Key™” earlier in this section.
SPA2048
REAR HATCH (Hatchback)
3-24Pre-driving checks and adjustments
Page 140 of 338

REAR HATCH RELEASE
The rear hatch release mechanism allows the rear
hatch to be opened in the event of a discharged
battery.
To release the rear hatch from the inside of the
vehicle, perform the following operations:1. Fold the rear seats down. See “Folding rear seat” in the “Safety — seats, seat belts and
supplemental restraint system” section of
this manual. 2. Put a hand or a suitable tool in the underside
of the rear hatch to access the release lever
�A. Move the release lever to the right. The
rear hatch will be unlatched.
3. Push the rear hatch up to open.
NOTE:
If you had to open the rear hatch using this
lever, have your vehicle checked by a
NISSAN dealer as soon as possible.
WARNING
● Do not drive with the trunk lid open. This
could allow dangerous exhaust gases
to be drawn into the vehicle. See “Ex-
haust gas” in the “Starting and driving”
section of this manual.
● Closely supervise children when they
are around cars to prevent them from
playing and becoming locked in the
trunk where they could be seriously in-
jured. Keep the car locked, with the rear
seatback and trunk lid securely latched
when not in use, and prevent children’s
access to car keys.
LPD0352
TRUNK LID (Sedan)
Pre-driving checks and adjustments3-25
Page 141 of 338
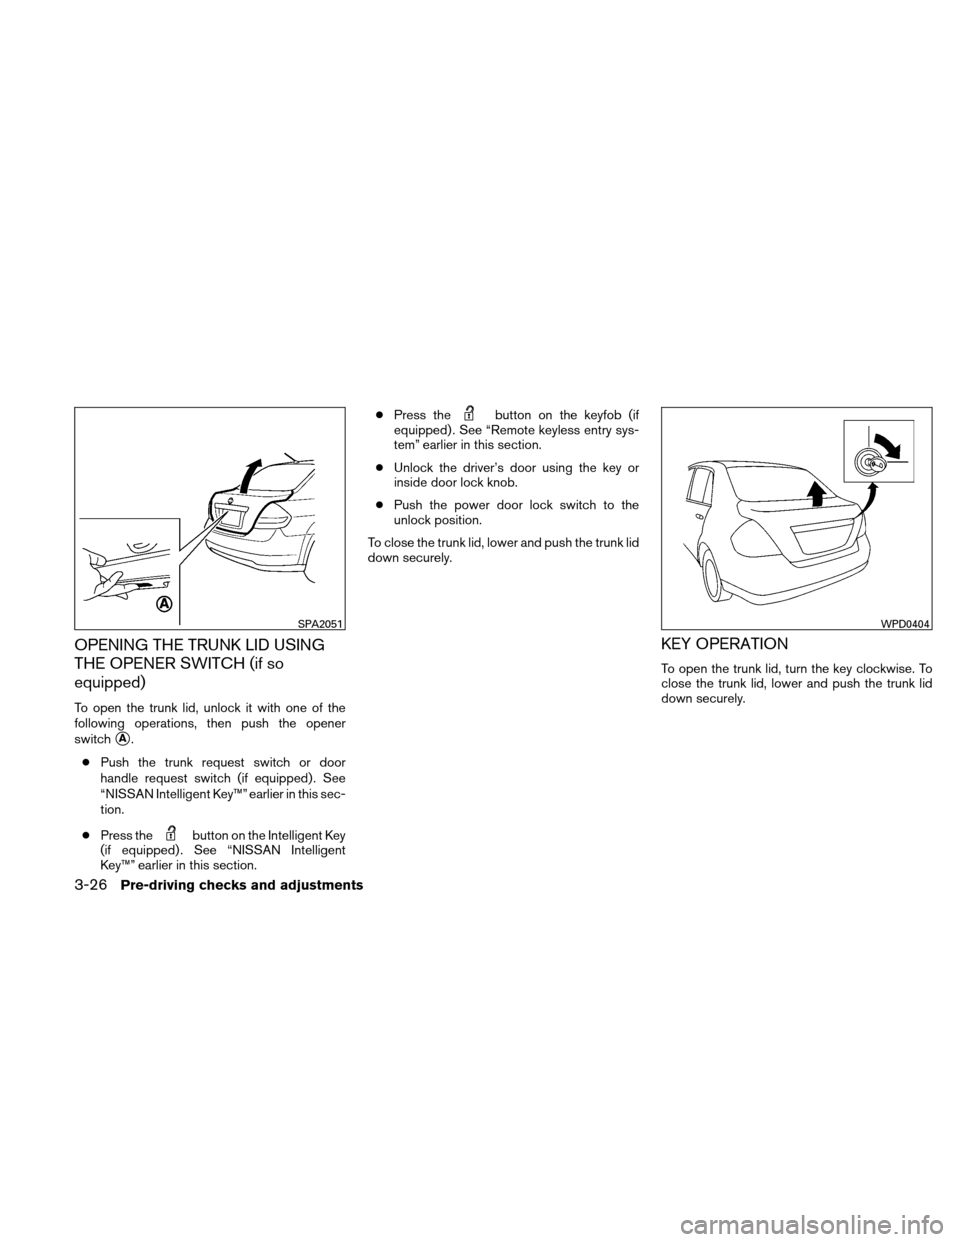
OPENING THE TRUNK LID USING
THE OPENER SWITCH (if so
equipped)
To open the trunk lid, unlock it with one of the
following operations, then push the opener
switch
�A.
● Push the trunk request switch or door
handle request switch (if equipped) . See
“NISSAN Intelligent Key™” earlier in this sec-
tion.
● Press the
button on the Intelligent Key
(if equipped) . See “NISSAN Intelligent
Key™” earlier in this section. ●
Press the
button on the keyfob (if
equipped) . See “Remote keyless entry sys-
tem” earlier in this section.
● Unlock the driver’s door using the key or
inside door lock knob.
● Push the power door lock switch to the
unlock position.
To close the trunk lid, lower and push the trunk lid
down securely.
KEY OPERATION
To open the trunk lid, turn the key clockwise. To
close the trunk lid, lower and push the trunk lid
down securely.
SPA2051WPD0404
3-26Pre-driving checks and adjustments
Page 142 of 338

INTERIOR TRUNK LID RELEASE
WARNING
Closely supervise children when they are
around cars to prevent them from playing
and becoming locked in the trunk where
they could be seriously injured. Keep the
car locked, with the rear seatback and
trunk lid securely latched when not in use,
and prevent children’s access to car keys.
The interior trunk lid release mechanism provides
a means of escape for children and adults in the
event they become locked inside the trunk. To open the trunk from the inside, rotate the
illuminated lever
�1until the lock releases and
push up on the trunk lid. The release lever is made
of a material that glows in the dark after a brief
exposure to ambient light.
The handle is located inside the trunk compart-
ment on the trunk lock at the center of the trunk
lid.
OPENER OPERATION
The fuel-filler lid release is located below the
instrument panel. To open the fuel-filler lid, pull
the release. To lock, close the fuel-filler lid se-
curely.
WPD0405
Rear tank opener
WPD0372
FUEL-FILLER DOOR
Pre-driving checks and adjustments3-27
Page 150 of 338

*For Navigation system control buttons, refer to
the separate Navigation System Owner’s
Manual.
When you use this system, make sure the engine
is running.
If you use the system with the engine not
running (ignition ON or ACC) for a long
time, it will discharge the battery, and the
engine will not start.
Reference symbols:
“Example” — Words marked in quotes refer to a
key shown only on the display. These keys can be
selected by touching the screen.
HOW TO USE THE TOUCH
SCREEN
CAUTION
●The glass screen on the liquid crystal
display may break if it is hit with a hard
or sharp object. If the glass breaks, do
not touch the liquid crystalline material,
which contains a small amount of mer-
cury. In case of contact with skin, wash
immediately with soap and water. ●
To clean the display, never use a rough
cloth, alcohol, benzine, thinner or any
kind of solvent or paper towel with a
chemical cleaning agent. They will
scratch or deteriorate the panel.
● Do not splash any liquid such as water
or car fragrance on the display. Contact
with liquid will cause the system to
malfunction.
To help ensure safe driving, some functions can-
not be operated while driving.
The on-screen functions that are not available
while driving will be “grayed out” or muted.
Park the vehicle in a safe location and then oper-
ate the navigation system.
WARNING
● ALWAYS give your full attention to
driving.
● Avoid using vehicle features that could
distract you. If distracted, you could
lose control of your vehicle and cause
an accident.
Touch screen operation
Selecting the item:
Touch an item to select. For example, to select
the “Audio” key, touch the “Audio” key
�1on the
screen.
LHA1476
Display screen, heater, air conditioner, audio and phone systems4-3
Page 151 of 338

Adjusting the item:
For screens where an item can be adjusted incre-
mentally, such as when adjusting the bass and
treble for the audio system, touch the “+” key
�1
or the “�” key�2to adjust the settings of an item.
When there are more items than can be dis-
played on one screen, touch the up arrow
�3to
scroll up the page or touch the down arrow
�4to
scroll down the page. Other items are adjusted by selecting one of a set
number of conditions. For example, the Display
Mode can be set to “Automatic”, “Day” or “Night”.
To adjust this type of item, touch the item
�1. The
item will cycle through the available settings and
the red indicator lights to the left of the setting
condition
�2will come on or turn off accordingly. Inputting characters:
Touch the letter key
�1.
There are some options available when inputting
characters. ● 123 / ABC:
Changes the available character set to num-
bers.
● Space:
Inserts a space.
● Delete:
Deletes the last inputted character with one
touch. Touch and hold the “Delete” key to
delete all of the characters.
LHA1477LHA1478LHA1479
4-4Display screen, heater, air conditioner, audio and phone systems
Page 153 of 338
System setup
Select the “System” key to select and/or adjust
various functions of the system. A screen with
additional options will appear.Display:
Select the “Display” key to adjust the appearance
of the display. The following settings can be
adjusted:
Brightness
The brightness of the display can be set to Very
Bright, Bright, Default, Dark or Very Dark. Touch
the “Brightness” key to cycle through the options.
Display Mode
The display can be adjusted to fit the level of
lighting in the vehicle. Touch the “Display Mode”
key to cycle through the options. “Day” and“Night” modes are suited for the respective times
of day, while “Automatic” controls the display
automatically.
Scroll Direction
The direction that menus scroll can be adjusted.
Choose either “up” or “down”.
LHA1481LHA1482
4-6Display screen, heater, air conditioner, audio and phone systems
Page 154 of 338

Clock:
Select the “Clock” key to adjust the time and the
appearance of the clock on the display. The fol-
lowing settings can be adjusted:
Time Format
The clock can be set to 12 hours or 24 hours.
Use GPS Clock
When this setting is activated, the clock is set
and continually updated via the GPS used by the
Navigation System.Set Clock Manually
When this setting is activated, the clock can be
set manually. Touch the “+” or “-” key to adjust the
hours and minutes up or down.
Daylight Savings Time
When this setting is activated, daylight savings
time is on. Touch the “Daylight Savings Time” key
to toggle the setting on or off.
Time Zone
Choose the applicable time zone from the list.
Language:
Select the “Language” key to adjust the language
used by the system. The language can be set to
English, Français or Español.
Touch click:
Select the “Touch Click” key to toggle the touch
click feature on or off. When activated, a click
sound will be heard every time a key on the
screen is touched.
LHA1483LHA1484LHA1485
Display screen, heater, air conditioner, audio and phone systems4-7