2010 NISSAN QASHQAI ECU
[x] Cancel search: ECUPage 100 of 297

Downloaded from www.Manualslib.com manuals search engine ALARM SYSTEM (where fitted)
The alarm system provides visual and audible alarm
signals if parts of the vehicle are disturbed.
How to arm the alarm system
1. Close all doors, windows, back door and bon-net.
2. Lock the vehicle using the keyfob (lock button), for additional information, see “Integrated key-
fob/remote control system” in the “3. Pre-driving
checks and adjustments” section.
NOTE
If the vehicle is not fully locked, a door/bonnet/
back door is open, or the ignition switch is in the
ON position (after arming the system), the buzzer
will sound. After correctly closing, the buzzer will
stop.
Alarm system operation
The system will give the following alarm:
The siren sounds intermittently and all direction
indicators will flash.
The alarm automatically turns off after 28 sec-
onds.
The alarm is activated when:
The volumetric sensing system (ultrasonic sen-
sors) is triggered.
Any door/the back door is opened.
The bonnet is opened.
The ignition circuit is turned on without the own-
er’s key being used.
The alarm system will stop when:
The vehicle is unlocked using the keyfob unlock
button.
The ignition switch or ignition knob is turned to
the ON position with a registered NATS key.
If the system does not operate as described
above, have it checked by your NISSAN dealer or
qualified workshop.
Ultrasonic sensors (where fitted)
The ultrasonic sensors (volumetric sensing) detect
movements in the passenger’s compartment. When
the alarm system is set to the armed position, it will
automatically switch on the ultrasonic sensors.
It is possible to exclude the ultrasonic sensors (e.g.
when leaving pets inside the car).
To exclude the ultrasonic sensors:
1. Turn the ignition switch 3 times within 7 seconds from the “OFF” to the ON position.
2. Close the door(s)/bonnet/back door and press the lock button
on the keyfob to lock all doors/
back door.
The ultrasonic sensors are now excluded from the
alarm system. All other functions of the system re-
main activated until the alarm system is disarmed
again.
NISSAN ANTI-THEFT SYSTEM (NATS)
The NISSAN Anti-Theft System (NATS)* will not
allow the engine to start without the use of the reg-
istered NATS key.
* Immobilizer
If the engine fails to start using the registered NATS
key, it may be due to interference from another
NATS key, an automated toll road device or an auto-
mated payment device on the key ring. Restart the
engine using the following procedure:
1. Leave the ignition switch in the ON position for approximately 5 seconds.
2. Turn the ignition switch to the “OFF” or LOCK position and wait approximately 5 seconds.
3. Repeat steps 1 and 2.
4. Restart the engine while holding the device (which may have caused the interference) sepa-
rated from the registered NATS key or NATS
Intelligent Key (where fitted).
If this procedure allows the engine to start,
NISSAN recommends placing the registered
NATS key or NATS Intelligent Key (where fitted)
on a separate key-ring to avoid interference from
other devices.
SECURITY SYSTEM
Pre-driving checks and adjustments3-13
Page 101 of 297
Downloaded from www.Manualslib.com manuals search engine NATS security warning/indicator light
(where fitted)
One of the following functions (depending on the
vehicle specifications) indicates that the vehicle is
equipped with NATS:
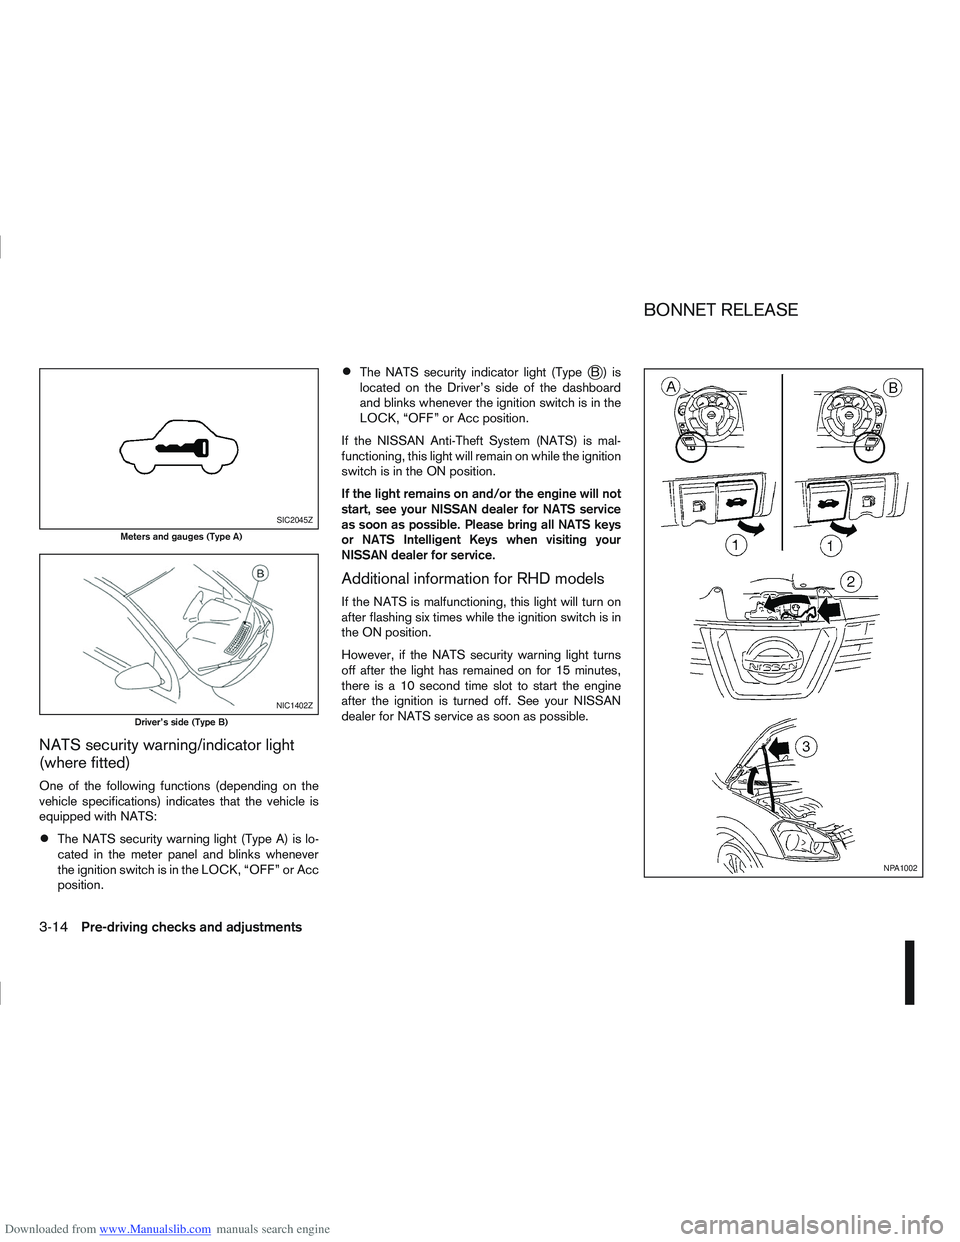
The NATS security warning light (Type A) is lo-
cated in the meter panel and blinks whenever
the ignition switch is in the LOCK, “OFF” or Acc
position.
The NATS security indicator light (TypejB) is
located on the Driver’s side of the dashboard
and blinks whenever the ignition switch is in the
LOCK, “OFF” or Acc position.
If the NISSAN Anti-Theft System (NATS) is mal-
functioning, this light will remain on while the ignition
switch is in the ON position.
If the light remains on and/or the engine will not
start, see your NISSAN dealer for NATS service
as soon as possible. Please bring all NATS keys
or NATS Intelligent Keys when visiting your
NISSAN dealer for service.
Additional information for RHD models
If the NATS is malfunctioning, this light will turn on
after flashing six times while the ignition switch is in
the ON position.
However, if the NATS security warning light turns
off after the light has remained on for 15 minutes,
there is a 10 second time slot to start the engine
after the ignition is turned off. See your NISSAN
dealer for NATS service as soon as possible.
SIC2045Z
Meters and gauges (Type A)
NIC1402Z
Driver’s side (Type B)
NPA1002
BONNET RELEASE
3-14Pre-driving checks and adjustments
Page 102 of 297
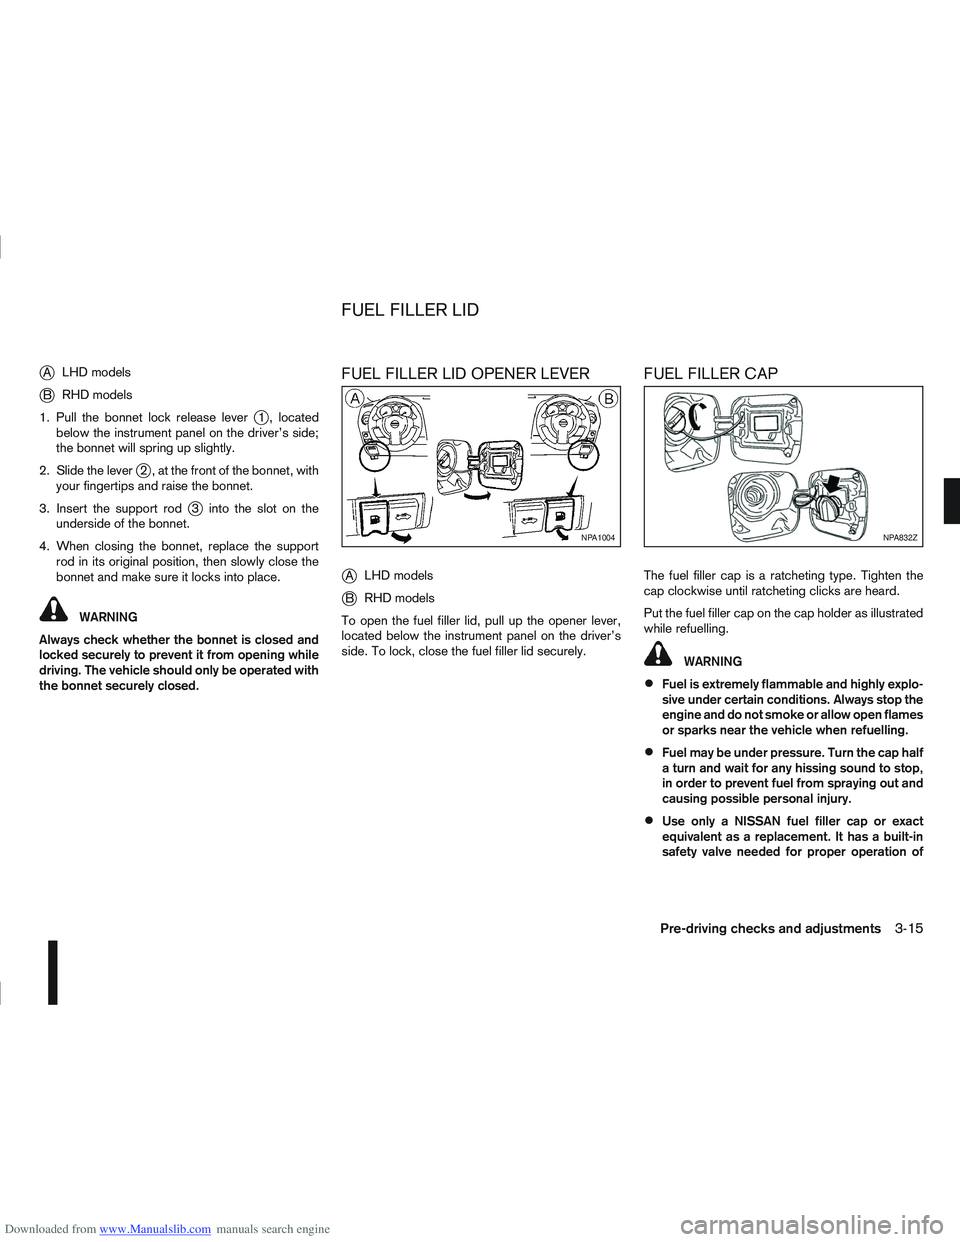
Downloaded from www.Manualslib.com manuals search engine jALHD models
jB RHD models
1. Pull the bonnet lock release lever
j1 , located
below the instrument panel on the driver’s side;
the bonnet will spring up slightly.
2. Slide the lever
j2 , at the front of the bonnet, with
your fingertips and raise the bonnet.
3. Insert the support rod
j3 into the slot on the
underside of the bonnet.
4. When closing the bonnet, replace the support rod in its original position, then slowly close the
bonnet and make sure it locks into place.
WARNING
Always check whether the bonnet is closed and
locked securely to prevent it from opening while
driving. The vehicle should only be operated with
the bonnet securely closed.
FUEL FILLER LID OPENER LEVER
j
A LHD models
jB RHD models
To open the fuel filler lid, pull up the opener lever,
located below the instrument panel on the driver’s
side. To lock, close the fuel filler lid securely.
FUEL FILLER CAP
The fuel filler cap is a ratcheting type. Tighten the
cap clockwise until ratcheting clicks are heard.
Put the fuel filler cap on the cap holder as illustrated
while refuelling.
WARNING
Fuel is extremely flammable and highly explo-
sive under certain conditions. Always stop the
engine and do not smoke or allow open flames
or sparks near the vehicle when refuelling.
Fuel may be under pressure. Turn the cap half
a turn and wait for any hissing sound to stop,
in order to prevent fuel from spraying out and
causing possible personal injury.
Use only a NISSAN fuel filler cap or exact
equivalent as a replacement. It has a built-in
safety valve needed for proper operation of
NPA1004NPA832Z
FUEL FILLER LID
Pre-driving checks and adjustments3-15
Page 109 of 297
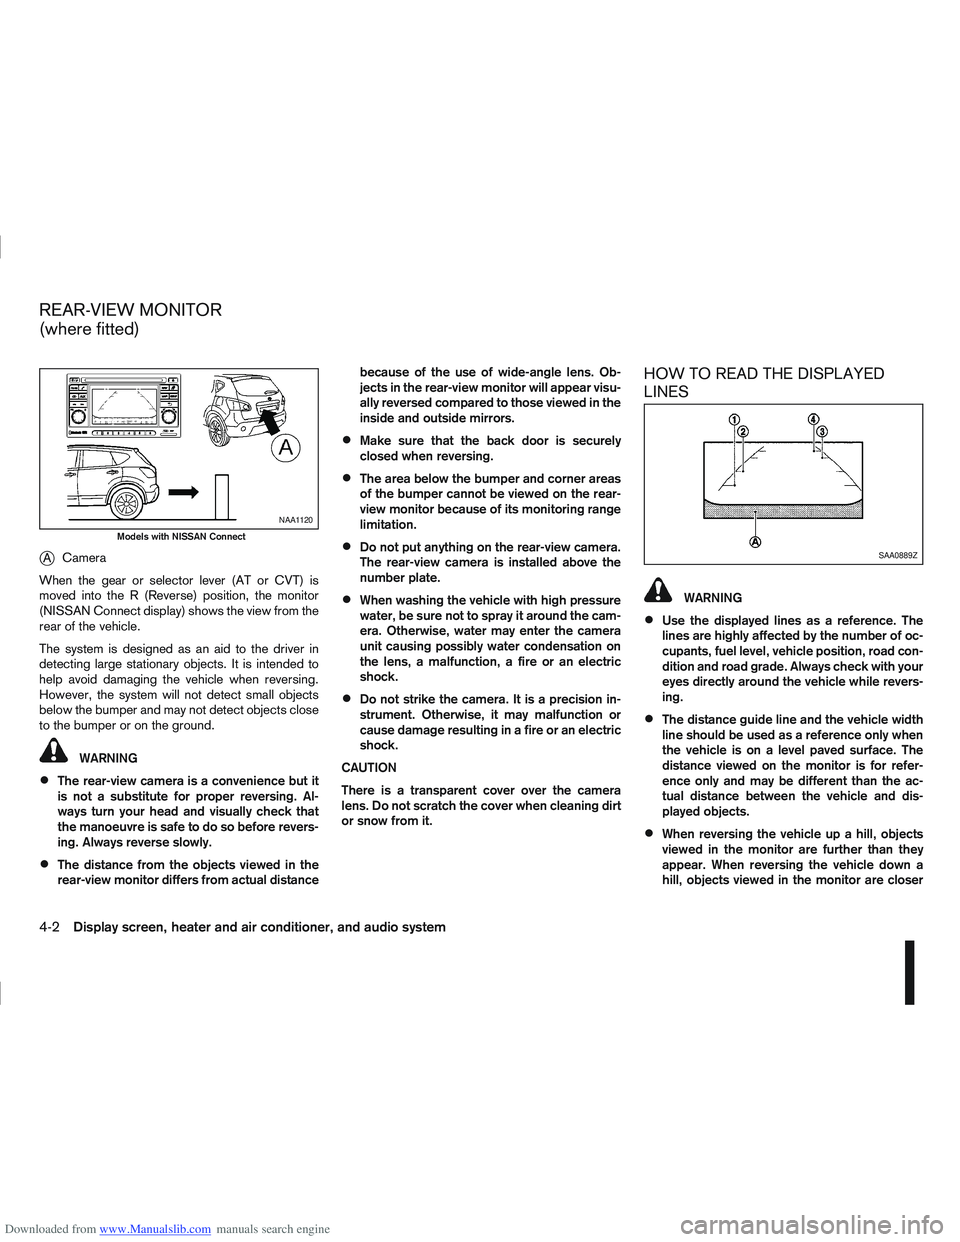
Downloaded from www.Manualslib.com manuals search engine jACamera
When the gear or selector lever (AT or CVT) is
moved into the R (Reverse) position, the monitor
(NISSAN Connect display) shows the view from the
rear of the vehicle.
The system is designed as an aid to the driver in
detecting large stationary objects. It is intended to
help avoid damaging the vehicle when reversing.
However, the system will not detect small objects
below the bumper and may not detect objects close
to the bumper or on the ground.
WARNING
The rear-view camera is a convenience but it
is not a substitute for proper reversing. Al-
ways turn your head and visually check that
the manoeuvre is safe to do so before revers-
ing. Always reverse slowly.
The distance from the objects viewed in the
rear-view monitor differs from actual distance because of the use of wide-angle lens. Ob-
jects in the rear-view monitor will appear visu-
ally reversed compared to those viewed in the
inside and outside mirrors.
Make sure that the back door is securely
closed when reversing.
The area below the bumper and corner areas
of the bumper cannot be viewed on the rear-
view monitor because of its monitoring range
limitation.
Do not put anything on the rear-view camera.
The rear-view camera is installed above the
number plate.
When washing the vehicle with high pressure
water, be sure not to spray it around the cam-
era. Otherwise, water may enter the camera
unit causing possibly water condensation on
the lens, a malfunction, a fire or an electric
shock.
Do not strike the camera. It is a precision in-
strument. Otherwise, it may malfunction or
cause damage resulting in a fire or an electric
shock.
CAUTION
There is a transparent cover over the camera
lens. Do not scratch the cover when cleaning dirt
or snow from it.
HOW TO READ THE DISPLAYED
LINES
WARNING
Use the displayed lines as a reference. The
lines are highly affected by the number of oc-
cupants, fuel level, vehicle position, road con-
dition and road grade. Always check with your
eyes directly around the vehicle while revers-
ing.
The distance guide line and the vehicle width
line should be used as a reference only when
the vehicle is on a level paved surface. The
distance viewed on the monitor is for refer-
ence only and may be different than the ac-
tual distance between the vehicle and dis-
played objects.
When reversing the vehicle up a hill, objects
viewed in the monitor are further than they
appear. When reversing the vehicle down a
hill, objects viewed in the monitor are closer
NAA1120
Models with NISSAN Connect
SAA0889Z
REAR-VIEW MONITOR
(where fitted)
4-2Display screen, heater and air conditioner, and audio system
Page 112 of 297
Downloaded from www.Manualslib.com manuals search engine Do not use the Around View Monitor with the
outside mirror in the stored position, and
make sure that the back door is securely
closed when operating the vehicle using the
Around View Monitor.
The distance between objects viewed on the
Around View Monitor differs from the actual
distance.
The cameras are installed above the front
grille, the outside mirrors and above the rear
number plate. Do not put anything on or cover
the cameras.
When washing the vehicle with high-pressure
water, be sure not to spray it around the cam-
eras. Otherwise, water may enter the camera
unit causing water condensation on the lens,
a malfunction, fire or an electric shock.
Do not strike the cameras. They are precision
instruments. Doing so could cause a malfunc-
tion or cause damage resulting in a fire or an
electric shock.
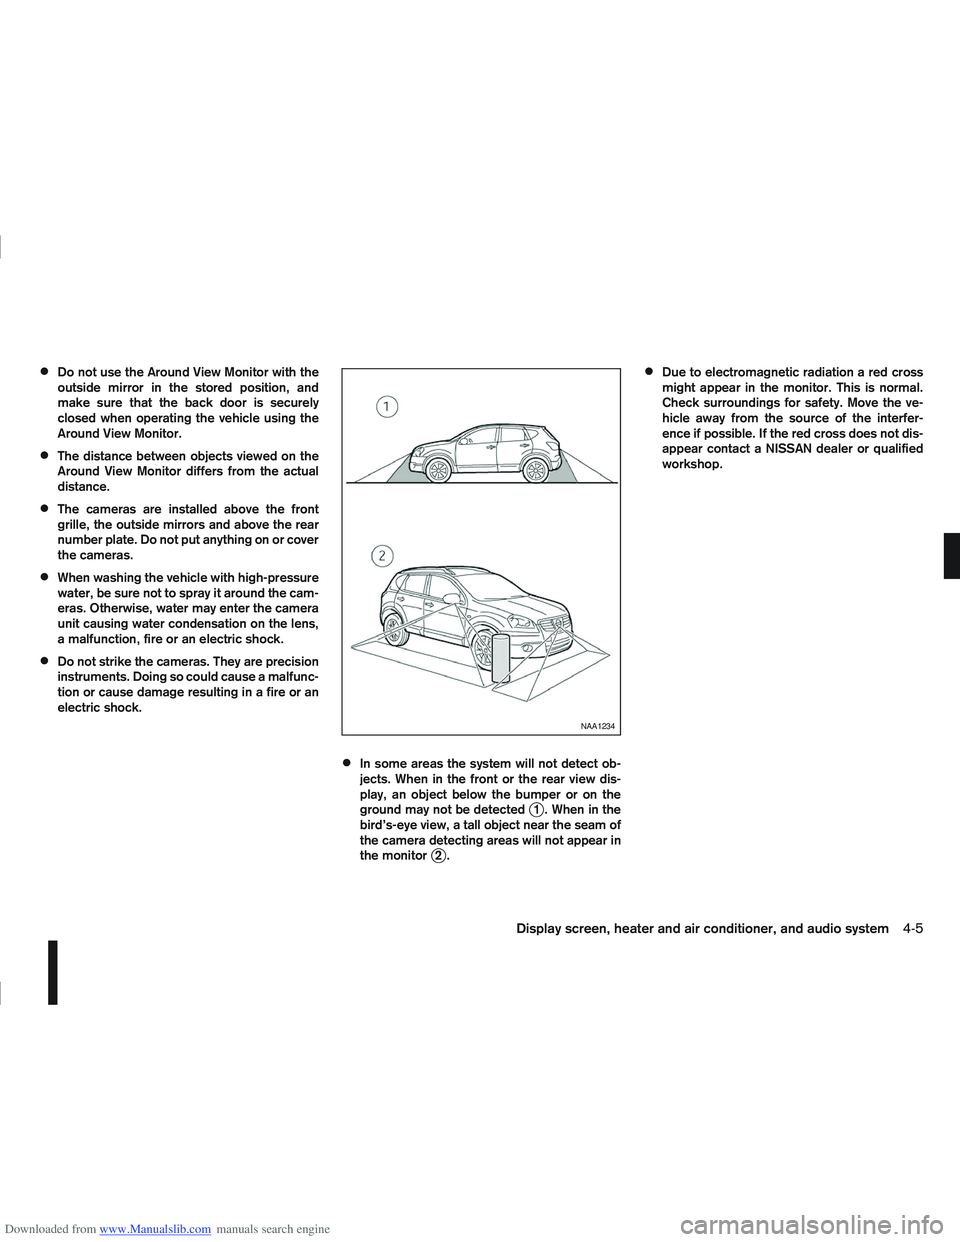
In some areas the system will not detect ob-
jects. When in the front or the rear view dis-
play, an object below the bumper or on the
ground may not be detected
j1 . When in the
bird’s-eye view, a tall object near the seam of
the camera detecting areas will not appear in
the monitor
j2.
Due to electromagnetic radiation a red cross
might appear in the monitor. This is normal.
Check surroundings for safety. Move the ve-
hicle away from the source of the interfer-
ence if possible. If the red cross does not dis-
appear contact a NISSAN dealer or qualified
workshop.
NAA1234
Display screen, heater and air conditioner, and audio system4-5
Page 138 of 297
Downloaded from www.Manualslib.com manuals search engine ANTI-THEFT SYSTEM
Use of a 4-digit radio PIN (Personal Identification
Number) code, known only to the vehicle owner,
effectively reduces the possibility of the audio unit
being stolen. Without the PIN code the audio unit
cannot be activated.
If force is used to try and remove the audio unit, the
Anti-theft system activates and the audio unit is
locked. The only way to unlock the audio unit is to
enter the radio code number shown on an identifica-
tion card supplied with the vehicle documentation.
NOTE
The 4 digit radio code is shown on a card that
you received with your vehicle documenta-
tion.
Record the 4 digit radio code on the “Security
information” page at the end of this manual.
Remove the security page and keep it in a
safe, not in the vehicle.
Contact a NISSAN dealer if you do lose the 4
digit radio code of the audio unit.
Unlocking the unit
If the battery supply to the vehicle is interrupted, the
audio unit will lock.
When the power is restored and the unit switched
on, the display will show [Radio Code:] and it will be
unlocked when the codes have been entered cor-
rectly.
Unlocking procedure:
Read this section very carefully. It is important
that the instructions are followed precisely.
To unlock the audio unit, proceed as follows:
1. Turn the ignition switch to the Acc or ON posi-tion.
2. [Radio Code:] is displayed along with four nu- merical zero digits.
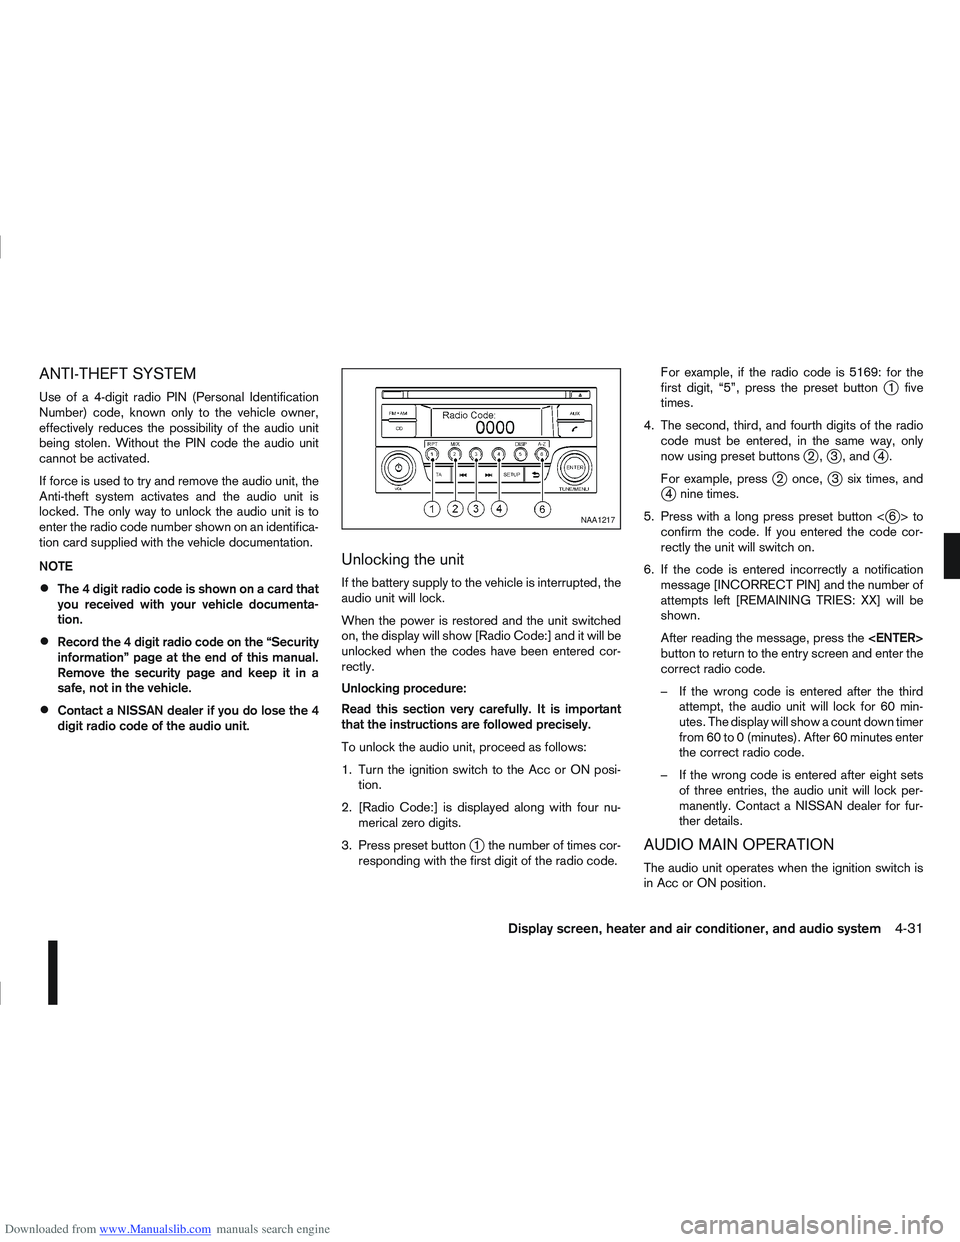
3. Press preset button
j1 the number of times cor-
responding with the first digit of the radio code. For example, if the radio code is 5169: for the
first digit, “5”, press the preset button
j1 five
times.
4. The second, third, and fourth digits of the radio code must be entered, in the same way, only
now using preset buttons
j2,j3 , andj4.
For example, press
j2 once,j3 six times, andj4 nine times.
5. Press with a long press preset button <
j6>to
confirm the code. If you entered the code cor-
rectly the unit will switch on.
6. If the code is entered incorrectly a notification message [INCORRECT PIN] and the number of
attempts left [REMAINING TRIES: XX] will be
shown.
After reading the message, press the
button to return to the entry screen and enter the
correct radio code.
– If the wrong code is entered after the third attempt, the audio unit will lock for 60 min-
utes. The display will show a count down timer
from 60 to 0 (minutes). After 60 minutes enter
the correct radio code.
– If the wrong code is entered after eight sets of three entries, the audio unit will lock per-
manently. Contact a NISSAN dealer for fur-
ther details.
AUDIO MAIN OPERATION
The audio unit operates when the ignition switch is
in Acc or ON position.
NAA1217
Display screen, heater and air conditioner, and audio system4-31
Page 164 of 297
Downloaded from www.Manualslib.com manuals search engine Operating precautions ........................................ 5-35
Tyre pressure ..................................................... 5-36
Safety chains ...................................................... 5-36
Trailer brakes...................................................... 5-36
Trailer detection (where fitted) ............................ 5-36
Installation of coupling device ............................. 5-36
Vehicle security........................................................ 5-38
Power steering system............................................. 5-38
Brake system ........................................................... 5-39 Brake precautions .............................................. 5-39
Anti-lock Braking System (ABS).......................... 5-39 Electronic Stability Programme (ESP) system
(where fitted) ........................................................... 5-40
Electronic Stability Programme (ESP) OFF
switch................................................................. 5-42
Cold weather driving................................................ 5-42 Battery ............................................................... 5-43
Engine coolant .................................................... 5-43
Tyre equipment ................................................... 5-43
Special winter equipment.................................... 5-43
Corrosion protection ........................................... 5-43
Page 166 of 297
Downloaded from www.Manualslib.com manuals search engine WARNING
Do not leave children or adults who would
normally require the support of others alone
in your vehicle. Pets should also not be left
alone. They could accidentally injure them-
selves or others through inadvertent opera-
tion of the vehicle. Also, on hot, sunny days,
temperatures in a closed vehicle could quickly
become high enough to cause severe or pos-
sibly fatal injuries to people or animals.
To prevent luggage or packages from sliding
forward during braking, do not stack anything
in the cargo area higher than the seatbacks.
Secure all cargo with ropes or straps to pre-
vent it from sliding or shifting.
Failure to follow proper seating instructions
see “Seats” in the “1. Safety — seats, seat
belts and supplemental restraint system” sec-
tion, could result in serious personal injury in
an accident or sudden stop.
EXHAUST GAS (Carbon Monoxide)
WARNING
Do not breathe exhaust gases; they contain
colourless and odourless carbon monoxide.
Carbon monoxide is a dangerous gas and can
cause unconsciousness or death.
If you suspect that exhaust fumes are enter-
ing the vehicle, drive with all windows fully
open and have the vehicle inspected immedi-
ately.
Do not run the engine in closed spaces, such
as a garage, for any longer than is absolutely
necessary.
Do not park the vehicle with the engine run-
ning for any extended length of time.
Keep the back door closed while driving, oth-
erwise exhaust gases could be drawn into the
passenger compartment. If you must drive in
this way for some reason, take the following
steps:
1) Open all the windows.
2) Set the air recirculation mode (
)tothe
“OFF” position.
3) Set the fan speed control to the maximum position to circulate the air.
If electrical wiring or other cable connections
must pass to a trailer through the seal of the
body, follow the manufacturer’s recommen-
dations to prevent carbon monoxide entry into
the vehicle.
When a vehicle has been stopped in an open
area with its engine running for any significant
length of time, turn the fan on to force outside
air into the vehicle.
The exhaust system and body should be in-
spected by a NISSAN dealer or qualified work-
shop whenever:
– the vehicle is raised for service.
– you suspect that exhaust fumes are enter-ing into the passenger compartment.
– you notice a change in the sound of the exhaust system.
– you have had an accident involving dam- age to the exhaust system, underbody, or
rear of the vehicle.
PRECAUTIONS WHEN STARTING
AND DRIVING
Starting and driving5-3