2010 NISSAN QASHQAI clutch
[x] Cancel search: clutchPage 192 of 297
Downloaded from www.Manualslib.com manuals search engine The cruise control system allows driving at constant
speeds without keeping your foot on the accelerator
pedal.
WARNING
The cruise control system ONLY maintains a
constant vehicle speed, it does not replace
the driver.
Always observe the posted speed limits and
do not set the speed above them.
Do not use the cruise control system when
driving under the following conditions. Doing
so could cause a loss of vehicle control and
result in an accident.
– When it is not possible to keep the vehicleat a constant speed
– When driving in heavy traffic
– When driving in traffic that varies speed
– When driving in windy areas
– When driving on winding or hilly roads
– When driving on slippery (rain, snow, ice, etc.) roads
CAUTION
On manual transmission models, do not shift into
N (Neutral) without depressing the clutch pedal
when the cruise control is set. Should this occur,
depress the clutch pedal and turn the cruise con-
trol main switch off immediately. Failure to do so
may cause engine damage. When the cruise control system is on the speed lim-
iter cannot be operated.
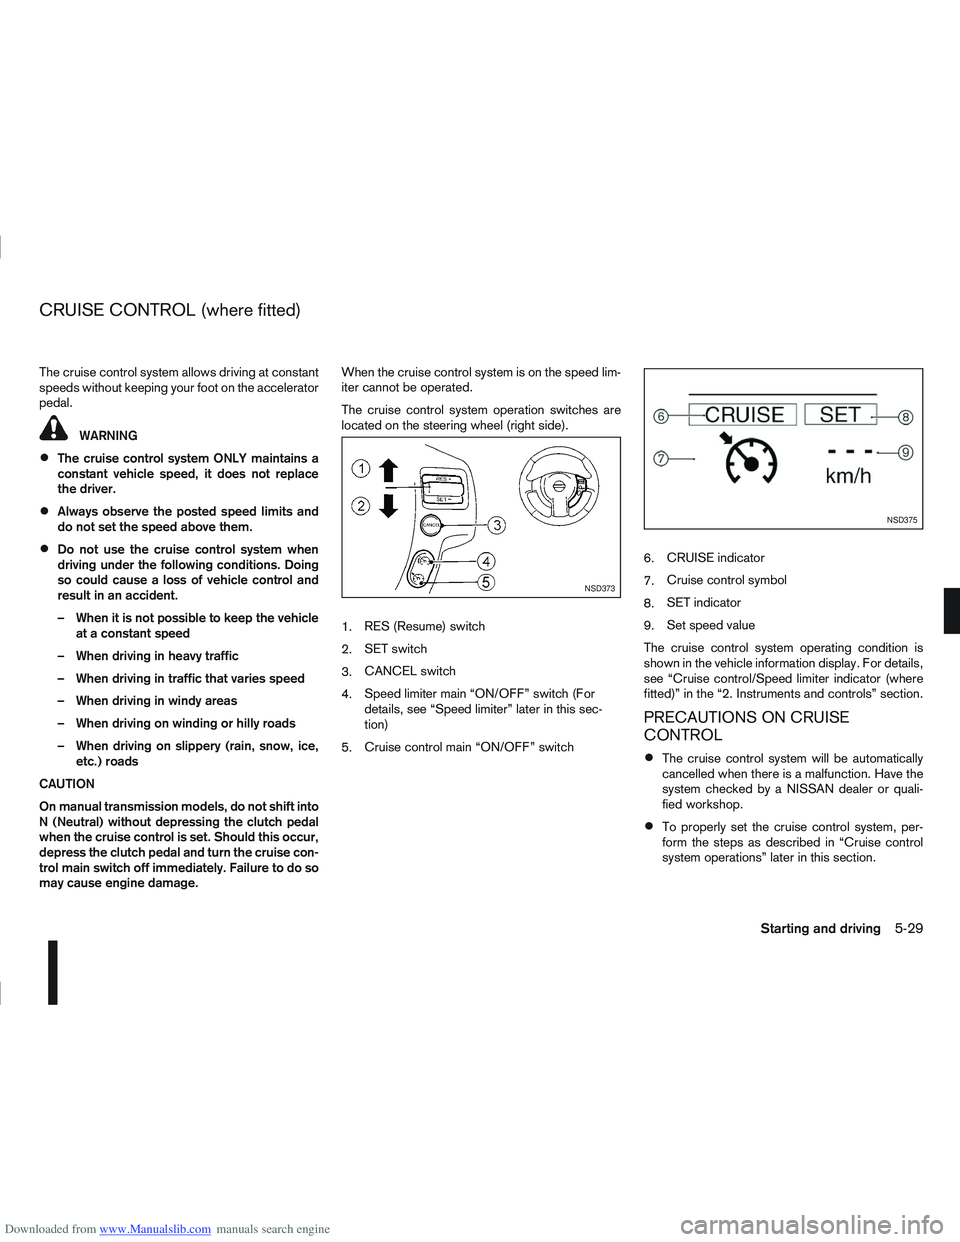
The cruise control system operation switches are
located on the steering wheel (right side).
1.
RES (Resume) switch
2. SET switch
3. CANCEL switch
4. Speed limiter main “ON/OFF” switch (For
details, see “Speed limiter” later in this sec-
tion)
5. Cruise control main “ON/OFF” switch 6.
CRUISE indicator
7. Cruise control symbol
8. SET indicator
9. Set speed value
The cruise control system operating condition is
shown in the vehicle information display. For details,
see “Cruise control/Speed limiter indicator (where
fitted)” in the “2. Instruments and controls” section.
PRECAUTIONS ON CRUISE
CONTROL
The cruise control system will be automatically
cancelled when there is a malfunction. Have the
system checked by a NISSAN dealer or quali-
fied workshop.
To properly set the cruise control system, per-
form the steps as described in “Cruise control
system operations” later in this section.
NSD373
NSD375
CRUISE CONTROL (where fitted)
Starting and driving5-29
Page 193 of 297
Downloaded from www.Manualslib.com manuals search engine CRUISE CONTROL SYSTEM
OPERATIONS
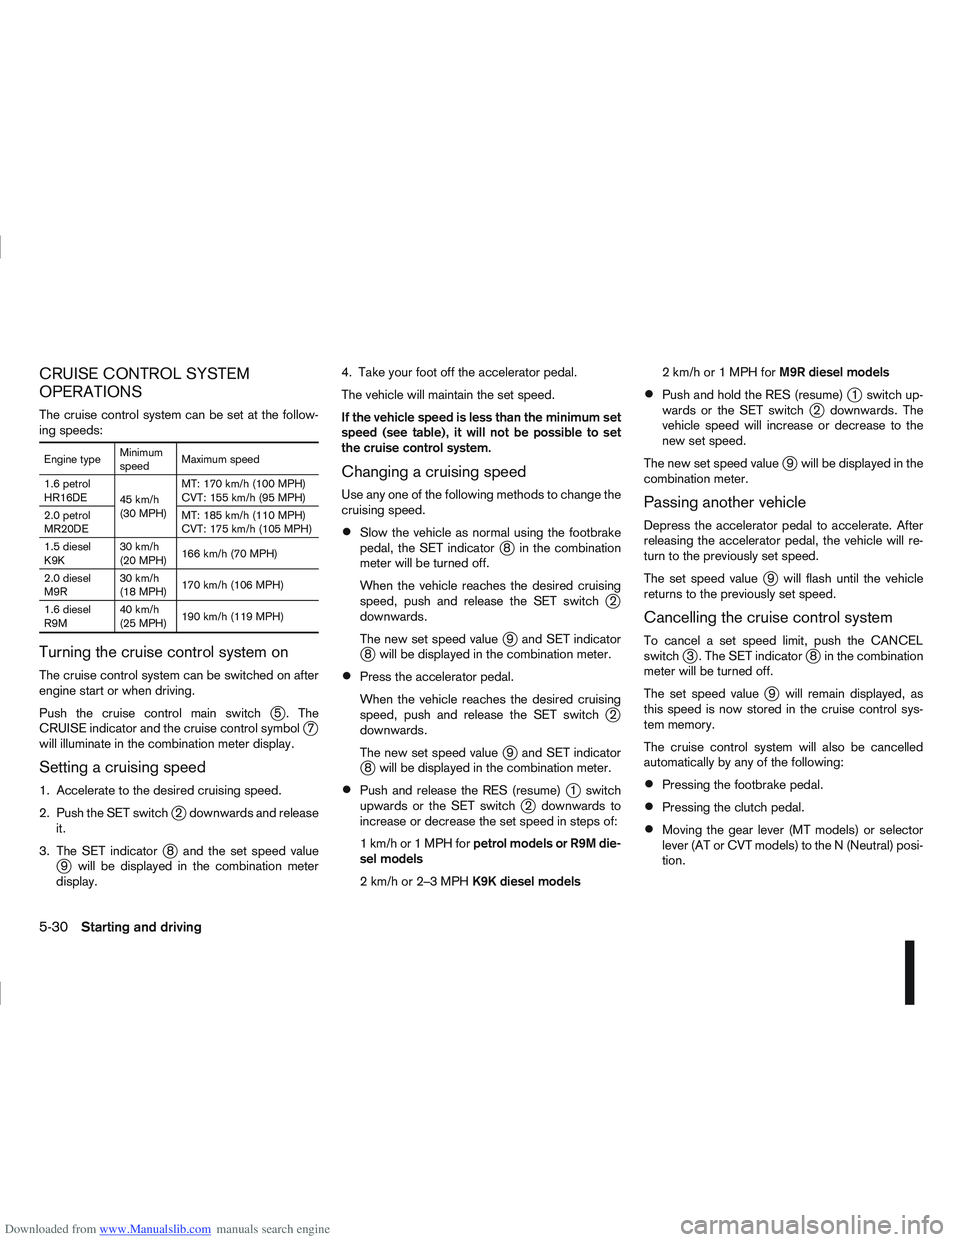
The cruise control system can be set at the follow-
ing speeds:
Engine typeMinimum
speedMaximum speed
1.6 petrol
HR16DE 45 km/h
(30 MPH)MT: 170 km/h (100 MPH)
CVT: 155 km/h (95 MPH)
2.0 petrol
MR20DE MT: 185 km/h (110 MPH)
CVT: 175 km/h (105 MPH)
1.5 diesel
K9K 30 km/h
(20 MPH)
166 km/h (70 MPH)
2.0 diesel
M9R 30 km/h
(18 MPH)
170 km/h (106 MPH)
1.6 diesel
R9M 40 km/h
(25 MPH)
190 km/h (119 MPH)
Turning the cruise control system on
The cruise control system can be switched on after
engine start or when driving.
Push the cruise control main switch
j5 . The
CRUISE indicator and the cruise control symbolj7
will illuminate in the combination meter display.
Setting a cruising speed
1. Accelerate to the desired cruising speed.
2. Push the SET switch
j2 downwards and release
it.
3. The SET indicator
j8 and the set speed valuej9 will be displayed in the combination meter
display. 4. Take your foot off the accelerator pedal.
The vehicle will maintain the set speed.
If the vehicle speed is less than the minimum set
speed (see table), it will not be possible to set
the cruise control system.
Changing a cruising speed
Use any one of the following methods to change the
cruising speed.
Slow the vehicle as normal using the footbrake
pedal, the SET indicatorj8 in the combination
meter will be turned off.
When the vehicle reaches the desired cruising
speed, push and release the SET switch
j2
downwards.
The new set speed value
j9 and SET indicatorj8 will be displayed in the combination meter.
Press the accelerator pedal.
When the vehicle reaches the desired cruising
speed, push and release the SET switch
j2
downwards.
The new set speed value
j9 and SET indicatorj8 will be displayed in the combination meter.
Push and release the RES (resume)j1 switch
upwards or the SET switchj2 downwards to
increase or decrease the set speed in steps of:
1km/hor1MPHforpetrol models or R9M die-
sel models
2km/hor2–3MPHK9K diesel models 2km/hor1MPHforM9R diesel models
Push and hold the RES (resume)j1 switch up-
wards or the SET switchj2 downwards. The
vehicle speed will increase or decrease to the
new set speed.
The new set speed value
j9 will be displayed in the
combination meter.
Passing another vehicle
Depress the accelerator pedal to accelerate. After
releasing the accelerator pedal, the vehicle will re-
turn to the previously set speed.
The set speed value
j9 will flash until the vehicle
returns to the previously set speed.
Cancelling the cruise control system
To cancel a set speed limit, push the CANCEL
switchj3 . The SET indicatorj8 in the combination
meter will be turned off.
The set speed value
j9 will remain displayed, as
this speed is now stored in the cruise control sys-
tem memory.
The cruise control system will also be cancelled
automatically by any of the following:
Pressing the footbrake pedal.
Pressing the clutch pedal.
Moving the gear lever (MT models) or selector
lever (AT or CVT models) to the N (Neutral) posi-
tion.
5-30Starting and driving
Page 196 of 297
Downloaded from www.Manualslib.com manuals search engine The new set speed limit valuej9 will be displayed
in the combination meter display.
Cancelling a speed limit
To cancel a set speed limit, push the CANCEL
switchj3 . The SET indicatorj8 in the combination
meter will be turned off. The set speed valuej9 will
remain displayed.
It is also possible to override the speed limiter by
fully depressing the accelerator pedal beyond the
resistance point.
WARNING
The vehicle may accelerate when the speed
limiter cancels.
When additional floor mats are used, be sure
that they are correctly secured and that they
cannot interfere with the accelerator pedal.
Mats not adapted to the vehicle may prevent
proper operation of the speed limiter.
Fully depress the accelerator pedal beyond the re-
sistance point. The speed limiter will be suspended
to allow driving above the set speed. The set speed
value
j9 will flash. The speed limiter will automati-
cally resume when the vehicle speed drops below
the set speed limit.
Resuming a previous set speed
If a set speed limit has been cancelled, the set speed
valuej9 will remain displayed in the combination
meter and the speed will be stored in the speed lim-
iter memory. This speed limit can be reactivated by pressing the
RES (Resume) switch
j1 upwards.
If the current vehicle speed is higher than the previ-
ous set speed, the accelerator pedal will not work
and the set speed value
j9 will flash until the vehicle
speed drops below the set speed limit.
Turning the speed limiter off
The speed limiter system will be turned off when
one of the following operations is performed:
Push the speed limiter main “ON/OFF” switchj4 . The speed limiter symbolj7 , the LIMIT indi-
catorj6 , the SET indicatorj8 , and the set
speed valuej9 will turn off in the combination
meter display.
Push the cruise control main “ON/OFF” switchj5 . The speed limiter information in the combi-
nation meter will be replaced with the cruise con-
trol information. For details see “Cruise control
(where fitted)” earlier in this section.
When the vehicle is stopped and the ignition is
turned to the off position.
Turning off the speed limiter will erase the set
speed limit memory.
Speed limiter malfunction
If the speed limiter malfunctions, the set indicatorj8 in the combination meter display will flash.
Turn the speed limiter off by pushing the speed lim-
iter main “ON/OFF” switch
j4 and have the system
checked by a NISSAN dealer or qualified workshop.
WARNING
Do not park the vehicle over flammable mate-
rials, such as dry grass, waste paper, or rags.
They may ignite and cause a fire.
Safe parking procedures require that:
– The handbrake is applied.
– The gear lever is placed in an appropriate gear for manual transmission models.
– The selector lever is placed in the P (Park) position for automatic transmission or con-
tinuously variable transmission models.
Failure to follow the above recommenda-
tions could cause the vehicle to move un-
expectedly or roll away and result in an
accident.
Never leave the engine running while the ve-
hicle is unattended.
Do not leave children or adults who would
normally require the support of others alone
in your vehicle. Pets should also not be left
alone either. On hot, sunny days, tempera-
tures in a closed vehicle could quickly be-
come high enough to cause severe or possi-
bly fatal injuries to people or animals.
Manual transmission models:
Depress the clutch pedal and place the gear
lever in the R (Reverse) position. When parking
on an uphill gradient, place the gear lever in the
1st (Low gear) position.
PARKING
Starting and driving5-33
Page 202 of 297
Downloaded from www.Manualslib.com manuals search engine The brake system has two separate hydraulic cir-
cuits. If one circuit malfunctions, you will still have
braking ability with two wheels.
BRAKE PRECAUTIONS
Vacuum assisted brake
The brake booster aids braking by using engine
vacuum. If the engine stops or the drive belt is bro-
ken, you can stop the vehicle by depressing the
brake pedal. However, greater foot pressure on the
brake pedal will be required to stop the vehicle and
the stopping distance will be longer.
Wet brakes
When the vehicle is washed or driven through wa-
ter, the brakes may get wet. As a result, your brak-
ing distance will be longer and the vehicle may pull
to one side during braking.
To dry brakes, drive the vehicle at a safe speed
while lightly pressing the brake pedal to heat up the
brakes. Do this until the brakes return to normal.
Avoid driving the vehicle at high speeds until the
brakes function correctly.
Using the brakes
Avoid resting your foot on the brake pedal while
driving. This will overheat the brakes, wear out the
brake linings and pads faster and reduce fuel
economy performance.
To help reduce brake wear and to prevent the brakes
from overheating, reduce speed and downshift to a
lower gear before going down a slope or long down-hill gradient. Overheated brakes may reduce brak-
ing performance and could result in loss of vehicle
control.
CAUTION
While driving on a slippery surface, be careful
when braking, accelerating or downshifting.
Abrupt braking actions or sudden acceleration
could cause the wheels to skid and result in an
accident.
Be aware that brakes will fade if repeated heavy
brake applications are made.
Driving uphill
When starting on a steep gradient, it is sometimes
difficult to operate the brake (AT or CVT models) or
both the brake and clutch (MT models). Use the
handbrake to hold the vehicle. Do not slip the clutch
(MT models). When ready to start, slowly release
the handbrake while depressing the accelerator
pedal and releasing the clutch (MT models) or de-
pressing the accelerator pedal (AT or CVT models).
Driving downhill
The engine braking action is effective for controlling
the vehicle while descending hills.
The gear lever (MT models) should be placed in a
gear position low enough to obtain sufficient engine
braking.
For the AT or CVT models, a low gear position in
the manual shift mode, low enough to obtain suffi-
cient engine braking, should be selected.
ANTI-LOCK BRAKING SYSTEM (ABS)
WARNING
The Anti-lock Braking System (ABS) is a so-
phisticated device, but it cannot prevent acci-
dents resulting from careless or dangerous
driving techniques. It can help maintain ve-
hicle control during braking on slippery sur-
faces. Remember that stopping distances
may also be longer on rough, gravel or snow
covered roads, or if you are using snow
chains. Always maintain a safe distance from
the vehicle in front of you. Ultimately, the
driver is responsible for safety.
Tyre type and condition may also affect brak-
ing effectiveness.
– When replacing tyres, install the specified
size of tyres on all four wheels.
– When installing a spare tyre, make sure it is the proper size and type as specified on
the tyre placard. See “Vehicle
identification” in the “9. Technical
information” section for the tyre placard
location.
– For detailed information, see “Wheels and tyres” in the “8. Maintenance and
do-it-yourself” section.
The Anti-lock Braking System (ABS) controls the
brakes so that the wheels do not lock during hard
braking or when braking on slippery surfaces. The
system detects the rotation speed at each wheel
BRAKE SYSTEM
Starting and driving5-39
Page 231 of 297

Downloaded from www.Manualslib.com manuals search engine 8Maintenance and do-it-yourself
Maintenance and do-it-yourself
Maintenance requirements ....................................... 8-2
Scheduled maintenance...................................... 8-2
General maintenance .......................................... 8-2
Where to go for service ...................................... 8-2
General maintenance ............................................... 8-2 Explanation of general maintenance items ........... 8-2
Maintenance precautions ......................................... 8-4
Engine compartment ................................................ 8-5
Engine cooling system ............................................. 8-6 Checking engine coolant level............................. 8-6
Changing engine coolant .................................... 8-6
Engine oil................................................................. 8-8 Checking engine oil level .................................... 8-8
Changing engine oil ............................................ 8-9
Changing engine oil filter .................................... 8-11
Protect the environment ...................................... 8-13
Fuel filter (Diesel engine models) ............................. 8-13 Draining water .................................................... 8-13
Bleeding the fuel system ..................................... 8-14
Automatic transmission fluid (ATF) ........................... 8-14
Continuously variable transmission (CVT) fluid ......... 8-14
Brakes ..................................................................... 8-15 Checking brake pedal......................................... 8-15
Checking handbrake........................................... 8-15
Brake and clutch fluid .............................................. 8-15
Window washer fluid/headlight cleaner fluid
(where fitted) ........................................................... 8-16
Battery..................................................................... 8-17 Vehicle battery .................................................... 8-17
Jump-starting ...................................................... 8-19 Integrated keyfob/Intelligent Key battery
replacement........................................................ 8-19
Drive belts ............................................................... 8-21
Spark plugs (Petrol engine models).......................... 8-21
Air cleaner filter........................................................ 8-21 Viscous paper type ............................................. 8-22
Dry paper type (where fitted) .............................. 8-22
Wiper blades ........................................................... 8-22 Cleaning ............................................................. 8-22
Front window wiper replacement ........................ 8-22
Back door window wiper replacement ................ 8-23
Windscreen washer nozzle ................................. 8-23
Fuses ...................................................................... 8-23 Passenger compartment ..................................... 8-23
Engine compartment ........................................... 8-24
Lights ...................................................................... 8-25 Headlights .......................................................... 8-25
Exterior lights ...................................................... 8-27
Interior lights....................................................... 8-27
Light locations .................................................... 8-27
Wheels and tyres ..................................................... 8-31 Tyre inflation pressure......................................... 8-31
Types of tyres ..................................................... 8-31
Snow chains....................................................... 8-32
Tyre rotation ....................................................... 8-32
Tyre wear and damage ....................................... 8-33
Tyre age ............................................................. 8-33
Changing tyres and wheels ................................. 8-33
Four-wheel drive (4WD) models ......................... 8-33
Wheel balance.................................................... 8-33
Page 234 of 297
Downloaded from www.Manualslib.com manuals search engine Lights*:
Clean the headlights on a regular basis. Make sure
that the headlights, stop lights, tail lights, turn signal
lights, and other lights are all operating properly and
installed securely. Also check headlight aim.
Tyres*:
Check the pressure with a gauge periodically when
at a service station (including the spare) and adjust
to the specified pressure if necessary. Check care-
fully for damage, cuts or excessive wear.
Tyre rotation*:
Tyres should be rotated every 10,000 km (6,000
miles) for Two-Wheel Drive (2WD) models and
5,000 km (3,000 miles) for Four-Wheel Drive (4WD)
models. However, the timing for tyre rotation may
vary according to your driving habits and road sur-
face conditions.
Wheel alignment and balance:
If the vehicle pull to either side while driving on a
straight and level road, or if you detect uneven or
abnormal tyre wear, there may be a need for wheel
alignment. If the steering wheel or seat vibrates at
normal highway speeds, wheel balancing may be
needed.
Wheel nuts:
When checking the tyres, make sure no wheel nuts
are missing, and check for any loose wheel nuts.
Tighten if necessary.Windscreen:
Clean the windscreen on a regular basis. Check the
windscreen at least every six months for cracks or
other damage. Have a damaged windscreen re-
paired by a qualified repair facility.
Wiper blades*:
Check for cracks or wear if they do not wipe prop-
erly.
Under the bonnet and vehicle
The maintenance items listed here should be
checked periodically, e.g. each time you check the
engine oil or refuel.
Battery*:
Check if the green indicator on the top of the main-
tenance free battery is visible. If it is not visible,
replace the battery as soon as possible.
Vehicles operated in high temperatures or under
severe conditions, check the fluid level frequently.
Brake and clutch fluid level*:
Make sure that the brake and clutch fluid level is
between the MAX and MIN lines on the reservoir.
Engine coolant level*:
Check the coolant level when the engine is cold.
Engine drive belts*:
Make sure that the drive belts are not frayed, worn,
cracked or oily.Engine oil level*:
Check the level after parking the vehicle on a level
surface and turning off the engine.
Fluid leaks:
Check under the vehicle for fuel, oil, water or other
fluid leaks after the vehicle has been parked for a
while. Water dripping from the air conditioner after
use is normal. If you should notice any leaks or if
petrol fumes are evident, check for the cause and
have it corrected immediately.
Window washer fluid*:
Check that there is adequate fluid in the tank.
Inside the vehicle
The maintenance items listed here should be
checked on a regular basis, such as when perform-
ing periodic maintenance, cleaning the vehicle, etc.
Accelerator pedal:
Check the pedal for smooth operation and make
sure that the pedal does not catch or require uneven
effort. Keep the floor mats away from the pedal.
Brake pedal*:
Check the pedal for smooth operation. If the brake
pedal suddenly goes down further than normal, the
pedal feels spongy or the vehicle seems to take
longer to stop, contact a NISSAN dealer or qualified
workshop immediately. Keep the floor mat away
from the pedal.
Maintenance and do-it-yourself8-3
Page 246 of 297
Downloaded from www.Manualslib.com manuals search engine CHECKING BRAKE PEDAL
If the brake pedal suddenly goes down further than
normal, the pedal feels “spongy” or the vehicle
seems to take longer to stop, see a NISSAN dealer
or qualified workshop.
CHECKING HANDBRAKE
Periodically check the holding ability of the hand-
brake by parking on a steep hill and restraining the
vehicle by using only the handbrake. If it does not
hold satisfactorily, see a NISSAN dealer or qualified
workshop.
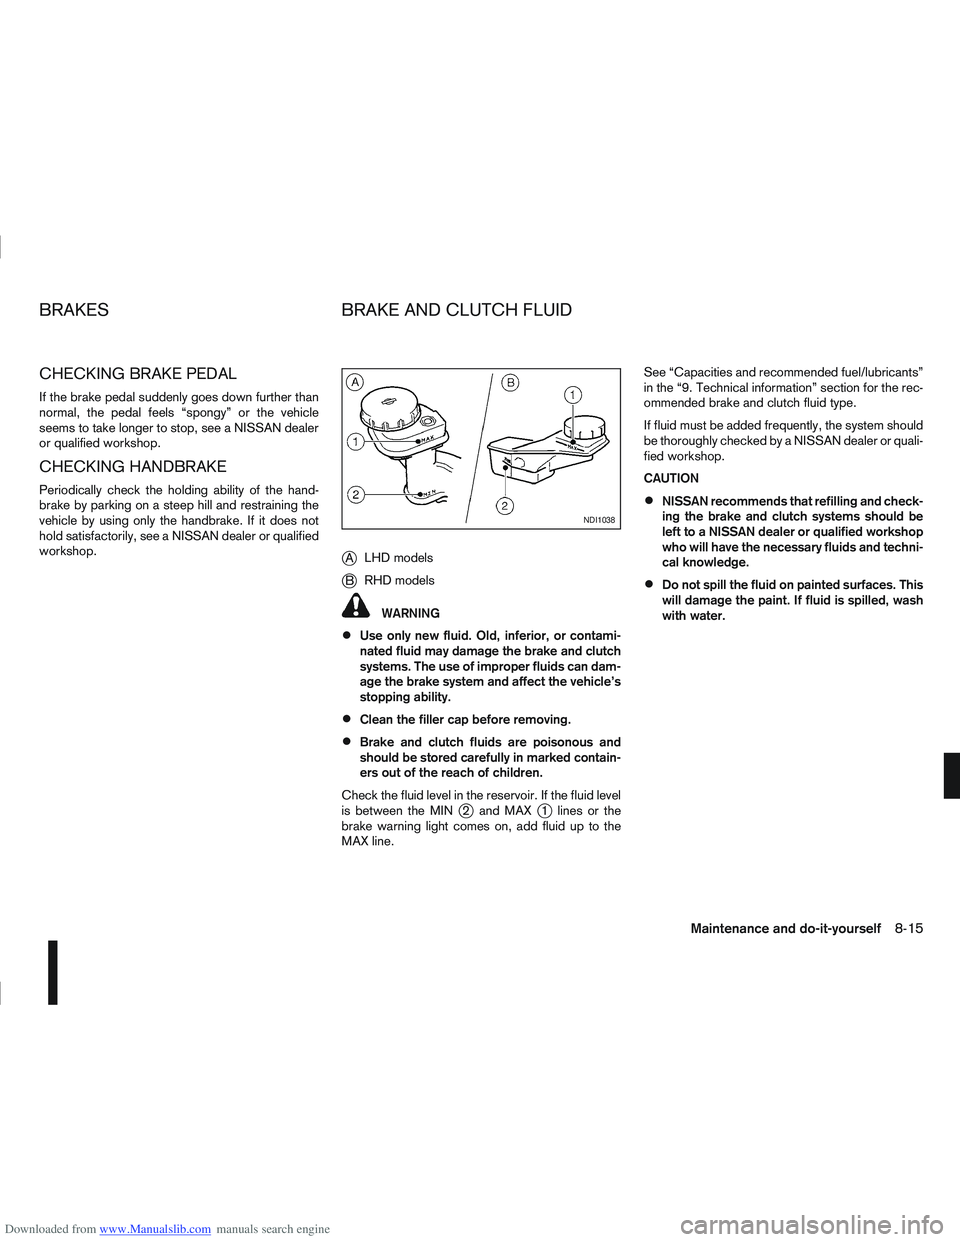
jALHD models
jB RHD models
WARNING
Use only new fluid. Old, inferior, or contami-
nated fluid may damage the brake and clutch
systems. The use of improper fluids can dam-
age the brake system and affect the vehicle’s
stopping ability.
Clean the filler cap before removing.
Brake and clutch fluids are poisonous and
should be stored carefully in marked contain-
ers out of the reach of children.
Check the fluid level in the reservoir. If the fluid level
is between the MIN
j2 and MAXj1 lines or the
brake warning light comes on, add fluid up to the
MAX line. See “Capacities and recommended fuel/lubricants”
in the “9. Technical information” section for the rec-
ommended brake and clutch fluid type.
If fluid must be added frequently, the system should
be thoroughly checked by a NISSAN dealer or quali-
fied workshop.
CAUTION
NISSAN recommends that refilling and check-
ing the brake and clutch systems should be
left to a NISSAN dealer or qualified workshop
who will have the necessary fluids and techni-
cal knowledge.
Do not spill the fluid on painted surfaces. This
will damage the paint. If fluid is spilled, wash
with water.
NDI1038
BRAKES
BRAKE AND CLUTCH FLUID
Maintenance and do-it-yourself8-15
Page 268 of 297

Downloaded from www.Manualslib.com manuals search engine Capacity (approximate)Recommended specifications
Litre Imp measure
Cooling system
Genuine NISSAN engine coolant or equivalent in its quality *3
HR16DE (with reservoir) 6.4 5–5/8 qt
MR20DE (with reservoir)
MT models
7.06–1/8 qt
CVT models 7.46–1/2 qt
K9K (with reservoir) without DPF
7.97 qt
with DPF 9.18 qt
M9R (with reservoir) MT models
8.47–3/8 qt
AT models 8.87–3/4 qt
R9M (with reservoir) 8.07 qt
Reservoir 0.83/4 qt
Differential gear oil 0.61/2 qt
Genuine NISSAN Differential oil Hypoid Super GL5 80W90 or API GL5. viscosity
SAE 80W90
Transfer gear oil 0.43/8 qt
Manual transaxle gear oil 5MT 2.32 qt
Genuine NISSAN gear oil or API GL4, viscosity SAE 75W80
6MT (MR20DE (2WD) or K9K) 2.01–3/4 qt
6MT (MR20DE (4WD), M9R or R9M) 2.01-3/4 qt Genuine NISSAN low viscosity gear oil LV MT-1 75W *7
Automatic Transmission fluid (ATF) M9R with 4WD 7.56–5/8 qt Genuine NISSAN Matic Fluid (ATF) type S *4 *6
Continuously Variable Transmission
(CVT) fluid HR16 with 2WD
7.16–1/4 qt
Genuine NISSAN CVT fluid NS-2 *5 *6
MR20 with 2WD 7.56–5/8 qt
MR20 with 4WD 8.57–1/2 qt
Brake & clutch fluid Refill to the proper oil level accord-
ing to the instructions in the “8.
Maintenance and do-it-yourself”
section.Genuine NISSAN brake fluid or equivalent. DOT 4 (US FMVSS No. 116)
Multi-purpose grease –– NLGI No. 2 (Lithium soap base)
Air conditioning system refrigerant –– HFC-134a (R-134a)
Air conditioning system lubricants –– Genuine NISSAN A/C System Oil Type S or exact equivalent
Technical information9-3