2010 NISSAN QASHQAI clutch
[x] Cancel search: clutchPage 62 of 297
Downloaded from www.Manualslib.com manuals search engine For more information, see “Seat belts” in the
“1. Safety — seats, seat belts and supplemental
restraint system” section
j4 Ignition knob warning (Intelligent Key
models)
The warning appears when the ignition knob is left
in the Acc or “OFF” position instead of completely
being turned to the LOCK position.
If this warning appears, turn the ignition knob to the
LOCK position.
When the ignition knob is in the ON position, a
buzzer will sound twice and the ignition knob warn-
ing shows when the ignition knob is turned to the
Acc or “OFF” position. This is to warn the driver that
the ignition knob is not in the LOCK position.
MT models:
Depress the ignition PUSH release button and turn
the ignition knob to the LOCK position.
AT or CVT models:
Make sure the gear selector lever is in the P (Park)
position and then turn the ignition switch to the
LOCK position.
See “Ignition knob (where fitted)” in the “5. Starting
and driving” section for further details.
CAUTION
The steering wheel can only be locked when
the ignition knob is in the LOCK position. Make
sure the ignition knob is in the LOCK position
before leaving the vehicle.
The emergency key can only be removed at
the LOCK position. Make sure the ignition
knob is in the LOCK position before removing
the emergency key.
See “Steering lock” in the “5. Starting and driving”
section for further details.
j5 Steering wheel lock warning
The warning appears when the ignition knob is
pressed, but not turned to the Acc or “OFF” posi-
tion within a short period. Move the steering wheel
to release the lock and turn the ignition knob to Acc
or ON. The warning will turn off in approximately 5
seconds.
See “Steering lock” in the “5. Starting and driving”
section for further details.
j6 Brake/Clutch warning (where fitted)
When starting your vehicle, it is necessary to oper-
ate the brake (CVT and AT models) or clutch pedal
(MT models).
For more information, see “Starting the engine” in
the “5. Starting and driving” section.
j7 Handbrake reminder
The reminder will come on if the handbrake is on
whilst the vehicle is being driven.
A buzzer will also sound.
j8 Intelligent Key detection warning
If the Intelligent Key is taken outside of the vehicle
ID recognition zone while the ignition knob is in the
Acc or ON position, the Intelligent Key detection
warning will be displayed and a buzzer will sound.
The Intelligent Key detection warning disappears
when the Intelligent Key is placed back in the pas-
senger compartment.
The message also appears when you try to start the
vehicle if the Intelligent Key is not detected within
the vehicle.
For more information, see “Integrated keyfob/re-
mote control system” in the “3. Pre-driving checks
and adjustments” section.
j9 Intelligent Key low battery warning
The Intelligent Key low battery warning may show if
a low battery voltage is detected when the ignition
knob is turned from “OFF” to the ON position.
For more information, see “Integrated keyfob/Intel-
ligent Key battery replacement” in the “8. Mainte-
nance and do-it-yourself” section.
j10Intelligent Key system fault warning
CAUTION
If the Intelligent Key system fault warning comes
on, it may indicate a system malfunction. We rec-
ommend that you contact a NISSAN dealer or
qualified workshop for repair.
Instruments and controls2-13
Page 165 of 297
Downloaded from www.Manualslib.com manuals search engine During the first 1,600 km (1,000 miles), follow these
recommendations for the future reliability and
economy of your new vehicle. Failure to follow the
recommendations may result in shortened engine
life and reduced engine performance.
Avoid driving for long periods at a constant
speed, either fast or slow.
Do not accelerate at full throttle in any gear.
Avoid quick starts.
Avoid hard braking as much as possible.
Do not tow a trailer during the first 800 km (500
miles).
NOTE
Models with K9K diesel engine will achieve top
performance only after approximately 5,000 km
(3,000 miles).
WARNING
The driving characteristics of your vehicle can be
changed remarkably by any additional load and
its distribution as well as by adding optional
equipment (trailer couplings, roof racks, etc.).
Your driving style and speed have to be adjusted
accordingly. Especially when carrying heavy
loads, your speed must be reduced adequately.
Make sure the area around the vehicle is free of
obstacles.
Check fluid levels such as engine oil, coolant,
brake and clutch fluid, and window washer fluid
as frequently as possible, at least whenever you
refuel.
Visually inspect tyres for their appearance and
condition. Also check the tyre pressure for
proper inflation.
Maintenance items in the “8. Maintenance and
do-it-yourself” section should be checked peri-
odically.
Check that all windows and light lenses are
clean.
Check that all doors are closed.
Position the seat and adjust the head restraints.
Adjust the inside and outside mirrors.
Fasten your seat belt and ask all passengers to
do likewise.
Check the operation of the warning/indicator
lights when the ignition switch is turned to the
ON position.
Do not place hard or heavy objects on the dash-
board or rear parcel shelf in order to prevent
injury in the event of a sudden stop.
RUNNING-IN SCHEDULE BEFORE STARTING THE ENGINE
5-2Starting and driving
Page 174 of 297
Downloaded from www.Manualslib.com manuals search engine If you failed to start the engine using the NATS Intel-
ligent Key, turn the ignition knob to the LOCK posi-
tion, wait for 5 seconds and turn the knob to the
START position again to start the engine.
For additional information, see “NISSAN Anti-Theft
System (NATS)” in the “3. Pre-driving checks and
adjustments” section.1. Apply the handbrake.
2.
Manual transmission models:
Move the gear lever to N (Neutral) position, and
depress the clutch pedal to the floor while start-
ing the engine.
Automatic transmission or Continuously vari-
able transmission models:
Depress the brake pedal and move the selector
lever to the P (Park) or N (Neutral) position.
(P position is preferred). NOTE
The starter is designed not to operate if the
selector lever is out of the P (Park) or N (Neu-
tral) position.
3. Models without Intelligent Key: Rotate the steering wheel left to right to release
the ignition lock whilst turning the ignition switch
to the ON position.
Models with Intelligent key:
MT models – keep the clutch pedal
depressed and/or depress the brake pedal
then:
AT or CVT models – depress the brake pedal
then:
1) Push the ignition knob.
2) Rotate the steering wheel left to right to release the ignition lock whilst turning the
ignition knob to the ON position. CAUTION
Make sure you carry the Intelligent Key with
you when operating the vehicle.
If the Intelligent Key is too far away from
the driver, the vehicle may not start.
4. For diesel engine models: Wait until the glow indicator light
goes out.
5. Crank the engine with your foot on the brake pedal, not on the accelerator pedal , by turning
the ignition switch to START.
6. Release the ignition switch when the engine starts. If the engine starts, but fails to run, repeat
the above procedure.
For petrol engine models:
NOTE
Models with HR16DE engine:
If the engine is very hard to start because it is
flooded, depress the accelerator pedal all the
way to the floor and hold it. Crank the engine
for 5-6 seconds and stop. After cranking the
engine, release the accelerator pedal. Then
crank the engine with your foot off the accel-
erator pedal. Release the ignition switch when
the engine starts. If the engine starts, but fails
to run, repeat the above procedure.
Models with MR20DE engine:
If the engine is very hard to start in extremely
cold or hot weather, or when restarting, de-
press the accelerator pedal a little (approxi-
STARTING THE ENGINE
Starting and driving5-11
Page 175 of 297
Downloaded from www.Manualslib.com manuals search engine mately 1/3 to the floor) and hold it then crank
the engine. Release the ignition switch and
the accelerator pedal when the engine starts.
CAUTION
Do not operate the starter for more than 15
seconds at a time. If the engine does not start,
turn the ignition switch to the “OFF” position
and wait 10 seconds (Petrol engine models)
or 20 seconds (Diesel engine models) before
cranking again, otherwise the starter could be
damaged.
If it becomes necessary to start the engine
with a booster battery and jumper leads, the
instructions and cautions contained in the
“Jump-starting” in the “6. In case of
emergency” section should be carefully fol-
lowed.
7. Warm-up
Allow the engine to idle for at least 30 seconds
after starting. Drive at moderate speed for a short
distance first, especially in cold weather.
WARNING
Do not leave the vehicle unattended while the
engine is warming up.
DRIVING WITH MANUAL
TRANSMISSION
CAUTION
Do not rest your foot on the clutch pedal while
driving. This may cause clutch damage.
Stop your vehicle completely before shifting
into the R (Reverse) position.
When you are shifting from one gear to an-
other, be certain to depress the clutch pedal
all the way to the floor to avoid clashing or
chipping the gears.
Avoid abrupt starts and acceleration for your
safety.
When quick acceleration is required for some
reason, shift to a lower gear and accelerate
until the vehicle reaches the maximum speed
in each gear. Do not exceed the speed limit of
any gear. Pay special attention when acceler-
ating or when shifting into a lower gear on
slippery surfaces. Sudden acceleration or
down shifting could cause the wheels to skid
and result in loss of control.
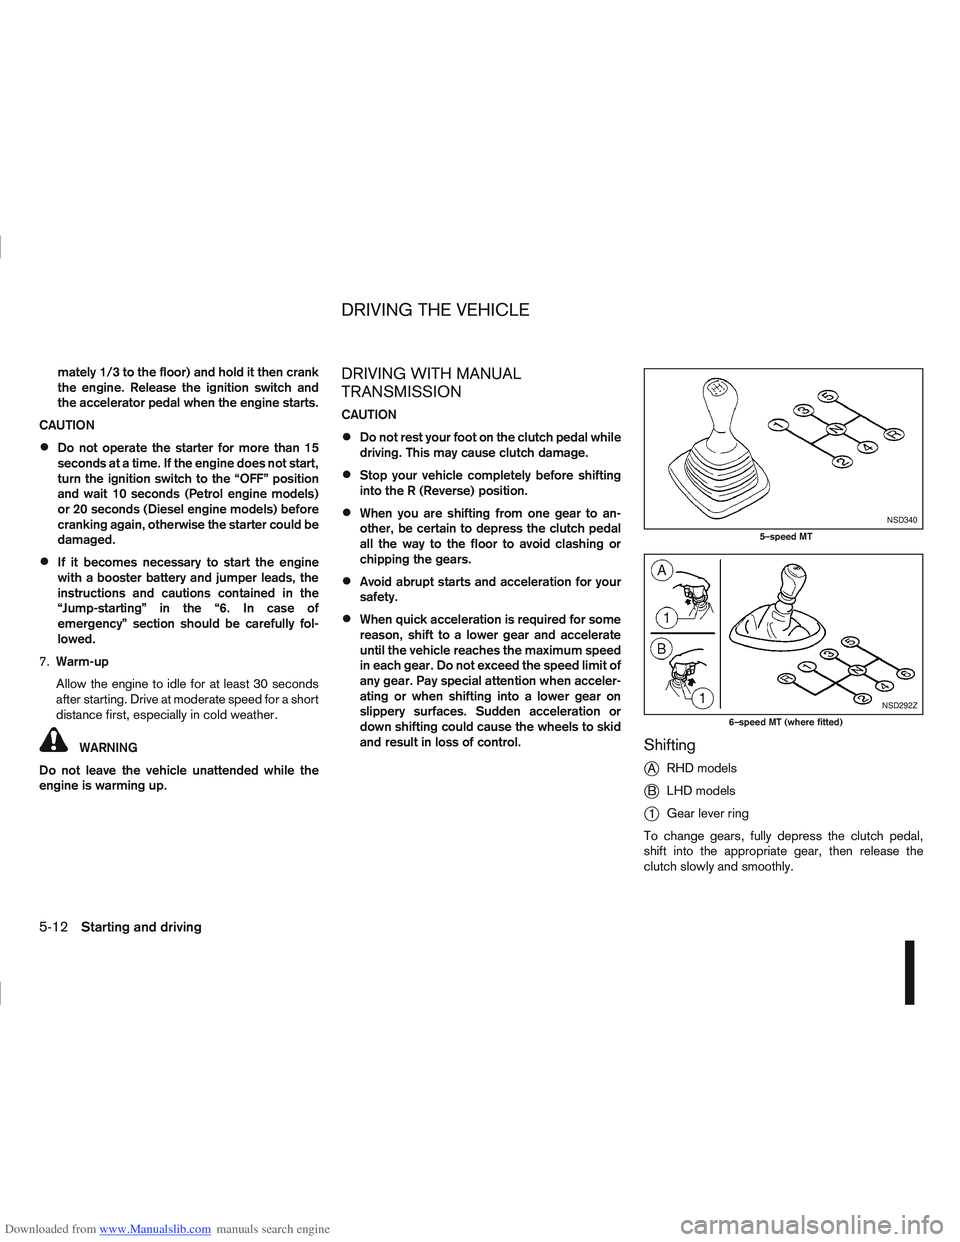
Shifting
j
A RHD models
jB LHD models
j1Gear lever ring
To change gears, fully depress the clutch pedal,
shift into the appropriate gear, then release the
clutch slowly and smoothly.
NSD340
5–speed MT
NSD292Z
6–speed MT (where fitted)
DRIVING THE VEHICLE
5-12Starting and driving
Page 176 of 297
Downloaded from www.Manualslib.com manuals search engine To ensure smooth gear changes, fully depress the
clutch pedal before operating the gear lever. If the
clutch pedal is not fully depressed before the trans-
mission is shifted, a gear noise may be heard. This
could result in damage to the transmission.
Start the vehicle in 1st gear and shift through the
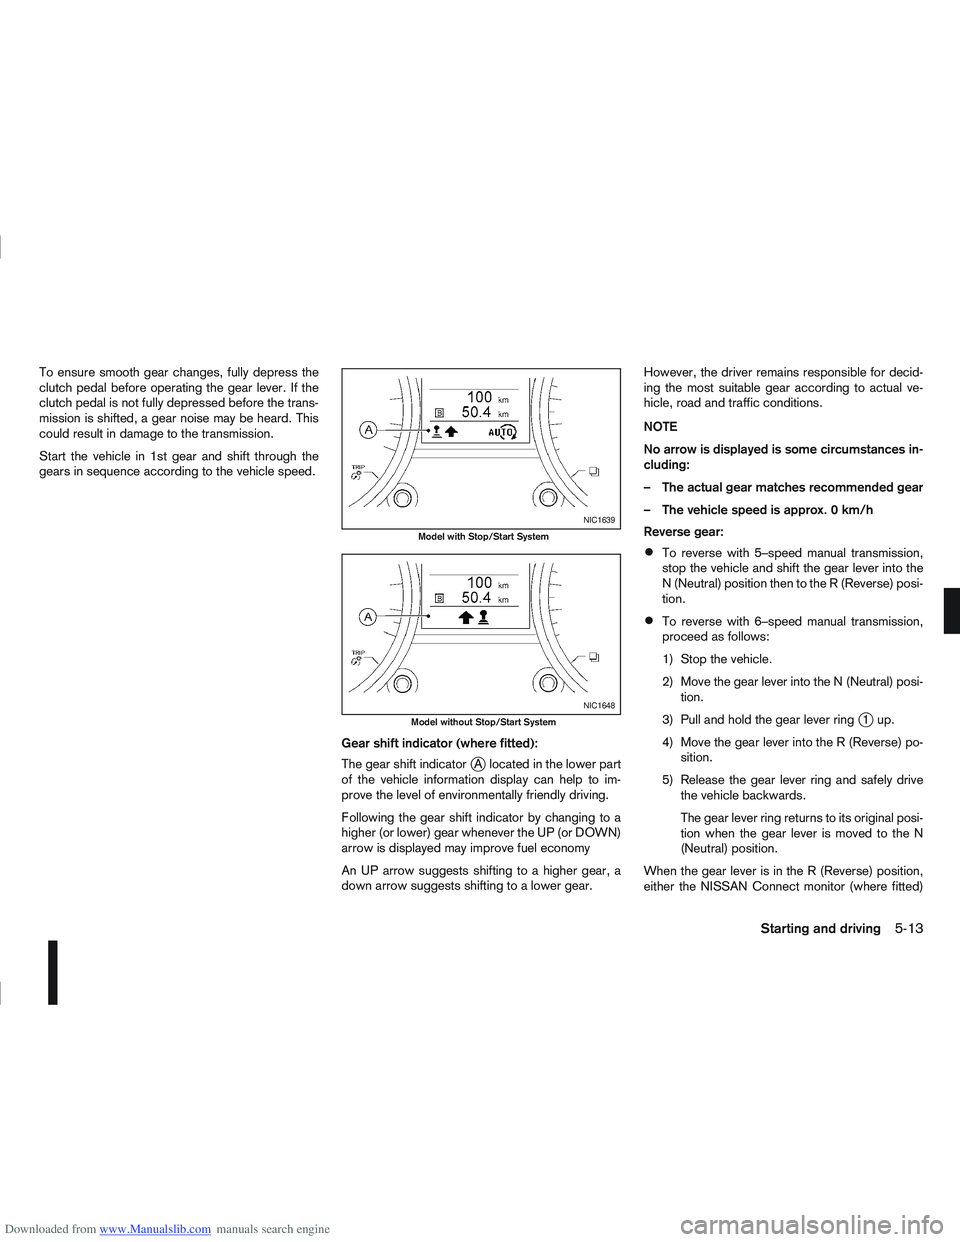
gears in sequence according to the vehicle speed.Gear shift indicator (where fitted):
The gear shift indicator
jA located in the lower part
of the vehicle information display can help to im-
prove the level of environmentally friendly driving.
Following the gear shift indicator by changing to a
higher (or lower) gear whenever the UP (or DOWN)
arrow is displayed may improve fuel economy
An UP arrow suggests shifting to a higher gear, a
down arrow suggests shifting to a lower gear. However, the driver remains responsible for decid-
ing the most suitable gear according to actual ve-
hicle, road and traffic conditions.
NOTE
No arrow is displayed is some circumstances in-
cluding:
– The actual gear matches recommended gear
– The vehicle speed is approx. 0 km/h
Reverse gear:
To reverse with 5–speed manual transmission,
stop the vehicle and shift the gear lever into the
N (Neutral) position then to the R (Reverse) posi-
tion.
To reverse with 6–speed manual transmission,
proceed as follows:
1) Stop the vehicle.
2) Move the gear lever into the N (Neutral) posi-
tion.
3) Pull and hold the gear lever ring
j1up.
4) Move the gear lever into the R (Reverse) po- sition.
5) Release the gear lever ring and safely drive the vehicle backwards.
The gear lever ring returns to its original posi-
tion when the gear lever is moved to the N
(Neutral) position.
When the gear lever is in the R (Reverse) position,
either the NISSAN Connect monitor (where fitted)
NIC1639
Model with Stop/Start System
NIC1648
Model without Stop/Start System
Starting and driving5-13
Page 177 of 297

Downloaded from www.Manualslib.com manuals search engine or the ultra sonic parking sensor (where fitted) will
be activated. For details, see “Rear-view monitor
(where fitted)” in the “4. Display screen, heater and
air conditioner, and audio system” section, “Around
view monitor (where fitted)” in the “4. Display
screen, heater and air conditioner, and audio
system” section or “Ultrasonic Parking Sensor
(where fitted)” later in this section.
If it is difficult to move the gear lever into R (Re-
verse) or 1st. Shift into N (Neutral), then release the
clutch pedal. Fully depress the clutch pedal again
and shift into R (Reverse) or 1st.
DRIVING WITH AUTOMATIC
TRANSMISSION OR WITH
CONTINUOUSLY VARIABLE
TRANSMISSION (Models with manual
shift)
CAUTION
The cold engine idle speed is high, so use
caution when shifting into a forward or re-
verse gear before the engine has warmed up.
Avoid revving up the engine while the vehicle
is stopped. This could cause unexpected ve-
hicle movement.
Driving precautions
Never shift to P (Park) or R (Reverse) while
the vehicle is moving, this could result in dam-
age to the transmission.
Start the engine in the P (Park) or N (Neutral)
position. The engine will not start in any otherselector position. If it does, have your vehicle
checked by a NISSAN dealer or qualified
workshop.
Do not depress the accelerator pedal while
shifting from P (Park) or N (Neutral) to R (Re-
verse), D (Drive) or Manual shift modes posi-
tion. Always depress the brake pedal until
shifting is completed.
On an uphill grade, do not hold the vehicle by
depressing the accelerator pedal. The foot-
brake should be used for this purpose, in or-
der to hold the vehicle in place and to prevent
overheating of the transmission.
Shift into the N (Neutral) position and apply
the handbrake when at a standstill for longer
than a short waiting period.
Keep the engine at idling speed while shifting
from the N (Neutral) position to any driving
position.
CAUTION (when starting the vehicle):
DEPRESS THE FOOTBRAKE PEDAL
When the engine is running, shifting the se-
lector lever into the R (Reverse), D (Drive) or
Manual shift mode position without depress-
ing the brake pedal causes the vehicle to
move slowly. Be sure the brake pedal is fully
depressed and the vehicle is stopped, before
shifting the selector lever.
BE AWARE OF THE SELECTOR LEVER POSI-
TION Make sure that the selector lever is in the
desired position. Use the D (Drive), or Manual
shift mode to move forwards and the R (Re-
verse) to move backwards. Release the hand-
brake lever and the footbrake pedal, then de-
press the accelerator pedal to start the vehicle
in motion and merge with traffic (avoid abrupt
starting and spinning the wheels).
Avoid revving up the engine while the vehicle
is stopped, this could cause unexpected ve-
hicle movement [if the selector lever is in the
R (Reverse), D (Drive), or Manual shift mode
position] or damage the engine [if the selec-
tor lever is in the N (Neutral) or P (Park) posi-
tion].
WARM THE ENGINE UP
Due to the higher idle speeds when the en-
gine is cold, extra caution must be taken when
shifting the selector lever into the driving po-
sition immediately after starting the engine.
PARKING THE VEHICLE
Depress the footbrake pedal and, once the
vehicle stops, move the selector lever into the
P (Park) position, pull the handbrake lever and
release the footbrake pedal.
Starting the vehicle
1. After starting the engine, fully depress the foot-
brake pedal before shifting the selector lever from
P (Park) to R (Reverse), D (Drive) or Manual shift
mode.
5-14Starting and driving
Page 184 of 297
Downloaded from www.Manualslib.com manuals search engine NISSAN GREEN PROGRAM
The Stop/Start System is designed to prevent un-
necessary fuel consumption, exhaust emissions,
and noise during a journey:
When the vehicle comes to rest the engine is
automatically stopped*.
The engine is then automatically restarted before
you are ready to drive away**.
CAUTION
At the end of the journey the engine must be
stopped and ignition turned OFF. Lock the ve-
hicle as normal. Turning the ignition OFF will shut
down all electrical systems. Failure to do this may
result in a flat battery.
NORMAL OPERATION
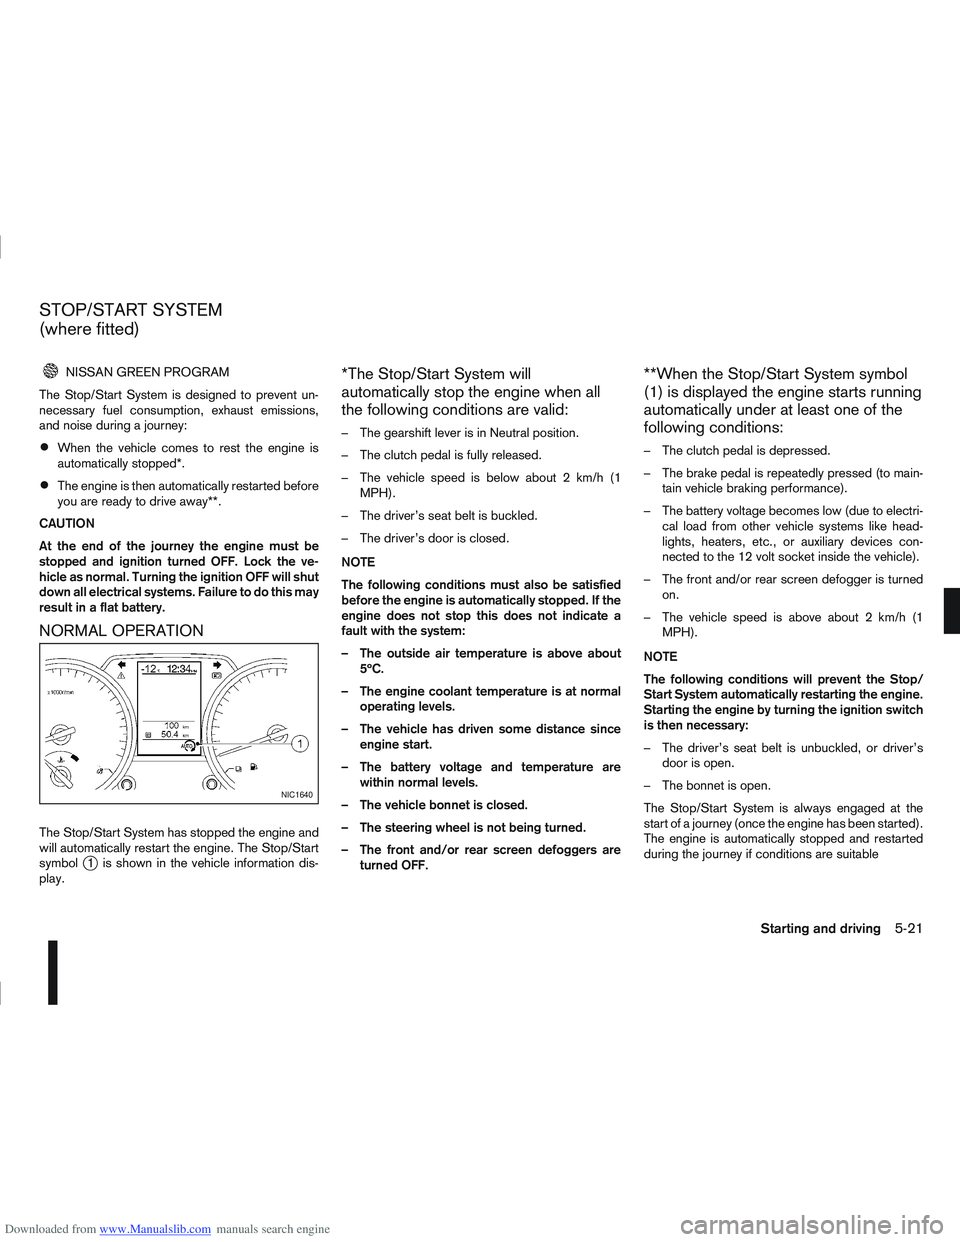
The Stop/Start System has stopped the engine and
will automatically restart the engine. The Stop/Start
symbol
j1 is shown in the vehicle information dis-
play.
*The Stop/Start System will
automatically stop the engine when all
the following conditions are valid:
– The gearshift lever is in Neutral position.
– The clutch pedal is fully released.
– The vehicle speed is below about 2 km/h (1 MPH).
– The driver’s seat belt is buckled.
– The driver’s door is closed.
NOTE
The following conditions must also be satisfied
before the engine is automatically stopped. If the
engine does not stop this does not indicate a
fault with the system:
– The outside air temperature is above about 5ºC.
– The engine coolant temperature is at normal operating levels.
– The vehicle has driven some distance since engine start.
– The battery voltage and temperature are within normal levels.
– The vehicle bonnet is closed.
– The steering wheel is not being turned.
– The front and/or rear screen defoggers are turned OFF.
**When the Stop/Start System symbol
(1) is displayed the engine starts running
automatically under at least one of the
following conditions:
– The clutch pedal is depressed.
– The brake pedal is repeatedly pressed (to main-tain vehicle braking performance).
– The battery voltage becomes low (due to electri- cal load from other vehicle systems like head-
lights, heaters, etc., or auxiliary devices con-
nected to the 12 volt socket inside the vehicle).
– The front and/or rear screen defogger is turned on.
– The vehicle speed is above about 2 km/h (1 MPH).
NOTE
The following conditions will prevent the Stop/
Start System automatically restarting the engine.
Starting the engine by turning the ignition switch
is then necessary:
– The driver’s seat belt is unbuckled, or driver’s door is open.
– The bonnet is open.
The Stop/Start System is always engaged at the
start of a journey (once the engine has been started).
The engine is automatically stopped and restarted
during the journey if conditions are suitable
NIC1640
STOP/START SYSTEM
(where fitted)
Starting and driving5-21
Page 190 of 297
Downloaded from www.Manualslib.com manuals search engine – Blinks slowly (about once every 2 seconds)Change the driving mode to 2WD and reduce
the vehicle speed as soon as safely possible.
If the warning light is still on after performing
the above operation, have the system
checked by a NISSAN dealer or qualified
workshop as soon as possible.
4WD MODE INDICATOR LIGHTS
4WD mode indicator light ( LOCK):
This light comes on when the ignition switch is
turned to the ON position, and turns off within 1
second. When selecting LOCK mode while the
engine is running, this light will illuminate simul-
taneously along with the 4WD mode indicator
light (AUTO).
4WD mode indicator light ( AUTO):
This light comes on when the ignition switch is
turned to the ON position, and turns off within 1
second. If the engine is running, this light will illu-
minate when selecting AUTO mode.
The 4WD mode indicator light is located in the
tachometer.
The light should turn off within 1 second of the
ignition switch being turned to the ON position.
While the engine is running, the 4WD mode indi-
cator light will display the position selected by
the 4WD mode control. NOTE
The 4WD mode indicator light may blink while
shifting from one drive mode to another. Once
shifting is completed, the 4WD mode indicator
light will come on. If the indicator light does not
come on immediately, make sure that the area
around the vehicle is safe and free from ob-
stacles. Drive the vehicle straight (DO NOT ac-
celerate, decelerate or reverse), then turn the
4WD mode control.
If the 4WD warning lights comes on, the 4WD indi-
cator light(s) will go out.
DRIVING FOUR-WHEEL DRIVE (4WD)
SAFELY
Your NISSAN is designed for both normal and off-
road use. However, avoid driving in deep water or
mud as your NISSAN is mainly designed for leisure
use, unlike a conventional off-road vehicle.
Remember that Two-Wheel drive (2WD) models are
less capable than Four-Wheel Drive (4WD) models
for rough road driving and extrication when stuck,
for example, in deep snow or mud.
Please observe the following precautions:
Drive carefully when off-road and avoid danger-
ous areas. Always wear seat belts to help keep
you and your passengers in position when driv-
ing over rough terrain.
Do not drive across steep slopes. Instead drive
either straight up or straight down the slope. Off- road vehicles can tip over sideways much more
easily than they can forwards or backwards.
Many hills are too steep for any vehicle. If you
drive up them, you may stall. If you drive down
them, you may not be able to control your speed.
If you drive across them, you may roll over.
Do not shift gears when driving on downhill
grades as this could cause loss of control of the
vehicle.
Stay alert when driving to the top of a hill. At the
top there could be a drop-off or other hazard that
could cause an accident.
If the engine of the vehicle stalls or you cannot
make it to the top of a steep grade, never at-
tempt to turn around. Your vehicle could tip or
roll over. Always drive backwards and straight
down in R (Reverse) gear.
Never drive backwards under the following con-
ditions as this could result in loss of control:
– with the gear lever in N (Neutral) and/or with
the clutch depressed and using the brake
(MT models).
– with the selector lever in N (Neutral) and us- ing only the brake (AT or CVT models).
Heavy braking down a hill could cause your
brakes to overheat and fade, resulting in loss of
control and an accident. Apply the brakes lightly
and use a low gear to control your vehicle speed.
Starting and driving5-27