2010 NISSAN QASHQAI bonnet
[x] Cancel search: bonnetPage 184 of 297
Downloaded from www.Manualslib.com manuals search engine NISSAN GREEN PROGRAM
The Stop/Start System is designed to prevent un-
necessary fuel consumption, exhaust emissions,
and noise during a journey:
When the vehicle comes to rest the engine is
automatically stopped*.
The engine is then automatically restarted before
you are ready to drive away**.
CAUTION
At the end of the journey the engine must be
stopped and ignition turned OFF. Lock the ve-
hicle as normal. Turning the ignition OFF will shut
down all electrical systems. Failure to do this may
result in a flat battery.
NORMAL OPERATION
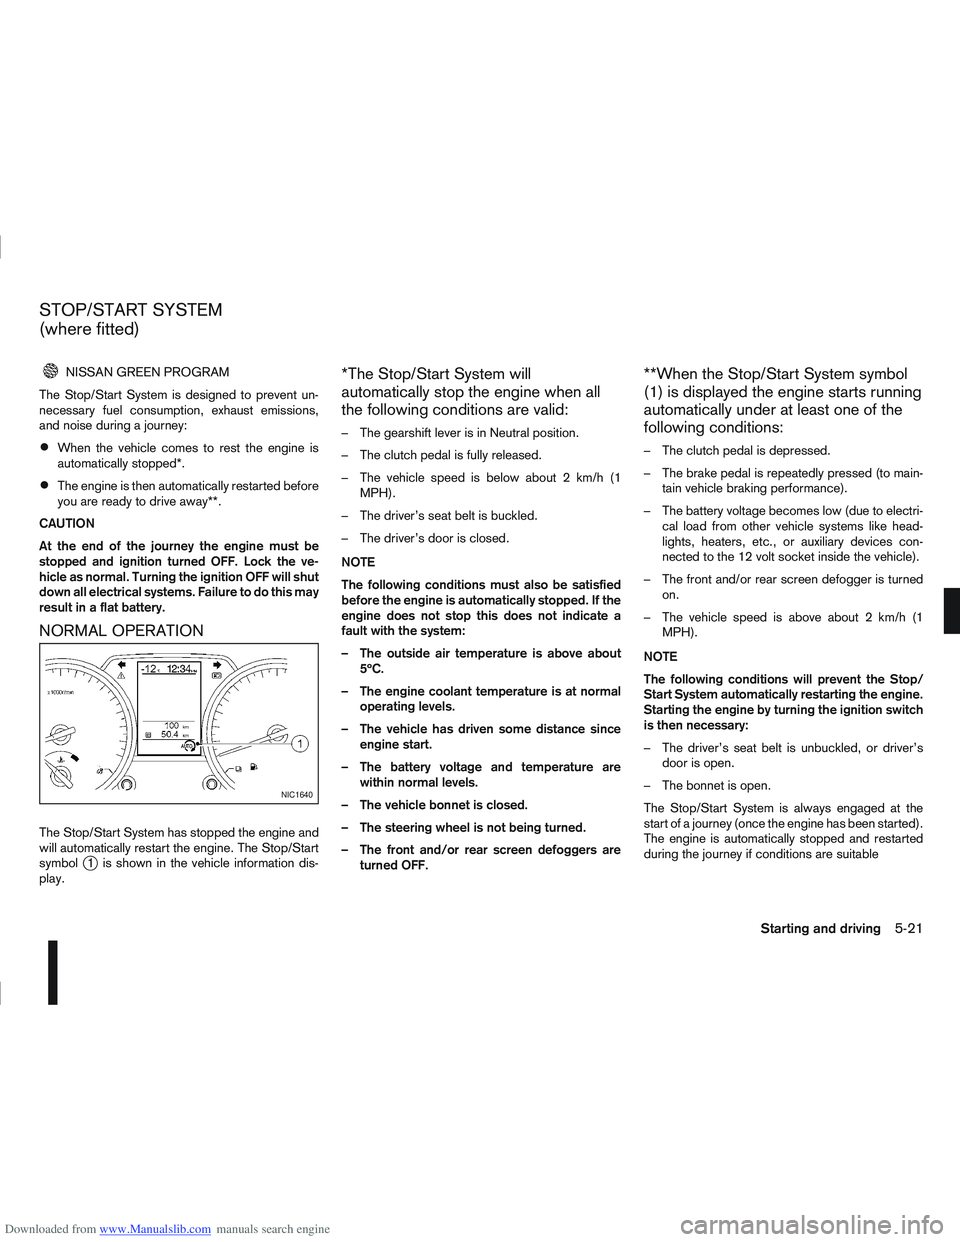
The Stop/Start System has stopped the engine and
will automatically restart the engine. The Stop/Start
symbol
j1 is shown in the vehicle information dis-
play.
*The Stop/Start System will
automatically stop the engine when all
the following conditions are valid:
– The gearshift lever is in Neutral position.
– The clutch pedal is fully released.
– The vehicle speed is below about 2 km/h (1 MPH).
– The driver’s seat belt is buckled.
– The driver’s door is closed.
NOTE
The following conditions must also be satisfied
before the engine is automatically stopped. If the
engine does not stop this does not indicate a
fault with the system:
– The outside air temperature is above about 5ºC.
– The engine coolant temperature is at normal operating levels.
– The vehicle has driven some distance since engine start.
– The battery voltage and temperature are within normal levels.
– The vehicle bonnet is closed.
– The steering wheel is not being turned.
– The front and/or rear screen defoggers are turned OFF.
**When the Stop/Start System symbol
(1) is displayed the engine starts running
automatically under at least one of the
following conditions:
– The clutch pedal is depressed.
– The brake pedal is repeatedly pressed (to main-tain vehicle braking performance).
– The battery voltage becomes low (due to electri- cal load from other vehicle systems like head-
lights, heaters, etc., or auxiliary devices con-
nected to the 12 volt socket inside the vehicle).
– The front and/or rear screen defogger is turned on.
– The vehicle speed is above about 2 km/h (1 MPH).
NOTE
The following conditions will prevent the Stop/
Start System automatically restarting the engine.
Starting the engine by turning the ignition switch
is then necessary:
– The driver’s seat belt is unbuckled, or driver’s door is open.
– The bonnet is open.
The Stop/Start System is always engaged at the
start of a journey (once the engine has been started).
The engine is automatically stopped and restarted
during the journey if conditions are suitable
NIC1640
STOP/START SYSTEM
(where fitted)
Starting and driving5-21
Page 203 of 297
Downloaded from www.Manualslib.com manuals search engine and varies the brake fluid pressure to prevent each
wheel from locking and sliding. By preventing each
wheel from locking, the system helps the driver to
maintain steering control and helps to minimise
swerving and spinning on slippery surfaces.
Using the system
Depress the brake pedal and hold it down. Depress
the brake pedal with firm steady pressure, but do
not pump the brakes. The ABS will operate to pre-
vent the wheels from locking up. Steer the vehicle to
avoid obstacles.
WARNING
Do not pump the brake pedal. Doing so may in-
crease the stopping distance.
Self-test feature
The ABS includes electronic sensors, electric
pumps, hydraulic solenoids and a computer. The
computer has a built-in diagnostic feature that tests
the system each time you start the engine and move
thevehicleatalowspeedinforwardorreverse.
When the self-test occurs, you may hear a “clunk”
noise and/or feel a pulsation in the brake pedal. This
is normal and does not indicate a malfunction. If the
computer senses a malfunction, it switches the ABS
off and illuminates the ABS warning light on the
instrument panel. The brake system then operates
normally, but without anti-lock assistance.
If the ABS warning light illuminates during the self-
test or while driving, have the vehicle checked by a
NISSAN dealer or qualified workshop.
Normal operation
The ABS will not initiate at speeds below 5 to 10
km/h (3 to 6 MPH). The speeds will vary according
to road conditions.
When the ABS senses that one or more wheels are
close to locking up, the actuator rapidly applies and
releases hydraulic pressure. This action is similar to
pumping the brakes very quickly. You may feel a
pulsation in the brake pedal and hear a noise from
the actuator under the bonnet when it is operating.
This is normal and indicates that the ABS is working
properly. However, the pulsation may indicate that
road conditions are hazardous and extra care is re-
quired while driving. When accelerating, driving on slippery surfaces or
suddenly avoiding obstacles on roads, the vehicle
might swerve or slip. The Electronic Stability Pro-
gramme (ESP) system continuously monitors and
compares the driver’s intended speed and the travel
direction. The system adjusts wheel brake pressure
and engine torque to assist in improving vehicle sta-
bility.
When the ESP system is operating, the “SLIP”
indicator light () in the combination meter
blinks.
When only the traction control (TCS) system in
the ESP system is operating, the “SLIP” indica-
tor light (
) in the combination meter will also
blink.
If the “SLIP” indicator light () blinks, the
road conditions are slippery. Be sure to drive
carefully. See “Warning/indicator lights and au-
dible reminders” in the “2. Instruments and
controls” section.
Indicator light
If a malfunction occurs in the system, the “SLIP”
indicator light (
) and the ESP indicator light
() come on in the combination meter.
As long as these indicator lights are on, the trac-
tion control function is cancelled.
The ESP system uses Active Brake Limited Slip
(ABLS) system to improve vehicle traction. The Ac-
tive Brake Limited Slip (ABLS) system works when
one of the driving wheels is spinning on a slippery
ELECTRONIC STABILITY
PROGRAMME (ESP) SYSTEM
(where fitted)
5-40Starting and driving
Page 204 of 297
Downloaded from www.Manualslib.com manuals search engine surface. The Active Brake Limited Slip (ABLS) sys-
tem, brakes the spinning wheel to distribute the driv-
ing power to the other driving wheel.
If the vehicle is operated with the ESP system turned
off, all ESP and TCS functions will be turned off.
The Active Brake Limited Slip (ABLS) system and
ABS will still operate with the ESP system off. If the
Active Brake Limited Slip (ABLS) system or the ABS
is activated, the “SLIP” indicator light (
) will
blink and you may hear a clunk noise and/or feel a
pulsation in the brake pedal. This is normal and does
not indicate a malfunction.
While the ESP system is operating, you may feel a
pulsation in the brake pedal and hear a noise or
vibration from under the bonnet. This is normal and
indicates that the ESP system is working properly.
The ESP computer has a built in diagnostic feature
that tests the system each time the engine is started
and the vehicle moves forwards or reverses at a
slow speed. When the self-test occurs, you may
hear a clunk noise and/or feel a pulsation in the
brake pedal. This is normal and is not an indication
of a malfunction.
WARNING
The ESP system is designed to help improve
driving stability but does not prevent accidents
caused by abrupt steering operation at high
speeds, or careless or dangerous driving
techniques. Reduce vehicle speed and be es-
pecially careful when driving and cornering on
slippery surfaces. Always drive carefully.
If engine related parts, such as a muffler, are
not standard equipment or are extremely de-
teriorated, the ESP OFF indicator light (
)
and/or the “SLIP” indicator light () may
illuminate.
If brake related parts, such as brake pads,
rotors and callipers, are not standard equip-
ment or are extremely deteriorated, the ESP
system may not operate properly and the ESP
OFF indicator light (
) and/or the “SLIP”
indicator light () may illuminate.
Do not modify the vehicle’s suspension. If
suspension parts, such as shock absorbers,
struts, springs, stabiliser bars and bushings,
are not NISSAN-approved or are extremely
deteriorated, the ESP system may not oper-
ate properly. This could adversely affect ve-
hicle handling performance and the ESP OFF
indicator light (
) and/or the “SLIP” indi-
cator light () may illuminate.
When driving on extremely inclined surfaces,
such as higher banked corners, the ESP sys-
tem may not operate properly and the ESP
OFF indicator light (
) and/or the “SLIP”
indicator light () may illuminate. Do not
drive on these types of roads. If ESP OFF indi-
cator light
does illuminate after driving
on extreme surfaces, restart the engine to re-
set the ESP system.
If wheels or tyres other than the
recommended ones are used, the ESP sys-
tem may not operate properly and the ESP OFF indicator light (
) and/or the “SLIP”
indicator light () may illuminate.
The ESP system is not a substitute for winter
tyres or snow chains on a snow covered road.
NOTE
The ESP system should be switched on under
normal circumstances although it may be ad-
vantageous to switch off the ESP system to
allow wheelspin under the following condi-
tions:
– When driving in deep snow or mud.
– When trying to rock a vehicle free that is stuck in snow.
– When driving with snow chains.
If the ESP system has been switched off, drive
carefully with reduced speed. When road con-
ditions allow, ESP should be switched back
on.
Starting and driving5-41
Page 210 of 297
Downloaded from www.Manualslib.com manuals search engine 6. Turn off the engine.
7. Open the bonnet (for details, see “Bonnetrelease” in the “3. Pre-driving checks and
adjustments” section) in order to:
Warn other traffic.
Signal to professional road assistance that
you require assistance.
8. Have all passengers exit the vehicle and stand in a safe place, away from traffic and clear of the
vehicle.
CHANGING FLAT TYRE (Models with
spare wheel, where fitted)
Blocking the wheels
WARNING
Make sure to block the appropriate wheel to pre-
vent the vehicle from moving, which may cause
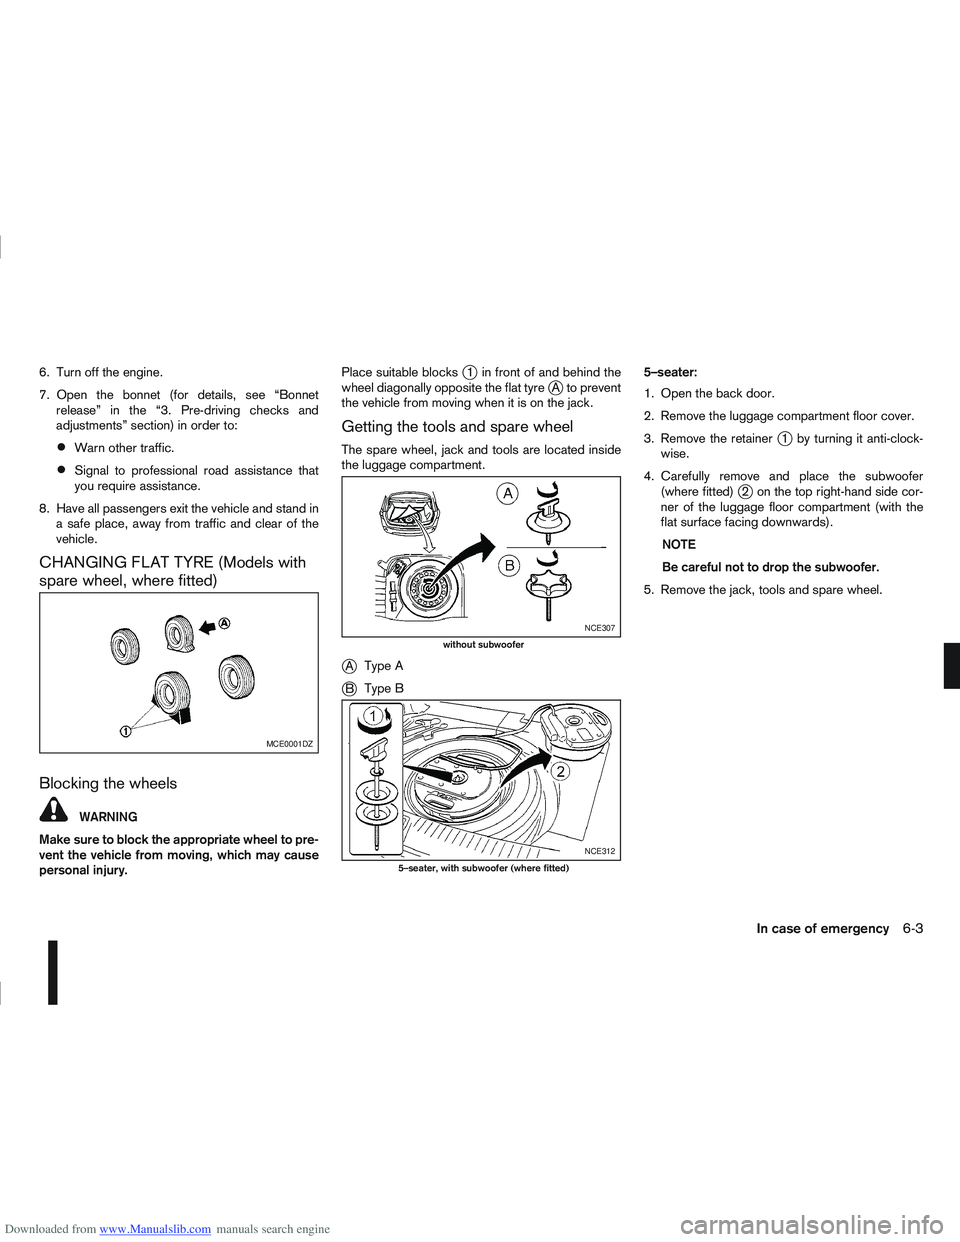
personal injury. Place suitable blocks
j1 in front of and behind the
wheel diagonally opposite the flat tyrejA to prevent
the vehicle from moving when it is on the jack.
Getting the tools and spare wheel
The spare wheel, jack and tools are located inside
the luggage compartment.
jA Type A
jB Type B 5–seater:
1. Open the back door.
2. Remove the luggage compartment floor cover.
3. Remove the retainer
j1 by turning it anti-clock-
wise.
4. Carefully remove and place the subwoofer (where fitted)
j2 on the top right-hand side cor-
ner of the luggage floor compartment (with the
flat surface facing downwards).
NOTE
Be careful not to drop the subwoofer.
5. Remove the jack, tools and spare wheel.
MCE0001DZ
NCE307
without subwoofer
NCE312
5–seater, with subwoofer (where fitted)
In case of emergency6-3
Page 218 of 297
Downloaded from www.Manualslib.com manuals search engine 6. Open the bonnet. For details, see “Bonnetrelease” in the “3. Pre-driving checks and
adjustments” section.
7. Remove the vent caps (where fitted) on the bat- tery and cover the battery with an old cloth.
8. Connect the jump leads in the sequence (
j1 →j2→j3→j4 ) as illustrated.
CAUTION
Always connect positivej+ to positivej+
and negativej- to body ground (for ex-
ample, engine lift bracket, etc.) – not to
the battery’s negative
j-.
An incorrect connection could damage the
charging system.
Be sure that the jumper cables do not
touch moving parts in the engine compart-
ment.
Be careful not to allow contact between
the positive jump lead connector and the
vehicle or the negative lead during con-
nection and disconnection.
9. Start the engine of the other vehicle
jA and let it
run for a few minutes. Keep the engine speed at
about 2,000 rpm.
10. Start the engine of your vehicle
jB in the nor-
mal way. CAUTION
Do not keep the starter motor engaged for
more than 10 seconds. If the engine does not
start immediately, turn the ignition switch to
“OFF” and wait 10 seconds before trying
again.
11. After starting the engine of your vehicle, care- fully disconnect the negative lead and then the
positive lead (
j4→j3→j2→j1).
12. Remove and dispose of the cloth that was used to cover the vent holes as it may be contami-
nated with corrosive acid.
13. Install the vent caps (where fitted).
14. Close the bonnet.
NOTE
For models which incorporate the Stop/Start
System:
Ensure that the battery fitted is the special
battery that is enhanced with regard to the
charge-discharge capacity and life perfor-
mance. Avoid using any other battery for the
Stop/Start System, as this may cause early
deterioration of the battery or a malfunction
of the Stop/Start System. It is recommended
that a Genuine NISSAN battery is fitted. For
more information, contact a NISSAN dealer or
qualified workshop
If the battery terminal is disconnected (for bat-
tery replacement, etc.) and then reconnected,
there may be some delay before the Stop/
Start System reactivates.
In case of emergency6-11
Page 219 of 297
Downloaded from www.Manualslib.com manuals search engine CAUTION
Three-way catalyst equipped models should
not be started by pushing the vehicle as the
three-way catalyst may be damaged.
Automatic transmission (AT) or continuously
variable transmission (CVT) models cannot be
started by pushing the vehicle. This may cause
transmission damage.
Never try to start the vehicle by towing it; when
the engine starts, the forward surge could
cause the vehicle to collide with the tow ve-
hicle.
WARNING
Never continue driving if the engine of your
vehicle overheats. Doing so could cause a ve-
hicle fire.
Never open the bonnet if steam is coming
out.
Never remove engine coolant reservoir cap
when the engine is hot. If the engine coolant
reservoir cap is removed while the engine is
hot, pressurised hot water will spurt out and
possibly cause burning, scalding or serious
injury.
If steam or coolant is coming out of the en-
gine, stand clear of the vehicle to prevent get-
ting injured.
The engine cooling fan will start whenever the
coolant temperature exceeds preset degrees.
Be careful not to allow your hands, hair, jewel-
lery or clothing to come into contact with, or
get caught in, the cooling fan or drive belts.
If the engine of your vehicle is overheating (indi-
cated by the engine coolant temperature gauge) or
if you feel a lack of engine power, detect unusual
noise, etc., proceed as follows:
1. Move and park the vehicle safely off the road and away from traffic.
2. Turn on the hazard warning flasher lights.
3. Apply the handbrake. 4. Shift the gear lever (MT models) into the N (Neu-
tral) position [AT or CVT models, move the se-
lector lever to the P (Park) position].
DO NOT STOP THE ENGINE.
5. Open all windows.
6. Switch off the air conditioner system (where fit- ted).
7. Set the heater or air conditioner temperature control to maximum “HOT” and fan speed con-
trol to maximum speed.
8. Exit the vehicle.
9. Visually inspect and listen for steam or coolant escaping from the radiator before opening the
bonnet. Wait until no steam or coolant can be
seen before proceeding.
10. Open the bonnet. For details, see “Bonnet release” in the “3. Pre-driving checks and
adjustments” section.
11. Visually check if the cooling fan is running.
12. Visually check the radiator and radiator hoses for leakage.
WARNING
If coolant is leaking, the cooling fan belt is
missing or loose or the cooling fan is not run-
ning, stop the engine.
13. After the engine cools down, check the coolant level in the engine coolant reservoir with the
engine running.
PUSH-STARTING ENGINE OVERHEAT
6-12In case of emergency
Page 220 of 297
Downloaded from www.Manualslib.com manuals search engine 14. If the level is low, remove the engine coolantreservoir cap and add coolant slowly into the
reservoir. After refilling the reservoir to the MAX
level, install the reservoir cap.
WARNING
Before removing the engine coolant reservoir
cap and to avoid the danger of being scalded,
cover the reservoir cap with a rag and loosen
the reservoir cap to the first notch to allow the
steam to escape.
15. Close the bonnet.
Have your vehicle inspected or repaired by a
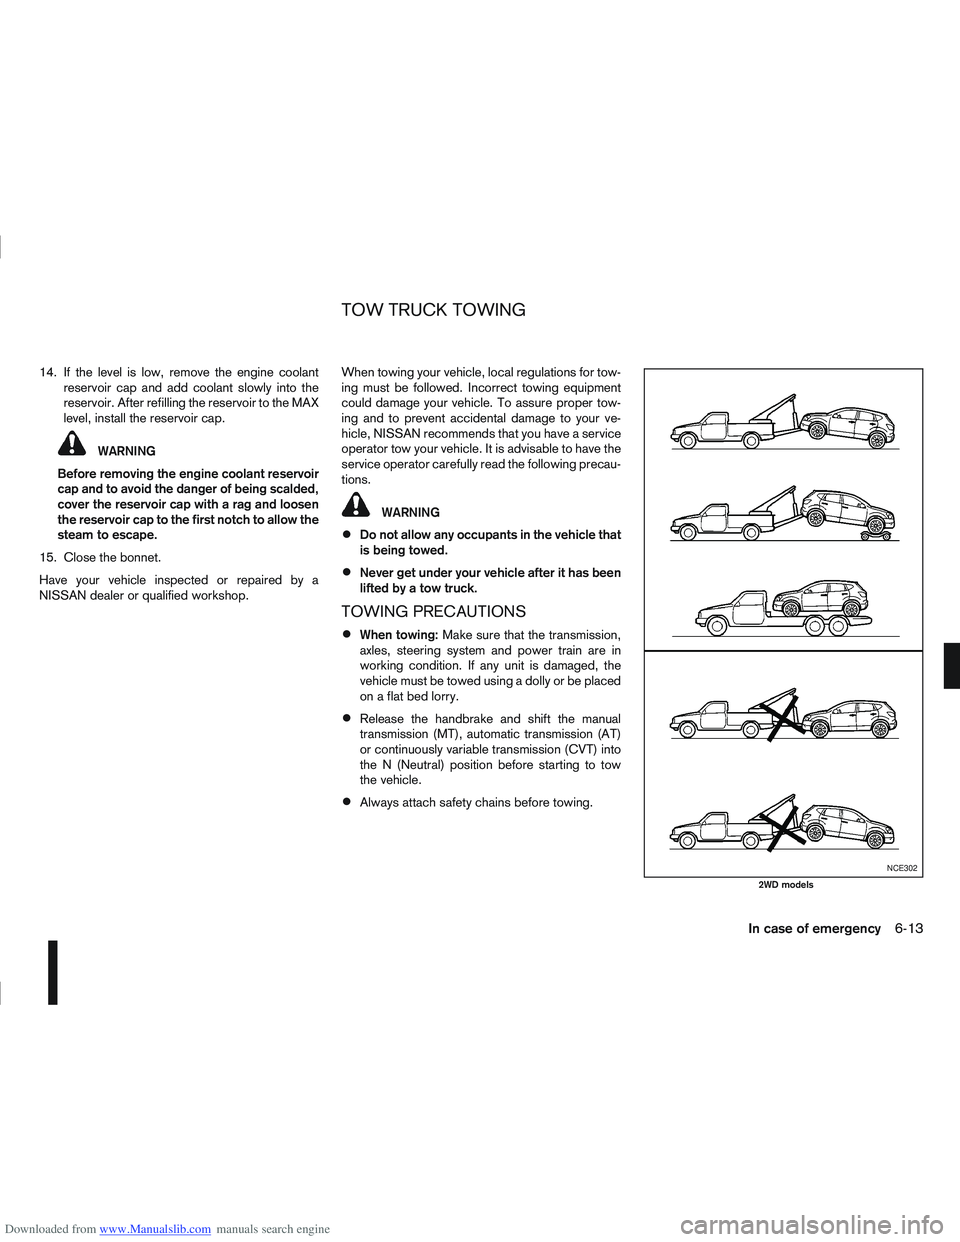
NISSAN dealer or qualified workshop. When towing your vehicle, local regulations for tow-
ing must be followed. Incorrect towing equipment
could damage your vehicle. To assure proper tow-
ing and to prevent accidental damage to your ve-
hicle, NISSAN recommends that you have a service
operator tow your vehicle. It is advisable to have the
service operator carefully read the following precau-
tions.
WARNING
Do not allow any occupants in the vehicle that
is being towed.
Never get under your vehicle after it has been
lifted by a tow truck.
TOWING PRECAUTIONS
When towing:
Make sure that the transmission,
axles, steering system and power train are in
working condition. If any unit is damaged, the
vehicle must be towed using a dolly or be placed
on a flat bed lorry.
Release the handbrake and shift the manual
transmission (MT), automatic transmission (AT)
or continuously variable transmission (CVT) into
the N (Neutral) position before starting to tow
the vehicle.
Always attach safety chains before towing.
NCE302
2WD models
TOW TRUCK TOWING
In case of emergency6-13
Page 225 of 297

Downloaded from www.Manualslib.com manuals search engine In order to maintain the appearance of your vehicle,
it is important to take proper care of it.
Whenever possible, park your vehicle inside a ga-
rage or in a covered area to minimise the chances
of damaging the paint surface of your vehicle.
When it is necessary to park outside, park in a shady
area or protect the vehicle with a body cover.Be
careful not to scratch the paint surface when put-
ting on or removing the body cover.
WASHING
In the following instances, wash your vehicle as soon
as possible to protect the paint surface:
After a rainfall, to prevent possible damage from
acid rain.
After driving on coastal roads.
When contaminants such as soot, bird drop-
pings, tree sap, metal particles or insects get on
the paint surface.
When dust or mud builds up on the paint sur-
face.
1. Wash the vehicle surface with a wet sponge and plenty of water.
2. Clean the vehicle surface gently and thoroughly using a mild soap or a special vehicle wash sham-
poo mixed with clean, lukewarm (never hot) wa-
ter. CAUTION
Do not wash the vehicle with strong house-
hold soap, strong chemical detergents, petrol
or solvents.
Do not wash the vehicle in direct sunlight or
while the vehicle body is hot, as the paint sur-
face may become water-spotted.
Avoid using tight-napped or rough cloths,
such as washing mitts. Care must be taken
when removing caked-on dirt or other foreign
substances so the paint surface is not
scratched or damaged.
3. Rinse the vehicle thoroughly with plenty of clean water.
4. Use a damp chamois to dry the paint surface to avoid leaving water spots.
When washing the vehicle, take care of the follow-
ing:
Inside flanges, joints and folds on the doors, back
door and bonnet are particularly vulnerable to
the effects of road salt. Therefore, these areas
must be cleaned regularly.
Be sure that the drain holes in the lower edge of
the doors are not clogged.
Spray water to the underbody and in the wheel
wells to loosen the dirt and/or wash away road
salt.
If using a high pressure washer always follow
the recommendations on the equipment (pres-
sure and spraying distance).
CAUTION
Do not spray directly into the engine compart-
ment with a high-pressure washer/hose this
could damage the engine.
If there are damaged areas on the vehicle (e.g.
painted bumpers or headlamp assembly), it is
not recommended to direct the high pressure jet
on to them. Carefully wash these areas by hand.
Avoid the entry of water into the locks.
REMOVING SPOTS
Remove tar and oil spots, industrial dust, insects,
and tree sap as quickly as possible from the paint
surface to avoid lasting damage or staining. Special
cleaning products are available at a NISSAN dealer
or any automotive accessory store.
WAXING
Regular waxing protects the paint surface and helps
to retain a new vehicle appearance.
After waxing, polishing is recommended to remove
built-up residue.
A NISSAN dealer or qualified workshop can assist
you in choosing the appropriate waxing products.
CAUTION
Wash your vehicle thoroughly and completely
before applying wax to the paint surface.
CLEANING EXTERIOR
7-2Appearance and care