2010 NISSAN QASHQAI battery
[x] Cancel search: batteryPage 26 of 297
Downloaded from www.Manualslib.com manuals search engine tened. The seat belt warning shows a filled circle
when the ignition switch is turned to the ON position
and an empty circle when the related seat belt has
been securely fastened, or after approximately 35
seconds after engine start, or when acknowledged
by the driver pushing the steering wheel switch
ji
(where fitted).
NOTE
If there is a change in (2nd row) rear seat belt
status during a journey then the applicable
symbol for any unbuckled seat will show again
for a further 35 seconds.
The front passenger seat belt warning light
will not illuminate if the seat is unoccupied.
Seat belts for 3rd row seats (where fitted) are
not part of the seat belt warning monitoring
system.
PRECAUTIONS ON SEAT BELT
USAGE
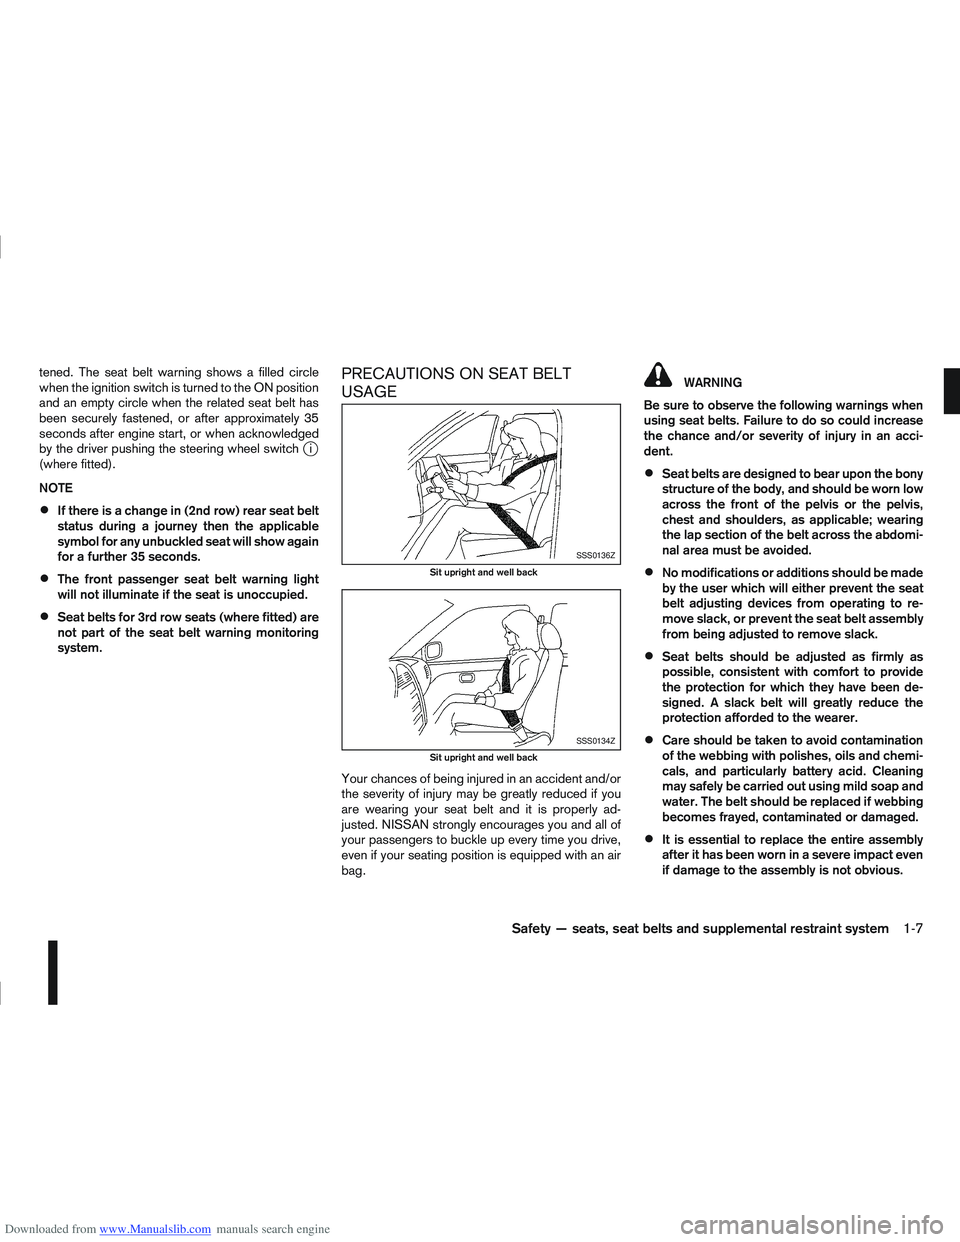
Your chances of being injured in an accident and/or
the severity of injury may be greatly reduced if you
are wearing your seat belt and it is properly ad-
justed. NISSAN strongly encourages you and all of
your passengers to buckle up every time you drive,
even if your seating position is equipped with an air
bag.
WARNING
Be sure to observe the following warnings when
using seat belts. Failure to do so could increase
the chance and/or severity of injury in an acci-
dent.
Seat belts are designed to bear upon the bony
structure of the body, and should be worn low
across the front of the pelvis or the pelvis,
chest and shoulders, as applicable; wearing
the lap section of the belt across the abdomi-
nal area must be avoided.
No modifications or additions should be made
by the user which will either prevent the seat
belt adjusting devices from operating to re-
move slack, or prevent the seat belt assembly
from being adjusted to remove slack.
Seat belts should be adjusted as firmly as
possible, consistent with comfort to provide
the protection for which they have been de-
signed. A slack belt will greatly reduce the
protection afforded to the wearer.
Care should be taken to avoid contamination
of the webbing with polishes, oils and chemi-
cals, and particularly battery acid. Cleaning
may safely be carried out using mild soap and
water. The belt should be replaced if webbing
becomes frayed, contaminated or damaged.
It is essential to replace the entire assembly
after it has been worn in a severe impact even
if damage to the assembly is not obvious.
SSS0136Z
Sit upright and well back
SSS0134Z
Sit upright and well back
Safety — seats, seat belts and supplemental restraint system1-7
Page 62 of 297
Downloaded from www.Manualslib.com manuals search engine For more information, see “Seat belts” in the
“1. Safety — seats, seat belts and supplemental
restraint system” section
j4 Ignition knob warning (Intelligent Key
models)
The warning appears when the ignition knob is left
in the Acc or “OFF” position instead of completely
being turned to the LOCK position.
If this warning appears, turn the ignition knob to the
LOCK position.
When the ignition knob is in the ON position, a
buzzer will sound twice and the ignition knob warn-
ing shows when the ignition knob is turned to the
Acc or “OFF” position. This is to warn the driver that
the ignition knob is not in the LOCK position.
MT models:
Depress the ignition PUSH release button and turn
the ignition knob to the LOCK position.
AT or CVT models:
Make sure the gear selector lever is in the P (Park)
position and then turn the ignition switch to the
LOCK position.
See “Ignition knob (where fitted)” in the “5. Starting
and driving” section for further details.
CAUTION
The steering wheel can only be locked when
the ignition knob is in the LOCK position. Make
sure the ignition knob is in the LOCK position
before leaving the vehicle.
The emergency key can only be removed at
the LOCK position. Make sure the ignition
knob is in the LOCK position before removing
the emergency key.
See “Steering lock” in the “5. Starting and driving”
section for further details.
j5 Steering wheel lock warning
The warning appears when the ignition knob is
pressed, but not turned to the Acc or “OFF” posi-
tion within a short period. Move the steering wheel
to release the lock and turn the ignition knob to Acc
or ON. The warning will turn off in approximately 5
seconds.
See “Steering lock” in the “5. Starting and driving”
section for further details.
j6 Brake/Clutch warning (where fitted)
When starting your vehicle, it is necessary to oper-
ate the brake (CVT and AT models) or clutch pedal
(MT models).
For more information, see “Starting the engine” in
the “5. Starting and driving” section.
j7 Handbrake reminder
The reminder will come on if the handbrake is on
whilst the vehicle is being driven.
A buzzer will also sound.
j8 Intelligent Key detection warning
If the Intelligent Key is taken outside of the vehicle
ID recognition zone while the ignition knob is in the
Acc or ON position, the Intelligent Key detection
warning will be displayed and a buzzer will sound.
The Intelligent Key detection warning disappears
when the Intelligent Key is placed back in the pas-
senger compartment.
The message also appears when you try to start the
vehicle if the Intelligent Key is not detected within
the vehicle.
For more information, see “Integrated keyfob/re-
mote control system” in the “3. Pre-driving checks
and adjustments” section.
j9 Intelligent Key low battery warning
The Intelligent Key low battery warning may show if
a low battery voltage is detected when the ignition
knob is turned from “OFF” to the ON position.
For more information, see “Integrated keyfob/Intel-
ligent Key battery replacement” in the “8. Mainte-
nance and do-it-yourself” section.
j10Intelligent Key system fault warning
CAUTION
If the Intelligent Key system fault warning comes
on, it may indicate a system malfunction. We rec-
ommend that you contact a NISSAN dealer or
qualified workshop for repair.
Instruments and controls2-13
Page 74 of 297
Downloaded from www.Manualslib.com manuals search engine Daytime light system (where fitted)
Even if the headlight switch is off, the headlight low
beam, front side, rear combination and number plate
lights will come on after starting the engine. How-
ever, you cannot change low beam to high beam
when the light switch is off.
When the light switch is turned to the
position,
the headlight low beam will turn off.
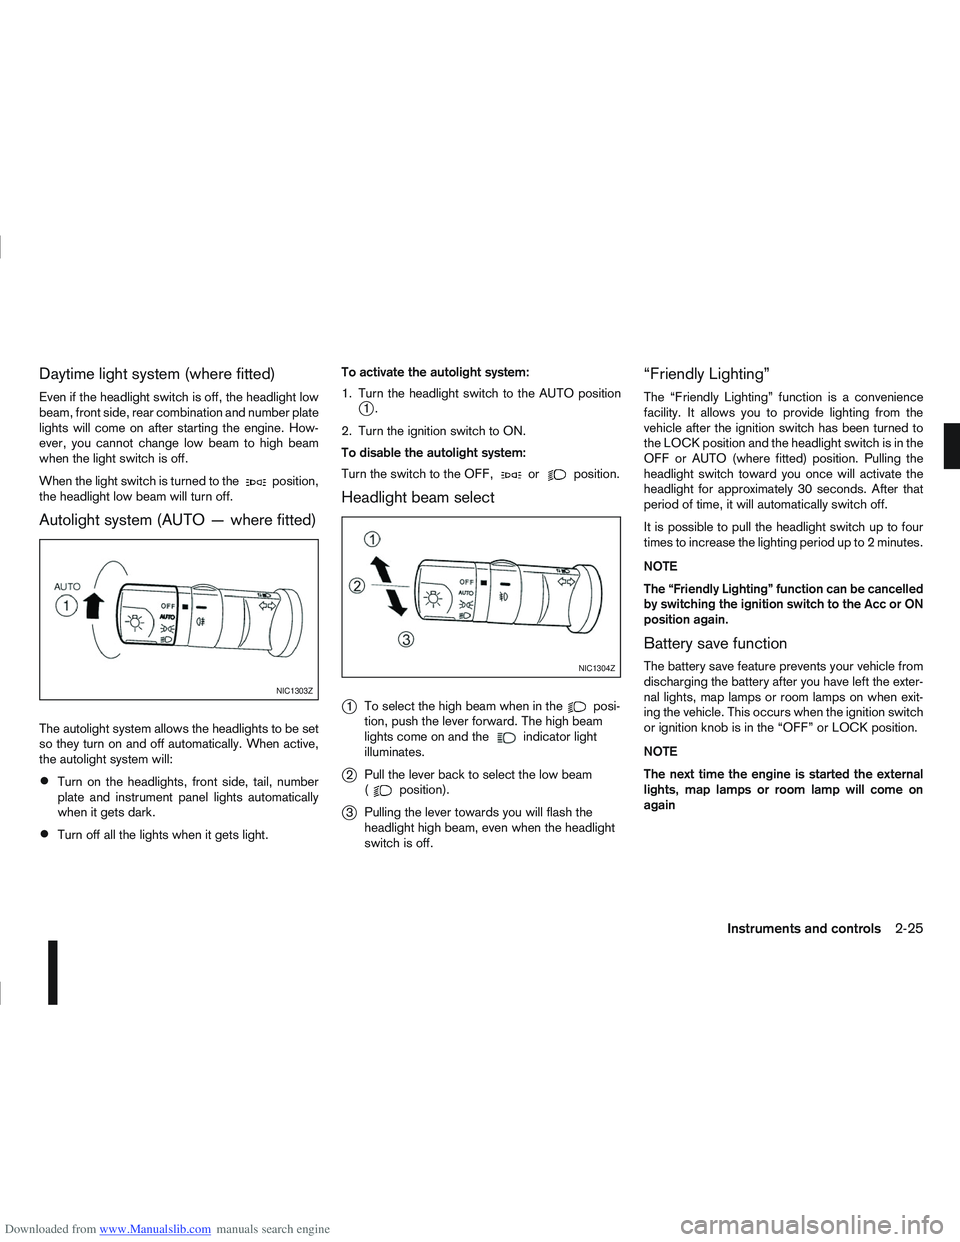
Autolight system (AUTO — where fitted)
The autolight system allows the headlights to be set
so they turn on and off automatically. When active,
the autolight system will:
Turn on the headlights, front side, tail, number
plate and instrument panel lights automatically
when it gets dark.
Turn off all the lights when it gets light. To activate the autolight system:
1. Turn the headlight switch to the AUTO position
j1.
2. Turn the ignition switch to ON.
To disable the autolight system:
Turn the switch to the OFF,
orposition.
Headlight beam select
j
1 To select the high beam when in theposi-
tion, push the lever forward. The high beam
lights come on and the
indicator light
illuminates.
j2 Pull the lever back to select the low beam
(position).
j3Pulling the lever towards you will flash the
headlight high beam, even when the headlight
switch is off.
“Friendly Lighting”
The “Friendly Lighting” function is a convenience
facility. It allows you to provide lighting from the
vehicle after the ignition switch has been turned to
the LOCK position and the headlight switch is in the
OFF or AUTO (where fitted) position. Pulling the
headlight switch toward you once will activate the
headlight for approximately 30 seconds. After that
period of time, it will automatically switch off.
It is possible to pull the headlight switch up to four
times to increase the lighting period up to 2 minutes.
NOTE
The “Friendly Lighting” function can be cancelled
by switching the ignition switch to the Acc or ON
position again.
Battery save function
The battery save feature prevents your vehicle from
discharging the battery after you have left the exter-
nal lights, map lamps or room lamps on when exit-
ing the vehicle. This occurs when the ignition switch
or ignition knob is in the “OFF” or LOCK position.
NOTE
The next time the engine is started the external
lights, map lamps or room lamp will come on
again
NIC1303Z
NIC1304Z
Instruments and controls2-25
Page 75 of 297
Downloaded from www.Manualslib.com manuals search engine Battery save function for external lights:
If the ignition switch is turned to the “OFF” position
but the external lights are accidentally left on, the
external lights will automatically be switched off as
soon as the driver’s door is opened.
It is possible to leave the external lights on perma-
nently by switching them back on using the head-
light switch while the ignition switch is still in the
LOCK or “OFF” position. In this case, the light re-
minder chime will sound when the driver’s door is
opened.
Battery save function for interior light:
The interior light will automatically be switched off
after approximately 15 minutes if it has been acci-
dentally left on.
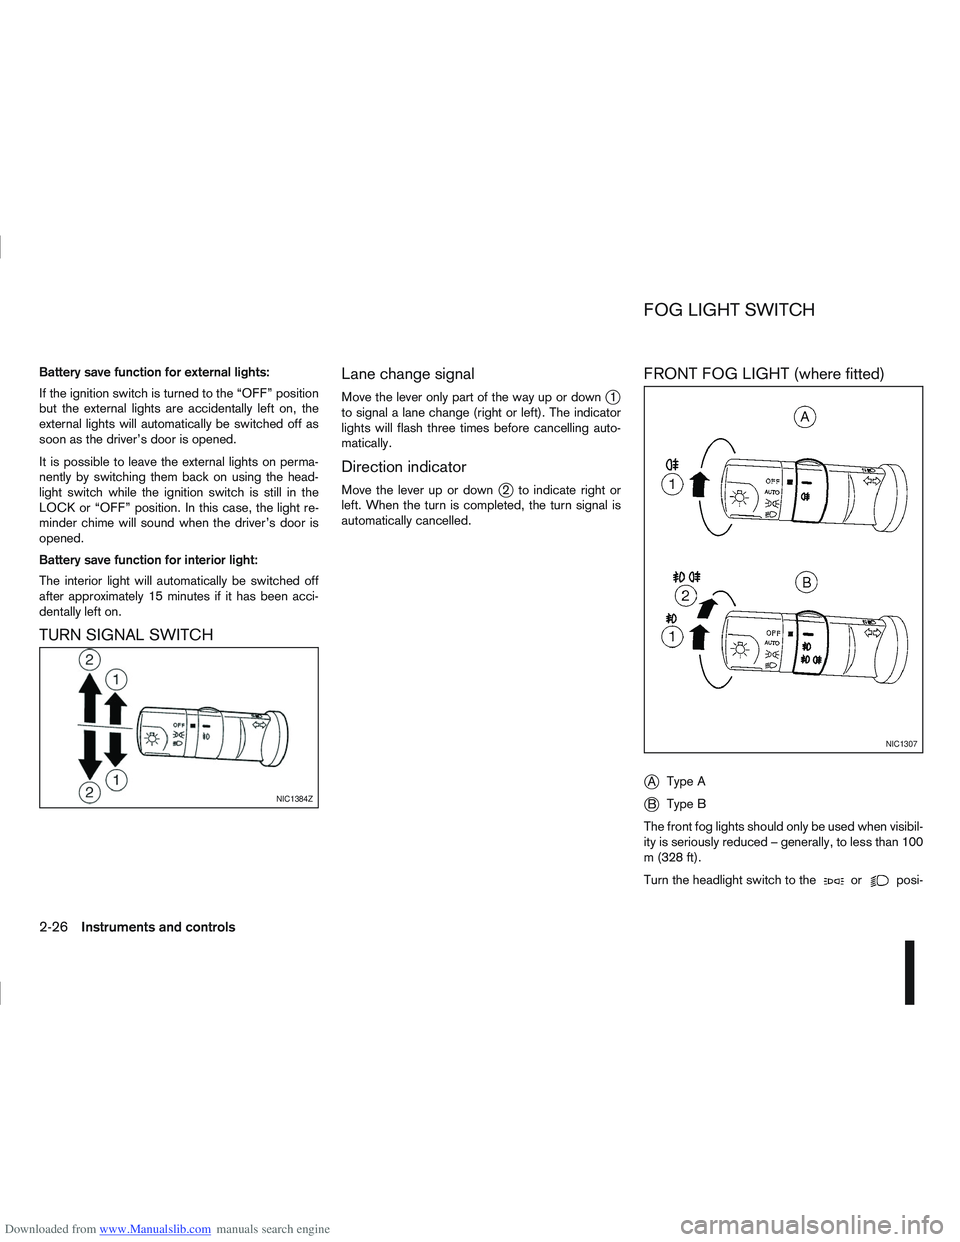
TURN SIGNAL SWITCHLane change signal
Move the lever only part of the way up or downj1
to signal a lane change (right or left). The indicator
lights will flash three times before cancelling auto-
matically.
Direction indicator
Move the lever up or downj2 to indicate right or
left. When the turn is completed, the turn signal is
automatically cancelled.
FRONT FOG LIGHT (where fitted)
j
A Type A
jB Type B
The front fog lights should only be used when visibil-
ity is seriously reduced – generally, to less than 100
m (328 ft).
Turn the headlight switch to the
orposi-
NIC1384Z
NIC1307
FOG LIGHT SWITCH
2-26Instruments and controls
Page 78 of 297
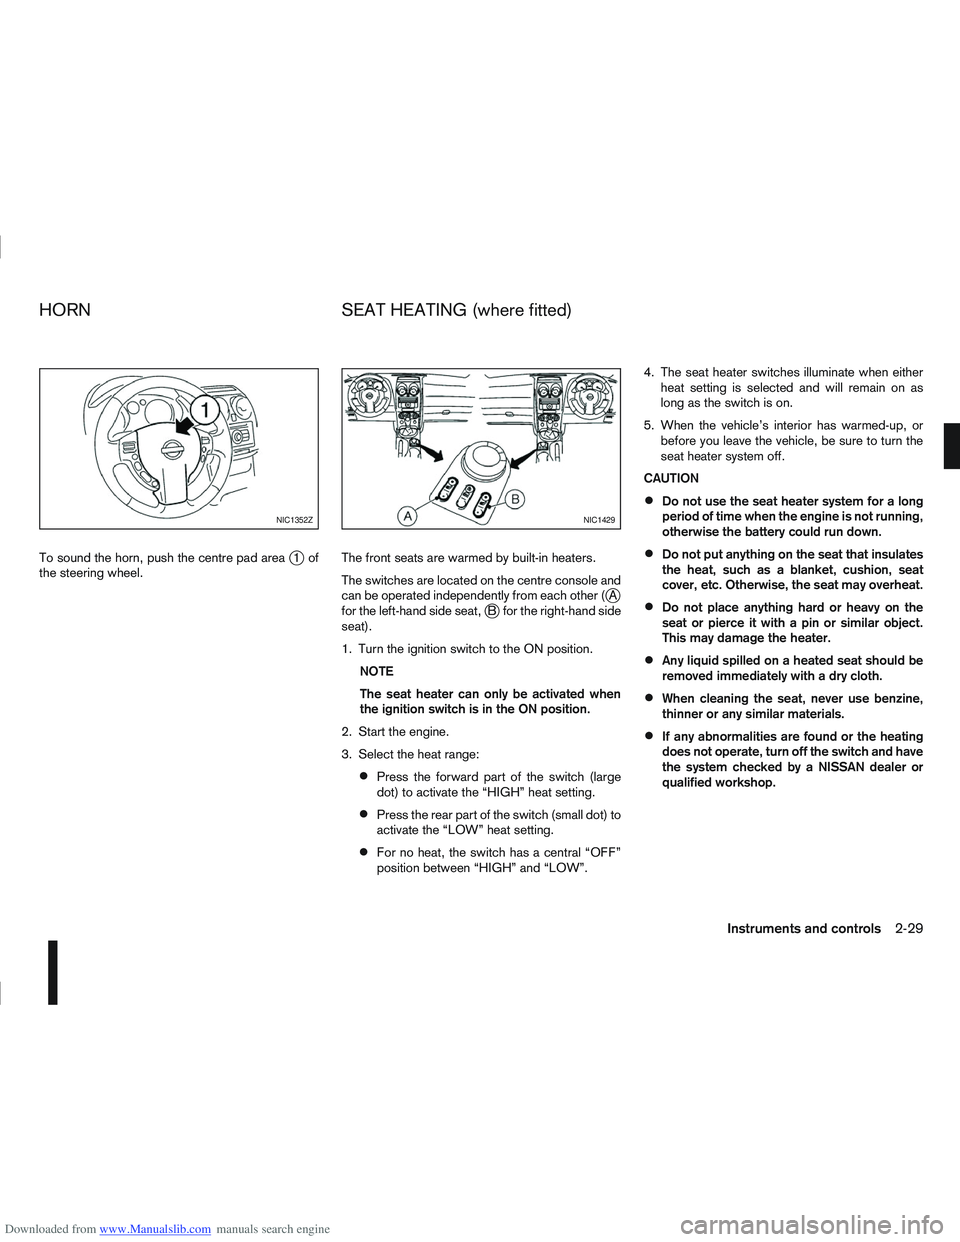
Downloaded from www.Manualslib.com manuals search engine To sound the horn, push the centre pad areaj1of
the steering wheel. The front seats are warmed by built-in heaters.
The switches are located on the centre console and
can be operated independently from each other (
jA
for the left-hand side seat,jB for the right-hand side
seat).
1. Turn the ignition switch to the ON position.
NOTE
The seat heater can only be activated when
the ignition switch is in the ON position.
2. Start the engine.
3. Select the heat range:
Press the forward part of the switch (large
dot) to activate the “HIGH” heat setting.
Press the rear part of the switch (small dot) to
activate the “LOW” heat setting.
For no heat, the switch has a central “OFF”
position between “HIGH” and “LOW”. 4. The seat heater switches illuminate when either
heat setting is selected and will remain on as
long as the switch is on.
5. When the vehicle’s interior has warmed-up, or before you leave the vehicle, be sure to turn the
seat heater system off.
CAUTION
Do not use the seat heater system for a long
period of time when the engine is not running,
otherwise the battery could run down.
Do not put anything on the seat that insulates
the heat, such as a blanket, cushion, seat
cover, etc. Otherwise, the seat may overheat.
Do not place anything hard or heavy on the
seat or pierce it with a pin or similar object.
This may damage the heater.
Any liquid spilled on a heated seat should be
removed immediately with a dry cloth.
When cleaning the seat, never use benzine,
thinner or any similar materials.
If any abnormalities are found or the heating
does not operate, turn off the switch and have
the system checked by a NISSAN dealer or
qualified workshop.
NIC1352ZNIC1429
HORN SEAT HEATING (where fitted)
Instruments and controls2-29
Page 84 of 297
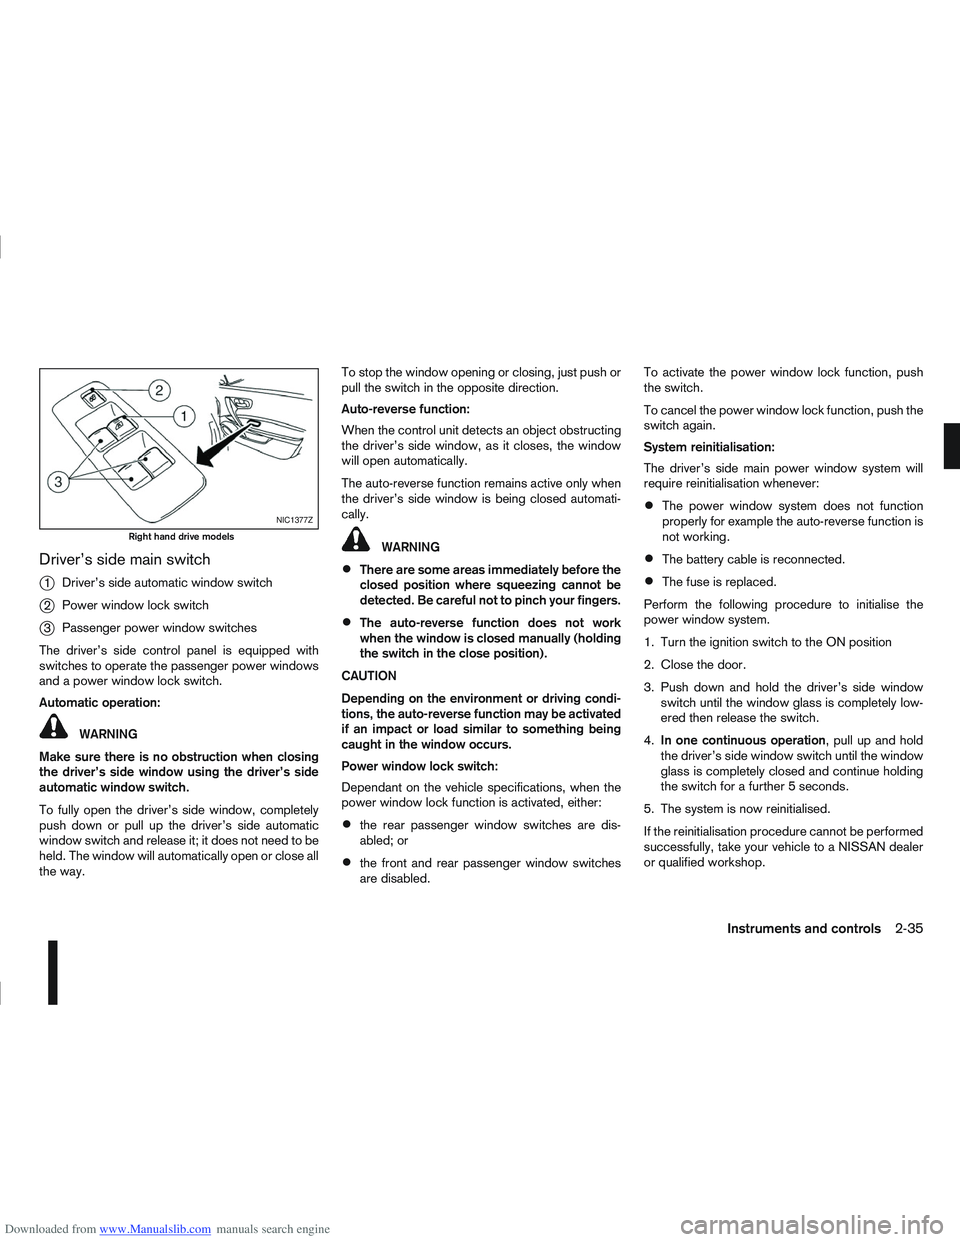
Downloaded from www.Manualslib.com manuals search engine Driver’s side main switch
j
1Driver’s side automatic window switch
j2Power window lock switch
j3Passenger power window switches
The driver’s side control panel is equipped with
switches to operate the passenger power windows
and a power window lock switch.
Automatic operation:
WARNING
Make sure there is no obstruction when closing
the driver’s side window using the driver’s side
automatic window switch.
To fully open the driver’s side window, completely
push down or pull up the driver’s side automatic
window switch and release it; it does not need to be
held. The window will automatically open or close all
the way. To stop the window opening or closing, just push or
pull the switch in the opposite direction.
Auto-reverse function:
When the control unit detects an object obstructing
the driver’s side window, as it closes, the window
will open automatically.
The auto-reverse function remains active only when
the driver’s side window is being closed automati-
cally.
WARNING
There are some areas immediately before the
closed position where squeezing cannot be
detected. Be careful not to pinch your fingers.
The auto-reverse function does not work
when the window is closed manually (holding
the switch in the close position).
CAUTION
Depending on the environment or driving condi-
tions, the auto-reverse function may be activated
if an impact or load similar to something being
caught in the window occurs.
Power window lock switch:
Dependant on the vehicle specifications, when the
power window lock function is activated, either:
the rear passenger window switches are dis-
abled; or
the front and rear passenger window switches
are disabled. To activate the power window lock function, push
the switch.
To cancel the power window lock function, push the
switch again.
System reinitialisation:
The driver’s side main power window system will
require reinitialisation whenever:
The power window system does not function
properly for example the auto-reverse function is
not working.
The battery cable is reconnected.
The fuse is replaced.
Perform the following procedure to initialise the
power window system.
1. Turn the ignition switch to the ON position
2. Close the door.
3. Push down and hold the driver’s side window switch until the window glass is completely low-
ered then release the switch.
4. In one continuous operation , pull up and hold
the driver’s side window switch until the window
glass is completely closed and continue holding
the switch for a further 5 seconds.
5. The system is now reinitialised.
If the reinitialisation procedure cannot be performed
successfully, take your vehicle to a NISSAN dealer
or qualified workshop.
NIC1377Z
Right hand drive models
Instruments and controls2-35
Page 86 of 297
Downloaded from www.Manualslib.com manuals search engine SYSTEM REINITIALISATION
The C-View® sunshade will require reinitialisation
whenever:
The sunshade system does not function prop-
erly.
The battery cable is reconnected.
The fuse is replaced.
Perform the following procedure to initialise the sun-
shade system.
1. Make sure the vehicle battery is connected.
2. Turn the ignition switch to the ON position.
3. Press and hold the “CLOSE” side of the switch. The system will now proceed as follows:
a. If open, the sunshade will start moving to the closed position.
b. After a few seconds, the system will fully open the sunshade.
c. From the fully open position, it returns to the closed position.
4. After reaching the closed position, release the sunshade switch.
5. The sunshade system is now reinitialised. NOTE
Do not disconnect the power for at least 2
seconds. If the reinitialisation procedure cannot be performed
successfully, take your vehicle to a NISSAN dealer
or qualified workshop.
CAUTION
Do not use for extended periods of time with the
engine stopped. This could discharge the bat-
tery.
NOTE
The interior lights will go off after approximately
15 minutes unless the ignition switch is in the
Acc or ON position.
FRONT ROOM LIGHT
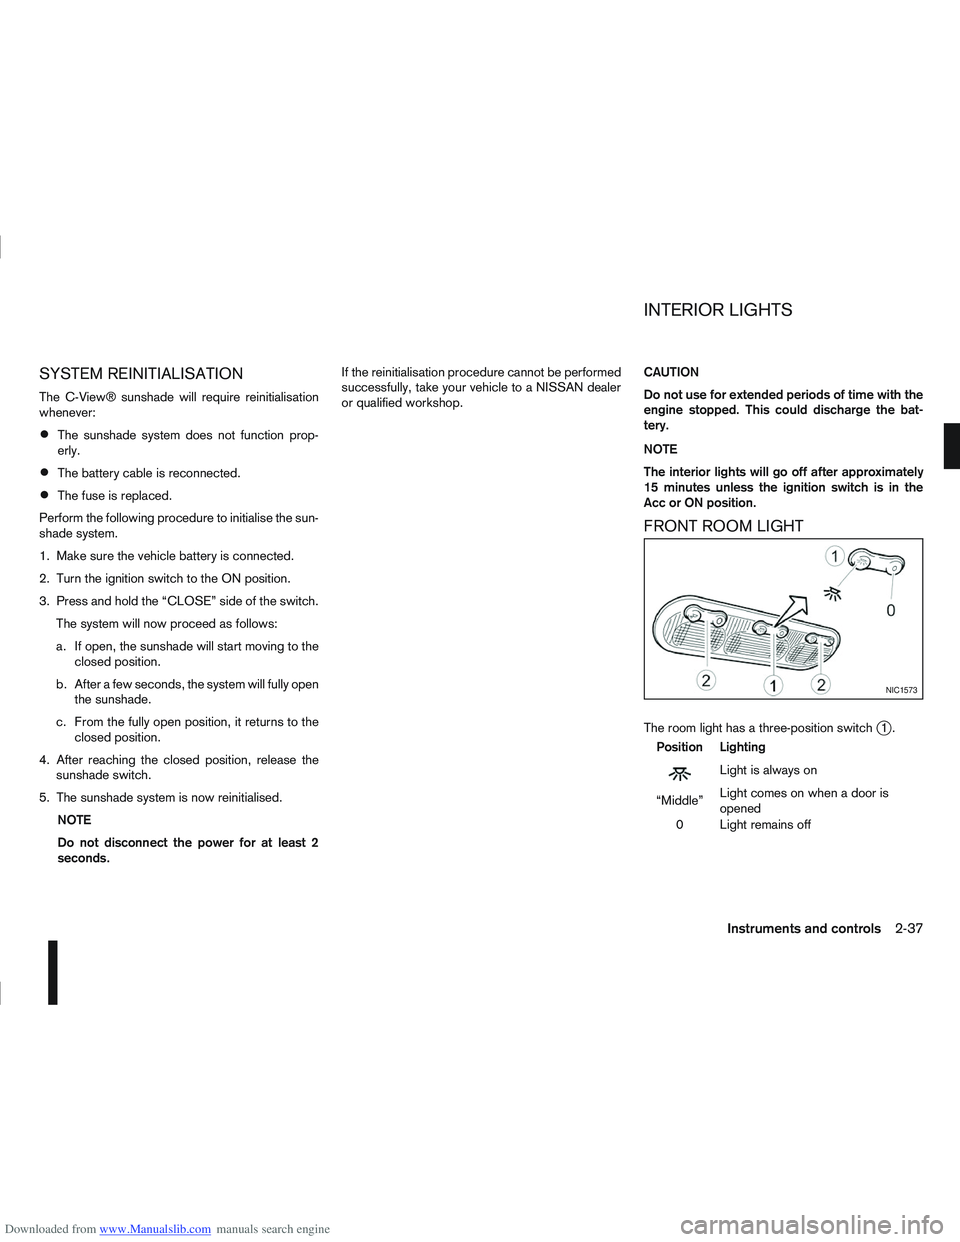
The room light has a three-position switchj1.
Position Lighting
mLightisalwayson
“Middle” Light comes on when a door is
opened
0 Light remains off
NIC1573
INTERIOR LIGHTS
Instruments and controls2-37
Page 88 of 297
Downloaded from www.Manualslib.com manuals search engine 3Pre-driving checks and adjustments
Pre-driving checks and adjustments
Keys ........................................................................\
3-2
NISSAN Anti-Theft System (NATS)* key ............. 3-2
Intelligent Key (where fitted)................................ 3-2
Key number ........................................................ 3-3
New keys ........................................................... 3-3
Emergency/mechanical key (Intelligent Key
models) .............................................................. 3-3
Integrated keyfob/remote control system .................. 3-3 Switching from Convenience mode to
Anti-hijack mode ................................................. 3-4
Using the remote keyless entry system ................ 3-5
Locking the doors ............................................... 3-5
Unlocking the doors ............................................ 3-5
Keyfob operation failure ...................................... 3-6
Intelligent Key system (where fitted) ......................... 3-6 Intelligent Key operating range ............................ 3-6
Using Intelligent Key system................................ 3-7
Locking/unlocking .............................................. 3-7
Starting the engine with the Intelligent Key .......... 3-8
Door locks ............................................................... 3-9 Super Lock system (RHD models) ...................... 3-9
Locking/unlocking with the key (vehicle dead
battery) ............................................................... 3-9 Inside door handle .............................................. 3-10
Power door lock switch ...................................... 3-10
Child safety lock — rear doors............................ 3-11
Back door lock ................................................... 3-12
Security system ....................................................... 3-13 Alarm system (where fitted) ................................ 3-13
NISSAN Anti-Theft System (NATS)..................... 3-13
Bonnet release ........................................................ 3-14
Fuel filler lid ............................................................. 3-15 Fuel filler lid opener lever .................................... 3-15
Fuel filler cap ...................................................... 3-15
Handbrake lever ...................................................... 3-16
Steering wheel......................................................... 3-16
Sun visors ............................................................... 3-17
Mirrors..................................................................... 3-17 Inside rear-view mirror ........................................ 3-17
Automatic anti-dazzling inside mirror (where
fitted).................................................................. 3-17
Outside rear-view mirrors.................................... 3-17
Vanity mirror ....................................................... 3-19