2010 NISSAN NOTE maintenance
[x] Cancel search: maintenancePage 2 of 235
Foreword
Welcome to the growing family of new NISSAN owners. This vehicle has been delivered to you with confidence. It has been produced using the latest techniques
and strict quality control.
This manual was prepared to help you understand the operation and maintenance of your vehicle so that you may enjoy many kilometres (miles) of driving pleasure.
Please read through this manual before operating your vehicle.
A separate Warranty Information & Maintenance Booklet explains in detail the warranty coverage that applies to your vehicle.
Your NISSAN dealer knows your vehicle best. When you require any service or have any questions, your NISSAN dealer will be glad to assist you with the extensive
resources available for you.
IMPORTANT SAFETY INFORMATION
REMINDERS FOR SAFETY!
Follow these important driving rules to help ensure a safe and complete trip for
you and your passengers!
•NEVER drive under the influence of alcohol or drugs.
•ALWAYS observe posted speed limits and never drive too fast for condi-
tions.
•ALWAYS use your seat belts and appropriate child restraint systems.
Preteen children should be seated in the rear seat.
•ALWAYS provide information about the proper use of vehicle safety fea-
tures to all occupants of the vehicle.
•ALWAYS review this Owner’s Manual for important safety information.
WHEN READING THE MANUAL
This manual includes information for all options available on this model. There-
fore, you may find some information that does not apply to your vehicle.
All information, specifications and illustrations in this manual are those in effect
at the time of printing. NISSAN reserves the right to change specifications or
designs at any time without notice and without obligation.
MODIFICATION OF YOUR VEHICLE
This vehicle should not be modified. Modifications could affect its performance,
safety or durability, and may even violate governmental regulations. In addition,
damage or performance problems resulting from modifications may not be cov-
ered under NISSAN warranties.
READ FIRST — THEN DRIVE SAFELY
Before driving your vehicle, read this Owner’s Manual carefully. This will ensure
familiarity with controls and maintenance requirements, assisting you in the safe
operation of your vehicle.
Throughout this manual the following symbols and words are used:
WARNING
Indicates the presence of a hazard that could cause death or serious per-
sonal injury. To avoid or reduce the risk, the procedures described must be
followed precisely.
CAUTION
Indicates the presence of a hazard that could cause minor or moderate per-
sonal injury, or damage to your vehicle. To avoid or reduce the risk, the pro-
cedures described must be followed carefully.
NOTE
Indicates additional helpful information.
Page 5 of 235
ContentsIllustrated table of contents0
Safety — seats, seat belts and supplemental
restraint system1
Instruments and controls2
Pre-driving checks and adjustments3
Heater and air conditioner, and audio system4
Starting and driving5
In case of emergency6
Appearance and care7
Maintenance and do-it-yourself8
Technical information9
Index10
Page 19 of 235
1Safety — seats, seat belts and supplemental
restraint systemSafety — seats, seat belts and supplemental
restraint system
Seats ....................................................................... 1-2
Front seats ......................................................... 1-2
Rear seat ............................................................ 1-2
Head restraints ................................................... 1-4
Active head restraints (where fitted for front
seats) ................................................................. 1-5
Seat belts ................................................................ 1-5
Seat belt warning lights....................................... 1-5
Precautions on seat belt usage ........................... 1-6
Child safety ........................................................ 1-7
Pregnant women ................................................ 1-7
Injured persons................................................... 1-7
Three-point type seat belts .................................. 1-7
Seat belt maintenance ........................................ 1-9Pre-tensioner seat belt system ................................. 1-9
Supplemental Restraint System (air bag system) ...... 1-10
Air bag system.................................................... 1-11
Air bag warning labels ........................................ 1-13
Air bag warning light ........................................... 1-13
Front passenger air bag indicator light ................ 1-14
Child restraints ........................................................ 1-16
Precautions on child restraint usage.................... 1-16
Installation of a child restraint system on the
front passenger seat ........................................... 1-19
Installation of a child restraint system on rear
seats .................................................................. 1-20
ISOFIX system ................................................... 1-22
Top tether strap for child restraint ....................... 1-23
Page 27 of 235
the belt operation. Grasp the shoulder belt and pull
quickly forward. The retractor should lock and re-
strict further belt movement.
If the retractor does not lock during these checks or
if you have any questions about the seat belt opera-
tion see a NISSAN dealer or qualified workshop.
SEAT BELT MAINTENANCE
•To clean the seat belt webbings,apply a mild
soap solution or any solution recommended for
cleaning upholstery or carpets. Then brush it,
wipe with a cloth and allow it to dry in the shade.
Do not allow the seat belts to retract until they
are completely dry.
•If dirt builds up in the shoulder belt guide of the
seat belt anchors, the seat belts may retract
slowly. Wipe the shoulder belt guide with a clean,
dry cloth.
•Periodically check to see whether the seat
belt and the metal componentssuch as buck-
les, tongues, retractors, flexible wires and an-
chors work properly. If loose parts, deteriora-
tion, cuts or other damage to the webbing is
found, the entire belt assembly should be re-
placed.
WARNING
•The pre-tensioner seat belt cannot be reused
after activation. It must be replaced together
with the retractor as a unit.
•If the vehicle is involved in a frontal collision
but the pre-tensioner is not activated, be sure
to have the pre-tensioner system checked
and, if necessary, replaced by a NISSAN
dealer or qualified workshop.
•No unauthorised changes should be made to
any components or wiring of the pre-tensioner
seat belt system. This is to prevent accidental
activation of the pre-tensioner seat belt or
damage to the pre-tensioner seat belt opera-
tion. Tampering with the pre-tensioner seat
belt system may result in serious personal in-
jury.
•Work on and around the pre-tensioner system
should be done by an authorised NISSAN
dealer or qualified workshop. Installation of
electrical equipment should also be done by a
NISSAN dealer or qualified workshop. Unau-
thorised electrical test equipment and prob-
ing devices should not be used on the pre-
tensioner seat belt system.
•If you need to dispose of the pre-tensioner or
scrap the vehicle, contact a NISSAN dealer or
qualified workshop. Correct pre-tensioner
disposal procedures are set forth in the ap-propriate NISSAN Service Manual. Incorrect
disposal procedures could cause personal in-
jury.
The front seat pre-tensioner seat belt system is acti-
vated in conjunction with the front air bag system. It
helps tighten the seat belt when the vehicle is in-
volved in certain types of collisions by restraining
the seat occupants via the seat belt retractor.
The pre-tensioner is encased with the seat belt’s
retractor. These seat belts are used in the same way
as conventional seat belts.
Additionally, the driver’s side pre-tensioner seat belt
system is also equipped with a lap pre-tensioner.
Both the retractor pre-tensioner and lap pre-ten-
sioner provide significant protection against injury in
an accident and increase the safety performance of
your vehicle.
When the pre-tensioner seat belt system activates,
smoke is released and a loud noise may be heard.
The smoke is harmless, but care should be taken
not to inhale it as it may cause irritation and choking.
When the ignition switch is in the ON or START
position, the Supplemental Restraint System (SRS)
air bag warning light will illuminate. The SRS air bag
warning light will turn off after approximately 7 sec-
onds if the system is operational. If any of the follow-
ing conditions occur, the air bag and/or pre-ten-
sioner seat belt need servicing and your vehicle must
be taken to the nearest NISSAN dealer or qualified
workshop.
PRE-TENSIONER SEAT BELT
SYSTEM
Safety — seats, seat belts and supplemental restraint system1-9
Page 32 of 235

monitored by the SRS air bag warning light are: all
sensors, air bag modules and all related wiring, and
the pre-tensioner seat belt.
After turning the ignition switch to the ON or
START position, the supplemental air bag warn-
ing light illuminates. The air bag warning light will
turn off after approximately 7 seconds if the sys-
tem is operational.
If any of the following conditions occurs, the front air
bag, side and curtain air bag systems (where fitted)
and pre-tensioner seat belt need servicing and
should be taken to the nearest NISSAN dealer or
qualified workshop:
•The SRS air bag warning light remains on after
approximately 7 seconds.
•The SRS air bag warning light flashes intermit-
tently.
•The SRS air bag warning light does not come on
at all.
Under these conditions, the front air bags, side and
curtain air bags (where fitted) and/or pre-tensioner
seat belt will not operate properly. They must be
checked and repaired.
Repair and replacement procedure
The front air bags, side air bags (where fitted), cur-
tain air bags (where fitted) and pre-tensioner seat
belt are designed to activate on a one-time-only ba-
sis. As a reminder, unless it is damaged, the air bag
warning light will remain illuminated after inflationhas occurred. Repair and replacement of the air bag
system should be done only by a NISSAN dealer or
qualified workshop.
When maintenance work is required on the vehicle,
the air bag systems, related parts and pre-tensioner
seat belt should be pointed out to the person con-
ducting the maintenance. The ignition switch should
always be in the LOCK position when working un-
der the bonnet or inside the vehicle.
WARNING
•Once the air bag has inflated or the pre-ten-
sioner seat belt has been activated, the air
bag module and pre-tensioner seat belt will
not function again and must be replaced. The
air bag module should be replaced by a
NISSAN dealer or qualified workshop. The air
bag module cannot be repaired.
•All air bag systems should be inspected by a
NISSAN dealer or qualified workshop if there
is any damage to the front end portion of the
vehicle.
•When selling your vehicle, we request that you
inform the buyer about the air bag system and
guide the buyer to the appropriate sections in
this Owner’s Manual.
•If you need to dispose of an air bag or scrap
the vehicle, contact a NISSAN dealer or quali-
fied workshop. Correct air bag disposal pro-
cedures are set forth in the appropriate
NISSAN Service Manual. Incorrect disposal
procedures could cause personal injury.Note that the above illustration is for LHD models.
FRONT PASSENGER AIR BAG
INDICATOR LIGHT
WARNING
•Since your vehicle is equipped with a front
passenger air bag, it is not permitted to install
a rear facing child restraint on the front pas-
senger seat unless the front passenger air bag
has been previously deactivated.
•Do not fit a rear facing child seat on the front
passenger seat if the air bag activation/deac-
tivation system is malfunctioning. Your ve-
hicle must be immediately taken to a NISSAN
dealer or qualified workshop in such situa-
tion.
The front passenger air bag indicator light
lo-
cated on the centre console illuminates for approxi-
mately 7 seconds and then goes off. This means the
system is operational.
NPA732Z
1-14Safety — seats, seat belts and supplemental restraint system
Page 47 of 235

puter (where fitted) mode that was displayed before
the ignition switch was turned to the Acc, “OFF” or
LOCK position.
HR16DE or K9K engine oil level status
The Oil level status provides specific information
regarding the engine oil level.
If the oil level is sufficient, “Oil Good” is displayed
for approximately 10 seconds. If the oil level is low,
“Oil Lo” blinks for approximately 30 seconds in or-
der to draw your attention on necessary action.
G.Oil level 5 (Max)
H.Oil level 1 (Min)
A short press on the TRIP button/Steering wheel
switch during the “Oil Good” or “Oil Lo” mode
displays an approximate oil level indication between
jG /Max orjH /Min.
In the case of a low engine oil level, see “Engine oil”
in the “8. Maintenance and do-it-yourself” section
for the proper engine oil refilling procedure.
Oil change schedule set-up
It is possible to adjust the interval distance to oil
change by pressing the Clock setting/Oil change
schedule setting switch
j2 for 3 seconds while the
wrench symboland the distance to oil change
are displayed. The symbol and distance display will
start flashing and the display shows the current in-
terval. Press the switch
j2 again to increase the
interval distance. Each step increases the interval
distance by 1,000 km (500 miles). The interval dis-
tance can be set up to 63,000 km (31,500 miles)
after which the display returns to zero.
If no further action is made, the display returns to oil
level status mode and the new interval is set.
If the interval distance is set to 0, the display will
skip the distance to oil change information and
wrench symbol display mode and will directly dis-
play the oil level status (“Oil Good” or “Oil Lo” –
HR16DE or K9K engine equipped models only). In
order to return to the distance to oil change informa-
tion and wrench symbol display mode, press the
Clock setting/Oil change schedule setting switch
j2 for approximately 3 seconds after the ignition
switch has been turned to the ON position, and
adjust the distance to oil change schedule as previ-
ously described.
See the Warranty Information & Maintenance Book-
let for the appropriate interval distance to oil change.CAUTION
•The oil level should be checked regularly. Op-
erating with an insufficient oil level can dam-
age the engine and such damage is not cov-
ered by the warranty.
•NISSAN recommends checking the oil level
every 5,000 km (3,000 miles).
DIGITAL CLOCKjA
The clock function at the top of the LCD displayj2
provides a clock display when the ignition switch is
in the ON position.
12/24 hour setting
Briefly pressing the Clock setting/Oil change sched-
ule setting* switchj2 will toggle between the 12
and 24 hour modes. Note that when the clock dis-
plays 0:01 in the 24 hour mode and is changed to
the 12 hour mode, the display will show 12.01 AM.
Hour setting
Pressing the Clock setting/Oil change schedule set-
ting switchj2 for 3 seconds or more will initialise
the clock adjustment procedure.
The hour setting mode is indicated by the hour dig-
it(s), the colon and AM or PM (in the 12 hour mode)
flashing at a certain frequency. Each activation of
the switch
j2 changes the time by 1 hour.
The display will show AM or PM in the 12 hour
mode and will change at midday and midnight. If the
j2 switch is not pressed for 5 seconds or more, the
clock changes to minutes setting mode.
NIC1486
Oil level detail examples:
Instruments and controls2-5
Page 50 of 235

“Supplemental Restraint System (air bag system)”
in the “1. Safety — seats, seat belts and supple-
mental restraint system” section.
Brake warning light
This light functions for both the handbrake and the
footbrake systems.
Handbrake indicator:
The light comes on when the handbrake is applied.
Low brake fluid warning:
The light warns of a low brake fluid level in the brake
power assist unit. If the light comes on while the
engine is running and the handbrake is not applied,
stop the vehicle and perform the following:
1. Check the brake fluid level. Add brake fluid as
much as necessary. See “Brake and clutch fluid”
in the “8. Maintenance and do-it-yourself” sec-
tion.
WARNING
If the level is below the MIN mark on the brake
fluid reservoir, do not drive until the brake sys-
tem has been checked at a NISSAN dealer or
qualified workshop.
2. If the brake fluid level is correct:
Have the warning system checked by a NISSAN
dealer or qualified workshop.
WARNING
•Driving your vehicle could be dangerous.
Therefore have it towed to the nearest
NISSAN dealer or qualified workshop.
•Pressing the brake pedal with the engine
stopped and/or low brake fluid level could in-
crease your stopping distance and require
greater pedal effort as well as pedal travel.
Charge warning light
If the light comes on while the engine is running, it
may indicate that the charging system is malfunc-
tioning. Turn the engine off and check the alternator
belt. If the belt is loose, broken, missing or if the light
remains on, see a NISSAN dealer or qualified work-
shop immediately.
CAUTION
Do not continue driving if the belt is loose, bro-
ken or missing.
Door open warning light
This light comes on when any of the doors are not
closed securely while the ignition switch is in the
ON position.
Engine coolant temperature
warning light
The engine coolant temperature varies with the out-
side air temperature and driving condition.
When the ignition switch is turned to the ON posi-tion, the engine coolant temperature warning light
illuminates for a few seconds and then goes off.
This means the system is operational.
The engine coolant temperature warning light illumi-
nates when the engine coolant temperature reaches
an excessively high temperature of approximately
105 °C (221 °F).
CAUTION
•If the engine coolant temperature warning
light comes on, stop the vehicle as soon as
safely possible and contact a NISSAN dealer
or qualified workshop.
•When towing a trailer or driving uphill, reduce
the vehicle speed as soon as safely possible
to decrease the engine coolant temperature.
•If the engine overheats, continued operation
of the vehicle may seriously damage the en-
gine. See “Engine overheat” in the “6. In case
of emergency” section for immediate action
required.
WARNING
Do not remove the radiator cap while the engine
is hot. Otherwise, there is a danger of being
scalded by the coolant that is likely to erupt from
the filler.
Engine oil pressure warning light
This light warns of low engine oil pressure. If the
light flickers, comes on during normal driving, or
stays on once the engine is started, pull off the road
2-8Instruments and controls
Page 68 of 235
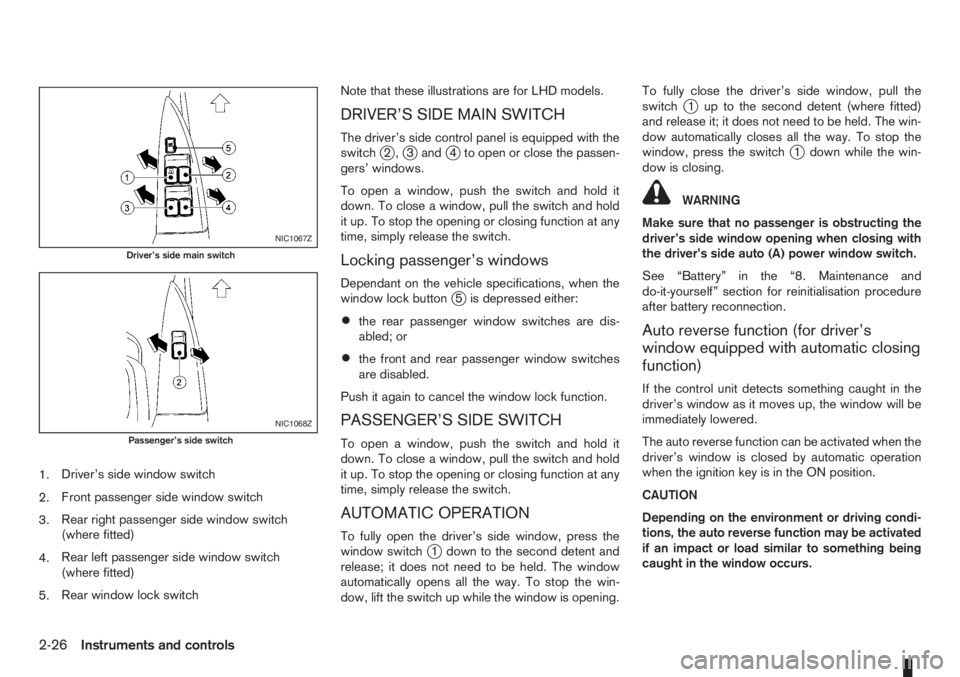
1.Driver’s side window switch
2.Front passenger side window switch
3.Rear right passenger side window switch
(where fitted)
4.Rear left passenger side window switch
(where fitted)
5.Rear window lock switchNote that these illustrations are for LHD models.
DRIVER’S SIDE MAIN SWITCH
The driver’s side control panel is equipped with the
switchj2,j3andj4 to open or close the passen-
gers’ windows.
To open a window, push the switch and hold it
down. To close a window, pull the switch and hold
it up. To stop the opening or closing function at any
time, simply release the switch.
Locking passenger’s windows
Dependant on the vehicle specifications, when the
window lock buttonj5 is depressed either:
•the rear passenger window switches are dis-
abled; or
•the front and rear passenger window switches
are disabled.
Push it again to cancel the window lock function.
PASSENGER’S SIDE SWITCH
To open a window, push the switch and hold it
down. To close a window, pull the switch and hold
it up. To stop the opening or closing function at any
time, simply release the switch.
AUTOMATIC OPERATION
To fully open the driver’s side window, press the
window switchj1 down to the second detent and
release; it does not need to be held. The window
automatically opens all the way. To stop the win-
dow, lift the switch up while the window is opening.To fully close the driver’s side window, pull the
switch
j1 up to the second detent (where fitted)
and release it; it does not need to be held. The win-
dow automatically closes all the way. To stop the
window, press the switch
j1 down while the win-
dow is closing.
WARNING
Make sure that no passenger is obstructing the
driver’s side window opening when closing with
the driver’s side auto (A) power window switch.
See “Battery” in the “8. Maintenance and
do-it-yourself” section for reinitialisation procedure
after battery reconnection.
Auto reverse function (for driver’s
window equipped with automatic closing
function)
If the control unit detects something caught in the
driver’s window as it moves up, the window will be
immediately lowered.
The auto reverse function can be activated when the
driver’s window is closed by automatic operation
when the ignition key is in the ON position.
CAUTION
Depending on the environment or driving condi-
tions, the auto reverse function may be activated
if an impact or load similar to something being
caught in the window occurs.
NIC1067Z
Driver’s side main switch
NIC1068Z
Passenger’s side switch
2-26Instruments and controls