Page 196 of 235
FRONT WINDOW WIPER
REPLACEMENT
1. Pull up the wiper arm.
2. Push the lock pin
j1 , then remove the wiper
blade as illustrated.
3. Install the new wiper blade in the reverse order
of removal.
4. Return the wiper arm to its original position.
BACK DOOR WINDOW WIPER
REPLACEMENT
1. Lift the wiper arm.
2. Turn and rotate carefully the wiper blade clock-
wise until the blade becomes free.
3. Insert the new wiper blade onto the wiper arm
and snap it into place.
4. Return the wiper arm to its original position.
WINDSCREEN WASHER NOZZLE
If you wax the surface of the engine bonnet, be care-
ful not to let wax get into the washer nozzlejA . This
may cause clogging or improper windscreen washer
operation. If wax gets into the nozzle, remove it with
a needle or small pin
jB.
NDI760
NDI724Z
NDI892Z
8-20Maintenance and do-it-yourself
Page 197 of 235
PASSENGER COMPARTMENT
CAUTION
Never use a fuse of higher or lower amperage
rating than that specified on the fuse box cover.
If any electrical equipment does not operate, check
for an open fuse.
The fuse box is located in the lower part of the
instrument panel at the driver’s side.
The affected circuits
j2 are shown on the back of
the fuse box lidj1.
1. Make sure the ignition switch and the headlight
switch are in the “OFF” position.
2. Open the fuse box lid.
3. Locate and remove the fuse with the fuse puller
(where fitted).
NOTE
The fuse puller is stored in the fusebox.4. If the fuse is openjA , replace it with a new fusejB.
5. Close the fuse box lid.
NOTE
If the new fuse opens again, after installing,
have the electrical system checked and re-
paired by a NISSAN dealer or qualified work-
shop.
NDI1004
NDI737Z
NDI624Z
FUSES
Maintenance and do-it-yourself8-21
Page 198 of 235

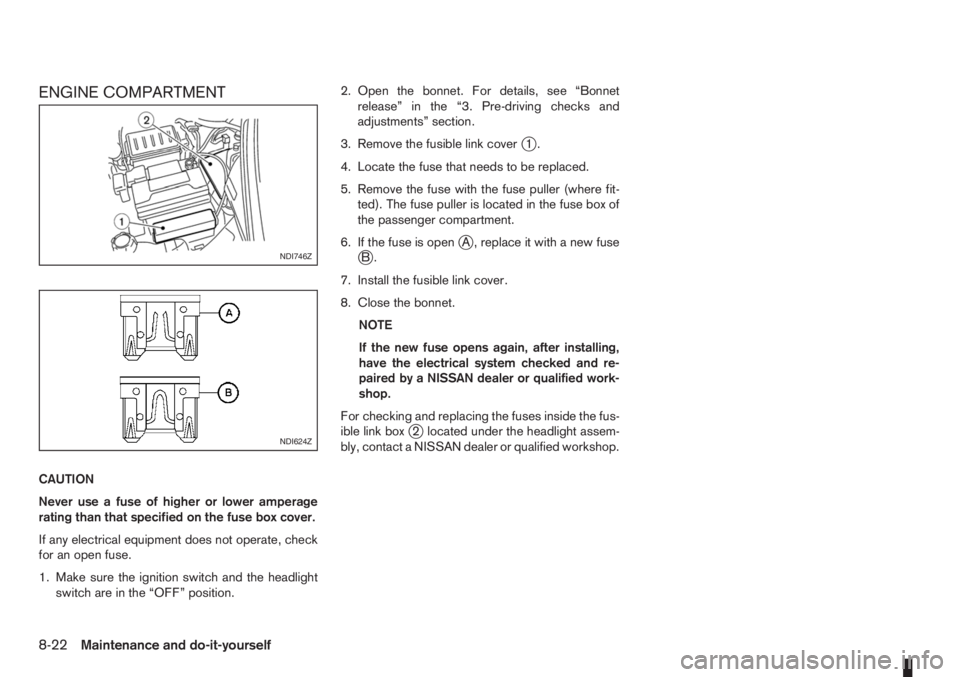
ENGINE COMPARTMENT
CAUTION
Never use a fuse of higher or lower amperage
rating than that specified on the fuse box cover.
If any electrical equipment does not operate, check
for an open fuse.
1. Make sure the ignition switch and the headlight
switch are in the “OFF” position.2. Open the bonnet. For details, see “Bonnet
release” in the “3. Pre-driving checks and
adjustments” section.
3. Remove the fusible link cover
j1.
4. Locate the fuse that needs to be replaced.
5. Remove the fuse with the fuse puller (where fit-
ted). The fuse puller is located in the fuse box of
the passenger compartment.
6. If the fuse is open
jA , replace it with a new fusejB.
7. Install the fusible link cover.
8. Close the bonnet.
NOTE
If the new fuse opens again, after installing,
have the electrical system checked and re-
paired by a NISSAN dealer or qualified work-
shop.
For checking and replacing the fuses inside the fus-
ible link box
j2 located under the headlight assem-
bly, contact a NISSAN dealer or qualified workshop.
NDI746Z
NDI624Z
8-22Maintenance and do-it-yourself
Page 199 of 235

HEADLIGHTS
Replacing the halogen headlight bulb
The headlight is a semi-sealed beam type which
uses a replaceable headlight (halogen) bulb. A bulb
can be replaced from inside the engine compart-
ment without removing the headlight assembly.
CAUTION
•High pressure halogen gas is sealed inside
the halogen bulb. The bulb may break if the
glass envelope is scratched or the bulb is
dropped.
•When handling the bulb, DO NOT TOUCH THE
GLASS ENVELOPE.
•Use the same number and wattage as origi-
nally installed.
•Aiming is usually not necessary after replac-
ing the bulb. When aiming adjustment is nec-
essary, contact a NISSAN dealer or qualified
workshop.
•Do not leave the bulb out of the headlight
reflector for a long period of time as dust,
moisture or smoke may enter the headlight
body and affect the performance of the head-
light.
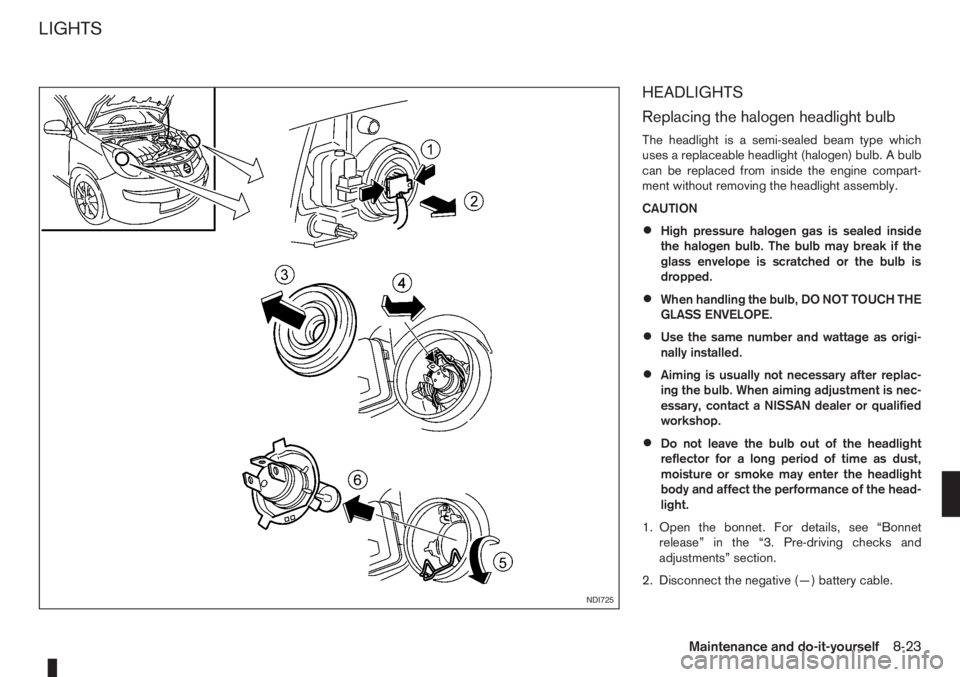
1. Open the bonnet. For details, see “Bonnet
release” in the “3. Pre-driving checks and
adjustments” section.
2. Disconnect the negative (—) battery cable.
NDI725
LIGHTS
Maintenance and do-it-yourself8-23
Page 200 of 235

3. Disconnect the electrical connector from the rear
end of the headlight bulb.
4. Remove the cap.
5. Push and turn the retaining spring to loosen it.
6. Remove the headlight bulb. Do not shake or ro-
tate the bulb during the removal.
7. Install the new bulb in the reverse order of re-
moval and make sure that the cap is securely
sealed with the headlight body.
8. Reconnect the negative (—) battery cable and
close the bonnet.
Contact a NISSAN dealer or qualified workshop, if
you need assistance for bulb replacement.
NOTE
Fog may temporarily form inside the lens of the
exterior lights in the rain or in a car wash. The fog
is caused by a temperature difference between
the inside and the outside of the lens. This is not
a malfunction. If large droplets can be seen, then
contact a NISSAN dealer or qualified workshop.EXTERIOR LIGHTS
Item Wattage (W)
Headlight (type H4) 55/60
Front turn signal light 21
Front side light 5
Front fog light (H11 type, where fitted)
*155
Side turn signal light 5
Rear combination light
Turn signal 16
Stop/Tail 21/5
Reverse 16
High-mounted stop light *1 18
Number plate light 5
Rear fog light 21
*1: If replacement is required, contact a NISSAN dealer
or qualified workshop.
INTERIOR LIGHTS
Item Wattage (W)
Room light/Map light (where fitted) 5
Luggage compartment light 10
NDI726
Light locations
8-24Maintenance and do-it-yourself
Page 201 of 235
LIGHT LOCATIONS
1.Headlight
2.Room light and Map light (where fitted)
3.Room and Map lights (where fitted)
4.Side turn signal light
5.Front side light
6.Front fog light (where fitted)
7.Front turn signal light
8.High mounted stop light
9.Rear combination light
10.Luggage compartment light
11.Rear fog light
12.Number plate light
REMOVE
INSTALL
Replacing procedures
All other lights are either type A, B, C or D. When
replacing a bulb, first remove the lens and/or cover.
NDI707
NDI729
Front turn signal light
Maintenance and do-it-yourself8-25
Page 202 of 235
NDI727
Front side light
NDI728Z
Side turn signal light
NDI739Z
Room light (type A)
8-26Maintenance and do-it-yourself
Page 203 of 235
NDI740Z
Room/Map light (type B, where fitted)
NDI733
Luggage compartment light
NDI732
Number plate light
Maintenance and do-it-yourself8-27