2010 NISSAN MURANO closed system
[x] Cancel search: closed systemPage 34 of 425
Black plate (30,1)
Model "Z51-D" EDITED: 2009/ 8/ 3
SSS0016SSS0014
WARNING
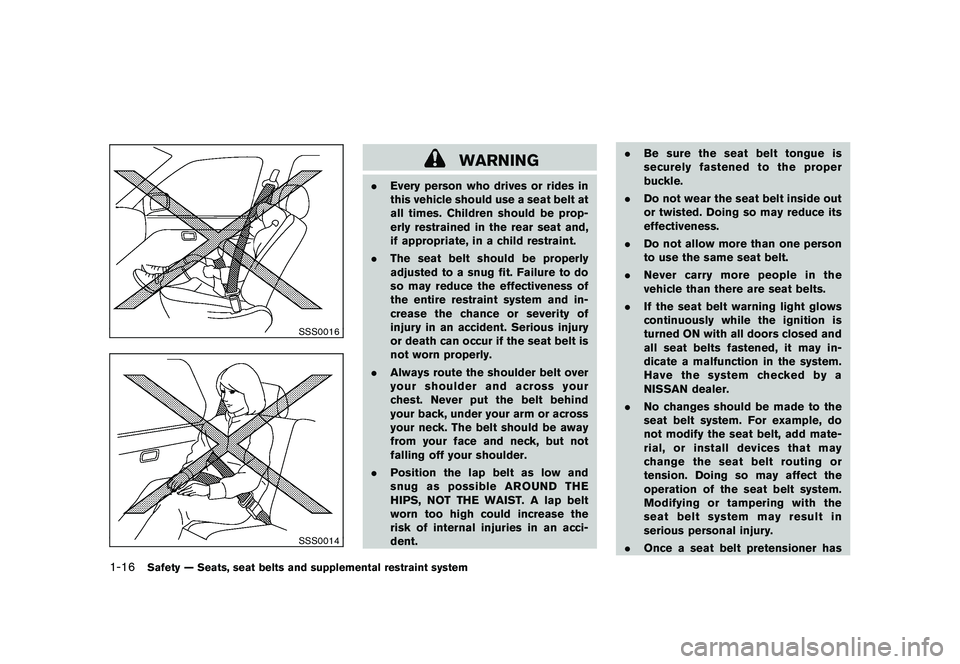
.Every person who drives or rides in
this vehicle should use a seat belt at
all times. Children should be prop-
erly restrained in the rear seat and,
if appropriate, in a child restraint.
. The seat belt should be properly
adjusted to a snug fit. Failure to do
so may reduce the effectiveness of
the entire restraint system and in-
crease the chance or severity of
injury in an accident. Serious injury
or death can occur if the seat belt is
not worn properly.
. Always route the shoulder belt over
your shoulder and across your
chest. Never put the belt behind
your back, under your arm or across
your neck. The belt should be away
from your face and neck, but not
falling off your shoulder.
. Position the lap belt as low and
snug as possible AROUND THE
HIPS, NOT THE WAIST. A lap belt
worn too high could increase the
risk of internal injuries in an acci-
dent. .
Be sure the seat belt tongue is
securely fastened to the proper
buckle.
. Do not wear the seat belt inside out
or twisted. Doing so may reduce its
effectiveness.
. Do not allow more than one person
to use the same seat belt.
. Never carry more people in the
vehicle than there are seat belts.
. If the seat belt warning light glows
continuously while the ignition is
turned ON with all doors closed and
all seat belts fastened, it may in-
dicate a malfunction in the system.
Have the system checked by a
NISSAN dealer.
. No changes should be made to the
seat belt system. For example, do
not modify the seat belt, add mate-
rial, or install devices that may
change the seat belt routing or
tension. Doing so may affect the
operation of the seat belt system.
Modifying or tampering with the
seat belt system may result in
serious personal injury.
. Once a seat belt pretensioner has
1-16
Safety — Seats, seat belts and supplemental restraint system
Page 45 of 425
Black plate (41,1)
Model "Z51-D" EDITED: 2009/ 8/ 3
seat. According to accident statis-
tics, children are safer when prop-
erly restrained in the rear seat than
in the front seat. If you must install a
front-facing child restraint in the
front seat, see “CHILD RESTRAINT
INSTALLATION USING THE SEAT
BELTS” later in this section.
. Improper use or improper installa-
tion of a child restraint can increase
the risk or severity of injury for both
the child and other occupants of the
vehicle and can lead to serious
injury or death in an accident.
. Follow all of the child restraint
manufacturer’s instructions for in-
stallation and use. When purchasing
a child restraint, be sure to select
one which will fit your child and
vehicle. It may not be possible to
properly install some types of child
restraints in your vehicle.
. If the child restraint is not anchored
properly, the risk of a child being
injured in a collision or a sudden
stop greatly increases.
. Child restraint anchor points are
designed to withstand only those loads imposed by correctly fitted
child restraints. Under no circum-
stances are they to be used for adult
seat belts or harnesses.
. Adjustable seatbacks should be
positioned to fit the child restraint,
but as upright as possible.
. After attaching the child restraint,
test it before you place the child in
it. Push it from side to side while
holding the seat near the LATCH
attachment or by the seat belt path.
The child restraint should not move
more than 1 inch (25 mm) from side
to side. Try to tug it forward and
check to see if the belt holds the
restraint in place. If the restraint is
not secure, tighten the belt as
necessary, or put the restraint in
another seat and test it again. You
may need to try a different child
restraint. Not all child restraints fit
in all types of vehicles.
. When your child restraint is not in
use, keep it secured with the LATCH
System or a seat belt to prevent it
from being thrown around in case of
a sudden stop or accident.
CAUTION
Remember that a child restraint left in a
closed vehicle can become very hot.
Check the seating surface and buckles
before placing your child in the child
restraint.
This vehicle is equipped with a universal child
restraint lower anchor system, referred to as the
Lower Anchors and Tethers for CHildren System
or LATCH. Some child restraints include two
rigid or webbing-mounted attachments that can
be connected to these lower anchors. For
details, see “Lower Anchors and Tethers for
CHildren System (LATCH)” later in this section.
If you do not have a LATCH compatible child
restraint, the vehicle seat belts can be used.
(See “CHILD RESTRAINT INSTALLATION
USING THE SEAT BELTS” later in this section.)
In general, child restraints are also designed to
be installed with the lap portion of a lap/shoulder
seat belt.
Several manufacturers offer child restraints for
infants and small children of various sizes. When
selecting any child restraint, keep the following
points in mind:
. Choose only a restraint with a label certifying
that it complies with Federal Motor Vehicle
Safety Standard 213 or Canadian Motor
Safety — Seats, seat belts and supplemental restraint system
1-27
Page 60 of 425
Black plate (56,1)
Model "Z51-D" EDITED: 2009/ 8/ 3
during normal driving or a collision
and result in serious injury or death.
Booster seats are designed to be
used with a lap/shoulder belt. Boos-
ter seats are designed to properly
route the lap and shoulder portions
of the seat belt over the strongest
portions of a child’s body to provide
the maximum protection during a
collision.
. Follow all of the booster seat man-
ufacturer’s instructions for installa-
tion and use. When purchasing a
booster seat, be sure to select one
which will fit your child and vehicle.
It may not be possible to properly
install some types of booster seats
in your vehicle.
. If the booster seat and seat belt is
not used properly, the risk of a child
being injured in a collision or a
sudden stop greatly increases.
. Adjustable seatbacks should be
positioned to fit the booster seat,
but as upright as possible.
. After placing the child in the booster
seat and fastening the seat belt,
make sure the shoulder portion of the belt is away from the child’s face
and neck and the lap portion of the
belt does not cross the abdomen.
. Do not put the shoulder belt behind
the child or under the child’s arm. If
you must install a booster seat in
the front seat, see “BOOSTER SEAT
INSTALLATION” later in this section.
. When your booster seat is not in
use, keep it secured with a seat belt
to prevent it from being thrown
around in case of a sudden stop or
accident.
CAUTION
Remember that a booster seat left in a
closed vehicle can become very hot.
Check the seating surface and buckles
before placing your child in the booster
seat.
LRS0455
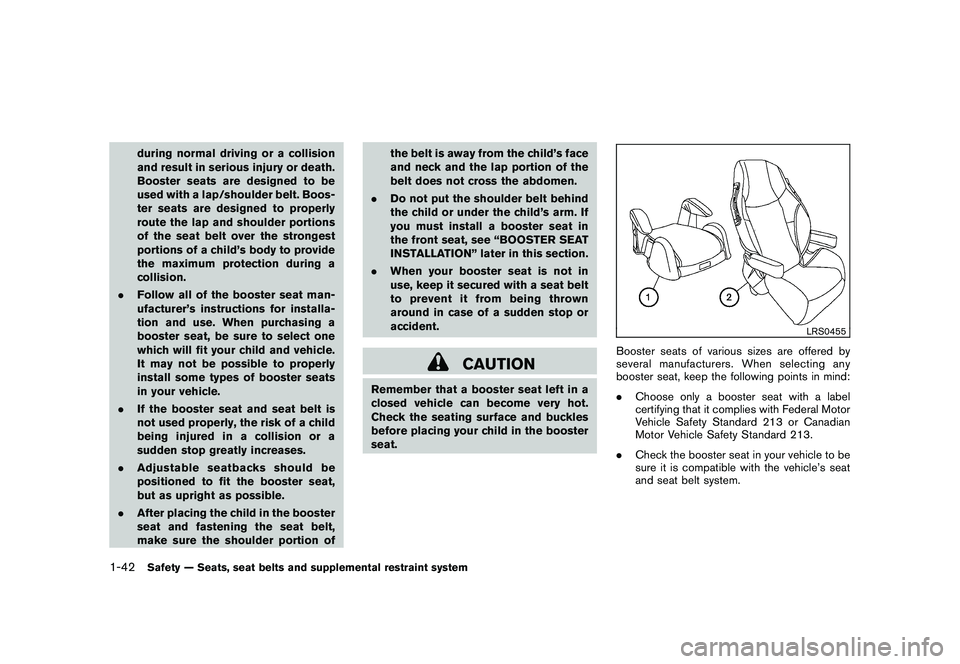
Booster seats of various sizes are offered by
several manufacturers. When selecting any
booster seat, keep the following points in mind:
.Choose only a booster seat with a label
certifying that it complies with Federal Motor
Vehicle Safety Standard 213 or Canadian
Motor Vehicle Safety Standard 213.
. Check the booster seat in your vehicle to be
sure it is compatible with the vehicle’s seat
and seat belt system.
1-42
Safety — Seats, seat belts and supplemental restraint system
Page 88 of 425

Black plate (84,1)
Model "Z51-D" EDITED: 2009/ 8/ 3
All-Wheel Drive (AWD) warning light (AWD
models)*
Low tire pressure warning light
High beam indicator light
Anti-lock Braking System (ABS) warning
light
Master warning light
Malfunction Indicator Light (MIL)
Seat belt warning light
Overdrive off indicator light
Brake warning light
Supplemental air bag warning light
Slip indicator light
All-Wheel Drive (AWD) LOCK indicator light
(AWD models)*
Small light indicator light
Charge warning light
Continuously Variable Transmission (CVT)
position indicator light
Turn signal/hazard indicator lights
Engine oil pressure warning light
Cruise indicator light
Vehicle Dynamic Control (VDC) off indicator
light
Intelligent Key warning light
Front passenger air bag status light*: if so equipped
CHECKING BULBSWith all doors closed, apply the parking brake
and push the ignition switch to the ON position
without starting the engine. The following lights
will come on (if so equipped):
,
or
,
,
,
,
,
The following lights come on briefly and then go
off (if so equipped):
,
or
,
,
,
,
,
,
If any light does not come on, it may indicate a
burned-out bulb or an open circuit in the
electrical system. Have the system checked by
a NISSAN dealer.
Some indicators and warnings are also dis-
played on the dot matrix crystal display on the
speedometer. (See “DOT MATRIX LIQUID
CRYSTAL DISPLAY” later in this section.)
WARNING LIGHTS
All-Wheel Drive (AWD) warning
light (AWD models)
The light comes on when the ignition switch is
pushed to ON. It turns off soon after the engine
is started.
If the AWD system malfunctions, or the diameter
of the front and the rear wheels are different, the
warning light will either remain illuminated or
WARNING/INDICATOR LIGHTS AND
AUDIBLE REMINDERS2-10
Instruments and controls
Page 93 of 425
Black plate (89,1)
Model "Z51-D" EDITED: 2009/ 8/ 3
Continuously Variable Transmis-
sion (CVT) position indicator light
When the ignition switch is pushed to the ON
position, the indicator shows the automatic
selector shift position. (See “CONTINUOUSLY
VARIABLE TRANSMISSION (CVT)” in the “5.
Starting and driving” section.)
Cruise indicator light
Cruise main switch indicator:
This light illuminates when the cruise control
main switch is pushed. The light turns off when
the main switch is pushed again. When the
cruise main switch indicator light illuminates, the
cruise control system is operational. (See
“CRUISE CONTROL” in the “5. Starting and
driving” section.)
Cruise malfunction:
If the cruise indicator light blinks while the
engine is running, it may indicate the cruise
control system is not functioning properly. Have
the system checked by a NISSAN dealer. (See
“CRUISE CONTROL” in the “5. Starting and
driving” section.)
Front passenger air bag status
light
The front passenger air bag status lightwill be lit and the passenger front air bag will be
OFF depending on how the front passenger
seat is being used.
For front passenger air bag status light opera-
tion,see“NISSANADVANCEDAIRBAG
SYSTEM (front seats)” in the “1. Safety —
Seats, seat belts and supplemental restraint
system” section of this manual.
High beam indicator light (Blue)
This light comes on when the headlight high
beam is on and goes out when the low beam is
selected.
Malfunction Indicator Light (MIL)
If the malfunction indicator light comes on
steady or blinks while the engine is running, it
may indicate a potential emission control and/or
Continuously Variable Transmission (CVT) mal-
function.
The malfunction indicator light may also come on
steady if the fuel-filler cap is loose or missing, or
if the vehicle runs out of fuel. Check to make
sure the fuel-filler cap is installed and closedtightly, and that the vehicle has at least 3 US
gallons (11.4 liters) of fuel in the fuel tank.
After a few driving trips, the
light should
turn off if no other potential emission control
system malfunction exists.
If this indicator light remains on for 20 seconds
and then blinks for 10 seconds when the engine
is not running, it indicates that the vehicle is not
ready for an emission control system inspection/
maintenance test. (See “READINESS FOR
INSPECTION/MAINTENANCE (I/M) TEST” in
the “9. Technical and consumer information”
section.)
Operation:
The malfunction indicator light will come on in
one of two ways:
. Malfunction indicator light on steady — An
emission control system and/or CVT mal-
function has been detected. Check the fuel-
filler cap. If the fuel-filler cap is loose or
missing, tighten or install the cap and
continue to drive the vehicle. The
light
should turn off after a few driving trips. If the
light does not turn off after a few
driving trips, have the vehicle inspected by a
NISSAN dealer. You do not need to have
your vehicle towed to the dealer.
. Malfunction indicator light blinking — An
engine misfire has been detected which may
Instruments and controls
2-15
Page 97 of 425

Black plate (93,1)
Model "Z51-D" EDITED: 2009/ 8/ 3
wheel right and left.3. Key insertion indicatorThis indicator appears when the key needs to be
inserted into the key port.
If this indicator appears, insert the key into the
key port in the correct direction. (See “PUSH-
BUTTON IGNITION SWITCH” in the “5. Start-
ing and driving” section.)4. Key removal indicatorThis indicator appears when the driver’s door is
opened with the ignition switch in the OFF or
LOCK position and the key placed in the key
port. A key reminder chime also sounds.
If this indicator appears, remove the key from the
key port and take it with you when leaving the
vehicle.5. NO KEY warningThis warning appears in either of the following
conditions.
No key inside the vehicle:
The warning appears when the door is closed
with the Intelligent Key left outside the vehicle
and the ignition switch in the ACC or ON
position. Make sure that the Intelligent Key is
inside the vehicle.Unregistered key:
The warning appears when the ignition switch is
pushed from the LOCK position and the key
cannot be recognized by the system. You cannot
start the engine with an unregistered key. Use
the registered key.
See “INTELLIGENT KEY SYSTEM” in the “3.
Pre-driving checks and adjustments” section for
more details.
6. SHIFT “P” warningThis warning appears when the ignition switch is
pushed to stop the engine with the selector lever
in any position except the P (Park) position.
If this warning appears, move the selector lever
to the P (Park) position or push the ignition
switch to the ON position.
An inside warning chime will also sound. (See
“INTELLIGENT KEY SYSTEM” in the “3. Pre-
driving checks and adjustments” section.)7. “PUSH” warningThis warning appears when the selector lever is
moved to the P (Park) position with the ignition
switch in the ACC position after the SHIFT “P”
warning appears.
To push the ignition switch to the OFF position,
perform the following procedure: SHIFT “P” warning
?(Move the selector
lever to “P”) ?PUSH warning ?(Push
the ignition switch ?ignition switch position
is turned to ON) ?PUSH warning ?
(Push the ignition switch ?ignition switch
position is turned to OFF)
8. Key battery discharge indicatorThis indicator appears when the key battery is
running out of power.
If this indicator appears, replace the battery with
a new one. (See “BATTERY REPLACEMENT” in
the “8. Maintenance and do-it-yourself” section.)9. Parking brake release warningThis warning appears when the vehicle speed is
above 4 MPH (7 km/h) and the parking brake is
applied.10. Low fuel warningThis warning appears when the fuel level in the
tank is getting low. Refuel as soon as it is
convenient, preferably before the fuel gauge
reaches the empty (E) position.
There is a small reserve of fuel remaining
in the tank when the fuel gauge reaches
the empty (E) position.
Instruments and controls
2-19
Page 98 of 425
Black plate (94,1)
Model "Z51-D" EDITED: 2009/ 8/ 3
11. Low washer fluid warningThis warning appears when the washer tank fluid
is at a low level. Add washer fluid as necessary.
(See “WINDOW WASHER FLUID” in the “8.
Maintenance and do-it-yourself” section.)12. Door/lift gate open warning (ignition
switch is in the ON position)This warning appears if any of the doors and/or
the lift gate are open or not closed securely. The
vehicle icon indicates which door is open on the
display.13. “Time to rest” indicatorThis indicator appears when the set “time to
rest” indicator activates. You can set the time for
up to 6 hours. (See “TRIP COMPUTER” later in
this section.)14. Low outside temperature warningThis warning appears if the outside temperature
is below 378F(3 8C) . The warning can be set not
to be displayed. (See “TRIP COMPUTER” later
in this section.)
SIC3578
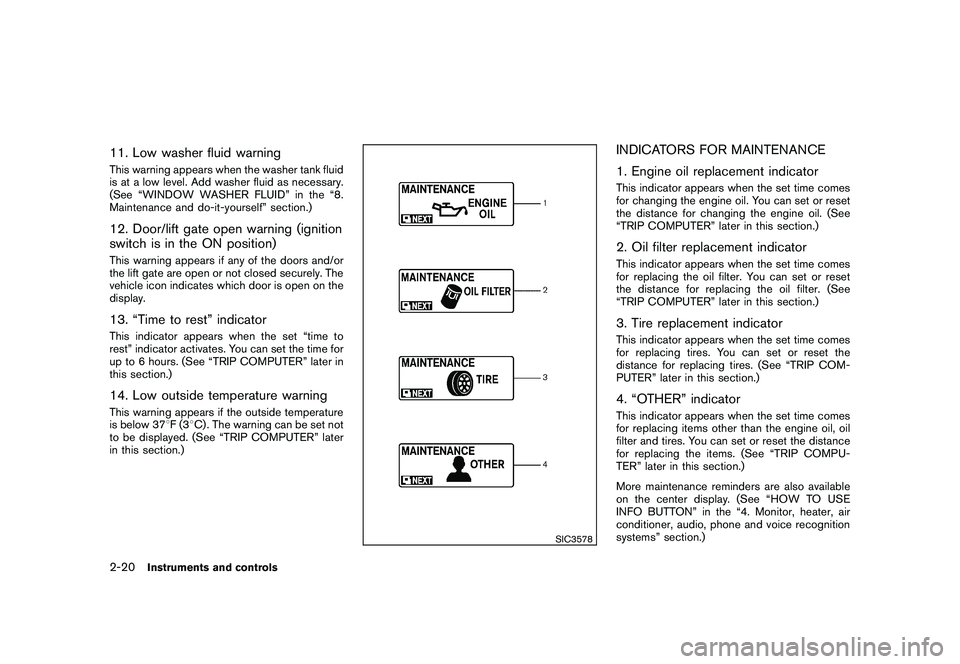
INDICATORS FOR MAINTENANCE
1. Engine oil replacement indicatorThis indicator appears when the set time comes
for changing the engine oil. You can set or reset
the distance for changing the engine oil. (See
“TRIP COMPUTER” later in this section.)2. Oil filter replacement indicatorThis indicator appears when the set time comes
for replacing the oil filter. You can set or reset
the distance for replacing the oil filter. (See
“TRIP COMPUTER” later in this section.)3. Tire replacement indicatorThis indicator appears when the set time comes
for replacing tires. You can set or reset the
distance for replacing tires. (See “TRIP COM-
PUTER” later in this section.)4. “OTHER” indicatorThis indicator appears when the set time comes
for replacing items other than the engine oil, oil
filter and tires. You can set or reset the distance
for replacing the items. (See “TRIP COMPU-
TER” later in this section.)
More maintenance reminders are also available
on the center display. (See “HOW TO USE
INFO BUTTON” in the “4. Monitor, heater, air
conditioner, audio, phone and voice recognition
systems” section.)
2-20
Instruments and controls
Page 128 of 425
Black plate (124,1)
Model "Z51-D" EDITED: 2009/ 8/ 3
SIC3285
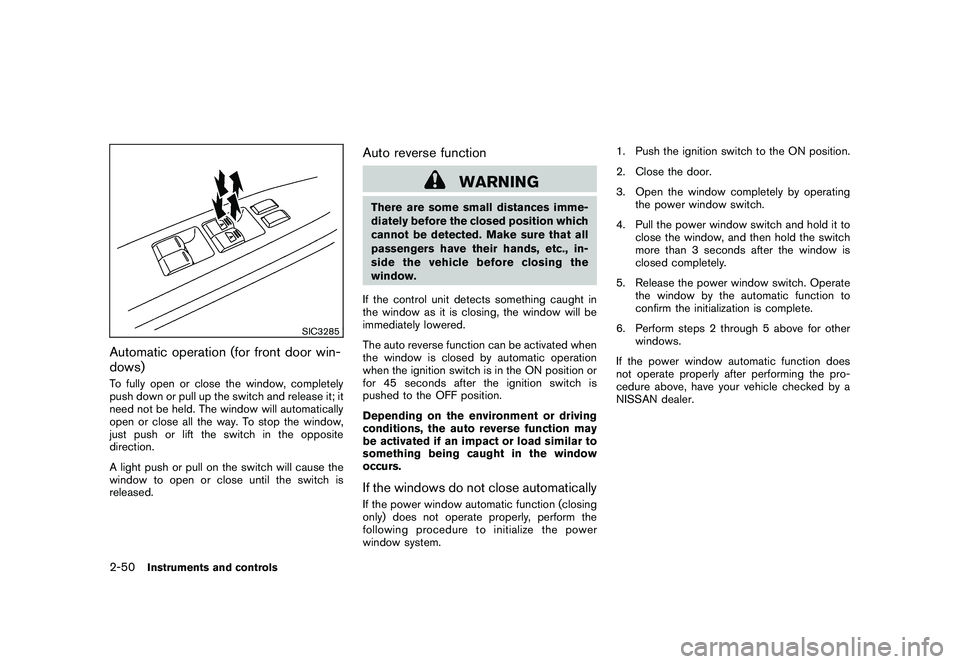
Automatic operation (for front door win-
dows)To fully open or close the window, completely
push down or pull up the switch and release it; it
need not be held. The window will automatically
open or close all the way. To stop the window,
just push or lift the switch in the opposite
direction.
A light push or pull on the switch will cause the
window to open or close until the switch is
released.
Auto reverse function
WARNING
There are some small distances imme-
diately before the closed position which
cannot be detected. Make sure that all
passengers have their hands, etc., in-
side the vehicle before closing the
window.
If the control unit detects something caught in
the window as it is closing, the window will be
immediately lowered.
The auto reverse function can be activated when
the window is closed by automatic operation
when the ignition switch is in the ON position or
for 45 seconds after the ignition switch is
pushed to the OFF position.
Depending on the environment or driving
conditions, the auto reverse function may
be activated if an impact or load similar to
something being caught in the window
occurs.If the windows do not close automaticallyIf the power window automatic function (closing
only) does not operate properly, perform the
following procedure to initialize the power
window system. 1. Push the ignition switch to the ON position.
2. Close the door.
3. Open the window completely by operating
the power window switch.
4. Pull the power window switch and hold it to close the window, and then hold the switch
more than 3 seconds after the window is
closed completely.
5. Release the power window switch. Operate the window by the automatic function to
confirm the initialization is complete.
6. Perform steps 2 through 5 above for other windows.
If the power window automatic function does
not operate properly after performing the pro-
cedure above, have your vehicle checked by a
NISSAN dealer.
2-50
Instruments and controls