2010 NISSAN MURANO check engine
[x] Cancel search: check enginePage 356 of 425
Black plate (356,1)
Model "Z51-D" EDITED: 2009/ 8/ 3
CHANGING ENGINE COOLANTMajor cooling system repairs should be per-
formed by a NISSAN dealer. The service
procedures can be found in the appropriate
NISSAN Service Manual.
Improper servicing can result in reduced
heater performance and engine overheat-
ing.
WARNING
.To avoid the danger of being
scalded, never change the coolant
when the engine is hot.
. Never remove the radiator cap when
the engine is hot. Serious burns
could be caused by high pressure
fluid escaping from the radiator.
. Avoid direct skin contact with used
coolant. If skin contact is made,
wash thoroughly with soap or hand
cleaner as soon as possible.
. Keep coolant out of reach of chil-
dren and pets.
Engine coolant must be disposed of properly.
Check your local regulations.
SDI2174
CHECKING ENGINE OIL LEVEL1. Park the vehicle on a level surface and apply the parking brake.
2. Run the engine until it reaches operating temperature.
3. Turn off the engine. Wait more than 10
minutes for the oil to drain back into
the oil pan.
4. Remove the dipstick and wipe it clean. Reinsert it all the way.
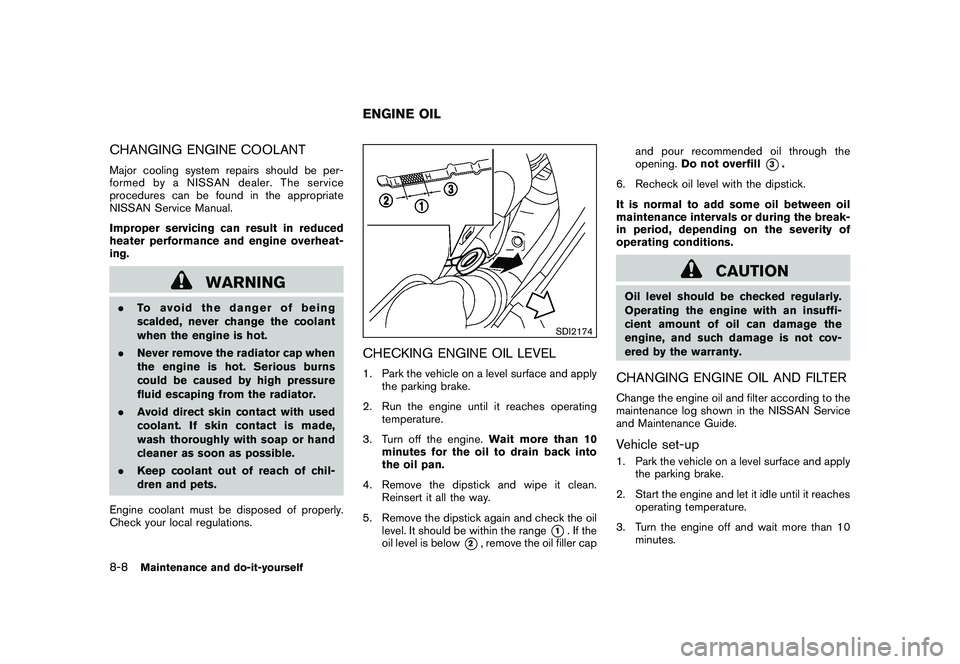
5. Remove the dipstick again and check the oil level. It should be within the range
*1. If the
oil level is below
*2, remove the oil filler cap and pour recommended oil through the
opening.
Do not overfill
*3.
6. Recheck oil level with the dipstick.
It is normal to add some oil between oil
maintenance intervals or during the break-
in period, depending on the severity of
operating conditions.
CAUTION
Oil level should be checked regularly.
Operating the engine with an insuffi-
cient amount of oil can damage the
engine, and such damage is not cov-
ered by the warranty.CHANGING ENGINE OIL AND FILTERChange the engine oil and filter according to the
maintenance log shown in the NISSAN Service
and Maintenance Guide.Vehicle set-up1. Park the vehicle on a level surface and apply the parking brake.
2. Start the engine and let it idle until it reaches operating temperature.
3. Turn the engine off and wait more than 10 minutes.
ENGINE OIL
8-8
Maintenance and do-it-yourself
Page 358 of 425

Black plate (358,1)
Model "Z51-D" EDITED: 2009/ 8/ 3
CAUTION
Be careful not to burn yourself, as the
engine oil is hot.. Waste oil must be disposed of
properly.
. Check your local regulations.
Perform steps 4 to 9 when the engine oil
filter change is needed.
4. Remove the plastic cover over the oil filter location by removing the small plastic clips
as illustrated.
5. Loosen the oil filter
*C
with an oil filter
wrench. Remove the oil filter by turning it by
hand.
6. Wipe the engine oil filter mounting surface with a clean rag.
CAUTION
Be sure to remove any old gasket
material remaining on the mounting
surface of the engine. Failure to do so
could lead to engine damage.
7. Coat the gasket on the new filter with clean engine oil. 8. Screw in the oil filter clockwise until a slight
resistance is felt, then tighten additionally
more than 2/3 turn.
Oil filter tightening torque:11 to 15 ft-lb (14.7 to 20.5 N·m)
9. Install the plastic cover.
10. Clean and re-install the drain plug with a new washer. Securely tighten the drain plug
with a wrench.
Drain plug tightening torque:22 to 29 ft-lb (29 to 39 N·m)
Do not use excessive force.
11. Refill engine with recommended oil through the oil filler opening, and install the oil filler
cap securely.
See “CAPACITIES AND RECOMMENDED
FUEL/LUBRICANTS” in the “9. Technical
and consumer information” section for drain
and refill capacity. The drain and refill
capacity depends on the oil temperature
and drain time. Use these specifications for
reference only. Always use the dipstick to
determine the proper amount of oil in the
engine.
12. Start the engine and check for leakage around the drain plug and the oil filter.
Correct as required.
13. Turn the engine off and wait more than 10 minutes. Check the oil level with the dipstick.
Add engine oil if necessary.
After the operation1. Lower the vehicle carefully to the ground.
2. Dispose of waste oil and filter properly.
WARNING
.
Prolonged and repeated contact
with used engine oil may cause skin
cancer.
. Try to avoid direct skin contact with
used oil. If skin contact is made,
wash thoroughly with soap or hand
cleaner as soon as possible.
. Keep used engine oil out of reach of
children.
8-10
Maintenance and do-it-yourself
Page 362 of 425
Black plate (362,1)
Model "Z51-D" EDITED: 2009/ 8/ 3
DI0137MA
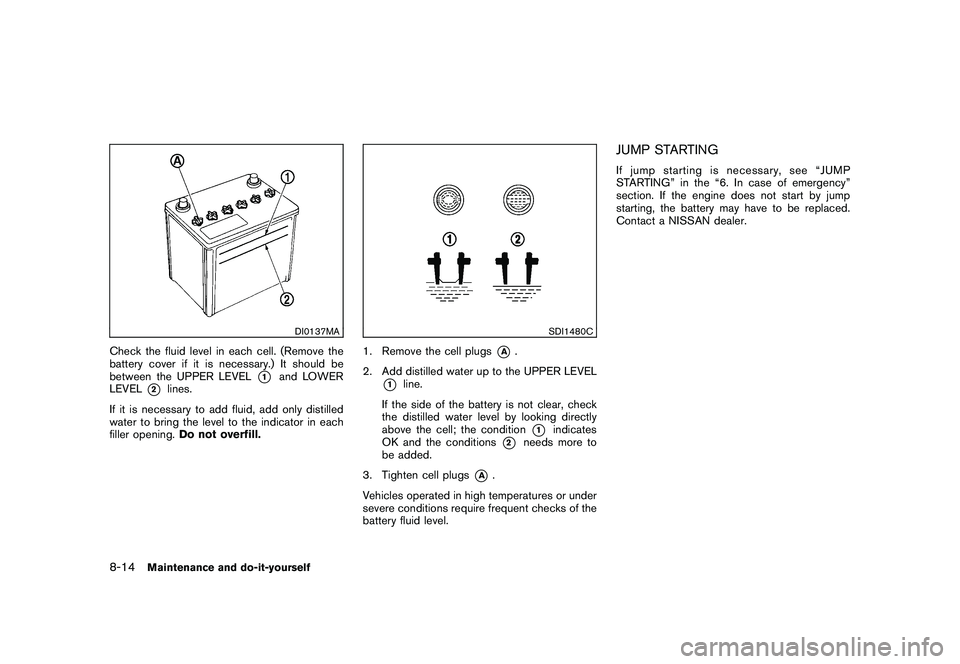
Check the fluid level in each cell. (Remove the
battery cover if it is necessary.) It should be
between the UPPER LEVEL
*1
and LOWER
LEVEL
*2
lines.
If it is necessary to add fluid, add only distilled
water to bring the level to the indicator in each
filler opening. Do not overfill.
SDI1480C
1. Remove the cell plugs
*A
.
2. Add distilled water up to the UPPER LEVEL
*1
line.
If the side of the battery is not clear, check
the distilled water level by looking directly
above the cell; the condition
*1
indicates
OK and the conditions
*2
needs more to
be added.
3. Tighten cell plugs
*A
.
Vehicles operated in high temperatures or under
severe conditions require frequent checks of the
battery fluid level.
JUMP STARTINGIf jump starting is necessary, see “JUMP
STARTING” in the “6. In case of emergency”
section. If the engine does not start by jump
starting, the battery may have to be replaced.
Contact a NISSAN dealer.
8-14
Maintenance and do-it-yourself
Page 363 of 425

Black plate (363,1)
Model "Z51-D" EDITED: 2009/ 8/ 3
CAUTION
.Do not ground accessories directly
to the battery terminal. Doing so will
bypass the variable voltage control
system and the vehicle battery may
not charge completely.
. Use electrical accessories with the
engine running to avoid discharging
the vehicle battery.
The variable voltage control system measures
the amount of electrical discharge from the
battery and controls voltage generated by the
generator.
SDI2186
1. Power steering oil pump
2. Alternator
3. Drive belt auto-tensioner
4. Crankshaft pulley
5. Air conditioner compressor
WARNING
Be sure the ignition switch is in the OFF
or LOCK position before servicing drive
belt. The engine could rotate unexpect-
edly.
1. Visually inspect the belt for signs of unusual wear, cuts, fraying or looseness. If the belt is
in poor condition or loose, have it replaced or adjusted by a NISSAN dealer.
2. Have the belt condition checked regularly.
VARIABLE VOLTAGE CONTROL
SYSTEM (if so equipped) DRIVE BELT
Maintenance and do-it-yourself
8-15
Page 368 of 425

Black plate (368,1)
Model "Z51-D" EDITED: 2009/ 8/ 3
SDI2181
ENGINE COMPARTMENT
CAUTION
Never use a fuse of a higher or lower
amperage rating than that specified on
the fuse box cover. This could damage
the electrical system or cause a fire.
If any electrical equipment does not operate,
check for an open fuse.
1. Be sure the ignition switch and the headlight switch are turned off.
2. Open the engine hood. 3. Remove the fuse/fusible link holder cover by
pushing the tab
*1.
4. Remove the fuse with the fuse puller located in the passenger compartment fuse box.
SDI1754
5. If the fuse is open
*A
, replace it with a new
fuse
*B. Spare fuses are stored in the
passenger compartment fuse box.
6. If a new fuse also opens, have the electrical system checked and repaired by a NISSAN
dealer.
Fusible linksIf any electrical equipment does not operate and
fuses are in good condition, check the fusible
links. If any of these fusible links are melted,
replace only with genuine NISSAN parts.
FUSES8-20
Maintenance and do-it-yourself
Page 392 of 425
Black plate (392,1)
Model "Z51-D" EDITED: 2009/ 8/ 3
E-85 fuelE-85 fuel is a mixture of approximately 85% fuel
ethanol and 15% unleaded gasoline. E-85 can
only be used in a Flexible Fuel Vehicle (FFV) . Do
not use E-85 fuel in your vehicle. U.S. govern-
ment regulations require fuel ethanol dispensing
pumps to be identified by a small, square,
orange and black label with the common
abbreviation or the appropriate percentage for
that region.Aftermarket fuel additivesNISSAN does not recommend the use of any
aftermarket fuel additives (for example, fuel
injector cleaner, octane booster, intake valve
deposit removers, etc.) which are sold commer-
cially. Many of these additives intended for gum,
varnish or deposit removal may contain active
solvent or similar ingredients that can be harmful
to the fuel system and engine.Octane rating tipsUsing unleaded gasoline with an octane
rating lower than recommended can cause
persistent, heavy “spark knock”. (Spark
knock is a metallic rapping noise.) If
severe, this can lead to engine damage. If
you detect a persistent heavy spark knock
even when using gasoline of the stated
octane rating, or if you hear steady spark
knock while holding a steady speed on
level roads, have a NISSAN dealer correctthe condition. Failure to correct the condi-
tion is misuse of the vehicle, for which
NISSAN is not responsible.
Incorrect ignition timing will result in spark
knock, after-run and/or overheating, which may
cause excessive fuel consumption or engine
damage. If any of the above symptoms are
encountered, have your vehicle checked at a
NISSAN dealer.
However, now and then you may notice
light spark knock for a short time while
accelerating or driving up hills. This is not a
cause for concern, because you get the
greatest fuel benefit when there is light
spark knock for a short time under heavy
engine load.
CAUTION
.
Your vehicle is not designed to run
on E-85 fuel. Using E-85 fuel in a
vehicle not specifically designed for
E-85 fuel can damage fuel system
components and is not covered by
the NISSAN new vehicle limited
warranty.
. E-85 is a mixture of approximately
85% fuel ethanol and 15% unleaded
gasoline. .
U.S. government regulations require
ethanol dispensing pumps to be
identified by a small, square, orange
and black label with the common
abbreviation or the appropriate per-
centage for that region.
9-4
Technical and consumer information
Page 411 of 425
Black plate (411,1)
Model "Z51-D" EDITED: 2009/ 8/ 3
vehicle handling. If swaying does occur,
firmly grip the steering wheel, steer straight
ahead, and immediately (but gradually)
reduce vehicle speed. This combination will
help stabilize the vehicle. Never increase
speed.
Do the following if the trailer begins to sway:
1. Take your foot off the accelerator pedal to allow the vehicle to coast and steer as
straight ahead as the road conditions allow.
This combination will help stabilize the
vehicle.
— Do not correct trailer sway by steering orapplying the brakes.
2. When the trailer sway stops, gently apply the brakes and pull to the side of the road in
a safe area.
3. Try to rearrange the trailer load so it is balanced as described earlier in this section.
. Be careful when passing other vehicles.
Passing while towing a trailer requires
considerably more distance than normal
passing. Remember the length of the trailer
must also pass the other vehicle before you
can safely change lanes.
. Down shift the transmission to a lower gear
for engine braking when driving down steep
or long hills. This will help slow the vehicle without applying the brakes.
. Avoid holding the brake pedal down too
long or too frequently. This could cause the
brakes to overheat, resulting in reduced
braking efficiency.
. Increase your following distance to allow for
greater stopping distances while towing a
trailer. Anticipate stops and brake gradually.
. Do not use cruise control while towing a
trailer.
. Some states or provinces have specific
regulations and speed limits for vehicles
that are towing trailers. Obey the local
speed limits.
. Check your hitch, trailer wiring harness
connections, and trailer wheel lug nuts after
50 miles (80 km) of travel and at every
break.
. When stopped in traffic for long periods of
time in hot weather, put the vehicle in the P
(Park) position.
. When launching a boat, don’t allow the
water level to go over the exhaust tail pipe or
rear bumper.
. Make sure you disconnect the trailer lights
before backing the trailer into the water or
the trailer lights may burn out. When towing a trailer, the transmission
fluid should be changed more frequently.
For additional information, see the “8.
Maintenance and do-it-yourself” section
earlier in this manual.
FLAT TOWINGTowing your vehicle with all four wheels on the
ground is sometimes called flat towing. This
method is sometimes used when towing a
vehicle behind a recreational vehicle, such as a
motor home.
CAUTION
.
Failure to follow these guidelines
can result in severe transmission
damage.
. Whenever flat towing your vehicle,
always tow forward, never back-
ward.
. DO NOT tow any continuously vari-
able transmission vehicle with all
four wheels on the ground (flat
towing) . Doing so WILL DAMAGE
internal transmission parts due to
lack of transmission lubrication.
. DO NOT tow an All-Wheel Drive
(AWD) vehicle with any of the
wheels on the ground. Doing soTechnical and consumer information
9-23
Page 414 of 425
Black plate (414,1)
Model "Z51-D" EDITED: 2009/ 8/ 3
A vehicle equipped with All-Wheel Drive (AWD)
should never be tested using a two wheel
dynamometer (such as the dynamometers used
by some states for emissions testing) , or similar
equipment. Make sure you inform test facility
personnel that your vehicle is equipped with
AWD before it is placed on a dynamometer.
Using the wrong test equipment may result in
transmission damage or unexpected vehicle
movement which could result in serious vehicle
damage or personal injury.
Due to legal requirements in some states/areas
or provinces, your vehicle may be required to be
in what is called the “ready condition” for an
Inspection/Maintenance (I/M) test of the emis-
sion control system.
The vehicle is set to the “ready condition” when
it is driven through certain driving patterns.
Usually, the “ready condition” can be obtained
by ordinary usage of the vehicle.
If a powertrain system component is repaired or
the battery is disconnected, the vehicle may be
reset to a “not ready condition”. Before taking
the I/M test, check the vehicle’s inspection/
maintenance test readiness condition. Turn the
ignition switch to the ON position without
starting the engine. If the Malfunction Indicator
Light (MIL) comes on steady for 20 seconds and
then blinks for 10 seconds, the I/M test
condition is “not ready”. If the MIL does not
blink after 20 seconds, the I/M test condition is“ready”.
If the MIL indicates the vehicle is in a “not ready”
condition, drive the vehicle through the following
pattern to set the vehicle to the “ready condi-
tion”. If you cannot or do not want to perform the
driving pattern, a NISSAN dealer can conduct it
for you.
WARNING
Always drive the vehicle in a safe and
prudent manner according to traffic
conditions and obey all traffic laws.
1. Start the engine. Allow the engine to idle until the engine coolant temperature gauge
needle points between the C and H (normal
operating temperature) .
2. Accelerate the vehicle to 55 MPH (88 km/h) , then quickly release the accelerator
pedal completely and keep it released for at
least 10 seconds.
3. Quickly depress the accelerator pedal for a moment, then drive the vehicle at a speed of
53 to 60 MPH (86 to 96 km/h) for at least 9
minutes.
4. Stop the vehicle. Leave the engine running.
5. Accelerate the vehicle to 35 MPH (55 km/h) and maintain the speed for 20 seconds. 6. Repeat steps 4 and 5 at least 10 times.
7. Accelerate the vehicle to 55 MPH (88 km/h)
and maintain the speed for at least 3
minutes.
8. Stop the vehicle. Place the transmission selector lever in the P (Park) or N (Neutral)
position.
9. Turn the engine off.
10. Repeat steps 1 through 8 at least one more time.
If step 1 through 7 is interrupted, repeat the
preceding step. Any safe driving mode is
acceptable between steps. Do not stop the
engine until step 7 is completed.
READINESS FOR INSPECTION/
MAINTENANCE (I/M) TEST9-26
Technical and consumer information