2010 NISSAN MURANO battery
[x] Cancel search: batteryPage 136 of 425

Black plate (132,1)
Model "Z51-D" EDITED: 2009/ 8/ 3
NOTE:
If programming a garage door opener, etc.,
it is advised to unplug the device during
the “cycling” process to prevent possible
damage to the garage door opener com-
ponents.OPERATING THE HomeLink
®UNIVER-
SAL TRANSCEIVER
HomeLink
®Universal Transceiver (once pro-
grammed) may now be used to activate the
garage door, etc. To operate, simply push the
appropriate programmed HomeLink
®Universal
Transceiver button. The red indicator light will
illuminate while the signal is being transmitted.
PROGRAMMING TROUBLE-DIAGNO-
SISIf HomeLink
®does not quickly learn the hand-
held transmitter information:
. replace the hand-held transmitter batteries
with new batteries.
. position the hand-held transmitter with its
battery area facing away from the Home-
Link
®surface.
. push and hold both the HomeLink
®and
hand-held transmitter buttons without inter-
ruption.
. position the hand-held transmitter 2 to 5 in (50 to 127 mm) away from the HomeLink
®
surface. Hold the transmitter in that position
for up to 15 seconds. If HomeLink
®is not
programmed within that time, try holding the
transmitter in another position - keeping the
indicator light in view at all times.
If you continue to have programming difficulties,
please contact the NISSAN Consumer Affairs
Department. The phone numbers are located in
the Foreword of this Owner’s Manual.
CLEARING THE PROGRAMMED IN-
FORMATIONIndividual buttons cannot be cleared, however to
clear all programming, push and hold the two
outside buttons and release when the indicator
light begins to flash (in approximately 20
seconds) .REPROGRAMMING A SINGLE Home-
Link
®BUTTON
To reprogram a HomeLink
®Universal Transcei-
ver button, complete the following.
1. PushandholdthedesiredHomeLink
®
button. Do not release the button until step
4 has been completed.
2. When the indicator light begins to flash slowly (after 20 seconds), position the
hand-held transmitter 2 to 5 in (50 to 127
mm) away from the HomeLink
®surface. 3. Push and hold the hand-held transmitter
button.
4. The HomeLink
®indicator light will flash, first
slowly and then rapidly. When the indicator
light begins to flash rapidly, release both
buttons.
The HomeLink
®Universal Transceiver button has
now been reprogrammed. The new device can
be activated by pushing the HomeLink
®button
that was just programmed. This procedure will
not affect any other programmed HomeLink
®
buttons.IF YOUR VEHICLE IS STOLENIf your vehicle is stolen, you should change the
codes of any non-rolling code device that has
been programmed into HomeLink
®. Consult the
Owner’s Manual of each device or call the
manufacturer or dealer of those devices for
additional information.
When your vehicle is recovered, you will
need to reprogram the HomeLink
®Univer-
sal Transceiver with your new transmitter
information.
FCC Notice:
This device complies with FCC rules part
15. Operation is subject to the following
two conditions: (1) This device may not
cause harmful interference and (2) This
2-58
Instruments and controls
Page 139 of 425

Black plate (10,1)
3 Pre-driving checks and adjustments
Model "Z51-D" EDITED: 2009/ 8/ 3
Keys ............................................................... 3-2NISSAN Vehicle Immobilizer System keys ............ 3-2
Intelligent Key system ...................................... 3-3
Mechanical key .............................................. 3-4
Valet hand-off ................................................ 3-4
Doors .............................................................. 3-4
Locking with mechanical key ............................. 3-5
Opening and closing windows with the
mechanical key .............................................. 3-5
Locking with inside lock knob ........................... 3-5
Locking with power door lock switch .................. 3-6
Automatic door locks ...................................... 3-6
Child safety rear door lock ............................... 3-7
Intelligent Key system .......................................... 3-7
Intelligent Key operating range .......................... 3-9
Door locks/unlocks precaution .......................... 3-9
Intelligent Key operation ................................. 3-10
Battery saver system ..................................... 3-13
Warning signals ........................................... 3-13
Troubleshooting guide ................................... 3-14
Remote keyless entry system .............................. 3-15
How to use remote keyless entry system ........... 3-16Hood
............................................................ 3-18
Lift gate ......................................................... 3-19
Operating manual lift gate .............................. 3-19
Operating power lift gate (if so equipped) .......... 3-19
Auto closure ............................................... 3-22
Lift gate release ........................................... 3-23
Fuel-filler door ................................................. 3-23
Opening fuel-filler door .................................. 3-23
Fuel-filler cap .............................................. 3-24
Tilt/telescopic steering ...................................... 3-25
Manual operation ......................................... 3-25
Electric operation ......................................... 3-26
Sun visors ...................................................... 3-26
Mirrors ........................................................... 3-27
Inside mirror ................................................ 3-27
Outside mirrors ............................................ 3-29
Vanity mirror ................................................ 3-30
Automatic drive positioner (if so equipped) ............. 3-30
Entry/exit function ......................................... 3-30
Memory storage ........................................... 3-31
System operation ......................................... 3-32
Page 146 of 425

Black plate (142,1)
Model "Z51-D" EDITED: 2009/ 8/ 3
computer.
. When the vehicle is parked near a parking
meter.
In such cases, correct the operating conditions
before using the Intelligent Key function or use
the mechanical key.
Although the life of the battery varies depending
on the operating conditions, the battery’s life is
approximately 2 years. If the battery is dis-
charged, replace it with a new one.
Since the Intelligent Key is continuously receiv-
ing radio waves, if the key is left near equipment
which transmits strong radio waves, such as
signals from a TV and personal computer, the
battery life may become shorter.
For information regarding replacement of a
battery, see “BATTERY REPLACEMENT” in
the “8. Maintenance and do-it-yourself” section.
For models with a steering wheel lock mechan-
ism: Because the steering wheel is locked
electrically, unlocking the steering wheel with
the ignition switch in the LOCK position is
impossible when the vehicle battery is comple-
tely discharged. Pay special attention that the
vehicle battery is not completely discharged.
As many as 4 Intelligent Keys can be registered
and used with one vehicle. For information about
the purchase and use of additional Intelligent Keys, contact a NISSAN dealer.
CAUTION
.
Do not allow the Intelligent Key,
which contains electrical compo-
nents, to come into contact with
water or salt water. This could affect
the system function.
. Do not drop the Intelligent Key.
. Do not strike the Intelligent Key
sharply against another object.
. Do not change or modify the Intel-
ligent Key.
. Wetting may damage the Intelligent
Key. If the Intelligent Key gets wet,
immediately wipe until it is comple-
tely dry.
. Do not place the Intelligent Key for
an extended period in an area where
temperatures exceed 140 8F (60 8C) .
. Do not attach the Intelligent Key
with a key holder that contains a
magnet.
. Do not place the Intelligent Key near
equipment that produces a mag-
netic field, such as a TV, audio
equipment, personal computer or cellular phone.
If an Intelligent Key is lost or stolen, NISSAN
recommends erasing the ID code of that
Intelligent Key from the vehicle. This may prevent
the unauthorized use of the Intelligent Key to
operate the vehicle. For information regarding
the erasing procedure, contact a NISSAN deal-
er.
3-8
Pre-driving checks and adjustments
Page 147 of 425

Black plate (143,1)
Model "Z51-D" EDITED: 2009/ 8/ 3
SPA1948A
INTELLIGENT KEY OPERATING
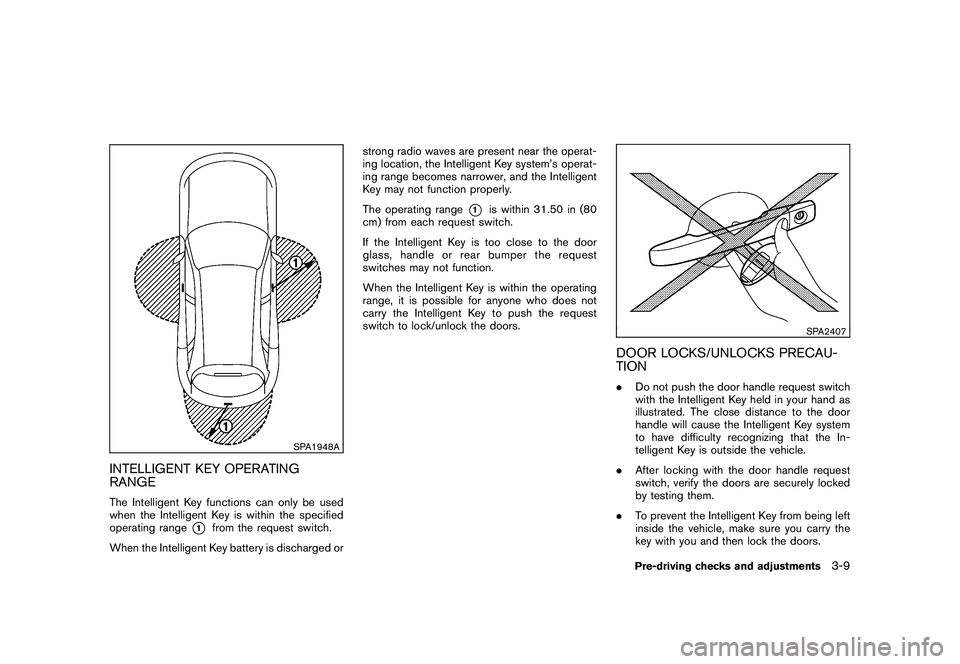
RANGEThe Intelligent Key functions can only be used
when the Intelligent Key is within the specified
operating range
*1
from the request switch.
When the Intelligent Key battery is discharged or strong radio waves are present near the operat-
ing location, the Intelligent Key system’s operat-
ing range becomes narrower, and the Intelligent
Key may not function properly.
The operating range
*1
is within 31.50 in (80
cm) from each request switch.
If the Intelligent Key is too close to the door
glass, handle or rear bumper the request
switches may not function.
When the Intelligent Key is within the operating
range, it is possible for anyone who does not
carry the Intelligent Key to push the request
switch to lock/unlock the doors.
SPA2407
DOOR LOCKS/UNLOCKS PRECAU-
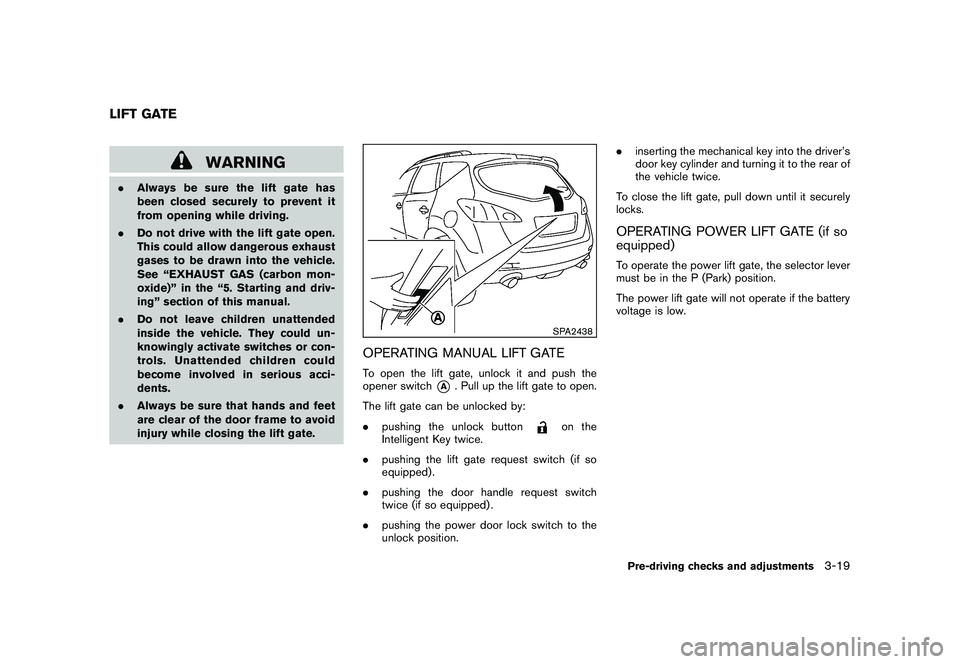
TION. Do not push the door handle request switch
with the Intelligent Key held in your hand as
illustrated. The close distance to the door
handle will cause the Intelligent Key system
to have difficulty recognizing that the In-
telligent Key is outside the vehicle.
. After locking with the door handle request
switch, verify the doors are securely locked
by testing them.
. To prevent the Intelligent Key from being left
inside the vehicle, make sure you carry the
key with you and then lock the doors.
Pre-driving checks and adjustments
3-9
Page 151 of 425

Black plate (147,1)
Model "Z51-D" EDITED: 2009/ 8/ 3
Switching procedure:
Push the LOCK
*1
and UNLOCK
*2
buttons simultaneously for more than 2 seconds
to switch the mode from one to the other.
When pushing the buttons to set the hazard
indicator mode, the hazard indicator flashes 3
times.
When pushing the buttons to set the hazard
indicator and horn mode, the hazard indicator
flashes once and the horn chirps once.
BATTERY SAVER SYSTEMWhen all the following conditions are met for 60
minutes, the battery saver system will cut off the
power supply to prevent battery discharge.
.The ignition switch is in the ACC position,
and
. All doors are closed, and
. The selector lever is in the P (Park) position.WARNING SIGNALSTo help prevent the vehicle from moving
unexpectedly by erroneous operation of the
Intelligent Key listed on the following chart or
to help prevent the vehicle from being stolen,
chime or beep sounds inside and outside the
vehicle and a warning displays in the dot matrix
liquid crystal display.
When a chime or beep sounds or the warning
displays, be sure to check the vehicle and
Intelligent Key.
See “TROUBLESHOOTING GUIDE” later in
this section and “DOT MATRIX LIQUID CRYS-
TAL DISPLAY” in the “2. Instruments and
controls” section.
Pre-driving checks and adjustments
3-13
Page 153 of 425

Black plate (149,1)
Model "Z51-D" EDITED: 2009/ 8/ 3
WARNING
The Intelligent Key transmits radio
waves when the buttons are pushed.
The FAA advises that radio waves may
affect aircraft navigation and commu-
nication systems. Do not operate the
Intelligent Key while on an airplane.
Make sure the buttons are not operated
unintentionally when the unit is stored
for a flight.
It is possible to lock/unlock all doors, activate
the panic alarm and open the windows and lift
gate (if so equipped) by pushing the buttons on
the Intelligent Key from outside the vehicle.
Before locking the doors, make sure the
Intelligent Key is not left in the vehicle.
The LOCK/UNLOCK button on the Intelligent
Key can operate at a distance of approximately
33 ft (10 m) from the vehicle. (The effective
distance depends upon the conditions around
the vehicle.)
The lock and unlock buttons will not operate
when:
. the distance between the Intelligent Key and
the vehicle is over 33 ft (10 m) .
. the Intelligent Key battery is completely discharged.
After locking with the remote keyless entry
function, pull the door handle to make sure the
doors are securely locked.
The LOCK/UNLOCK operating range varies
depending on the environment. To securely
operate the lock and unlock buttons, approach
the vehicle to about 3 ft (1 m) from the door.
SPA2252A
Type A
SPA2436
Type B
REMOTE KEYLESS ENTRY SYSTEM
Pre-driving checks and adjustments
3-15
Page 157 of 425

Black plate (153,1)
Model "Z51-D" EDITED: 2009/ 8/ 3
WARNING
.Always be sure the lift gate has
been closed securely to prevent it
from opening while driving.
. Do not drive with the lift gate open.
This could allow dangerous exhaust
gases to be drawn into the vehicle.
See “EXHAUST GAS (carbon mon-
oxide)” in the “5. Starting and driv-
ing” section of this manual.
. Do not leave children unattended
inside the vehicle. They could un-
knowingly activate switches or con-
trols. Unattended children could
become involved in serious acci-
dents.
. Always be sure that hands and feet
are clear of the door frame to avoid
injury while closing the lift gate.
SPA2438
OPERATING MANUAL LIFT GATETo open the lift gate, unlock it and push the
opener switch
*A
. Pull up the lift gate to open.
The lift gate can be unlocked by:
. pushing the unlock button
on the
Intelligent Key twice.
. pushing the lift gate request switch (if so
equipped) .
. pushing the door handle request switch
twice (if so equipped) .
. pushing the power door lock switch to the
unlock position. .
inserting the mechanical key into the driver’s
door key cylinder and turning it to the rear of
the vehicle twice.
To close the lift gate, pull down until it securely
locks.
OPERATING POWER LIFT GATE (if so
equipped)To operate the power lift gate, the selector lever
must be in the P (Park) position.
The power lift gate will not operate if the battery
voltage is low.
LIFT GATE
Pre-driving checks and adjustments
3-19
Page 159 of 425

Black plate (155,1)
Model "Z51-D" EDITED: 2009/ 8/ 3
Power openWhen the lift gate is fully closed, the lift gate will
fully open automatically by:
.pushing the power lift gate switch
*A
on
the instrument panel
. pushing the lift gate opener switch
*B
.pushing the power lift gate button
*C
on
the Intelligent Key for more than 1 second
The hazard flashes 4 times and the outside
chime sounds when the lift gate starts opening.
NOTE:
The lift gate can be opened by the power
lift gate switch
*A
or the lift gate button
*C
even if the lift gate is locked.
The lift gate will individually unlock and
open. Once the lift gate is closed, its lock
will align to the vehicle’s lock or unlock
status.
Power closeWhen the lift gate is fully opened, the lift gate
will fully close automatically by:
. pushing the power lift gate switch
*A
on
the instrument panel
. pushing the power lift gate switch
*D
on
the lower part of the lift gate
. pushing the lift gate release button
*C
on the Intelligent Key for more than 1 second
The hazard flashes 4 times and the outside
chime sounds when the lift gate starts closing.
Reverse functionThe power lift gate will reverse immediately if
one of the following actions is performed during
power open or power close.
. pushing the power lift gate switch
*A
on
the instrument panel
. pushing the lift gate switch
*D
on the lower
part of the lift gate
. pushing the lift gate button
*C
on
the Intelligent Key.
The outside chime sounds when the lift gate
starts to reverse.
The power lift gate button
*C
on the
Intelligent Key cannot be operated when the
ignition switch is in the ON position.
Auto reverse functionThe auto-reverse function enables the lift gate to
automatically reverse when something is caught
in the lift gate as it is opening or closing. When
the control unit detects an obstacle, the lift gate
will reverse and return to the full open or full
close position.
If a second obstacle is detected, the lift gate motion will stop and the drive motor will
disengage. The lift gate will enter the manual
mode.
A pinch sensor is mounted on each side of the
lift gate. If an obstacle is detected by the pinch
sensor during power close, the lift gate will
reverse and return to the full open position
immediately.
NOTE:
If the pinch sensor is damaged or removed,
the power close function will not operate.
WARNING
There is a small distance immediately
before the closed position that cannot
be detected. Make sure that all passen-
gers keep their hands, etc., clear from
the lift gate opening before closing the
lift gate.Manual modeIf power operation is not available, the lift gate
can be operated manually. Power operation may
not be available if multiple obstacles have been
detected in a single power cycle or if the battery
voltage is low. When the power lift gate main
switch is in the OFF position, the lift gate can be
opened manually by pushing the lift gate opener
switch. If the power lift gate opener switch isPre-driving checks and adjustments
3-21