Page 19 of 293

WARNING
●Do not ride in a moving vehicle when
the seatback is reclined. This can be
dangerous. The shoulder belt will not
be against your body. In an accident,
you could be thrown into it and receive
neck or other serious injuries. You
could also slide under the lap belt and
receive serious internal injuries. ●
For the most effective protection when
the vehicle is in motion, the seat should
be upright. Always sit well back in the
seat with both feet on the floor and
adjust the seat properly. For additional
information, refer to “Precautions on
seat belt usage” in this section.
● After adjustment, gently rock in the seat
to make sure it is securely locked.
● Do not leave children unattended inside
the vehicle. They could unknowingly ac-
tivate switches or controls. Unattended
children could become involved in seri-
ous accidents. ●
Do not adjust the driver’s seat while
driving so full attention may be given to
vehicle operation. The seat may move
suddenly and could cause loss of con-
trol of the vehicle.
● The seatback should not be reclined
any more than needed for comfort. Seat
belts are most effective when the pas-
senger sits well back and straight up in
the seat. If the seatback is reclined, the
risk of sliding under the lap belt and
being injured is increased.
Page 22 of 293
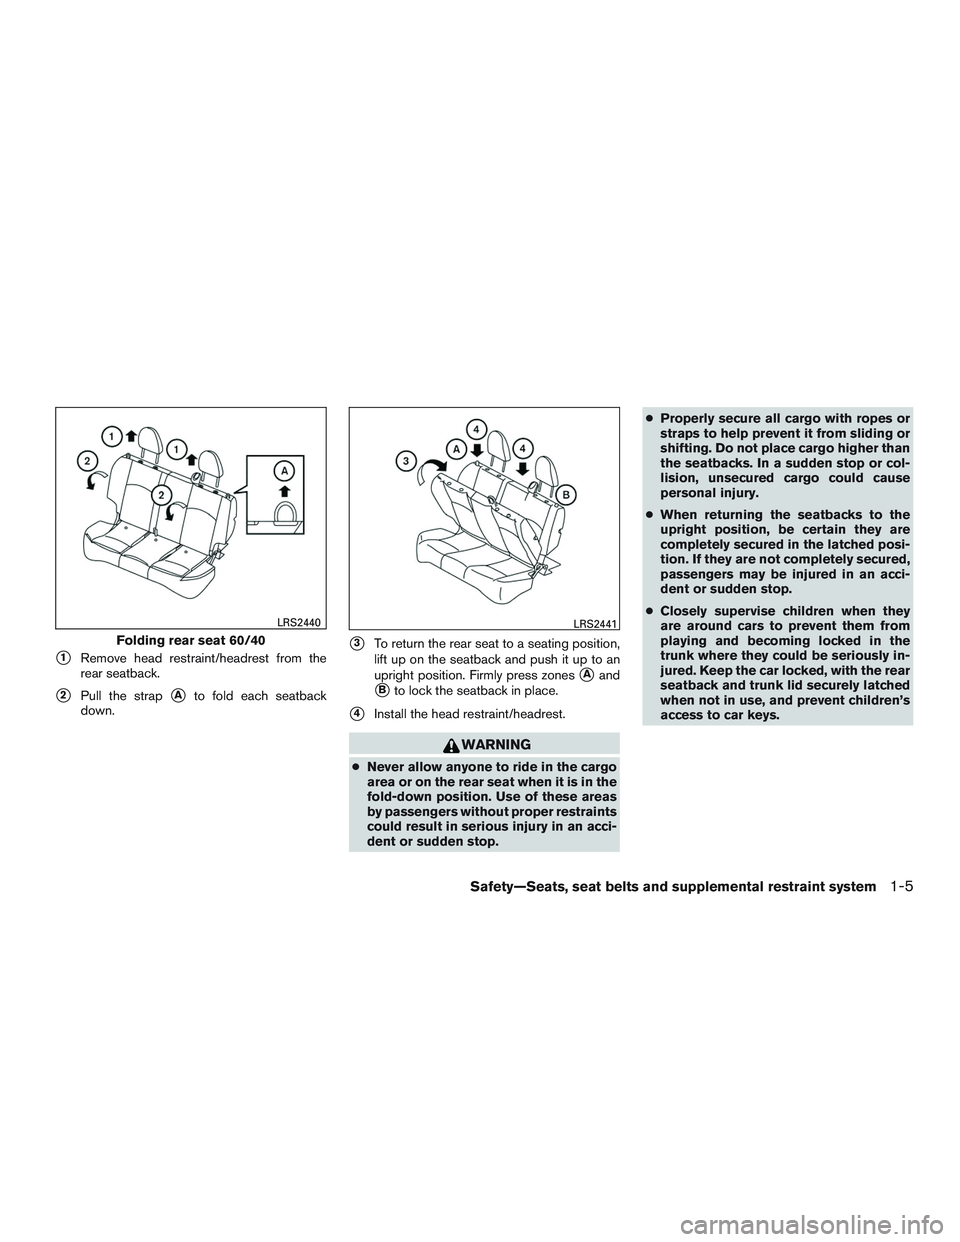
�1Remove head restraint/headrest from the
rear seatback.
�2Pull the strap�Ato fold each seatback
down.
�3To return the rear seat to a seating position,
lift up on the seatback and push it up to an
upright position. Firmly press zones
�Aand
�Bto lock the seatback in place.
�4Install the head restraint/headrest.
Page 23 of 293

WARNING
Head restraints/headrests supplement
the other vehicle safety systems. They may
provide additional protection against in-
jury in certain rear end collisions. Adjust-
able head restraints/headrests must be
adjusted properly, as specified in this sec-
tion. Check the adjustment after someone
else uses the seat. Do not attach anything
to the head restraint/headrest stalks or
remove the head restraint/headrest. Do
not use the seat if the head
restraint/headrest has been removed. If
the head restraint/headrest was removed,
reinstall and properly adjust the head
restraint/headrest before an occupant
uses the seating position. Failure to fol-
low these instructions can reduce the ef-
fectiveness of the head
restraints/headrests. This may increase
the risk of serious injury or death in a
collision.The illustration shows the seating positions
equipped with head restraints/headrests.
�
Indicates the seating position is equipped with
a head restraint.
� Indicates the seating position is equipped with
a headrest.
+ Indicates the seating position is not equipped
with a head restraint or headrest (if applicable) .
● Your vehicle is equipped with a head
restraint/headrest that may be integrated,
adjustable or non-adjustable. ●
Adjustable head restraints/headrests have
multiple notches along the stalk(s) to lock
them in a desired adjustment position.
● The non-adjustable head
restraints/headrests have a single locking
notch to secure them to the seat frame.
● Proper Adjustment:
– For the adjustable type, align the head restraint/headrest so the center of your
ear is approximately level with the center
of the head restraint/headrest.
– If your ear position is still higher than the recommended alignment, place the head
restraint/headrest at the highest position.
● If the head restraint/headrest has been re-
moved, ensure that it is reinstalled and
locked in place before riding in that desig-
nated seating position.
Page 30 of 293

●Do not ride in a moving vehicle when
the seatback is reclined. This can be
dangerous. The shoulder belt will not
be against your body. In an accident,
you could be thrown into it and receive
neck or other serious injuries. You
could also slide under the lap belt and
receive serious internal injuries.
● For the most effective protection when
the vehicle is in motion, the seat should
be upright. Always sit well back in the
seat with both feet on the floor and
adjust the seat belt properly.
● Do not allow children to play with the
seat belts. Most seating positions are
equipped with Automatic Locking Re-
tractor (ALR) mode seat belts. If the seat
belt becomes wrapped around a child’s
neck with the ALR mode activated, the
child can be seriously injured or killed if
the seat belt retracts and becomes
tight. This can occur even if the vehicle
is parked. Unbuckle the seat belt to
release the child. If the seat belt cannot
be unbuckled or is already unbuckled,
release the child by cutting the seat belt
with a suitable tool (such as a knife or
scissors) to release the seat belt.
Fastening the seat belts
1. Adjust the seat. For additional information, refer to “Seats” in this section.
�2Slowly pull the seat belt out of the retractor
and insert the tongue into the buckle until
you hear and feel the latch engage.
● The retractor is designed to lock dur-
ing a sudden stop or on impact. A
slow pulling motion permits the seat
belt to move, and allows you some
freedom of movement in the seat.
● If the seat belt cannot be pulled from
its fully retracted position, firmly pull
the belt and release it. Then
smoothly pull the belt out of the re-
tractor.
Page 31 of 293

�3Position the lap belt portionlow and snug
on the hips as shown.
�4Pull the shoulder belt portion toward the
retractor to take up extra slack. Be sure the
shoulder belt is routed over your shoulder
and across your chest.
The front passenger seat and the rear seating
positions three-point seat belts have two modes
of operation:
● Emergency Locking Retractor (ELR)
● Automatic Locking Retractor (ALR)
The ELR mode allows the seat belt to extend and
retract to allow the driver and passengers some freedom of movement in the seat. The ELR locks
the seat belt when the vehicle slows down rapidly
or during certain impacts.
The ALR mode (child restraint mode) locks the
seat belt for child restraint installation.
When the ALR mode is activated, the seat belt
cannot be extended again until the seat belt
tongue is detached from the buckle and fully
retracted. The seat belt returns to the ELR mode
after the seat belt fully retracts. For additional
information, refer to “Child restraints” in this sec-
tion.
The ALR mode should be used only for
child restraint installation. During normal
seat belt use by an occupant, the ALR mode
should not be activated. If it is activated, it
may cause uncomfortable seat belt ten-
sion. It can also change the operation of
the front passenger air bag. For additional
information, refer to “Supplemental air bag
warning light” in this section.
Page 32 of 293
To increase your confidence in the seat belts,
check the operation as follows:● Grasp the shoulder belt and pull forward
quickly. The retractor should lock and re-
strict further belt movement.
If the retractor does not lock during this check or
if you have any questions about seat belt opera-
tion, see a NISSAN dealer.
Shoulder belt height adjustment (front
seats)
The shoulder belt anchor height should be ad-
justed to the position best for you. For additional
information, refer to “Precautions on seat belt
usage” in this section. To adjust, pull out the
adjustment button
�1and move the shoulder belt
anchor to the desired position
�2, so the belt
passes over the center of the shoulder. The belt
should be away from your face and neck, but not
falling off your shoulder. Release the adjustment
button to lock the shoulder belt anchor into posi-
tion.
Page 89 of 293
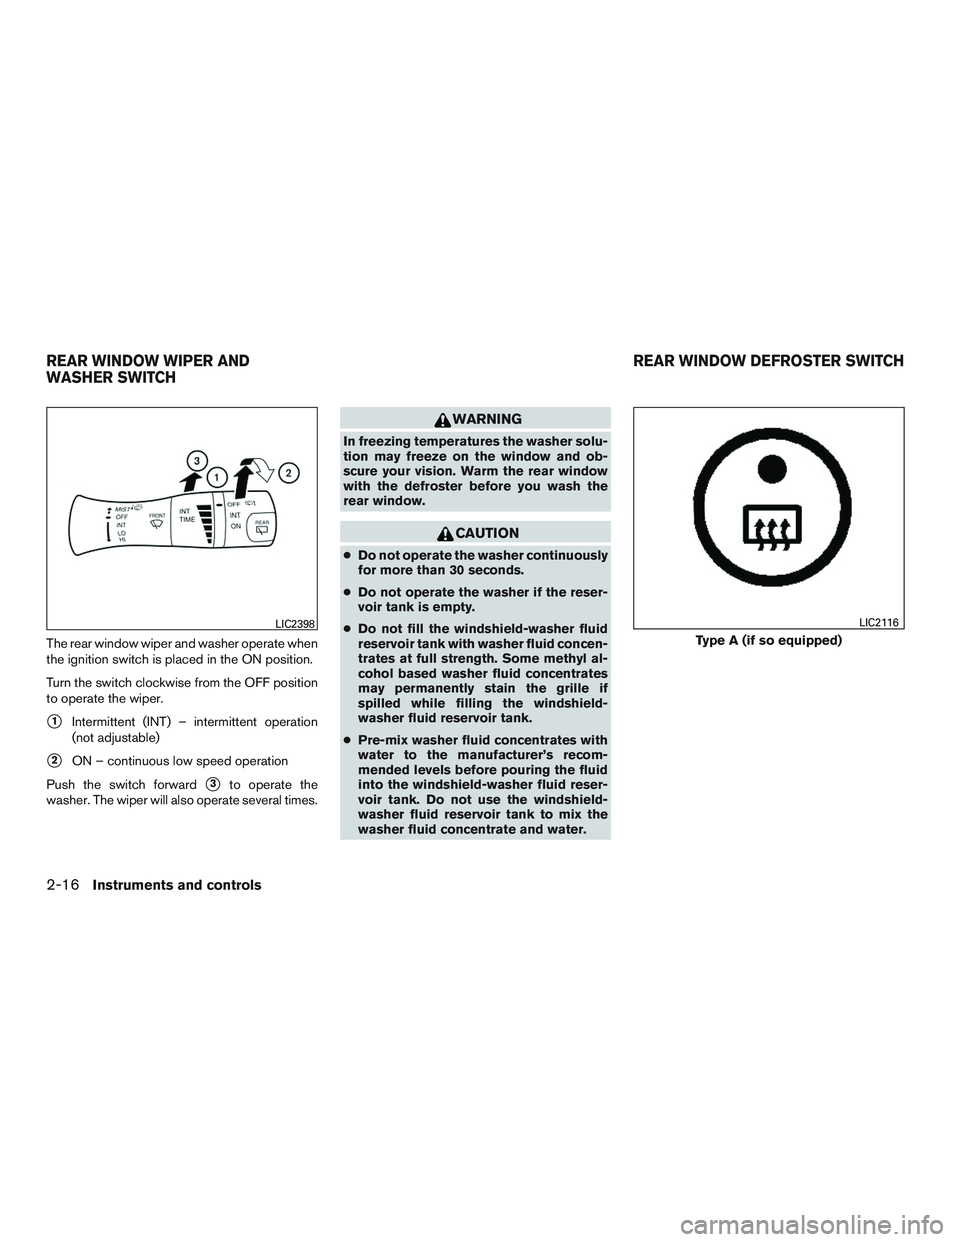
The rear window wiper and washer operate when
the ignition switch is placed in the ON position.
Turn the switch clockwise from the OFF position
to operate the wiper.
�1Intermittent (INT) – intermittent operation
(not adjustable)
�2ON – continuous low speed operation
Push the switch forward
�3to operate the
washer. The wiper will also operate several times.
Page 100 of 293

The interior light has a three-position switch and
operates regardless of ignition switch position.
When the switch is in the ON position
�3, the
interior lights illuminate, regardless of door posi-
tion. The lights will go off after a period of time
unless the ignition switch is placed in the ACC or
ON position (if so equipped) .
When the switch is in the DOOR position
�2, the
interior lights will stay on for a period of time
when:
● The doors are unlocked by the key fob, a key
or the power door lock switch while all doors
are closed and the ignition switch is placed
in the OFF position. ●
The driver’s door is opened and then closed
while the key is removed from the ignition
switch.
● The key is removed from the ignition switch
while all doors are closed.
The lights will turn off while the timer is activated
when: ● The driver’s door is locked by the key fob, a
key, or the power door lock switch.
● The ignition switch is placed in the ON po-
sition.
When the switch is in the OFF position
�1, the
interior lights do not illuminate, regardless of door
position.
The lights will turn off automatically after a period
of time while doors are open to prevent the bat-
tery from becoming discharged.