2010 NISSAN LATIO turn signal
[x] Cancel search: turn signalPage 1260 of 3745

DI-50
< SERVICE INFORMATION >
WARNING CHIME
OK >> Check battery power supply circuit of combination meter. If OK, replace combination meter. Referto IP-12, "
Removal and Installation".
NG >> Replace BCM. Refer to BCS-19, "
Removal and Installation of BCM".
Front Door Switch LH Signal InspectionINFOID:0000000005395046
1.CHECK BCM INPUT SIGNAL
With CONSULT-III
1. Select “BCM”.
2. With “DATA MONITOR” of “BUZZER”, confirm “DOOR SW-DR” when the driver's door is operated.
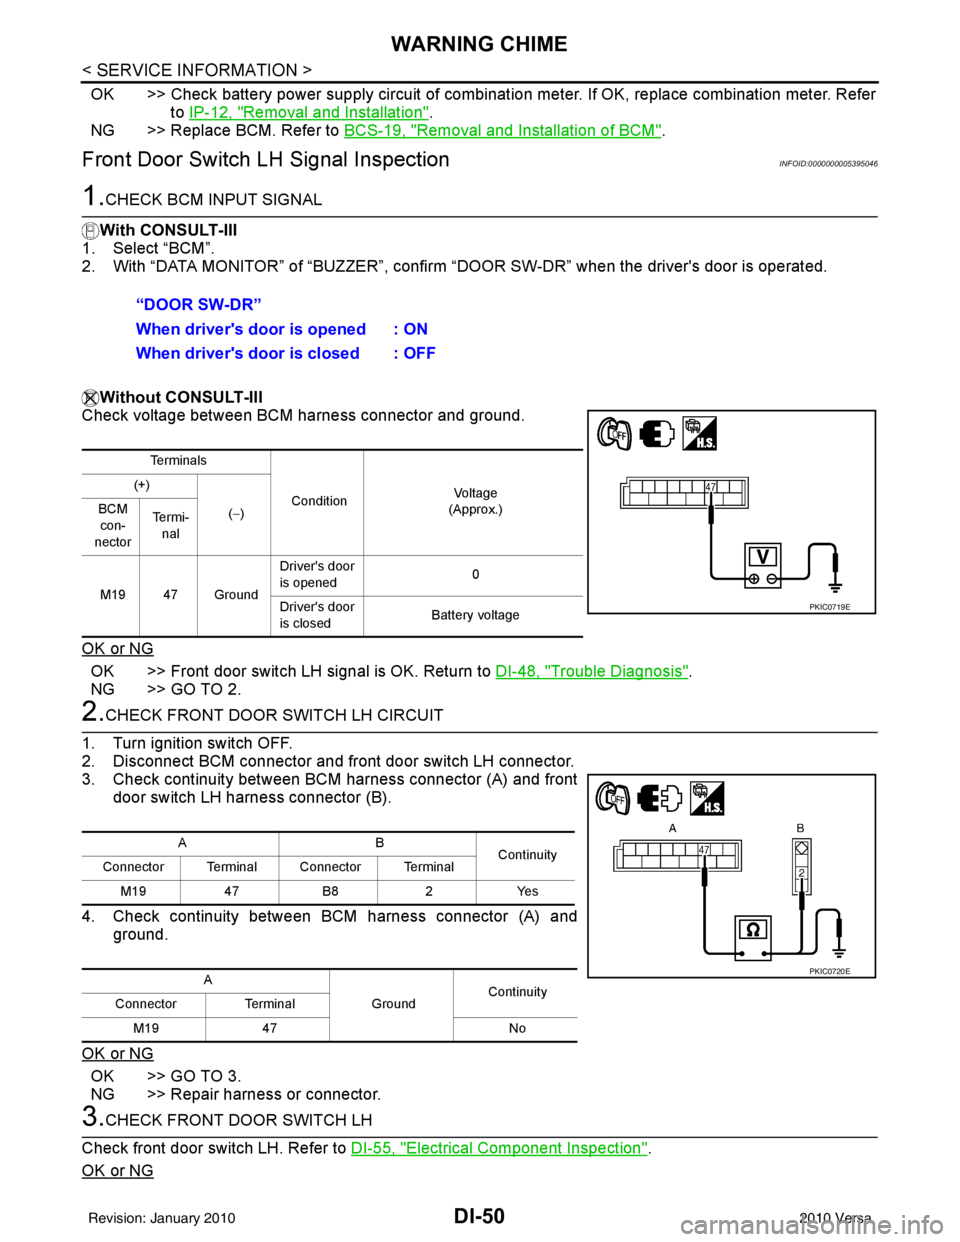
Without CONSULT-III
Check voltage between BCM harness connector and ground.
OK or NG
OK >> Front door switch LH signal is OK. Return to DI-48, "Trouble Diagnosis".
NG >> GO TO 2.
2.CHECK FRONT DOOR SWITCH LH CIRCUIT
1. Turn ignition switch OFF.
2. Disconnect BCM connector and front door switch LH connector.
3. Check continuity between BCM harness connector (A) and front door switch LH harness connector (B).
4. Check continuity between BCM harness connector (A) and ground.
OK or NG
OK >> GO TO 3.
NG >> Repair harness or connector.
3.CHECK FRONT DOOR SWITCH LH
Check front door switch LH. Refer to DI-55, "
Electrical Component Inspection".
OK or NG
“DOOR SW-DR”
When driver's door is opened : ON
When driver's door is closed : OFF
Te r m i n a l s
Condition Vol tag e
(Approx.)
(+)
(−)
BCM
con-
nector Te r m i -
nal
M19 47 Ground Driver's door
is opened
0
Driver's door
is closed Battery voltage
PKIC0719E
AB
Continuity
Connector Terminal Connector Terminal
M19 47B8 2Yes
A GroundContinuity
Connector Terminal
M19 47 No
PKIC0720E
Revision: January 20102010 Versa
Page 1261 of 3745

WARNING CHIMEDI-51
< SERVICE INFORMATION >
C
DE
F
G H
I
J
L
M A
B
DI
N
O P
OK >> Replace BCM. Refer to BCS-19, "Removal and Installation of BCM".
NG >> Replace front door switch LH.
Key Switch Signal Inspection (Without Intelligent Key)INFOID:0000000005395047
1.CHECK FUSE
Check if the key switch and key lock solenoid 10A fuse [No. 14, located in the fuse block (J/B)] is blown.
OK or NG
OK >> GO TO 2.
NG >> Be sure to repair the cause of malfunction before installing new fuse. Refer to PG-4
.
2.CHECK BCM INPUT SIGNAL
With CONSULT-III
1. Select “BCM”.
2. With “DATA MONITOR” of “BUZZER”, confirm “KEY ON SW” when the key is operated.
Without CONSULT-III
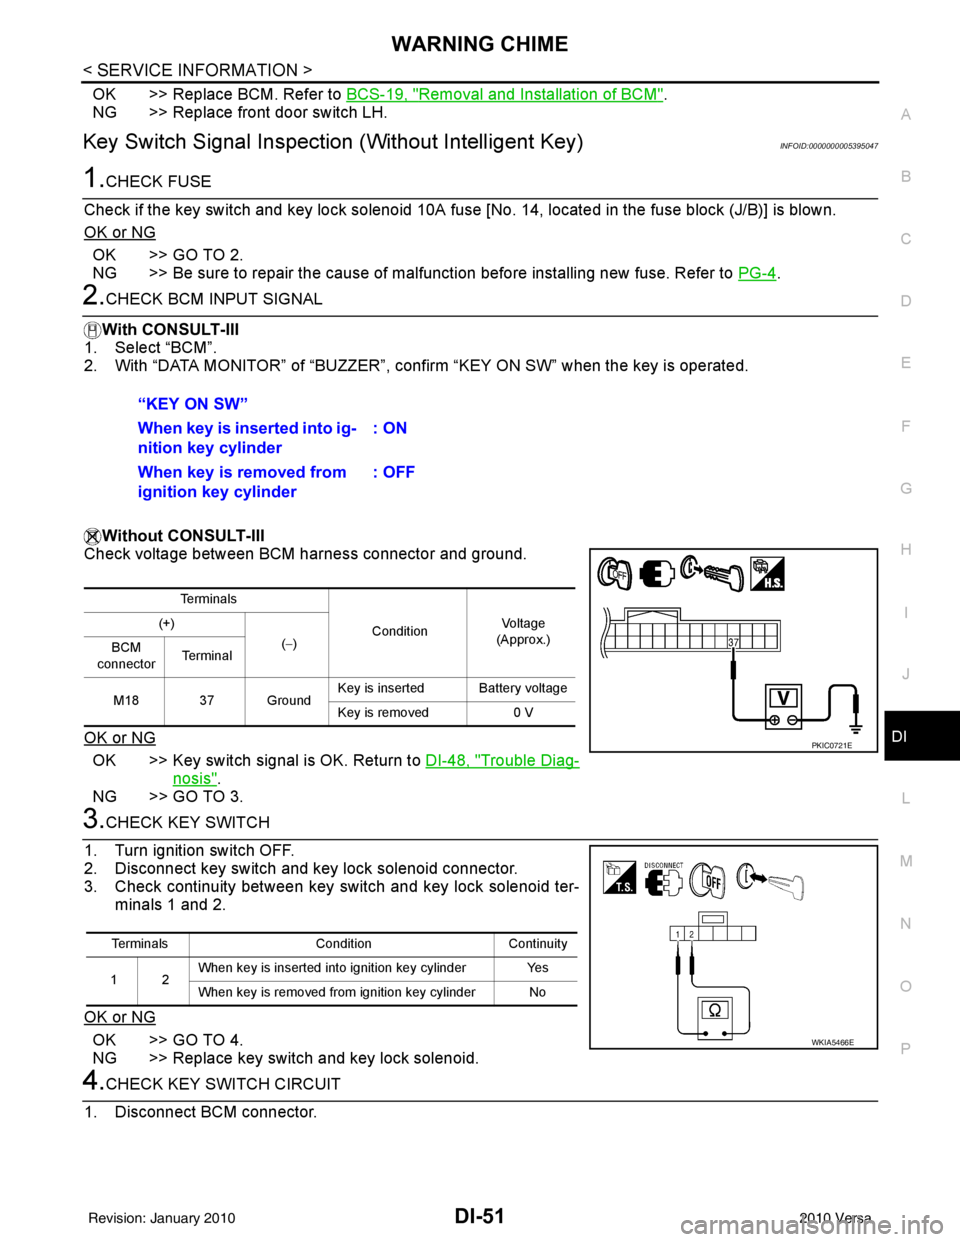
Check voltage between BCM harness connector and ground.
OK or NG
OK >> Key switch signal is OK. Return to DI-48, "Trouble Diag-
nosis".
NG >> GO TO 3.
3.CHECK KEY SWITCH
1. Turn ignition switch OFF.
2. Disconnect key switch and key lock solenoid connector.
3. Check continuity between key switch and key lock solenoid ter- minals 1 and 2.
OK or NG
OK >> GO TO 4.
NG >> Replace key switch and key lock solenoid.
4.CHECK KEY SWITCH CIRCUIT
1. Disconnect BCM connector. “KEY ON SW”
When key is inserted into ig-
nition key cylinder
: ON
When key is removed from
ignition key cylinder : OFF
Te r m i n a l s
ConditionVoltag e
(Approx.)
(+)
(−)
BCM
connector Te r m i n a l
M18 37 Ground Key is inserted Battery voltage
Key is removed
0 V
PKIC0721E
Terminals ConditionContinuity
12 When key is inserted into ignition key cylinder Yes
When key is removed from ignition key cylinder No
WKIA5466E
Revision: January 20102010 Versa
Page 1263 of 3745

WARNING CHIMEDI-53
< SERVICE INFORMATION >
C
DE
F
G H
I
J
L
M A
B
DI
N
O P
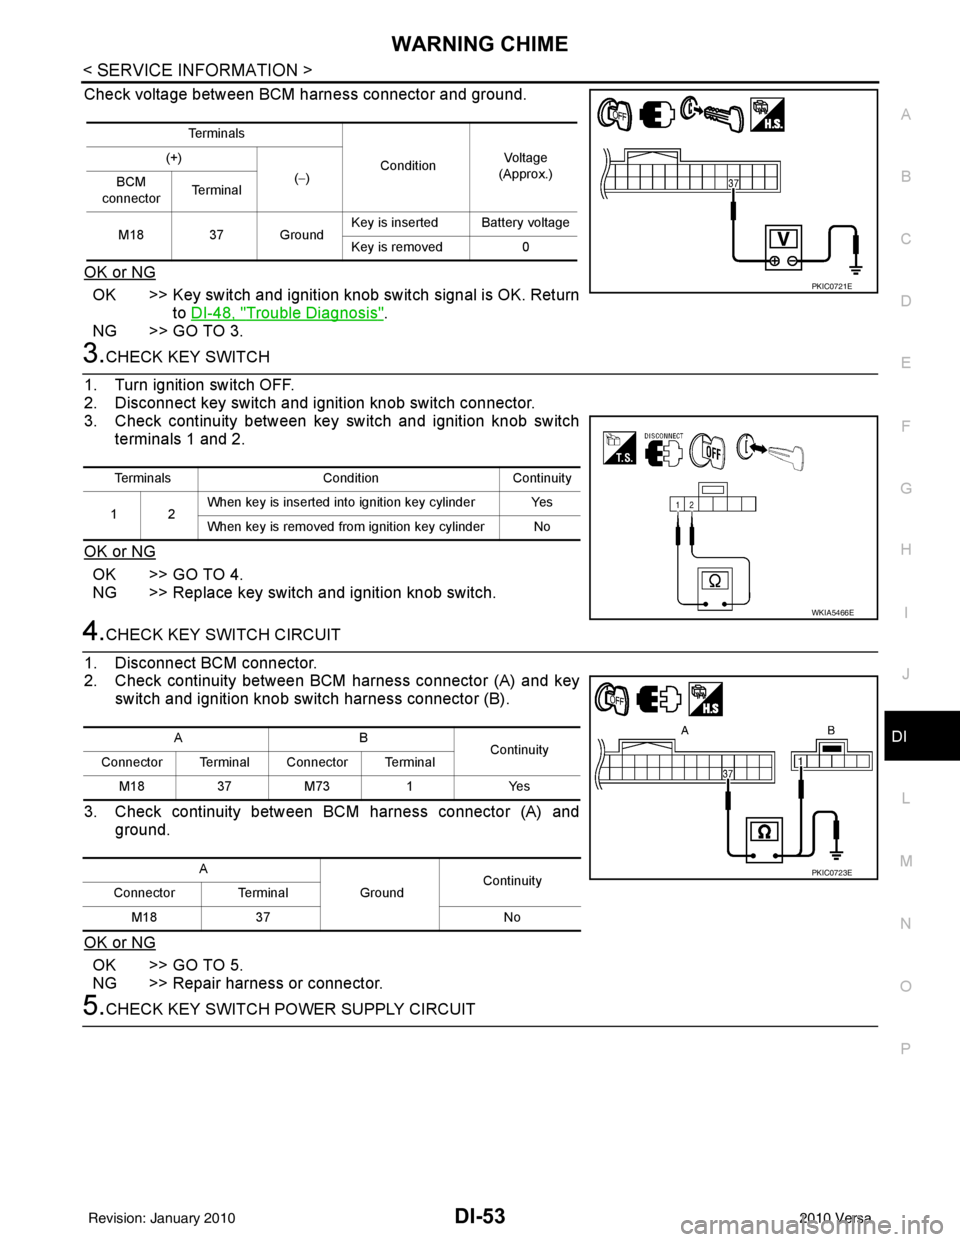
Check voltage between BCM harness connector and ground.
OK or NG
OK >> Key switch and ignition knob switch signal is OK. Return to DI-48, "
Trouble Diagnosis".
NG >> GO TO 3.
3.CHECK KEY SWITCH
1. Turn ignition switch OFF.
2. Disconnect key switch and i gnition knob switch connector.
3. Check continuity between key switch and ignition knob switch
terminals 1 and 2.
OK or NG
OK >> GO TO 4.
NG >> Replace key switch and ignition knob switch.
4.CHECK KEY SWITCH CIRCUIT
1. Disconnect BCM connector.
2. Check continuity between BCM harness connector (A) and key switch and ignition knob switch harness connector (B).
3. Check continuity between BCM harness connector (A) and ground.
OK or NG
OK >> GO TO 5.
NG >> Repair harness or connector.
5.CHECK KEY SWITCH POWER SUPPLY CIRCUIT
Te r m i n a l s ConditionVol tag e
(Approx.)
(+)
(−)
BCM
connector Te r m i n a l
M18 37 Ground Key is inserted Battery voltage
Key is removed
0
PKIC0721E
Terminals ConditionContinuity
12 When key is inserted into ignition key cylinder Yes
When key is removed from ignition key cylinder No
WKIA5466E
AB
Continuity
Connector Terminal Connector Terminal
M183 7M 73 1 Y es
A GroundContinuity
Connector Terminal
M18 37 No
PKIC0723E
Revision: January 20102010 Versa
Page 1264 of 3745

DI-54
< SERVICE INFORMATION >
WARNING CHIME
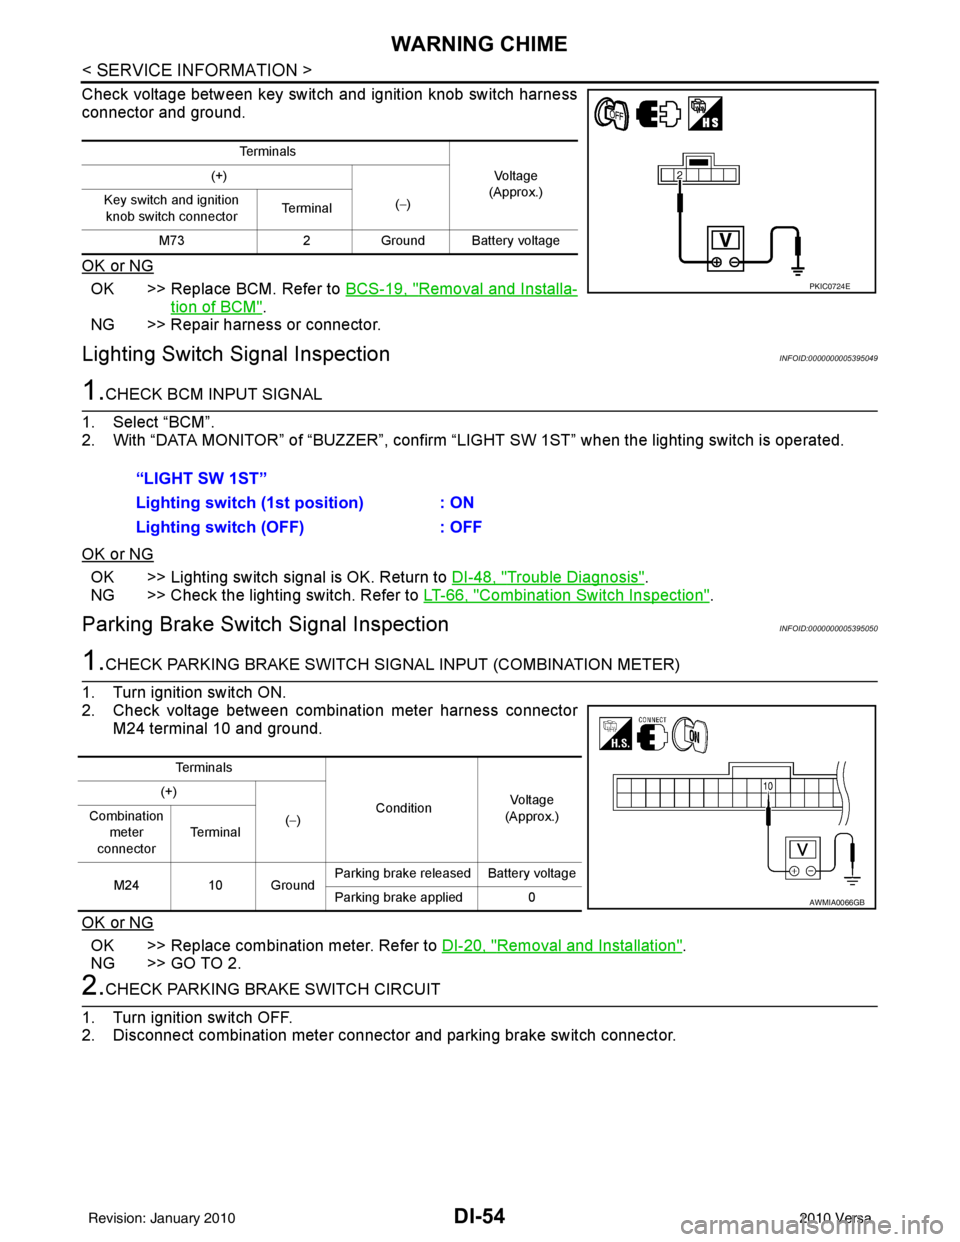
Check voltage between key switch and ignition knob switch harness
connector and ground.
OK or NG
OK >> Replace BCM. Refer to BCS-19, "Removal and Installa-
tion of BCM".
NG >> Repair harness or connector.
Lighting Switch Signal InspectionINFOID:0000000005395049
1.CHECK BCM INPUT SIGNAL
1. Select “BCM”.
2. With “DATA MONITOR” of “BUZZER”, confirm “LIG HT SW 1ST” when the lighting switch is operated.
OK or NG
OK >> Lighting switch signal is OK. Return to DI-48, "Trouble Diagnosis".
NG >> Check the lighting switch. Refer to LT-66, "
Combination Switch Inspection".
Parking Brake Switch Signal InspectionINFOID:0000000005395050
1.CHECK PARKING BRAKE SWITCH SIGNAL INPUT (COMBINATION METER)
1. Turn ignition switch ON.
2. Check voltage between combination meter harness connector M24 terminal 10 and ground.
OK or NG
OK >> Replace combination meter. Refer to DI-20, "Removal and Installation".
NG >> GO TO 2.
2.CHECK PARKING BRAKE SWITCH CIRCUIT
1. Turn ignition switch OFF.
2. Disconnect combination meter connector and parking brake switch connector.
Te r m i n a l s
Vo l ta g e
(Approx.)
(+)
(−)
Key switch and ignition
knob switch connector Te r m i n a l
M73 2Ground Battery voltage
PKIC0724E
“LIGHT SW 1ST”
Lighting switch ( 1st position) : ON
Lighting switch (OFF) : OFF
Te r m i n a l s
ConditionVoltag e
(Approx.)
(+)
(−)
Combination
meter
connector Te r m i n a l
M24 10 Ground Parking brake released Battery voltage
Parking brake applied 0
AWMIA0066GB
Revision: January 20102010 Versa
Page 1290 of 3745
![NISSAN LATIO 2010 Service Repair Manual INSPECTION AND ADJUSTMENTEC-25
< BASIC INSPECTION > [HR16DE]
C
D
E
F
G H
I
J
K L
M A
EC
NP
O
VIN REGISTRATION : Special Repair RequirementINFOID:0000000005398239
1.CHECK VIN
Check the VIN of the vehic NISSAN LATIO 2010 Service Repair Manual INSPECTION AND ADJUSTMENTEC-25
< BASIC INSPECTION > [HR16DE]
C
D
E
F
G H
I
J
K L
M A
EC
NP
O
VIN REGISTRATION : Special Repair RequirementINFOID:0000000005398239
1.CHECK VIN
Check the VIN of the vehic](/manual-img/5/57358/w960_57358-1289.png)
INSPECTION AND ADJUSTMENTEC-25
< BASIC INSPECTION > [HR16DE]
C
D
E
F
G H
I
J
K L
M A
EC
NP
O
VIN REGISTRATION : Special Repair RequirementINFOID:0000000005398239
1.CHECK VIN
Check the VIN of the vehicle and note it. Refer to GI-43, "
Model Variation".
>> GO TO 2.
2.PERFORM VIN REGISTRATION
With CONSULT-III
1. Turn ignition switch ON and engine stopped.
2. Select “VIN REGISTRATION” in “WORK SUPPORT” mode.
3. Follow the instruction of CONSULT-III display.
>> END
ACCELERATOR PEDAL RELEAS ED POSITION LEARNING
ACCELERATOR PEDAL RELEASED PO SITION LEARNING : DescriptionINFOID:0000000005398240
Accelerator Pedal Released Position Learning is a function of ECM to learn the fully released position of the
accelerator pedal by monitoring the accelerator pedal pos ition sensor output signal. It must be performed each
time harness connector of accelerator pedal position sensor or ECM is disconnected.
ACCELERATOR PEDAL RELEASED POSITION LEARNING : Special Repair Re-
quirement
INFOID:0000000005398241
1.START
1. Make sure that accelerator pedal is fully released.
2. Turn ignition switch ON and wait at least 2 seconds.
3. Turn ignition switch OFF and wait at least 10 seconds.
4. Turn ignition switch ON and wait at least 2 seconds.
5. Turn ignition switch OFF and wait at least 10 seconds.
>> END
THROTTLE VALVE CLOSED POSITION LEARNING
THROTTLE VALVE CLOSED POSITION LEARNING : DescriptionINFOID:0000000005398242
Throttle Valve Closed Position Learning is a function of ECM to learn the fully closed position of the throttle
valve by monitoring the throttle position sensor out put signal. It must be performed each time harness connec-
tor of electric throttle contro l actuator or ECM is disconnected.
THROTTLE VALVE CLOSED POSITION LEA RNING : Special Repair Requirement
INFOID:0000000005398243
1.START
1. Make sure that accelerator pedal is fully released.
2. Turn ignition switch ON.
3. Turn ignition switch OFF and wait at least 10 seconds. Make sure that throttle valve moves during above 10 seconds by confirming the operating sound.
>> END
IDLE AIR VOLUME LEARNING
IDLE AIR VOLUME LEARNING : DescriptionINFOID:0000000005398244
Idle Air Volume Learning is a function of ECM to lear n the idle air volume that keeps each engine idle speed
within the specific range. It must be performed under any of the following conditions:
Revision: January 20102010 Versa
Page 1317 of 3745
![NISSAN LATIO 2010 Service Repair Manual EC-52
< FUNCTION DIAGNOSIS >[HR16DE]
AIR CONDITIONING CUT CONTROL
AIR CONDITIONING CUT CONTROL
System DiagramINFOID:0000000005398260
System DescriptionINFOID:0000000005398261
INPUT/OUTPUT SIGNAL CHART NISSAN LATIO 2010 Service Repair Manual EC-52
< FUNCTION DIAGNOSIS >[HR16DE]
AIR CONDITIONING CUT CONTROL
AIR CONDITIONING CUT CONTROL
System DiagramINFOID:0000000005398260
System DescriptionINFOID:0000000005398261
INPUT/OUTPUT SIGNAL CHART](/manual-img/5/57358/w960_57358-1316.png)
EC-52
< FUNCTION DIAGNOSIS >[HR16DE]
AIR CONDITIONING CUT CONTROL
AIR CONDITIONING CUT CONTROL
System DiagramINFOID:0000000005398260
System DescriptionINFOID:0000000005398261
INPUT/OUTPUT SIGNAL CHART
*1: This signal is sent to the ECM via the CAN communication line.
*2: ECM determines the start signal status by the signals of engine speed and battery voltage.
SYSTEM DESCRIPTION
This system improves engine operati
on when the air conditioner is used.
Under the following conditions, the air conditioner is turned off.
• When the accelerator pedal is fully depressed.
• When cranking the engine.
• At high engine speeds.
• When the engine coolant temperat ure becomes excessively high.
JMBIA2195GB
Sensor Input Signal to ECMECM functionActuator
Air conditioner switch*
1Air conditioner ON signal
Air conditioner
cut controlIPDM E/R
↓
Air conditio
ner relay
↓
Compressor
Accelerator pedal position sensor
Accelerator pedal position
Crankshaft position sensor (POS)
Camshaft position sensor (PHASE) Engine speed*
2
Engine coolant temperature sensor
Engine coolant temperature
Battery Battery voltage*
2
Refrigerant pressure sensorRefrigerant pressure
EPS control unit Power steering operation
ABS actuator and electric unit (control unit)
Vehicle speed*
1
Combination meter
BCM Air conditioner ON signal*
1
Revision: January 20102010 Versa
Page 1368 of 3745
![NISSAN LATIO 2010 Service Repair Manual ON BOARD DIAGNOSTIC (OBD) SYSTEMEC-103
< FUNCTION DIAGNOSIS > [HR16DE]
C
D
E
F
G H
I
J
K L
M A
EC
NP
O
ACTIVE TEST MODE
Test Item
*: Leaving cooling fan OFF with CONSULT-III while engine is running ma NISSAN LATIO 2010 Service Repair Manual ON BOARD DIAGNOSTIC (OBD) SYSTEMEC-103
< FUNCTION DIAGNOSIS > [HR16DE]
C
D
E
F
G H
I
J
K L
M A
EC
NP
O
ACTIVE TEST MODE
Test Item
*: Leaving cooling fan OFF with CONSULT-III while engine is running ma](/manual-img/5/57358/w960_57358-1367.png)
ON BOARD DIAGNOSTIC (OBD) SYSTEMEC-103
< FUNCTION DIAGNOSIS > [HR16DE]
C
D
E
F
G H
I
J
K L
M A
EC
NP
O
ACTIVE TEST MODE
Test Item
*: Leaving cooling fan OFF with CONSULT-III while engine is running may cause the engine to overheat.
DTC & SRT CONFIRMATION MODE
SRT STATUS Mode
For details, refer to
EC-84, "Diagnosis Description".
PERMANENT DTC STATUS Mode
For details, refer to EC-84, "Diagnosis Description".
NOTE:
This mode is not used in regions that permanent DTCs are not regulated by law.
TEST ITEMCONDITION JUDGMENTCHECK ITEM (REMEDY)
FUEL INJECTION • Engine: Return to the original
trouble condition
• Change the amount of fuel injec-
tion using CONSULT-III. If trouble symptom disappears, see
CHECK ITEM.
• Harness and connectors
• Fuel injector
• Air fuel ratio (A/F) sensor 1
IGNITION TIMING • Engine: Return to the original
trouble condition
• Timing light: Set
• Retard the ignition timing using
CONSULT-III. If trouble symptom disappears, see
CHECK ITEM.
• Perform Idle Air Volume Learning.
POWER BALANCE • Engine: After warming up, idle
the engine.
• A/C switch OFF
• Selector lever: P or N position (A/ T), Neutral position (M/T)
• Cut off each fuel injector signal one at a time using CONSULT-
III. Engine runs rough or dies.
• Harness and connectors
• Compression
• Fuel injector
• Power transistor
• Spark plug
• Ignition coil
COOLING FAN* • Ignition switch: ON
• Turn the cooling fan “LOW”, “HI”
and “OFF” using CONSULT-III. Cooling fan moves and stops. • Harness and connectors
• IPDM E/R (Cooling fan relay)
• Cooling fan motor
ENG COOLANT
TEMP • Engine: Return to the original
trouble condition
• Change the engine coolant tem- perature using CONSULT-III. If trouble symptom disappears, see
CHECK ITEM.
• Harness and connectors
• Engine coolant temperature sen-
sor
• Fuel injector
FUEL PUMP RELAY • Ignition switch: ON (Engine
stopped)
• Turn the fuel pump relay “ON” and “OFF” using CONSULT-III
and listen to operating sound. Fuel pump relay makes the operat-
ing sound.
• Harness and connectors
•Fuel pump relay
PURG VOL CONT/V • Engine: After warming up, run
engine at 1,500 rpm.
• Change the EVAP canister purge volume control solenoid
valve opening percent using
CONSULT-III. Engine speed changes according
to the opening percent.
• Harness and connectors
• Solenoid valve
FUEL/T TEMP SEN • Change the fuel tank temperature using CONSULT-III.
VENT CONTROL/V • Ignition switch: ON (Engine
stopped)
• Turn solenoid valve “ON” and
“OFF” using the CONSULT-III
and listen to operating sound. Solenoid valve makes an operating
sound.
• Harness and connectors
• Solenoid valve
V/T ASSIGN ANGLE • Engine: Return to the original
trouble condition
• Change intake valve timing us- ing CONSULT-III. If trouble symptom disappears, see
CHECK ITEM.
• Harness and connectors
• Intake valve timing control sole-
noid valve
Revision: January 20102010 Versa
Page 1385 of 3745
![NISSAN LATIO 2010 Service Repair Manual EC-120
< COMPONENT DIAGNOSIS >[HR16DE]
U0101 CAN COMM CIRCUIT
U0101 CAN COMM CIRCUIT
DescriptionINFOID:0000000005398288
CAN (Controller Area Network) is a serial communication line for real time appli NISSAN LATIO 2010 Service Repair Manual EC-120
< COMPONENT DIAGNOSIS >[HR16DE]
U0101 CAN COMM CIRCUIT
U0101 CAN COMM CIRCUIT
DescriptionINFOID:0000000005398288
CAN (Controller Area Network) is a serial communication line for real time appli](/manual-img/5/57358/w960_57358-1384.png)
EC-120
< COMPONENT DIAGNOSIS >[HR16DE]
U0101 CAN COMM CIRCUIT
U0101 CAN COMM CIRCUIT
DescriptionINFOID:0000000005398288
CAN (Controller Area Network) is a serial communication line for real time application. It is an on-vehicle mul-
tiplex communication line with high data communication s
peed and excellent error detection ability. Many elec-
tronic control units are equipped onto a vehicle, and each control unit shares information and links with other
control units during operation (not independent). In CA N communication, control units are connected with 2
communication lines (CAN H line, CAN L line) allowing a high rate of information transmission with less wiring.
Each control unit transmits/receives data but selectively reads required data only.
DTC LogicINFOID:0000000005398289
DTC DETECTION LOGIC
DTC CONFIRMATION PROCEDURE
1.PERFORM DTC CONFIRMATION PROCEDURE
1. Turn ignition switch ON and wait at least 3 seconds.
2. Check DTC.
Is DTC detected?
YES >> EC-121, "Diagnosis Procedure".
NO >> INSPECTION END
DTC No. Trouble diagnosis name DTC detecting conditionPossible cause
U0101 Lost communication with
TCM When ECM is not transmitting or receiving CAN
communication signal of OBD (emission-related
diagnosis) with TCM for 2 seconds or more. • CAN communication line between
TCM and ECM
(CAN communication line is open or
shorted)
Revision: January 20102010 Versa