2010 NISSAN CUBE radio
[x] Cancel search: radioPage 3 of 20
Remote keyless entry System (if so equipped) .........................2
ni SSAn intelligent k ey™ (if so equipped) ............................. 2
Automatic door Locks ............................................. 4
Windshield Wiper/Washer Switch ................................... 4
Headlight and Turn Signal control ................................... 5
Steering Wheel Switches for Audio control/Bluetooth
® (if so equipped) ... 5
cruise control (if so equipped) ...................................... 6
Automatic climate control (if so equipped) ............................6
f M/AM/SAT* Radio with cd Player (if so equipped) ....................8
clock Set/ display Adjustment ...................................... 10
u SB Jack with iPod
® connectivity (if so equipped) .................... 10
Vehicle information display ........................................ 10
RearView Monitor (if so equipped) .................................. 10
continuously Variable Transmission (cVT) (if so equipped) ..............11
6-Speed Manual Transmission (if so equipped) ........................11
Vehicle dynamic control (Vdc) Off Switch ...........................11
front Passenger Air Bag Status Light ............................... 12
Tire Pressure Monitoring System (TPMS) ............................ 12
Seat Belt Warning Light and chime ................................. 12
child Safety Rear door Locks ...................................... 13
fuel-filler door Release ........................................... 13
Tilt Steering column .............................................. 13
front Seat Adjustments ........................................... 13
Rear Seat Adjustments ........................................... 14
Bluetooth
® Hands-free Phone System (if so equipped) ................. 14
This easy-to-use Quick Reference Guide is intended to help you more fully
appreciate some of the unique features and functions of your new vehicle.
However, it is not intended to replace your Owner’s Manual. The Owner’s
Manual contains more detailed information to help you better understand
the important safety warnings, features, operation and maintenance of your
vehicle. All information, specifications, photographs and illustrations in this
publication are those in effect at the time of printing. niSSA n reserves the
right to change specifications or design without notice and without obligation.
TABLe O f cOnTenTS
Page 5 of 20
AcceSSORY POSi TiOn
Press the ignition switch START/STOP button once without depressing the brake pedal to
access the A cc position. This position activates electrical accessories such as the radio.
Press the ignition switch START/STOP button a second time without depressing the brake
pedal to access the O n position. This position turns on the ignition switch and all electrical
accessories.
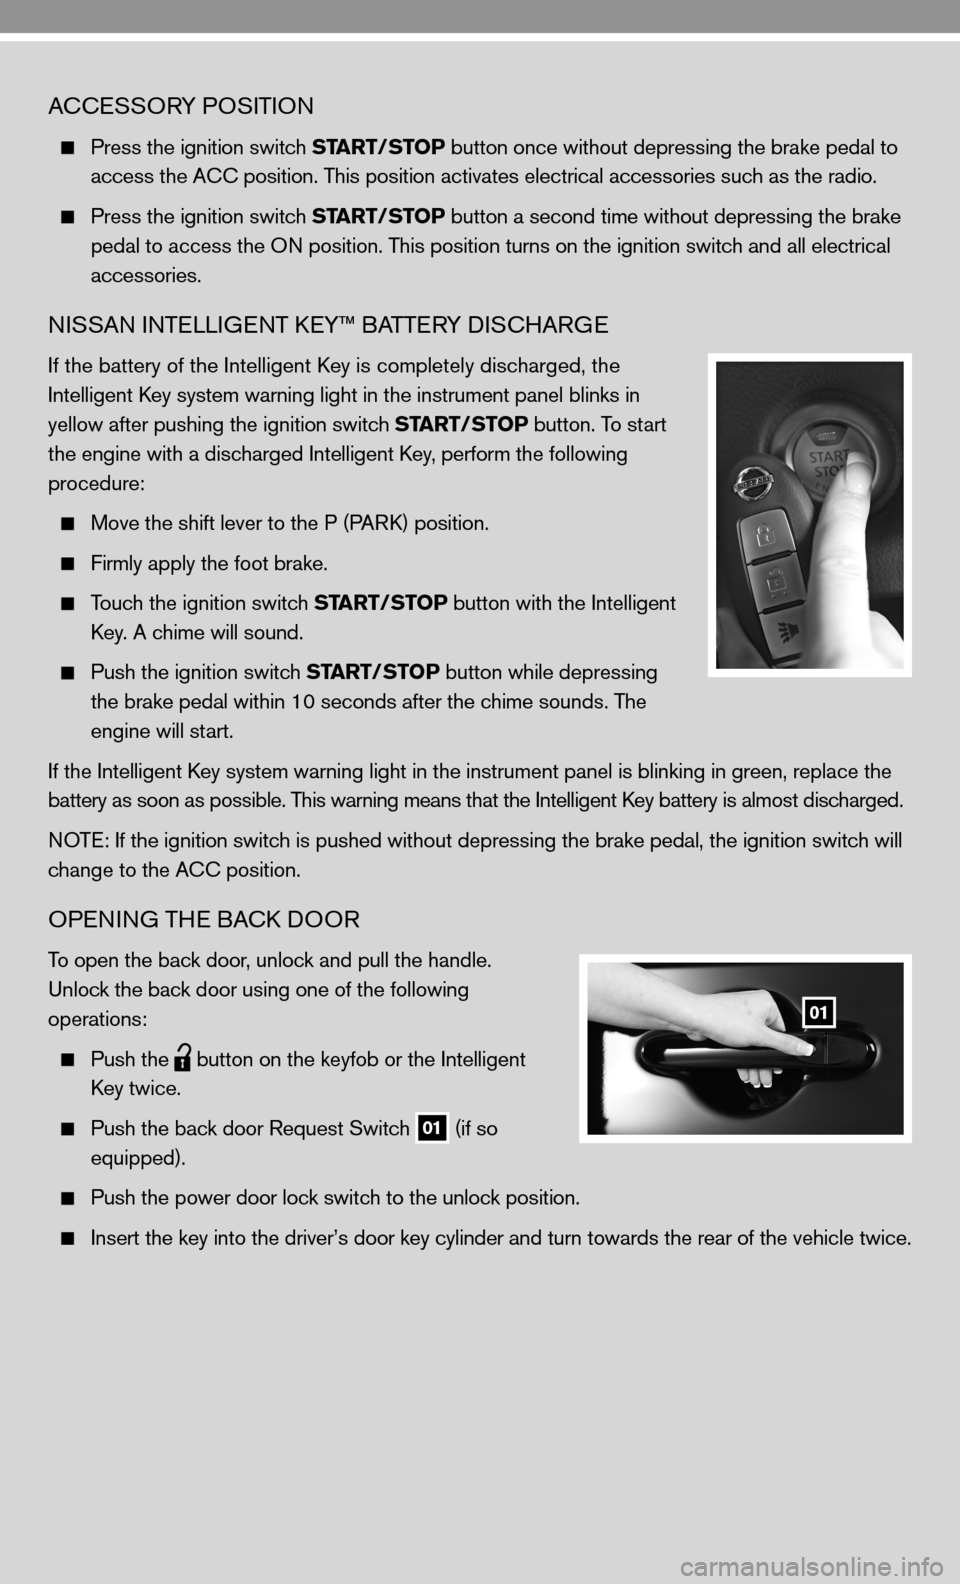
niSSAn inTe LLiGenT keY™ BATTe RY diSc HARG e
if the battery of the intelligent k ey is completely discharged, the
i ntelligent key system warning light in the instrument panel blinks in
yellow after pushing the ignition switch START/STOP button. To start
the engine with a discharged intelligent key, perform the following
procedure:
Move the shift lever to the P (PAR k) position.
firmly apply the foot brake.
Touch the ignition switch START/STOP button with the intelligent
k ey. A chime will sound.
Push the ignition switch START/STOP button while depressing
the brake pedal within 10 seconds after the chime sounds. The
engine will start.
if the intelligent k ey system warning light in the instrument panel is blinking in green, re\
place the
battery as soon as possible. This warning means that the intelligent k ey battery is almost discharged.
n OTe: if the ignition switch is pushed without depressing the brake pedal, the ignition switch will
change to the A cc position.
OPenin G THe BAck d OOR
To open the back door, unlock and pull the handle.
u nlock the back door using one of the following
operations:
Push the
button on the keyfob or the
intelligent
k ey twice.
Push the back door Request Switch
01 (if so
equipped).
Push the power door lock switch to the unlock position.
insert the key into the driver’s door key cylinder and turn towards th\
e rear of the vehicle twice.
01
Page 7 of 20
STEERING WHEEL SWITCHES FOR AUDIO CONTROL/
BLUETOOTH® (if so equipped)
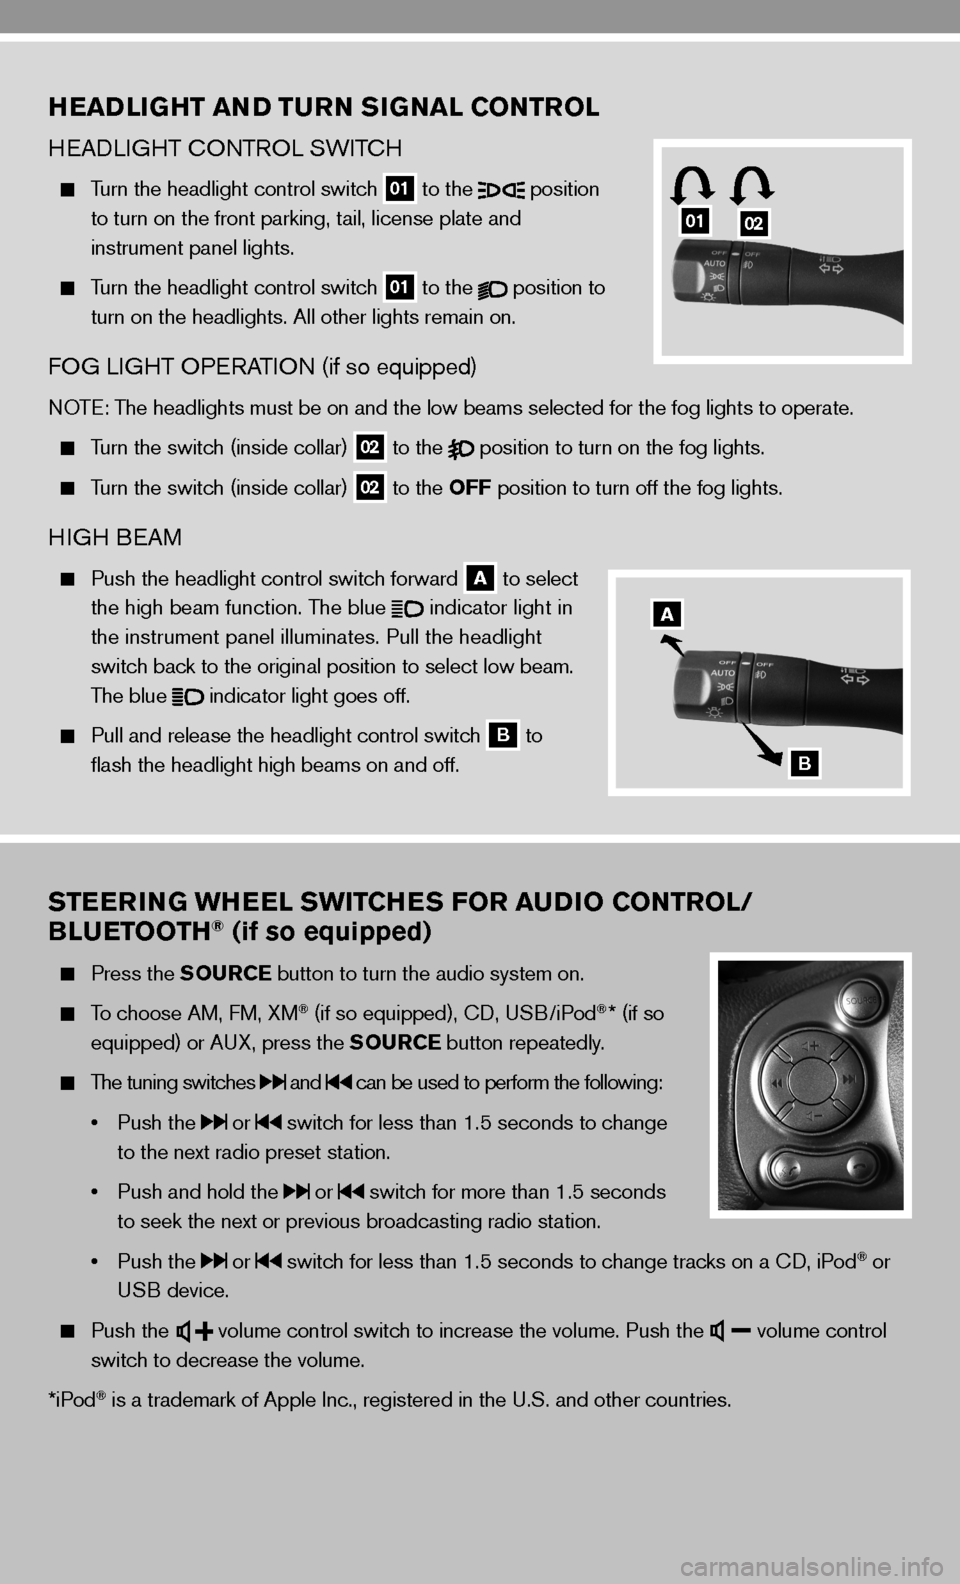
Press the SOURCE button to turn the audio system on.
To choose AM, f M, XM® (if so equipped), cd, u SB/iPod®* (if so
equipped) or A uX, press the SOURCE button repeatedly.
The tuning switches and can be used to perform the following:
• Push the
or switch for less than 1.5 seconds to change
to the next radio preset station.
• Push and hold the
or switch for more than 1.5 seconds
to seek the next or previous broadcasting radio station.
• Push the
or switch for less than 1.5 seconds to change tracks on a cd, iPod® or
u SB device.
Push the
volume control switch to increase the volume. Push the volume control
switch to decrease the volume.
*iPod
® is a trademark of Apple inc., registered in the u.S. and other countries.
HEADLIGHT AND TURN SIGNAL CONTROL
H eAd LiGHT c OnTROL SW iTc H
Turn the headlight control switch
01 to the
position
to turn on the front parking, tail, license plate and
instrument panel lights.
Turn the headlight control switch
01 to the
position to
turn on the headlights. All other lights remain on.
fOG Li GHT OP eRATi On (if so equipped)
nOTe: The headlights must be on and the low beams selected for the fog lights t\
o operate.
Turn the switch (inside collar)
02 to the
position to turn on the fog lights.
Turn the switch (inside collar)
02 to the OFF position to turn off the fog lights.
H
iGH B eAM
Push the headlight control switch forward
A to select
the high beam function. The blue
indicator light in
the instrument panel illuminates. Pull the headlight
switch back to the original position to select low beam.
The blue
indicator light goes off.
Pull and release the headlight control switch
B to
flash the headlight high beams on and off.
0102
A
B
Page 10 of 20
8
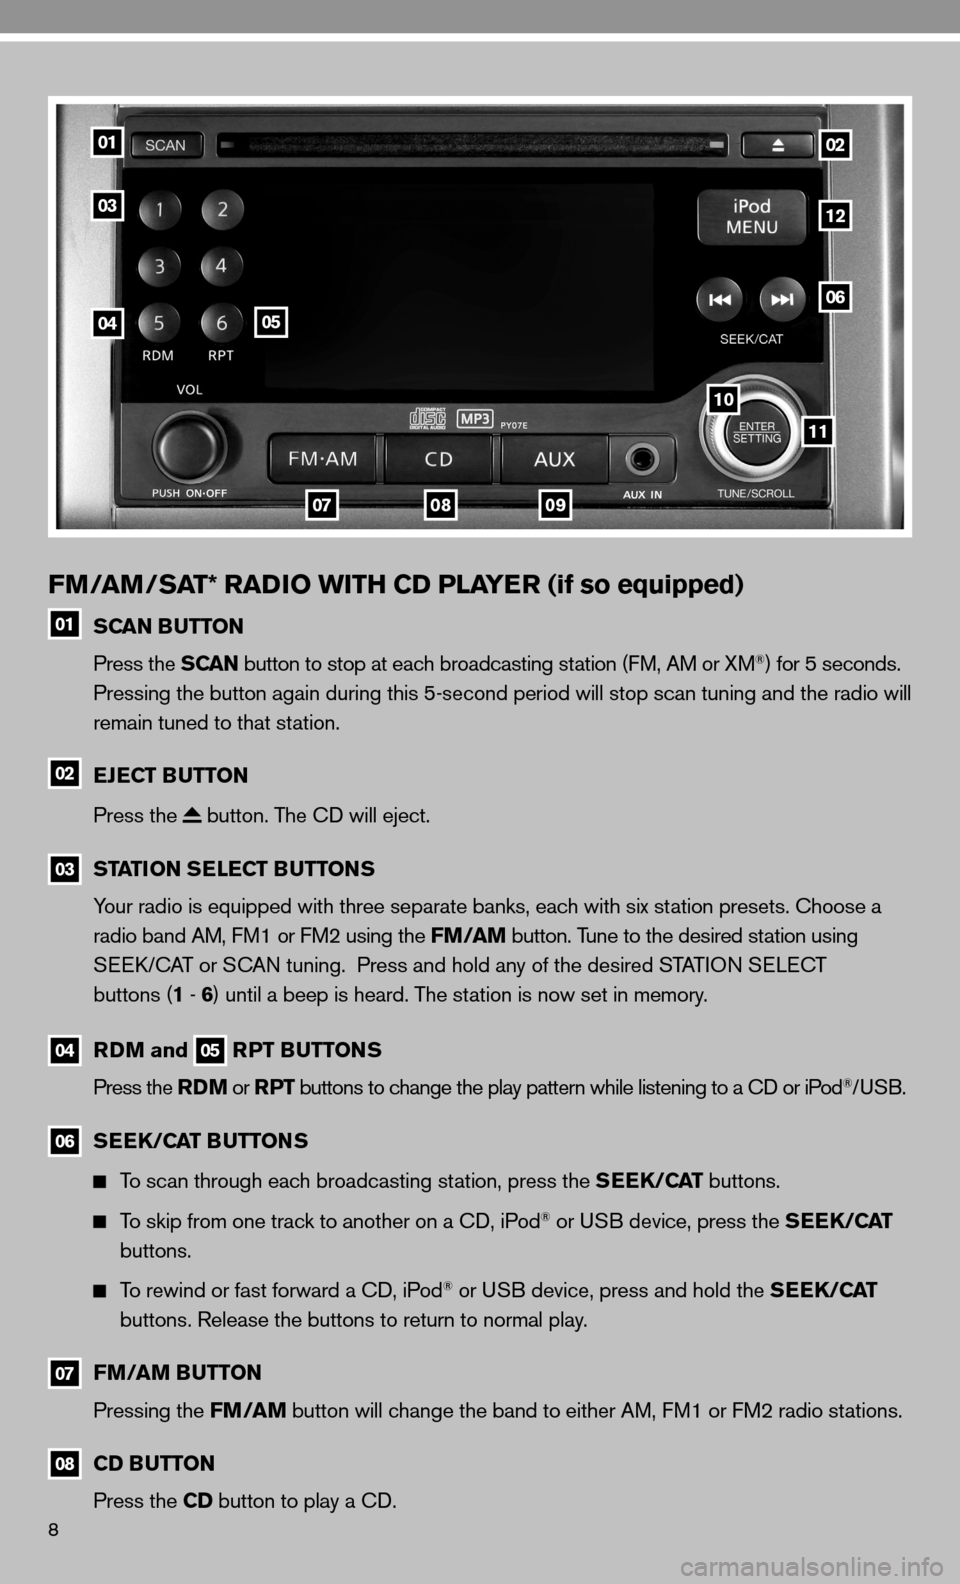
FM/AM/SAT* RADIO WITH CD PLAYER (if so equipped)
01 SCAN BUTTON
Press the SCAN button to stop at each broadcasting station (f M, AM or XM®) for 5 seconds.
Pressing the button again during this 5-second period will stop scan tuning and the radio will
remain tuned to that station.
02 EJECT BUTTON
Press the
button. The cd will eject.
03
STATION SELECT BUTTONS
Your radio is equipped with three separate banks, each with six station presets. choose a
radio band AM, f M1 or fM2 using the FM/AM button. Tune to the desired station using
Seek/c AT or S cAn tuning. Press and hold any of the desired STATi On S eLec T
buttons (1 - 6 ) until a beep is heard. The station is now set in memory.
04
RDM and 05 RPT BUTTONS
Press the RDM or RPT buttons to change the play pattern while listening to a cd or iPod®/uSB.
06
SEEK/CAT BUTTONS
To scan through each broadcasting station, press the SEEK/CAT buttons.
To skip from one track to another on a cd, iPod® or u SB device, press the SEEK/CAT
buttons.
To rewind or fast forward a cd, iPod® or u SB device, press and hold the SEEK/CAT
buttons. Release the buttons to return to normal play.
07
FM/AM BUTTON
Pressing the FM/AM button will change the band to either AM, f M1 or fM2 radio stations.
08
CD BUTTON
Press the CD button to play a cd.
01
03
0405
0709
11
10
06
12
02
08
Page 11 of 20
09 AUX BUTTON
Press the AUX button to play a compatible device such as an MP3 player when it is plugged
into the AUX (auxiliary) jack. The AUX button is also used to play a device plugged into the
USB jack. if there are devices plugged into both the AUX jack and the USB jack, pressing
the AUX button will toggle between the two functions. if so equipped, you can also press
the AUX button to access XM
® SAT1 and SAT2 preset banks.
n OTe: You may need to adjust the volume on any compatible device plugged into t\
he auxiliary
jack to find the most desired sound level of the audio system.
10 ENTER/SETTINGS BUTTON AND
11 TUNE/SCROLL CONTROL DIAL
To manually tune the radio, turn the TUNE/SCROLL dial. if playing a cd that is formatted
with MP3/WMA folders, turn the TUNE/SCROLL dial to scroll through the available folders.
To adjust the Bass, Treble, fade, Balance, Speed Sensitive Volume (SSV), Brightness,
contrast and clock (O n/O ff) press the ENTER/SETTINGS button until the desired
mode is displayed, then turn the TUNE/SCROLL dial to adjust to the desired level.
12
iPod® PLAYER OPERATION (if so equipped)
The USB jack is located in the lower center of the instrument panel. connect the cable that
is supplied with your iPod
® to the outlet, and then attach the other end of the cable to your
iPod®. if compatible, the battery of your iPod® will charge during the connection to the vehicle.
PLAYING AN iPod
®
The interface for iPod® operation shown on the vehicle center display is similar to the iPod®
interface. The iPod® can only be operated by the vehicle audio controls while connected.
Select the iPod
® by using one of the following methods:
Press the
12 iPod®/MENU
button.
Press the SOURCE select switch on the steering wheel.
SEEK/CAT BUTTONS AND TUNE/SCROLL DIAL
Press the SEEK/CAT buttons while a track is being played; the next track or the beginning
of the current track will be played.
Press and hold either SEEK/CAT (rewind or fast forward) button for more than approximately
1.5 seconds, the track will play while rewinding or fast forwarding. When the SEEK/CAT
(rewind or fast forward) button is released, the track will return to the normal playing speed.
Press the iPod MENU button, then use the TUNE/SCROLL dial to scroll through the
menu (Playlists, Artists, Albums, Songs, Podcasts, Genres, composers and Audiobooks)
and press ENTER to make a selection. The display will return to the previous menu or list
screen each time the iPod MENU button is pressed.
if the system is turned off while the iPod® is playing, the iPod® will start when the ON/OFF
or iPod MENU button is pressed. depending on the iPod® or software version, some
functions may not work as described.
*XM
® Satellite Radio is only available on vehicles equipped with optional XM® Satellite
subscription service.