2010 NISSAN CUBE tire size
[x] Cancel search: tire sizePage 38 of 329
Black plate (36,1)
Model "Z12-D" EDITED: 2009/ 9/ 17
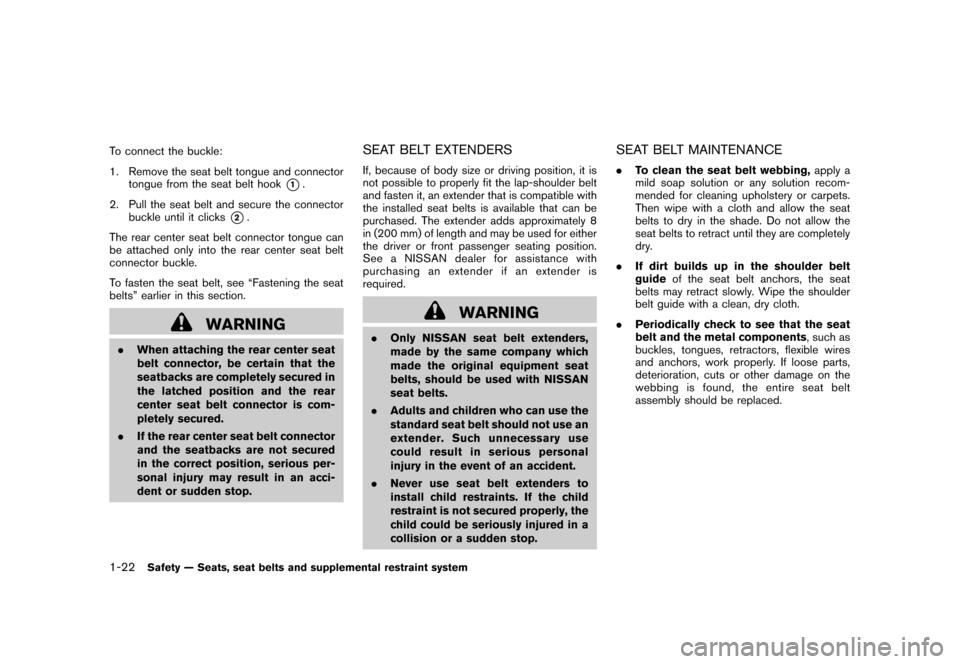
To connect the buckle:
1. Remove the seat belt tongue and connectortongue from the seat belt hook
*1.
2. Pull the seat belt and secure the connector buckle until it clicks
*2.
The rear center seat belt connector tongue can
be attached only into the rear center seat belt
connector buckle.
To fasten the seat belt, see “Fastening the seat
belts” earlier in this section.
WARNING
. When attaching the rear center seat
belt connector, be certain that the
seatbacks are completely secured in
the latched position and the rear
center seat belt connector is com-
pletely secured.
. If the rear center seat belt connector
and the seatbacks are not secured
in the correct position, serious per-
sonal injury may result in an acci-
dent or sudden stop.
SEAT BELT EXTENDERSIf, because of body size or driving position, it is
not possible to properly fit the lap-shoulder belt
and fasten it, an extender that is compatible with
the installed seat belts is available that can be
purchased. The extender adds approximately 8
in (200 mm) of length and may be used for either
the driver or front passenger seating position.
See a NISSAN dealer for assistance with
purchasing an extender if an extender is
required.
WARNING
.Only NISSAN seat belt extenders,
made by the same company which
made the original equipment seat
belts, should be used with NISSAN
seat belts.
. Adults and children who can use the
standard seat belt should not use an
extender. Such unnecessary use
could result in serious personal
injury in the event of an accident.
. Never use seat belt extenders to
install child restraints. If the child
restraint is not secured properly, the
child could be seriously injured in a
collision or a sudden stop.
SEAT BELT MAINTENANCE.To clean the seat belt webbing, apply a
mild soap solution or any solution recom-
mended for cleaning upholstery or carpets.
Then wipe with a cloth and allow the seat
belts to dry in the shade. Do not allow the
seat belts to retract until they are completely
dry.
. If dirt builds up in the shoulder belt
guide of the seat belt anchors, the seat
belts may retract slowly. Wipe the shoulder
belt guide with a clean, dry cloth.
. Periodically check to see that the seat
belt and the metal components , such as
buckles, tongues, retractors, flexible wires
and anchors, work properly. If loose parts,
deterioration, cuts or other damage on the
webbing is found, the entire seat belt
assembly should be replaced.
1-22
Safety — Seats, seat belts and supplemental restraint system
Page 88 of 329
Black plate (88,1)
Model "Z12-D" EDITED: 2009/ 9/ 17
CAUTION
.The TPMS is not a substitute for the
regular tire pressure check. Be sure
to check the tire pressure regularly.
. If the vehicle is being driven at
speeds of less than 16 MPH (25
km/h) , the TPMS may not operate
correctly.
. Be sure to install the specified size
of tires to the four wheels correctly.
Low washer fluid warning light
(Canada only)
This light illuminates when the washer fluid is at
a low level. Add washer fluid as necessary. (See
“WINDOW WASHER FLUID” in the “8. Main-
tenance and do-it-yourself” section.)
P position selecting warning light
(if so equipped)
The warning light blinks in red when the ignition
switch is pushed to stop the engine with the
selector lever in any position except the P (Park)
position.
If this warning appears, move the selector lever to the P (Park) position or push the ignition
switch to the ON position.
An inside warning chime will also sound.
See “INTELLIGENT KEY SYSTEM” in the “3.
Pre-driving checks and adjustments” section.
Seat belt warning light
The light and chime remind you to fasten seat
belts. The light illuminates whenever the ignition
switch is placed in the ON position, and will
remain illuminated until the driver’s seat belt is
fastened. At the same time, the chime will sound
for about 6 seconds unless the driver’s seat belt
is securely fastened.
The seat belt warning light for the front
passenger will illuminate if the seat belt is not
fastened when the front passenger’s seat is
occupied. For 5 seconds after the ignition
switch is in the ON position, the system does
not activate the warning light for the front
passenger.
See “SEAT BELTS” in the “1. Safety — Seats,
seat belts and supplemental restraint system”
section for precautions on seat belt usage.
Supplemental air bag warning light
After turning the ignition switch to the ON
position, the supplemental air bag warning light
will illuminate. The supplemental air bag warning
light will turn off after about 7 seconds if the
supplemental front air bag and supplemental
side air bag, curtain side-impact air bag systems
and/or pretensioner seat belt are operational.
If any of the following conditions occur, the front
air bag, side air bag, curtain air bag and
pretensioner systems need servicing and your
vehicle must be taken to your nearest NISSAN
dealer.
.
The supplemental air bag warning light
remains on after approximately 7 seconds.
. The supplemental air bag warning light
flashes intermittently.
. The supplemental air bag warning light does
not illuminate at all.
Unless checked and repaired, the Supplemental
Restraint Systems and/or the pretensioners may
not function properly.
For additional information, see “SUPPLEMEN-
TAL RESTRAINT SYSTEM” in the “1. Safety —
Seats, seat belts and supplemental restraint
system” section.
2-14
Instruments and controls
Page 203 of 329
Black plate (207,1)
Model "Z12-D" EDITED: 2009/ 9/ 17
WARNING
.The exhaust gas and the exhaust
system are very hot. Keep people,
animals or flammable materials
away from the exhaust system com-
ponents.
. Do not stop or park the vehicle over
flammable materials such as dry
grass, waste paper or rags. They
may ignite and cause a fire.
CAUTION
.Do not use leaded gasoline. Depos-
its from leaded gasoline will ser-
iously reduce the three-way
catalyst’s ability to help reduce ex-
haust pollutants.
. Keep your engine tuned up. Mal-
functions in the ignition, fuel injec-
tion, or electrical systems can cause
overrich fuel flow into the three-way
catalyst, causing it to overheat. Do
not keep driving if the engine mis-
fires, or if noticeable loss of perfor-
mance or other unusual operating
conditions are detected. Have the vehicle inspected promptly by a
NISSAN dealer.
. Avoid driving with an extremely low
fuel level. Running out of fuel could
cause the engine to misfire, dama-
ging the three-way catalyst.
. Do not race the engine while warm-
ing it up.
. Do not push or tow your vehicle to
start the engine.
TIRE PRESSURE MONITORING SYS-
TEM (TPMS)Each tire, including the spare (if provided) ,
should be checked monthly when cold and
inflated to the inflation pressure recommended
by the vehicle manufacturer on the vehicle
placard or tire inflation pressure label. (If your
vehicle has tires of a different size than the size
indicated on the vehicle placard or tire inflation
pressure label, you should determine the proper
tire inflation pressure for those tires.)
As an added safety feature, your vehicle has
been equipped with a Tire Pressure Monitoring
System (TPMS) that illuminates a low tire
pressure telltale when one or more of your tires
is significantly under-inflated. Accordingly, when
the low tire pressure telltale illuminates, you
should stop and check your tires as soon as possible, and inflate them to the proper pres-
sure. Driving on a significantly under-inflated tire
causes the tire to overheat and can lead to tire
failure. Under-inflation also reduces fuel effi-
ciency and tire tread life, and may affect the
vehicle’s handling and stopping ability.
Please note that the TPMS is not a substitute for
proper tire maintenance, and it is the driver’s
responsibility to maintain correct tire pressure,
even if under-inflation has not reached the level
to trigger illumination of the TPMS low tire
pressure telltale.
Your vehicle has also been equipped with a
TPMS malfunction indicator to indicate when the
system is not operating properly. The TPMS
malfunction indicator is combined with the low
tire pressure telltale. When the system detects a
malfunction, the telltale will flash for approxi-
mately one minute and then remain continuously
illuminated. This sequence will continue upon
subsequent vehicle start-ups as long as the
malfunction exists. When the malfunction indi-
cator is illuminated, the system may not be able
to detect or signal low tire pressure as intended.
TPMS malfunctions may occur for a variety of
reasons, including the installation of replace-
ment or alternate tires or wheels on the vehicle
that prevent the TPMS from functioning properly.
Always check the TPMS malfunction telltale
after replacing one or more tires or wheels on
your vehicle to ensure that the replacement or
Starting and driving
5-3
Page 226 of 329
Black plate (230,1)
Model "Z12-D" EDITED: 2009/ 9/ 17
BRAKING PRECAUTIONSThe brake system has two separate hydraulic
circuits. If one circuit malfunctions, you will still
have braking at two wheels.
You may feel a small click and hear a sound
when the brake pedal is fully depressed slowly.
This is not a malfunction and indicates that the
brake assist mechanism is operating properly.Vacuum assisted brakesThe brake booster aids braking by using engine
vacuum. If the engine stops, you can stop the
vehicle by depressing the brake pedal. However,
greater foot pressure on the brake pedal will be
required to stop the vehicle and the stopping
distance will be longer.Using the brakesAvoid resting your foot on the brake pedal while
driving. This will cause overheating of the
brakes, wearing out the brake pads and shoes
faster and reduce gas mileage.
To help reduce brake wear and to prevent the
brakes from overheating, reduce speed and
downshift to a lower gear before going down a
slope or long grade. Overheated brakes may
reduce braking performance and could result in
loss of vehicle control.
WARNING
.While driving on a slippery surface,
be careful when braking, accelerat-
ing or downshifting. Abrupt braking
or accelerating could cause the
wheelstoskidandresultinan
accident.
. If the engine is not running or is
turned off while driving, the power
assist for the brakes will not work.
Braking will be harder.Wet brakesWhen the vehicle is washed or driven through
water, the brakes may get wet. As a result, your
braking distance will be longer and the vehicle
may pull to one side during braking.
To dry brakes, drive the vehicle at a safe speed
while lightly tapping the brake pedal to heat-up
the brakes. Do this until the brakes return to
normal. Avoid driving the vehicle at high speeds
until the brakes function correctly.
ANTI-LOCK BRAKING SYSTEM (ABS)
WARNING
.The Anti-lock Braking System (ABS)
is a sophisticated device, but it
cannot prevent accidents resulting
from careless or dangerous driving
techniques. It can help maintain
vehicle control during braking on
slippery surfaces. Remember that
stopping distances on slippery sur-
faces will be longer than on normal
surfaces even with ABS. Stopping
distances may also be longer on
rough, gravel or snow covered
roads, or if you are using tire chains.
Alwaysmaintainasafedistance
from the vehicle in front of you.
Ultimately, the driver is responsible
for safety.
. Tire type and condition may also
affect braking effectiveness.
— When replacing tires, install the
specified size of tires on all four
wheels.
— When installing a spare tire, make sure that it is the proper
size and type as specified on the
BRAKE SYSTEM5-26
Starting and driving
Page 230 of 329
Black plate (234,1)
Model "Z12-D" EDITED: 2009/ 9/ 17
TIRE EQUIPMENTSUMMER tires have a tread designed to provide
superior performance on dry pavement. How-
ever, the performance of these tires will be
substantially reduced in snowy and icy condi-
tions. If you operate your vehicle on snowy or icy
roads, NISSAN recommends the use of MUD &
SNOW or ALL SEASON tires on all four wheels.
Consult a NISSAN dealer for the tire type, size,
speed rating and availability information.
For additional traction on icy roads, studded
tires may be used. However, some U.S. states
and Canadian provinces prohibit their use.
Check local, state and provincial laws before
installing studded tires.
Skid and traction capabilities of studded
snow tires, on wet or dry surfaces, may be
poorer than that of non-studded snow
tires.
Tire chains may be used. For details, see “TIRE
CHAINS” in the “8. Maintenance and do-it-
yourself” section of this manual.
SPECIAL WINTER EQUIPMENTIt is recommended that the following items be
carried in the vehicle during winter:
.A scraper and stiff-bristled brush to remove
ice and snow from the windows and wiper
blades.
. A sturdy, flat board to be placed under the
jack to give it firm support.
. A shovel to dig the vehicle out of snow-
drifts.
. Extra window washer fluid to refill the
reservoir tank.DRIVING ON SNOW OR ICE
WARNING
.Wet ice (32 8F, 0 8C and freezing rain) ,
very cold snow or ice can be slick
and very hard to drive on. The
vehicle will have much less traction
or “grip” under these conditions. Try
to avoid driving on wet ice until the
road is salted or sanded.
. Whatever the condition, drive with
caution. Accelerate and slow down
with care. If accelerating or down-
shifting too fast, the drive wheels will lose even more traction.
. Allow more stopping distance under
these conditions. Braking should be
started sooner than on dry pave-
ment.
. Allow greater following distances
on slippery roads.
. Watch for slippery spots (glare ice) .
These may appear on an otherwise
clear road in shaded areas. If a
patch of ice is seen ahead, brake
before reaching it. Try not to brake
while on the ice, and avoid any
sudden steering maneuvers.
. Do not use cruise control on slip-
pery roads.
. Snow can trap dangerous exhaust
gases under your vehicle. Keep
snow clear of the exhaust pipe and
from around your vehicle.
ENGINE BLOCK HEATER (if so
equipped)Engine block heaters are used to assist in cold
temperature starting.
The engine block heater should be used when
the outside temperature is 20 8F( �7 8C) or lower.
5-30
Starting and driving
Page 240 of 329
Black plate (244,1)
Model "Z12-D" EDITED: 2009/ 9/ 17
SCE0828
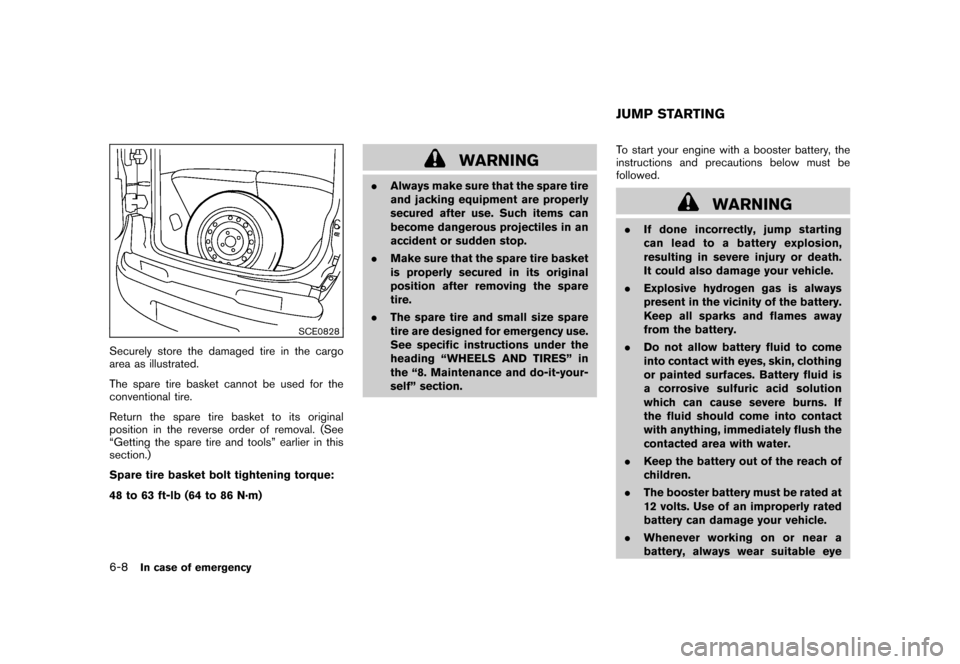
Securely store the damaged tire in the cargo
area as illustrated.
The spare tire basket cannot be used for the
conventional tire.
Return the spare tire basket to its original
position in the reverse order of removal. (See
“Getting the spare tire and tools” earlier in this
section.)
Spare tire basket bolt tightening torque:
48 to 63 ft-lb (64 to 86 N·m)
WARNING
.Always make sure that the spare tire
and jacking equipment are properly
secured after use. Such items can
become dangerous projectiles in an
accident or sudden stop.
. Make sure that the spare tire basket
is properly secured in its original
position after removing the spare
tire.
. The spare tire and small size spare
tire are designed for emergency use.
See specific instructions under the
heading “WHEELS AND TIRES” in
the “8. Maintenance and do-it-your-
self” section. To start your engine with a booster battery, the
instructions and precautions below must be
followed.
WARNING
.
If done incorrectly, jump starting
can lead to a battery explosion,
resulting in severe injury or death.
It could also damage your vehicle.
. Explosive hydrogen gas is always
present in the vicinity of the battery.
Keep all sparks and flames away
from the battery.
. Do not allow battery fluid to come
into contact with eyes, skin, clothing
or painted surfaces. Battery fluid is
a corrosive sulfuric acid solution
which can cause severe burns. If
the fluid should come into contact
with anything, immediately flush the
contacted area with water.
. Keep the battery out of the reach of
children.
. The booster battery must be rated at
12 volts. Use of an improperly rated
battery can damage your vehicle.
. Whenever working on or near a
battery, always wear suitable eyeJUMP STARTING
6-8
In case of emergency
Page 288 of 329
Black plate (292,1)
Model "Z12-D" EDITED: 2009/ 9/ 17
SDI2503
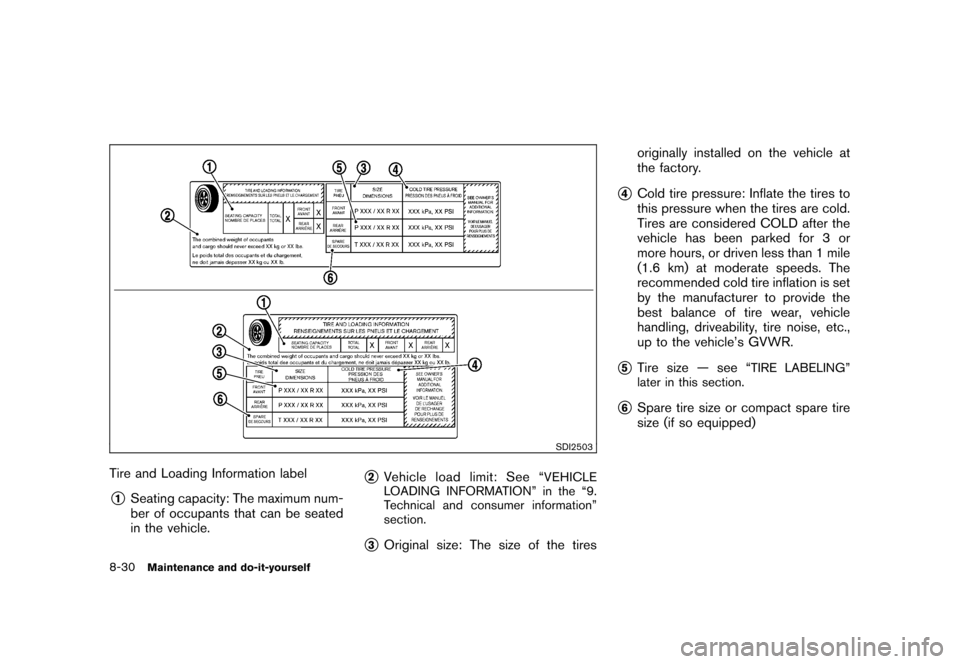
Tire and Loading Information label*1
Seating capacity: The maximum num-
ber of occupants that can be seated
in the vehicle.
*2
Vehicle load limit: See “
VEHICLE
LOADING INFORMATION” in the “9.
Technical and consumer information”
section.
*3
Original size: The size of the tires originally installed on the vehicle at
the factory.
*4
Cold tire pressure: Inflate the tires to
this pressure when the tires are cold.
Tires are considered COLD after the
vehicle has been parked for 3 or
more hours, or driven less than 1 mile
(1.6 km) at moderate speeds. The
recommended cold tire inflation is set
by the manufacturer to provide the
best balance of tire wear, vehicle
handling, driveability, tire noise, etc.,
up to the vehicle’s GVWR.
*5
Tire size — see “
TIRE LABELING”
later in this section.
*6
Spare tire size or compact spare tire
size (if so equipped)
8-30
Maintenance and do-it-yourself
Page 289 of 329
Black plate (293,1)
Model "Z12-D" EDITED: 2009/ 9/ 17
SDI1949
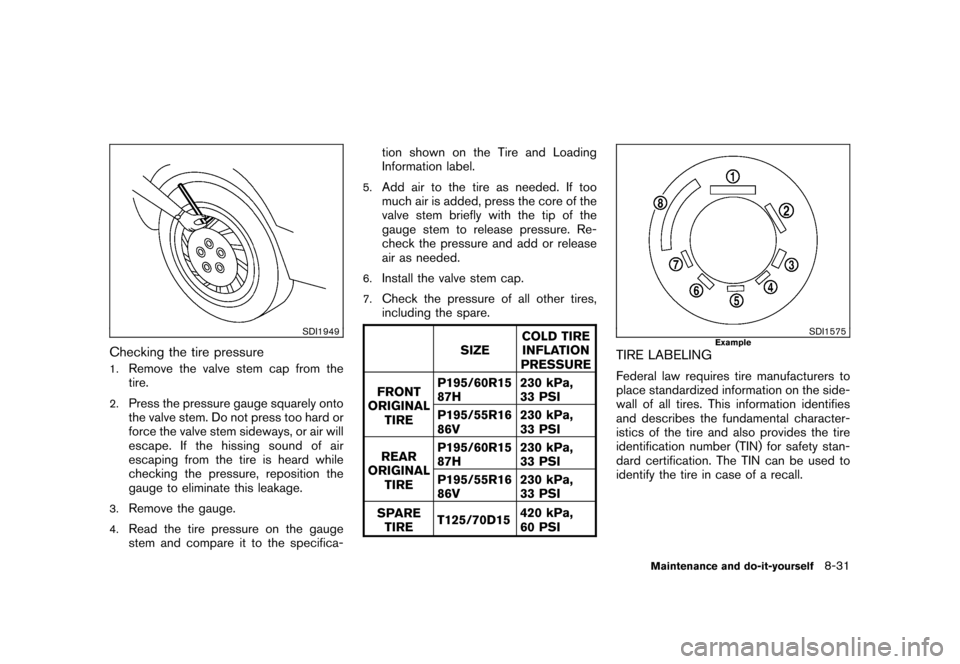
Checking the tire pressure1.
Remove the valve stem cap from the
tire.
2.
Press the pressure gauge squarely onto
the valve stem. Do not press too hard or
force the valve stem sideways, or air will
escape. If the hissing sound of air
escaping from the tire is heard while
checking the pressure, reposition the
gauge to eliminate this leakage.
3.
Remove the gauge.
4.
Read the tire pressure on the gauge
stem and compare it to the specifica-tion shown on the Tire and Loading
Information label.
5.
Add air to the tire as needed. If too
much air is added, press the core of the
valve stem briefly with the tip of the
gauge stem to release pressure. Re-
check the pressure and add or release
air as needed.
6.
Install the valve stem cap.
7.
Check the pressure of all other tires,
including the spare.
SIZECOLD TIRE
INFLATION
PRESSURE
FRONT
ORIGINAL
TIRE P195/60R15
87H
230 kPa,
33 PSI
P195/55R16
86V 230 kPa,
33 PSI
REAR
ORIGINAL TIRE P195/60R15
87H
230 kPa,
33 PSI
P195/55R16
86V 230 kPa,
33 PSI
SPARE TIRE T125/70D15 420 kPa,
60 PSI
SDI1575
Example
TIRE LABELINGFederal law requires tire manufacturers to
place standardized information on the side-
wall of all tires. This information identifies
and describes the fundamental character-
istics of the tire and also provides the tire
identification number (TIN) for safety stan-
dard certification. The TIN can be used to
identify the tire in case of a recall.
Maintenance and do-it-yourself
8-31