2010 NISSAN CUBE heater
[x] Cancel search: heaterPage 6 of 329
Black plate (1,1)
Table of
Contents
Model "Z12-D" Edited: 2009/ 9/ 17
Illustrated table of contents
0
Safety — Seats, seat belts and supplemental
restraint system
1
Instruments and controls
2
Pre-driving checks and adjustments
3
Heater, air conditioner, audio and phone systems
4
Starting and driving
5
In case of emergency
6
Appearance and care
7
Maintenance and do-it-yourself
8
Technical and consumer information
9
Index
10
Page 14 of 329
Black plate (10,1)
Model "Z12-D" EDITED: 2009/ 9/ 17
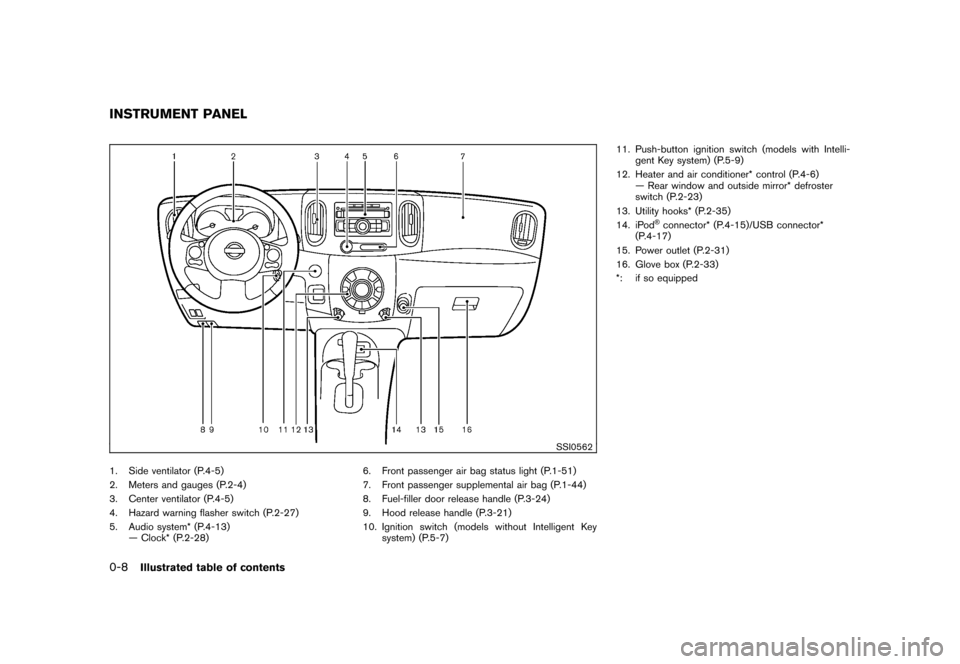
SSI0562
1. Side ventilator (P.4-5)
2. Meters and gauges (P.2-4)
3. Center ventilator (P.4-5)
4. Hazard warning flasher switch (P.2-27)
5. Audio system* (P.4-13)— Clock* (P.2-28) 6. Front passenger air bag status light (P.1-51)
7. Front passenger supplemental air bag (P.1-44)
8. Fuel-filler door release handle (P.3-24)
9. Hood release handle (P.3-21)
10. Ignition switch (models without Intelligent Key
system) (P.5-7) 11. Push-button ignition switch (models with Intelli-
gent Key system) (P.5-9)
12. Heater and air conditioner* control (P.4-6) — Rear window and outside mirror* defroster
switch (P.2-23)
13. Utility hooks* (P.2-35)
14. iPod
®connector* (P.4-15)/USB connector*
(P.4-17)
15. Power outlet (P.2-31)
16. Glove box (P.2-33)
*: if so equipped
INSTRUMENT PANEL0-8
Illustrated table of contents
Page 77 of 329
Black plate (77,1)
Model "Z12-D" EDITED: 2009/ 9/ 17
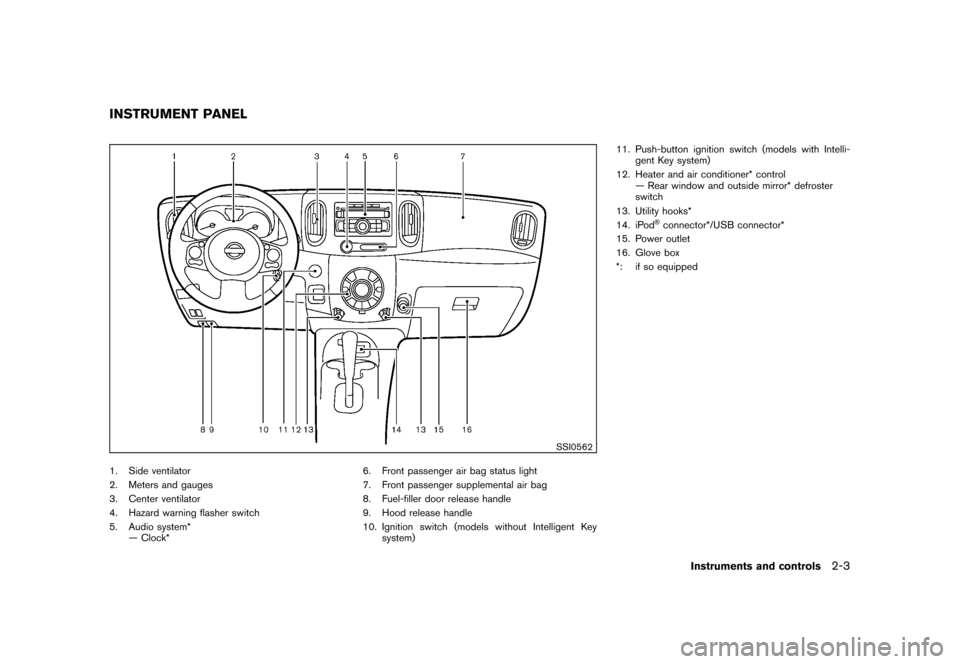
SSI0562
1. Side ventilator
2. Meters and gauges
3. Center ventilator
4. Hazard warning flasher switch
5. Audio system*— Clock* 6. Front passenger air bag status light
7. Front passenger supplemental air bag
8. Fuel-filler door release handle
9. Hood release handle
10. Ignition switch (models without Intelligent Key
system) 11. Push-button ignition switch (models with Intelli-
gent Key system)
12. Heater and air conditioner* control — Rear window and outside mirror* defroster
switch
13. Utility hooks*
14. iPod
®connector*/USB connector*
15. Power outlet
16. Glove box
*: if so equipped
INSTRUMENT PANEL
Instruments and controls
2-3
Page 143 of 329
Black plate (13,1)
4 Heater, air conditioner, audio and phonesystems
Model "Z12-D" EDITED: 2009/ 9/ 17
Safety note ....................................................... 4-2
RearView monitor (if so equipped) ......................... 4-2
How to read the displayed lines ......................... 4-3
How to adjust the screen ................................. 4-4
Operating tips ............................................... 4-4
Ventilators ........................................................ 4-5
Center ventilators ........................................... 4-5
Side ventilators .............................................. 4-5
Heater and air conditioner .................................... 4-6
Manual air conditioner (if so equipped) ................ 4-6
Automatic air conditioner (if so equipped) .......... 4-10
Operating tips ............................................. 4-12
In-cabin microfilter ........................................ 4-12
Servicing air conditioner ................................ 4-12
Audio system .................................................. 4-13
Audio operation precautions ........................... 4-13
FM-AM radio with Compact Disc (CD) player
(Type A)..................................................... 4-25 FM-AM radio with Compact Disc (CD) player
(Type B)..................................................... 4-29
FM-AM-SAT radio with Compact Disc (CD)
player
........................................................ 4-35
CD care and cleaning ................................... 4-41
Steering wheel switch for audio control
(if so equipped) ........................................... 4-41
Antenna ..................................................... 4-42
Car phone or CB radio ...................................... 4-44
Bluetooth
®Hands-Free Phone System
(if so equipped) ............................................... 4-44
Regulatory information ................................... 4-46
Using the system ......................................... 4-46
Control buttons ........................................... 4-48
Getting started ............................................ 4-49
List of voice commands ................................. 4-50
Speaker Adaptation (SA) mode ....................... 4-54
Troubleshooting guide ................................... 4-56
Page 144 of 329
Black plate (148,1)
Model "Z12-D" EDITED: 2009/ 9/ 17
WARNING
.Do not disassemble or modify this
system. If you do, it may result in
accidents, fire, or electric shock.
. Do not use this system if you notice
any abnormality, such as a frozen
screen or lack of sound. Continued
use of the system may result in
accident, fire or electric shock.
. In case you notice any foreign
object in the system hardware, spill
liquid on it, or notice smoke or smell
coming from it, stop using the
system immediately and contact
your nearest NISSAN dealer. Ignor-
ing such conditions may lead to
accidents, fire, or electric shock.
Do not attempt to operate the system in
extreme temperature conditions [below
� 48F( �208 C) and above 158 8F(70 8C)].
Operating this system under these condi-
tions may result in system malfunctions. When the selector lever is shifted into the R
(Reverse) position, the monitor display shows
the view to the rear of the vehicle.
The system is designed as an aid to the driver in
detecting large stationary objects to help avoid
damaging the vehicle. The system will not detect
small objects below the bumper and may not
detect objects close to the bumper or on the
ground.
WARNING
.
The rear view camera is a conve-
nience but it is not a substitute for
proper backing up. Always turn and
check that it is safe to do so before
backing up. Always back up slowly.
. Objects viewed in the RearView
Monitor differ from actual distance
because a wide-angle lens is used.
Objects in the RearView Monitor
will appear visually opposite than
when viewed in the rear view and
outside mirrors.
. Make sure that the back door is
securely closed when backing up.
. Underneath the bumper and the
corner areas of the bumper cannot
be viewed on the RearView Monitor because of its monitoring range
limitation.
. Do not put anything on the rear view
camera.
. When washing the vehicle with
high-pressure water, be sure not to
spray it around the camera. Other-
wise, water may enter the camera
unit causing water condensation on
the lens, a malfunction, fire or an
electric shock.
. Do not strike the camera. It is a
precision instrument. Otherwise, it
may malfunction or cause damage
resulting in a fire or an electric
shock.
CAUTION
Do not scratch the camera lens when
cleaning dirt or snow from the lens.
SAFETY NOTE REARVIEW MONITOR (if so
equipped)4-2
Heater, air conditioner, audio and phone systems
Page 145 of 329
Black plate (149,1)
Model "Z12-D" EDITED: 2009/ 9/ 17
SAA2776
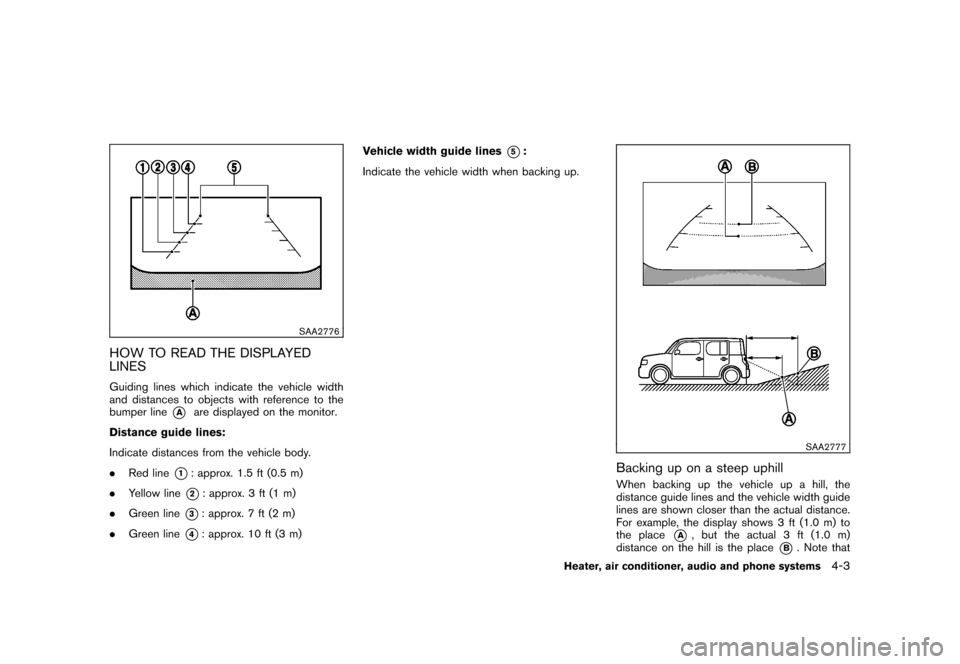
HOW TO READ THE DISPLAYED
LINESGuiding lines which indicate the vehicle width
and distances to objects with reference to the
bumper line
*A
are displayed on the monitor.
Distance guide lines:
Indicate distances from the vehicle body.
. Red line
*1: approx. 1.5 ft (0.5 m)
. Yellow line*2: approx. 3 ft (1 m)
. Green line
*3: approx. 7 ft (2 m)
. Green line
*4: approx. 10 ft (3 m) Vehicle width guide lines
*5:
Indicate the vehicle width when backing up.
SAA2777
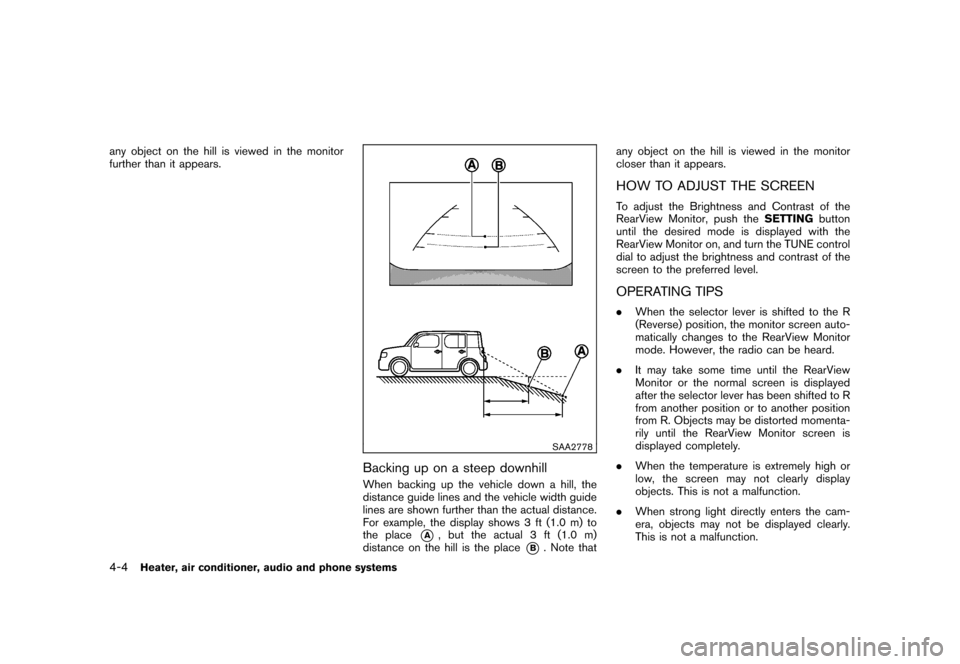
Backing up on a steep uphillWhen backing up the vehicle up a hill, the
distance guide lines and the vehicle width guide
lines are shown closer than the actual distance.
For example, the display shows 3 ft (1.0 m) to
the place
*A
, but the actual 3 ft (1.0 m)
distance on the hill is the place
*B. Note that
Heater, air conditioner, audio and phone systems
4-3
Page 146 of 329
Black plate (150,1)
Model "Z12-D" EDITED: 2009/ 9/ 17
any object on the hill is viewed in the monitor
further than it appears.
SAA2778
Backing up on a steep downhillWhen backing up the vehicle down a hill, the
distance guide lines and the vehicle width guide
lines are shown further than the actual distance.
For example, the display shows 3 ft (1.0 m) to
the place
*A
, but the actual 3 ft (1.0 m)
distance on the hill is the place
*B. Note that any object on the hill is viewed in the monitor
closer than it appears.
HOW TO ADJUST THE SCREENTo adjust the Brightness and Contrast of the
RearView Monitor, push the
SETTINGbutton
until the desired mode is displayed with the
RearView Monitor on, and turn the TUNE control
dial to adjust the brightness and contrast of the
screen to the preferred level.OPERATING TIPS. When the selector lever is shifted to the R
(Reverse) position, the monitor screen auto-
matically changes to the RearView Monitor
mode. However, the radio can be heard.
. It may take some time until the RearView
Monitor or the normal screen is displayed
after the selector lever has been shifted to R
from another position or to another position
from R. Objects may be distorted momenta-
rily until the RearView Monitor screen is
displayed completely.
. When the temperature is extremely high or
low, the screen may not clearly display
objects. This is not a malfunction.
. When strong light directly enters the cam-
era, objects may not be displayed clearly.
This is not a malfunction.
4-4
Heater, air conditioner, audio and phone systems
Page 147 of 329
Black plate (151,1)
Model "Z12-D" EDITED: 2009/ 9/ 17
.Vertical lines may be seen in objects on the
screen. This is due to strong reflected light
from the bumper. This is not a malfunction.
. The screen may flicker under fluorescent
light. This is not a malfunction.
. The colors of objects on the RearView
Monitor may differ somewhat from those of
the actual object.
. Objects on the monitor may not be clear in a
dark place or at night. This is not a
malfunction.
. If dirt, rain or snow attaches to the camera,
the RearView Monitor may not clearly dis-
play objects. Clean the camera.
. Do not use alcohol, benzine or thinner to
clean the camera. This will cause discolora-
tion. To clean the camera, wipe with a cloth
dampened with diluted mild cleaning agent
and then wipe with a dry cloth.
. Do not damage the camera as the monitor
screen may be adversely affected.
. Do not use wax on the camera window.
Wipe off any wax with a clean cloth
dampened with mild detergent diluted with
water.
SAA2343
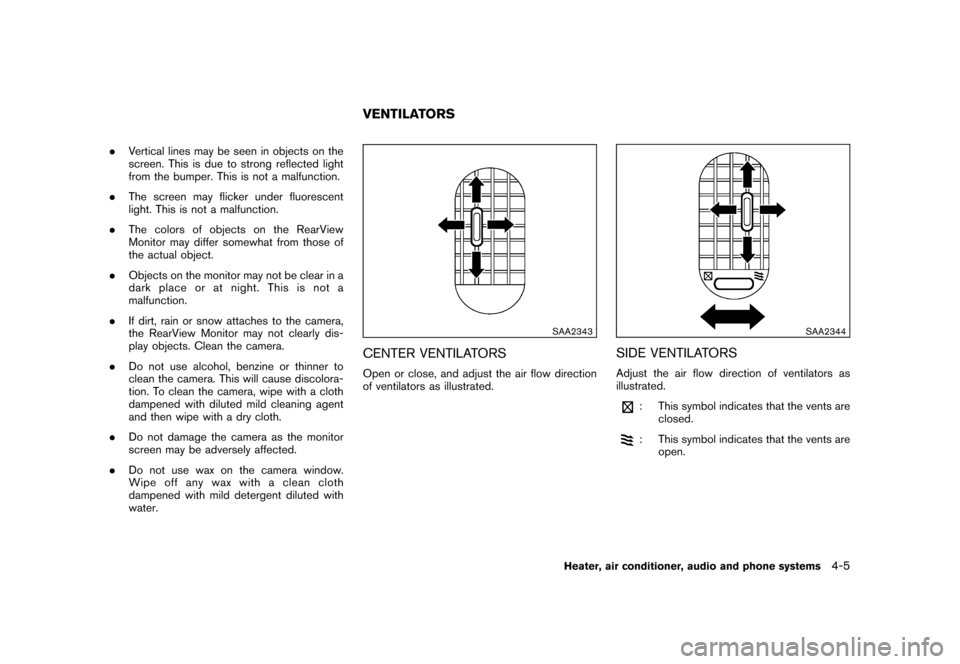
CENTER VENTILATORSOpen or close, and adjust the air flow direction
of ventilators as illustrated.
SAA2344
SIDE VENTILATORSAdjust the air flow direction of ventilators as
illustrated.
: This symbol indicates that the vents are
closed.: This symbol indicates that the vents areopen.
VENTILATORS
Heater, air conditioner, audio and phone systems
4-5