2010 NISSAN CUBE phone
[x] Cancel search: phonePage 150 of 329
Black plate (154,1)
Model "Z12-D" EDITED: 2009/ 9/ 17
.To remove frost from the outside surface of
the windshield quickly, turn the temperature
control dial to the maximum hot position and
the fan speed control
dial to maximum
(IIII) position.
. When the
position is selected, the air
conditioner will automatically turn on. This
will dehumidify the air and help to defog the
windows. The A/C indicator light will illumi-
nate when the air conditioner automatically
turns on. The air conditioner and A/C
indicator light will remain on in all flow
control modes until the A/C button is
pressed or the fan control dial is turned to
off.
Bi-level heating:
This mode directs cool air from the side and
center vents and warm air from the foot outlets.
When the temperature control dial is turned to
the maximum hot or cool position, the air
between the ventilators and the foot outlets is
the same temperature.
1. Push the air recirculation
button to
switch to the outside air circulation mode.
(The indicator light turns off.)
2. Turn the air flow control dial to the
position.
3. Turn the fan speed control
dial to the
desired position. 4. Turn the temperature control dial to the
desired position.
Heating and defogging:
This mode heats the interior and defogs the
windows.
1. Turn the air flow control dial to the
position.
2. Turn the fan speed control
dial to the
desired position.
3. Turn the temperature control dial to the desired position.
When the
position is selected, the air
conditioner will automatically turn on. This will
dehumidify the air and help to defog the
windows. The A/C indicator light will illuminate
when the air conditioner automatically turns on.
The air conditioner and A/C indicator light will
remain on in all flow control modes until the A/C
button is pressed or the fan control dial is turned
to off.
Air conditioner operationThe air conditioner system should be operated
for approximately 10 minutes at least once a
month. This helps prevent damage to the air
conditioner system due to the lack of lubrication. Cooling:
This mode is used to cool and dehumidify the air.
1. Push the air recirculation
button to
switch to the outside air circulation mode.
(The indicator light turns off.)
2. Turn the air flow control dial to the
position.
3. Turn the fan speed control
dial to the
desired position.
4. Push the A/C button on. (The A/C indicator light will illuminate.)
5. Turn the temperature control dial to the desired position between the middle and the
cool (left) position.
. For quick cooling when the outside tem-
perature is high, push the air recirculation
button to switch to the air recirculation
mode. (The indicator light turns on.) Be sure
to push the air recirculation button to the
OFF position for normal cooling.
. A visible mist may be seen coming from the
ventilators in hot, humid conditions as the air
is cooled rapidly. This does not indicate a
malfunction.
4-8
Heater, air conditioner, audio and phone systems
Page 151 of 329
Black plate (155,1)
Model "Z12-D" EDITED: 2009/ 9/ 17
Dehumidified heating:
This mode is used to heat and dehumidify the
air.
1. Push the air recirculation
button to
switch to the outside air circulation mode.
(The indicator light turns off.)
2. Turn the air flow control dial to the
position.
3. Turn the fan speed control
dial to the
desired position.
4. Push the A/C button on. (The A/C indicator light will illuminate.)
5. Turn the temperature control dial to the desired position between the middle and the
hot (right) position.
Dehumidified defogging:
This mode is used to defog the windows and
dehumidify the air.
1. Turn the air flow control dial to the
position.
2. Turn the fan speed control
dial to the
desired position.
3. Turn the temperature control dial to the desired position. When the
position is selected, the air
conditioner will automatically turn on. This will
dehumidify the air and help to defog the
windows. The A/C indicator light will illuminate
when the air conditioner automatically turns on.
The air conditioner and A/C indicator light will
remain on in all flow control modes until the A/C
button is pressed or the fan control dial is turned
to off.
Heater, air conditioner, audio and phone systems
4-9
Page 152 of 329
Black plate (156,1)
Model "Z12-D" EDITED: 2009/ 9/ 17
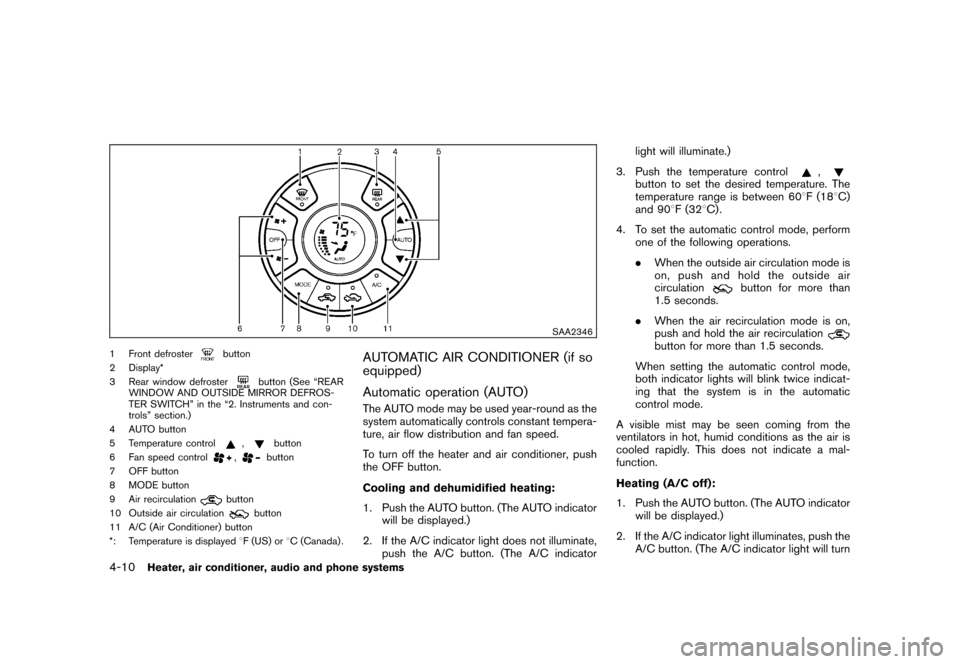
SAA2346
1 Front defroster
button
2 Display*
3 Rear window defroster
button (See “REAR
WINDOW AND OUTSIDE MIRROR DEFROS-
TER SWITCH” in the “2. Instruments and con-
trols” section.)
4 AUTO button
5 Temperature control
,
button
6 Fan speed control
,
button
7 OFF button
8 MODE button
9 Air recirculation
button
10 Outside air circulation
button
11 A/C (Air Conditioner) button
*: Temperature is displayed 8F (US) or 8C (Canada) .
AUTOMATIC AIR CONDITIONER (if so
equipped)
Automatic operation (AUTO)The AUTO mode may be used year-round as the
system automatically controls constant tempera-
ture, air flow distribution and fan speed.
To turn off the heater and air conditioner, push
the OFF button.
Cooling and dehumidified heating:
1. Push the AUTO button. (The AUTO indicator
will be displayed.)
2. If the A/C indicator light does not illuminate, push the A/C button. (The A/C indicator light will illuminate.)
3. Push the temperature control
,
button to set the desired temperature. The
temperature range is between 60 8F (18 8C)
and 90 8F (32 8C) .
4. To set the automatic control mode, perform one of the following operations.
.When the outside air circulation mode is
on, push and hold the outside air
circulation
button for more than
1.5 seconds.
. When the air recirculation mode is on,
push and hold the air recirculation
button for more than 1.5 seconds.
When setting the automatic control mode,
both indicator lights will blink twice indicat-
ing that the system is in the automatic
control mode.
A visible mist may be seen coming from the
ventilators in hot, humid conditions as the air is
cooled rapidly. This does not indicate a mal-
function.
Heating (A/C off):
1. Push the AUTO button. (The AUTO indicator will be displayed.)
2. If the A/C indicator light illuminates, push the A/C button. (The A/C indicator light will turn
4-10
Heater, air conditioner, audio and phone systems
Page 153 of 329
Black plate (157,1)
Model "Z12-D" EDITED: 2009/ 9/ 17
off.)
3. Push the temperature control
,
button to set the desired temperature. The
temperature range is between 60 8F (18 8C)
and 90 8F (32 8C) .
. Do not set the temperature lower than
the outside air temperature. Doing so
may cause the temperature to not be
controlled properly.
. If the windows fog up, use dehumidified
heating instead of the A/C off heating.
Dehumidified defrosting/defogging:
1. Push the front defroster
button. (The
indicator light will illuminate.)
2. Turn the temperature control
,
button to set the desired temperature.
. To remove moisture or fog on the front
window quickly, set the temperature to
the high temperature and the fan speed
to their maximum level.
. After the windshield is cleared, push the
front defroster
button again. (The
indicator light will turn off.)
. When the front defroster
button is
pushed, the air conditioner will auto-
matically turn on to defog the wind-
shield. The outside air circulation mode will be selected to improve the defog-
ging performance.
Manual operationThe manual mode can be used to control the
heater and air conditioner to your desired
settings.
To turn off the heater and air conditioner, push
the OFF button.
Fan speed control:
Turn the fan speed control
,
dial to
adjust the fan speed.
Air flow control:
Push the MODE button to change the air flow
mode.
— Air flows from the center and side ventilators.— Air flows from the center and sideventilators and foot outlets.— Air flows mainly from the foot outlets.— Air flows from the defroster outlets andfoot outlets.
Temperature control:
Push the temperature control
,
button
to set the desired temperature. The temperature range is between 608
F (188C)
and 90 8F (32 8C) .
Air recirculation:
Push the air recirculation
button to change
the air circulation mode. When the indicator light
illuminates, the flowing air is recirculated inside
the vehicle.
Outside air circulation:
Push the outside air circulation
button to
change the air circulation mode. When the
indicator light illuminates, the flowing air is
drawn from outside the vehicle.
Automatic air intake control:
To set the automatic control mode, perform one
of the following operations.
. When the outside air circulation mode is on,
push and hold the outside air circulation
button for more than 1.5 seconds.
. When the air recirculation mode is on, push
and hold the air recirculation
button for
more than 1.5 seconds.
When setting the automatic control mode, both
indicator lights will blink twice indicating that the
system is in the automatic control mode.
Heater, air conditioner, audio and phone systems
4-11
Page 154 of 329
Black plate (158,1)
Model "Z12-D" EDITED: 2009/ 9/ 17
SAA2368SAA2369
OPERATING TIPS.When the engine coolant temperature and
outside air temperature are low, the air flow
from the foot outlets may not operate for a
maximum of 150 seconds. This is not a
malfunction. After the coolant temperature
warms up, air will flow normally from the foot
outlets.
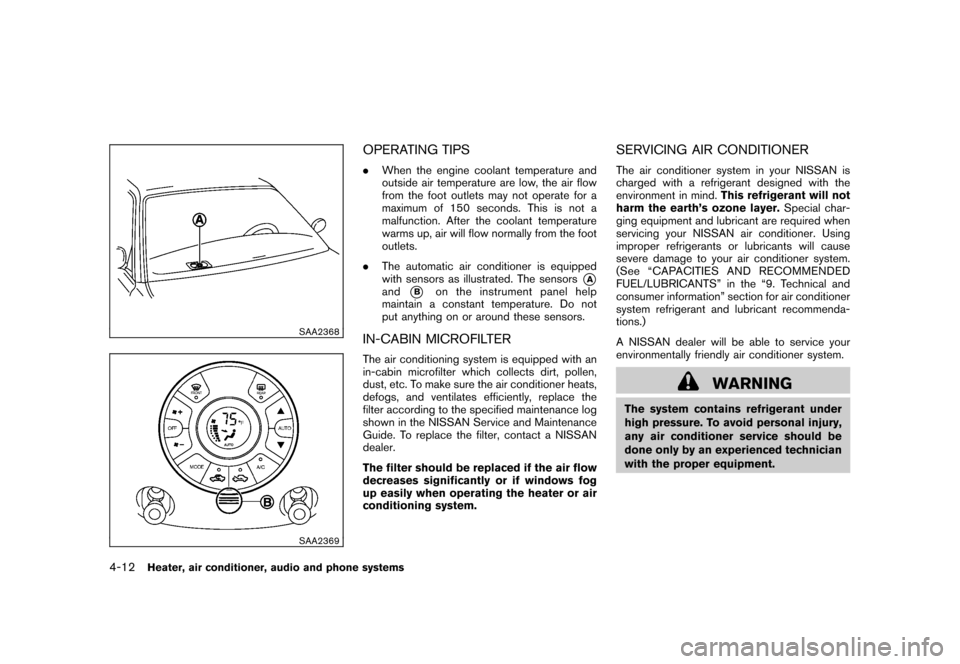
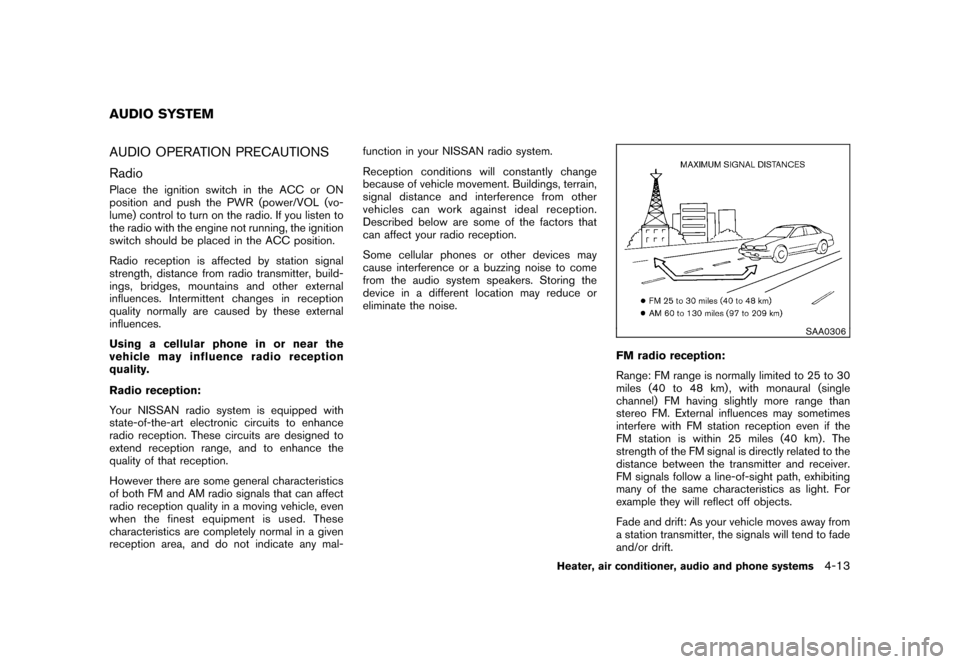
. The automatic air conditioner is equipped
with sensors as illustrated. The sensors
*A
and
*B
on the instrument panel help
maintain a constant temperature. Do not
put anything on or around these sensors.
IN-CABIN MICROFILTERThe air conditioning system is equipped with an
in-cabin microfilter which collects dirt, pollen,
dust, etc. To make sure the air conditioner heats,
defogs, and ventilates efficiently, replace the
filter according to the specified maintenance log
shown in the NISSAN Service and Maintenance
Guide. To replace the filter, contact a NISSAN
dealer.
The filter should be replaced if the air flow
decreases significantly or if windows fog
up easily when operating the heater or air
conditioning system.
SERVICING AIR CONDITIONERThe air conditioner system in your NISSAN is
charged with a refrigerant designed with the
environment in mind. This refrigerant will not
harm the earth’s ozone layer. Special char-
ging equipment and lubricant are required when
servicing your NISSAN air conditioner. Using
improper refrigerants or lubricants will cause
severe damage to your air conditioner system.
(See “CAPACITIES AND RECOMMENDED
FUEL/LUBRICANTS” in the “9. Technical and
consumer information” section for air conditioner
system refrigerant and lubricant recommenda-
tions.)
A NISSAN dealer will be able to service your
environmentally friendly air conditioner system.
WARNING
The system contains refrigerant under
high pressure. To avoid personal injury,
any air conditioner service should be
done only by an experienced technician
with the proper equipment.
4-12
Heater, air conditioner, audio and phone systems
Page 155 of 329
Black plate (159,1)
Model "Z12-D" EDITED: 2009/ 9/ 17
AUDIO OPERATION PRECAUTIONS
RadioPlace the ignition switch in the ACC or ON
position and push the PWR (power/VOL (vo-
lume) control to turn on the radio. If you listen to
the radio with the engine not running, the ignition
switch should be placed in the ACC position.
Radio reception is affected by station signal
strength, distance from radio transmitter, build-
ings, bridges, mountains and other external
influences. Intermittent changes in reception
quality normally are caused by these external
influences.
Using a cellular phone in or near the
vehicle may influence radio reception
quality.
Radio reception:
Your NISSAN radio system is equipped with
state-of-the-art electronic circuits to enhance
radio reception. These circuits are designed to
extend reception range, and to enhance the
quality of that reception.
However there are some general characteristics
of both FM and AM radio signals that can affect
radio reception quality in a moving vehicle, even
when the finest equipment is used. These
characteristics are completely normal in a given
reception area, and do not indicate any mal-function in your NISSAN radio system.
Reception conditions will constantly change
because of vehicle movement. Buildings, terrain,
signal distance and interference from other
vehicles can work against ideal reception.
Described below are some of the factors that
can affect your radio reception.
Some cellular phones or other devices may
cause interference or a buzzing noise to come
from the audio system speakers. Storing the
device in a different location may reduce or
eliminate the noise.
SAA0306
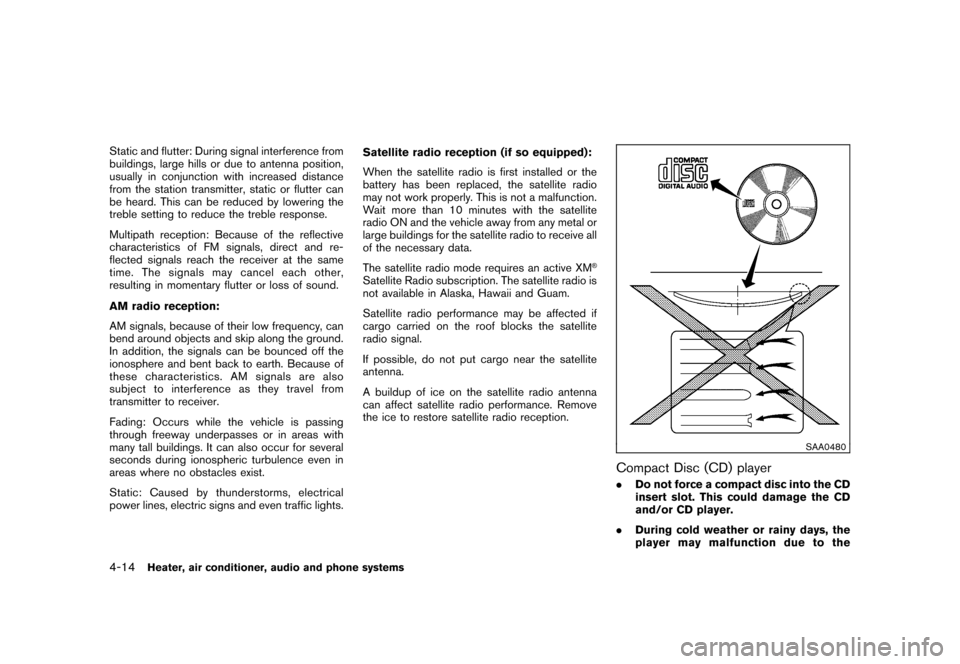
FM radio reception:
Range: FM range is normally limited to 25 to 30
miles (40 to 48 km) , with monaural (single
channel) FM having slightly more range than
stereo FM. External influences may sometimes
interfere with FM station reception even if the
FM station is within 25 miles (40 km). The
strength of the FM signal is directly related to the
distance between the transmitter and receiver.
FM signals follow a line-of-sight path, exhibiting
many of the same characteristics as light. For
example they will reflect off objects.
Fade and drift: As your vehicle moves away from
a station transmitter, the signals will tend to fade
and/or drift.
AUDIO SYSTEM
Heater, air conditioner, audio and phone systems
4-13
Page 156 of 329
Black plate (160,1)
Model "Z12-D" EDITED: 2009/ 9/ 17
Static and flutter: During signal interference from
buildings, large hills or due to antenna position,
usually in conjunction with increased distance
from the station transmitter, static or flutter can
be heard. This can be reduced by lowering the
treble setting to reduce the treble response.
Multipath reception: Because of the reflective
characteristics of FM signals, direct and re-
flected signals reach the receiver at the same
time. The signals may cancel each other,
resulting in momentary flutter or loss of sound.
AM radio reception:
AM signals, because of their low frequency, can
bend around objects and skip along the ground.
In addition, the signals can be bounced off the
ionosphere and bent back to earth. Because of
these characteristics. AM signals are also
subject to interference as they travel from
transmitter to receiver.
Fading: Occurs while the vehicle is passing
through freeway underpasses or in areas with
many tall buildings. It can also occur for several
seconds during ionospheric turbulence even in
areas where no obstacles exist.
Static: Caused by thunderstorms, electrical
power lines, electric signs and even traffic lights.Satellite radio reception (if so equipped):
When the satellite radio is first installed or the
battery has been replaced, the satellite radio
may not work properly. This is not a malfunction.
Wait more than 10 minutes with the satellite
radio ON and the vehicle away from any metal or
large buildings for the satellite radio to receive all
of the necessary data.
The satellite radio mode requires an active XM
®
Satellite Radio subscription. The satellite radio is
not available in Alaska, Hawaii and Guam.
Satellite radio performance may be affected if
cargo carried on the roof blocks the satellite
radio signal.
If possible, do not put cargo near the satellite
antenna.
A buildup of ice on the satellite radio antenna
can affect satellite radio performance. Remove
the ice to restore satellite radio reception.
SAA0480
Compact Disc (CD) player.
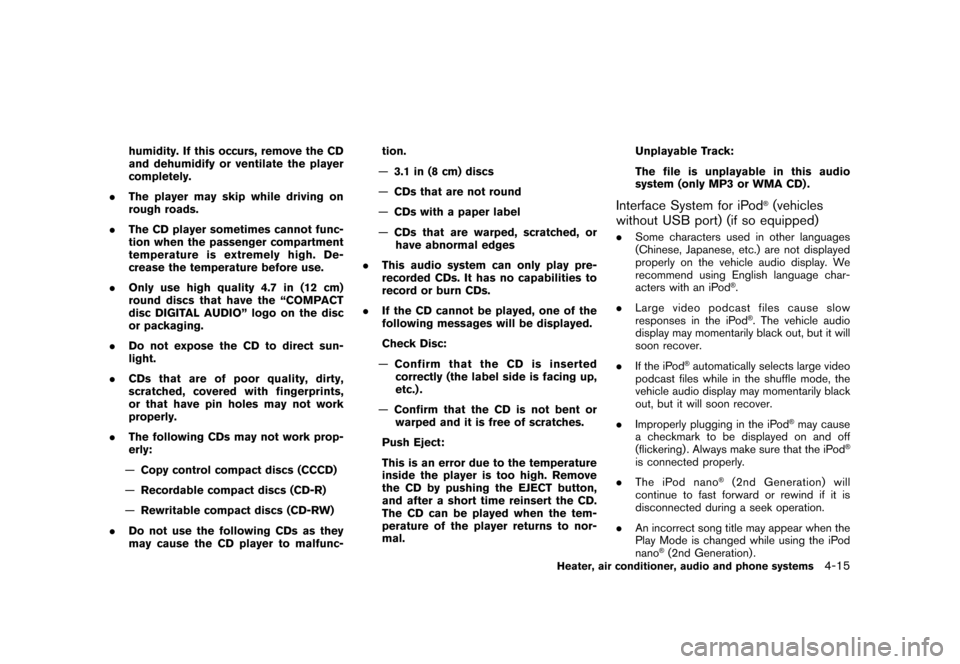
Do not force a compact disc into the CD
insert slot. This could damage the CD
and/or CD player.
. During cold weather or rainy days, the
player may malfunction due to the
4-14
Heater, air conditioner, audio and phone systems
Page 157 of 329
Black plate (161,1)
Model "Z12-D" EDITED: 2009/ 9/ 17
humidity. If this occurs, remove the CD
and dehumidify or ventilate the player
completely.
. The player may skip while driving on
rough roads.
. The CD player sometimes cannot func-
tion when the passenger compartment
temperature is extremely high. De-
crease the temperature before use.
. Only use high quality 4.7 in (12 cm)
round discs that have the “COMPACT
disc DIGITAL AUDIO” logo on the disc
or packaging.
. Do not expose the CD to direct sun-
light.
. CDs that are of poor quality, dirty,
scratched, covered with fingerprints,
or that have pin holes may not work
properly.
. The following CDs may not work prop-
erly:
— Copy control compact discs (CCCD)
— Recordable compact discs (CD-R)
— Rewritable compact discs (CD-RW)
. Do not use the following CDs as they
may cause the CD player to malfunc- tion.
— 3.1 in (8 cm) discs
— CDs that are not round
— CDs with a paper label
— CDs that are warped, scratched, or
have abnormal edges
. This audio system can only play pre-
recorded CDs. It has no capabilities to
record or burn CDs.
. If the CD cannot be played, one of the
following messages will be displayed.
Check Disc:
— Confirm that the CD is inserted
correctly (the label side is facing up,
etc.) .
— Confirm that the CD is not bent or
warped and it is free of scratches.
Push Eject:
This is an error due to the temperature
inside the player is too high. Remove
the CD by pushing the EJECT button,
and after a short time reinsert the CD.
The CD can be played when the tem-
perature of the player returns to nor-
mal. Unplayable Track:
The file is unplayable in this audio
system (only MP3 or WMA CD) .
Interface System for iPod
®(vehicles
without USB port) (if so equipped)
. Some characters used in other languages
(Chinese, Japanese, etc.) are not displayed
properly on the vehicle audio display. We
recommend using English language char-
acters with an iPod
®.
. Large video podcast files cause slow
responses in the iPod®. The vehicle audio
display may momentarily black out, but it will
soon recover.
. If the iPod
®automatically selects large video
podcast files while in the shuffle mode, the
vehicle audio display may momentarily black
out, but it will soon recover.
. Improperly plugging in the iPod
®may cause
a checkmark to be displayed on and off
(flickering) . Always make sure that the iPod
®
is connected properly.
. The iPod nano
®(2nd Generation) will
continue to fast forward or rewind if it is
disconnected during a seek operation.
. An incorrect song title may appear when the
Play Mode is changed while using the iPod
nano
®(2nd Generation) .
Heater, air conditioner, audio and phone systems
4-15