2010 NISSAN CUBE lock
[x] Cancel search: lockPage 53 of 329
Black plate (51,1)
Model "Z12-D" EDITED: 2009/ 9/ 17
SSS0100
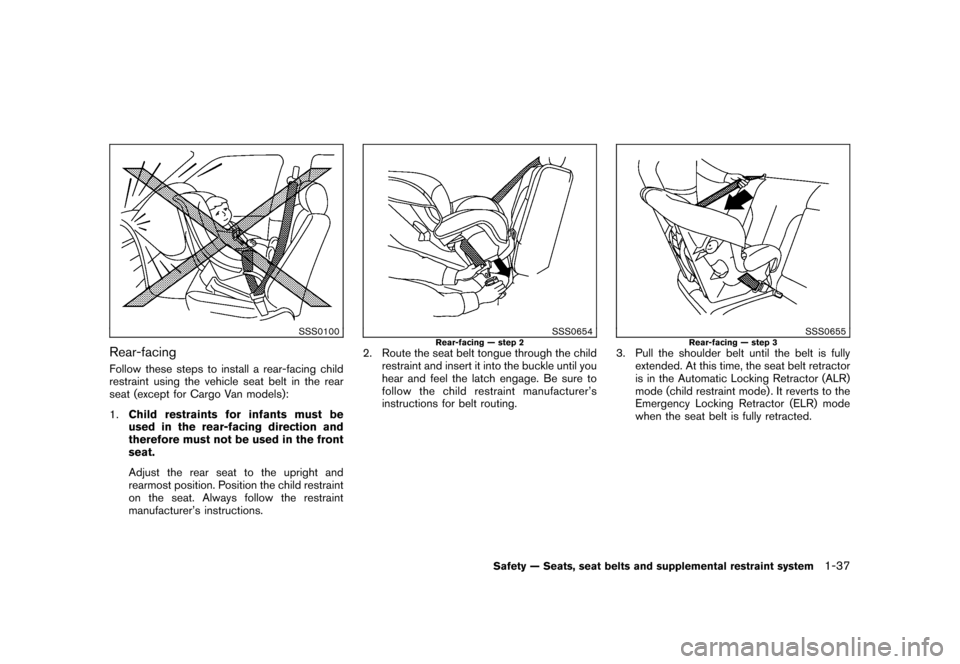
Rear-facingFollow these steps to install a rear-facing child
restraint using the vehicle seat belt in the rear
seat (except for Cargo Van models):
1.Child restraints for infants must be
used in the rear-facing direction and
therefore must not be used in the front
seat.
Adjust the rear seat to the upright and
rearmost position. Position the child restraint
on the seat. Always follow the restraint
manufacturer’s instructions.
SSS0654
Rear-facing — step 2
2. Route the seat belt tongue through the child
restraint and insert it into the buckle until you
hear and feel the latch engage. Be sure to
follow the child restraint manufacturer’s
instructions for belt routing.
SSS0655
Rear-facing — step 3
3. Pull the shoulder belt until the belt is fullyextended. At this time, the seat belt retractor
is in the Automatic Locking Retractor (ALR)
mode (child restraint mode) . It reverts to the
Emergency Locking Retractor (ELR) mode
when the seat belt is fully retracted.
Safety — Seats, seat belts and supplemental restraint system
1-37
Page 55 of 329
Black plate (53,1)
Model "Z12-D" EDITED: 2009/ 9/ 17
7. Check that the retractor is in the ALR modeby trying to pull more seat belt out of the
retractor. If you cannot pull any more seat
belt webbing out of the retractor, the
retractor is in the ALR mode.
8. Check to make sure that the child restraint is properly secured prior to each use. If the
seat belt is not locked, repeat steps 3
through 7.
After the child restraint is removed and the seat
belt fully retracted, the ALR mode (child restraint
mode) is canceled.
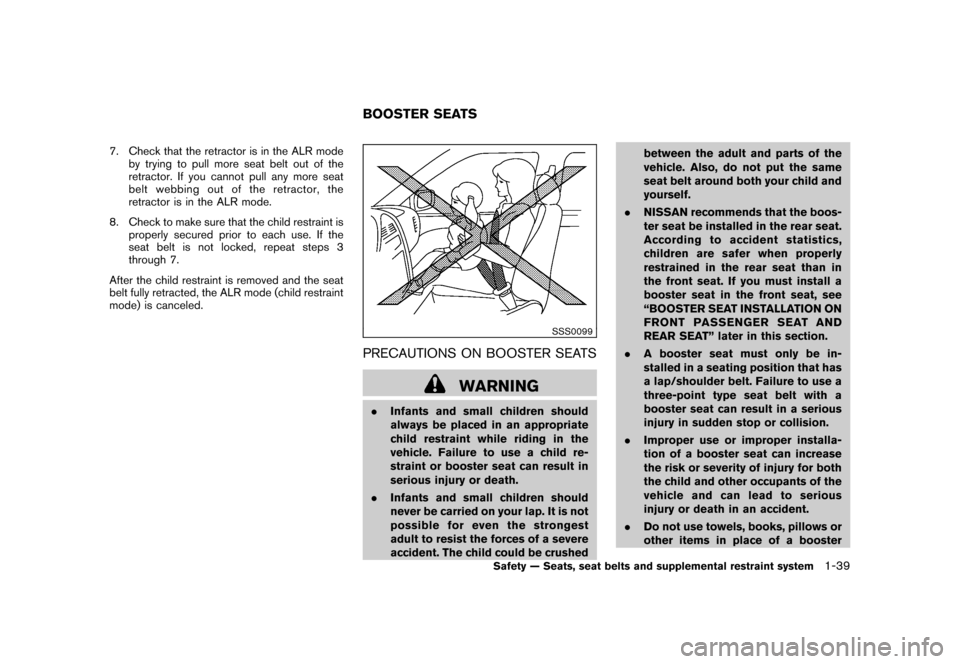
SSS0099
PRECAUTIONS ON BOOSTER SEATS
WARNING
. Infants and small children should
always be placed in an appropriate
child restraint while riding in the
vehicle. Failure to use a child re-
straint or booster seat can result in
serious injury or death.
. Infants and small children should
never be carried on your lap. It is not
possible for even the strongest
adult to resist the forces of a severe
accident. The child could be crushed between the adult and parts of the
vehicle. Also, do not put the same
seat belt around both your child and
yourself.
. NISSAN recommends that the boos-
ter seat be installed in the rear seat.
According to accident statistics,
children are safer when properly
restrained in the rear seat than in
the front seat. If you must install a
booster seat in the front seat, see
“BOOSTER SEAT INSTALLATION ON
FRONT PASSENGER SEAT AND
REAR SEAT” later in this section.
. A booster seat must only be in-
stalled in a seating position that has
a lap/shoulder belt. Failure to use a
three-point type seat belt with a
booster seat can result in a serious
injury in sudden stop or collision.
. Improper use or improper installa-
tion of a booster seat can increase
the risk or severity of injury for both
the child and other occupants of the
vehicle and can lead to serious
injury or death in an accident.
. Do not use towels, books, pillows or
other items in place of a boosterBOOSTER SEATS
Safety — Seats, seat belts and supplemental restraint system
1-39
Page 57 of 329
Black plate (55,1)
Model "Z12-D" EDITED: 2009/ 9/ 17
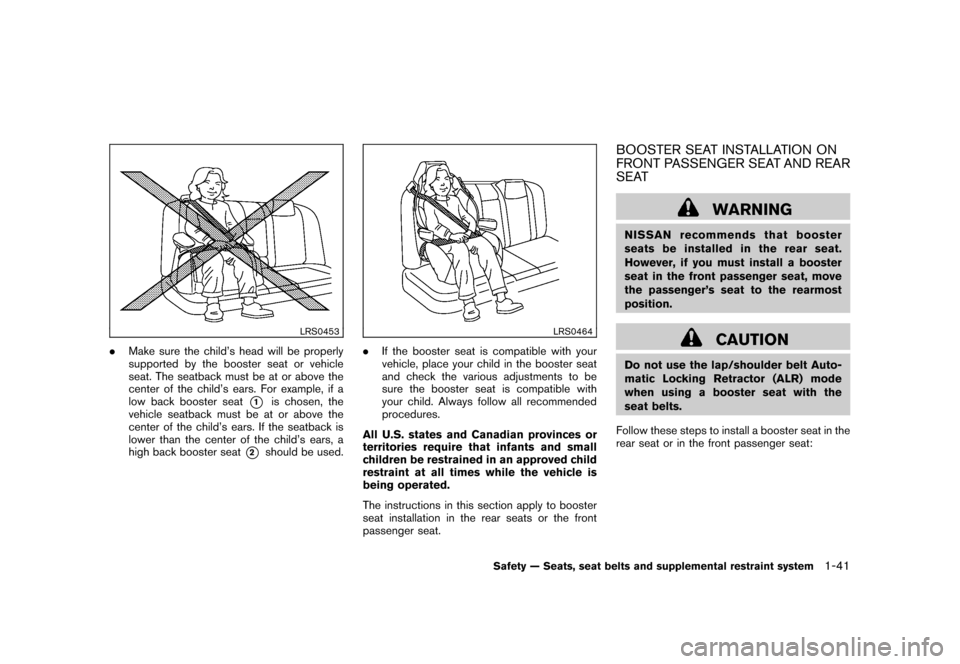
LRS0453
.Make sure the child’s head will be properly
supported by the booster seat or vehicle
seat. The seatback must be at or above the
center of the child’s ears. For example, if a
low back booster seat
*1
is chosen, the
vehicle seatback must be at or above the
center of the child’s ears. If the seatback is
lower than the center of the child’s ears, a
high back booster seat
*2
should be used.
LRS0464
. If the booster seat is compatible with your
vehicle, place your child in the booster seat
and check the various adjustments to be
sure the booster seat is compatible with
your child. Always follow all recommended
procedures.
All U.S. states and Canadian provinces or
territories require that infants and small
children be restrained in an approved child
restraint at all times while the vehicle is
being operated.
The instructions in this section apply to booster
seat installation in the rear seats or the front
passenger seat.
BOOSTER SEAT INSTALLATION ON
FRONT PASSENGER SEAT AND REAR
SEAT
WARNING
NISSAN recommends that booster
seats be installed in the rear seat.
However, if you must install a booster
seat in the front passenger seat, move
the passenger’s seat to the rearmost
position.
CAUTION
Do not use the lap/shoulder belt Auto-
matic Locking Retractor (ALR) mode
when using a booster seat with the
seat belts.
Follow these steps to install a booster seat in the
rear seat or in the front passenger seat:
Safety — Seats, seat belts and supplemental restraint system
1-41
Page 68 of 329
Black plate (66,1)
Model "Z12-D" EDITED: 2009/ 9/ 17
as children, by requiring the air bag to be
automatically turned OFF.
The occupant classification sensors (weight
sensors) are on the seat cushion frame under
the front passenger seat and are designed to
detect an occupant and objects on the seat. For
example, if a child is in the front passenger seat,
the Advanced Air Bag System is designed to
turn the passenger air bag OFF in accordance
with the regulations. Also, if a child restraint of
the type specified in the regulations is on the
seat, the occupant classification sensors can
detect it and cause the air bag to turn OFF.
Front passenger seat adult occupants who are
properly seated and using the seat belt as
outlined in this manual should not cause the
passenger air bag to be automatically turned
OFF. For small adults it may be turned OFF,
however, if the occupant does not sit in the seat
properly (for example, by not sitting upright, by
sitting on an edge of the seat, or by otherwise
being out of position) , this could cause the
sensors to turn the air bag OFF. Always be sure
to be seated and wearing the seat belt properly
for the most effective protection by the seat belt
and supplemental air bag.
NISSAN recommends that pre-teens and chil-
dren be properly restrained in a rear seat.
NISSAN also recommends that appropriate
child restraints and booster seats be properly
installed in a rear seat. If this is not possible, theoccupant classification sensors are designed to
operate as described above to turn the front
passenger air bag OFF for specified child
restraints. Failing to properly secure child
restrains and to use the Automatic Locking
Retractor (ALR) mode (child restraint mode)
may allow the restraint to tip or move in an
accident or sudden stop. This can also result in
the passenger air bag inflating in a crash instead
of being OFF. (See “CHILD RESTRAINTS”
earlierinthissectionforproperuseand
installation.)
If the front passenger seat is not occupied, the
passenger air bag is designed not to inflate in a
crash. However, heavy objects placed on the
seat could result in air bag inflation, because of
the object being detected by the occupant
classification sensors. Other conditions could
also result in air bag inflation, such as if a child is
standing on the seat, or if two children are on the
seat, contrary to the instructions in this manual.
Always be sure that you and all vehicle
occupants are seated and restrained properly.
Using the passenger air bag status light, you can
monitor when the front passenger air bag is
automatically turned OFF with the seat occu-
pied. The light will not illuminate when the front
passenger seat is unoccupied.
If an adult occupant is in the seat but the
passenger air bag status light is illuminated
(indicating that the air bag is OFF) , it could bethat the person is a small adult, or is not sitting
on the seat properly.
If a child restraint must be used in the front seat,
the passenger air bag status light may or may
not be illuminated, depending on the size of the
child and the type of child restraint being used. If
the air bag status light is not illuminated
(indicating that the air bag might inflate in a
crash) , it could be that the child restraint or seat
belt is not being used properly. Make sure that
the child restraint is installed properly, the seat
belt is used properly and the occupant is
positioned properly. If the air bag status light is
not illuminated, reposition the occupant or child
restraint in a rear seat.
If the passenger air bag status light will not
illuminate even though you believe that the child
restraint, the seat belts and the occupant are
properly positioned, the system may be sensing
an unoccupied seat (in which case the air bag is
OFF) . Your NISSAN dealer can check that the
system is OFF by using a special tool. However,
until you have confirmed with your dealer that
your air bag is working properly, reposition the
occupant or child restraint in a rear seat.
The air bag system and passenger air bag status
light will take a few seconds to register a change
in the passenger seat status. However, if the
seat becomes unoccupied, the air bag status
light will remain off.1-52
Safety — Seats, seat belts and supplemental restraint system
Page 74 of 329
Black plate (72,1)
Model "Z12-D" EDITED: 2009/ 9/ 17
WARNING
If the supplemental air bag warning
light is on, it could mean that the front
air bag, side air bag, curtain air bag
and/or pretensioner systems will not
operate in an accident. To help avoid
injury to yourself or others, have your
vehicle checked by a NISSAN dealer as
soon as possible.REPAIR AND REPLACEMENT PRO-
CEDUREThe front air bags, side air bags, curtain air bags
and pretensioners are designed to activate on a
one-time-only basis. As a reminder, unless it is
damaged, the supplemental air bag warning light
will remain illuminated after inflation has oc-
curred. Repair and replacement of these sys-
tems should be done only by a NISSAN dealer.
When maintenance work is required on the
vehicle, the front air bags, side air bags, curtain
air bags and pretensioners and related parts
should be pointed out to the person performing
the maintenance. The ignition switch should
always be in the LOCK position when working
under the hood or inside the vehicle.
WARNING
.Once a front air bag, side air bag or
curtain air bag has inflated, the air
bag module will not function again
and must be replaced. Additionally,
if any of the front air bags inflate,
the activated pretensioners must
also be replaced. The air bag mod-
ule and pretensioner should be
replaced by a NISSAN dealer. The
air bag modules and pretensioner
system cannot be repaired.
. The front air bag, side air bag and
curtain air bag systems, and preten-
sioner system should be inspected
by a NISSAN dealer if there is any
damage to the front end or side
portion of the vehicle.
. If you need to dispose of a supple-
mental air bag or pretensioner or
scrap the vehicle, contact a NISSAN
dealer. Correct supplemental air
bag and pretensioner system dis-
posal procedures are set forth in the
appropriate NISSAN Service Man-
ual. Incorrect disposal procedures
could cause personal injury.
1-58
Safety — Seats, seat belts and supplemental restraint system
Page 75 of 329
Black plate (7,1)
2 Instruments and controls
Model "Z12-D" EDITED: 2009/ 9/ 17
Cockpit............................................................ 2-2
Instrument panel ................................................ 2-3
Meters and gauges ............................................. 2-4
Speedometer and odometer ............................. 2-5
Tachometer ................................................... 2-6
Engine coolant temperature gauge ..................... 2-6
Fuel gauge ................................................... 2-7
Vehicle information display ................................ 2-7
Outside air temperature (if so equipped) .............. 2-7
Continuously Variable Transmission (CVT)
position indicator (if so equipped) ...................... 2-8
Trip computer ................................................ 2-8
Warning/indicator lights and audible reminders ....... 2-10
Checking bulbs ........................................... 2-10
Warning lights ............................................. 2-10
Indicator lights ............................................. 2-15
Audible reminders ........................................ 2-17
Security systems .............................................. 2-17
Vehicle Security System. ................................ 2-17
NISSAN Vehicle Immobilizer System ................. 2-19
Windshield wiper and washer switch .................... 2-20
Rear window wiper and washer switch .................. 2-22
Rear window and outside mirror defroster switch ..... 2-23Headlight and turn signal switch
.......................... 2-23
Headlight switch .......................................... 2-23
Turn signal switch ........................................ 2-26
Fog light switch (if so equipped) ...................... 2-27
Hazard warning flasher switch ............................. 2-27
Horn ............................................................. 2-28
Vehicle Dynamic Control (VDC) OFF switch ........... 2-28
Clock (if so equipped) ....................................... 2-28
Adjusting the time ........................................ 2-29
Resetting the time (Type B) ............................ 2-30
Power outlet ................................................... 2-31
Storage ......................................................... 2-31
Cup holders ................................................ 2-31
Glove box .................................................. 2-33
Rear pillar pocket ......................................... 2-34
Luggage hooks ............................................ 2-34
Utility hooks (if so equipped) ........................... 2-35
Windows ....................................................... 2-36
Power windows ........................................... 2-36
Interior lights ................................................... 2-38
Map lights (if so equipped) ............................. 2-38
Map light control switch (if so equipped) ........... 2-39
Ceiling light ................................................ 2-39
Cargo light (if so equipped) ................................ 2-40
Page 77 of 329
Black plate (77,1)
Model "Z12-D" EDITED: 2009/ 9/ 17
SSI0562
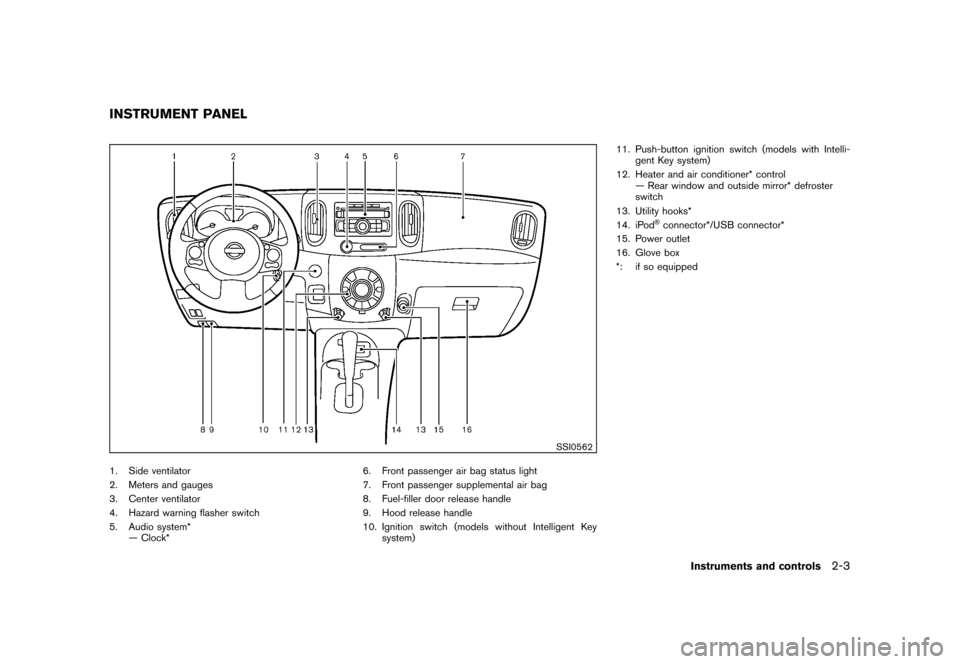
1. Side ventilator
2. Meters and gauges
3. Center ventilator
4. Hazard warning flasher switch
5. Audio system*— Clock* 6. Front passenger air bag status light
7. Front passenger supplemental air bag
8. Fuel-filler door release handle
9. Hood release handle
10. Ignition switch (models without Intelligent Key
system) 11. Push-button ignition switch (models with Intelli-
gent Key system)
12. Heater and air conditioner* control — Rear window and outside mirror* defroster
switch
13. Utility hooks*
14. iPod
®connector*/USB connector*
15. Power outlet
16. Glove box
*: if so equipped
INSTRUMENT PANEL
Instruments and controls
2-3
Page 78 of 329
Black plate (78,1)
Model "Z12-D" EDITED: 2009/ 9/ 17
SIC4119
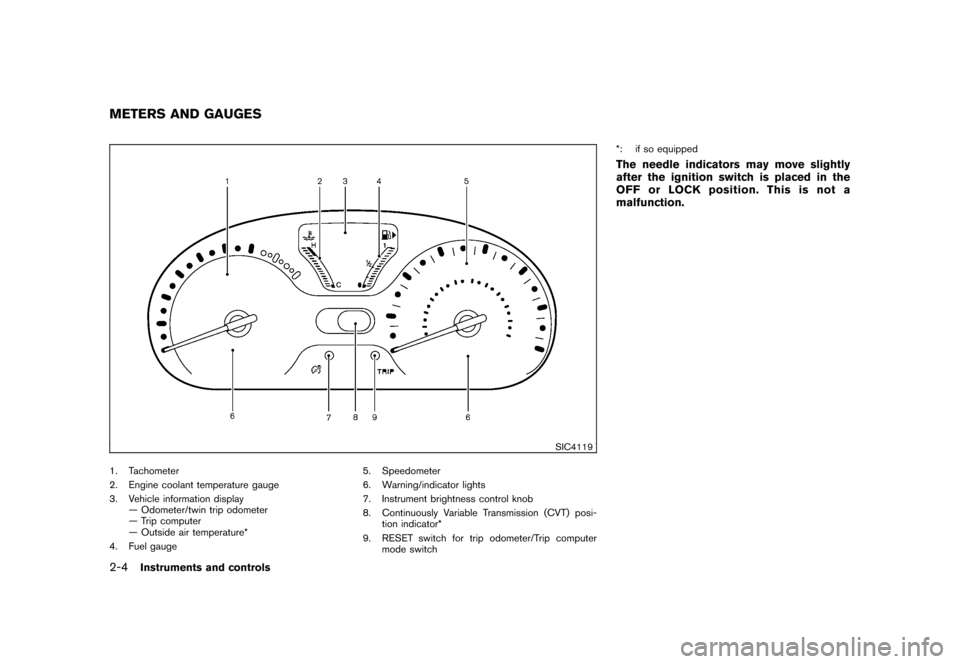
1. Tachometer
2. Engine coolant temperature gauge
3. Vehicle information display— Odometer/twin trip odometer
— Trip computer
— Outside air temperature*
4. Fuel gauge 5. Speedometer
6. Warning/indicator lights
7. Instrument brightness control knob
8. Continuously Variable Transmission (CVT) posi-
tion indicator*
9. RESET switch for trip odometer/Trip computer mode switch *: if so equipped
The needle indicators may move slightly
after the ignition switch is placed in the
OFF or LOCK position. This is not a
malfunction.
METERS AND GAUGES2-4
Instruments and controls