2010 NISSAN CUBE buttons
[x] Cancel search: buttonsPage 177 of 329
Black plate (181,1)
Model "Z12-D" EDITED: 2009/ 9/ 17
SAA2779
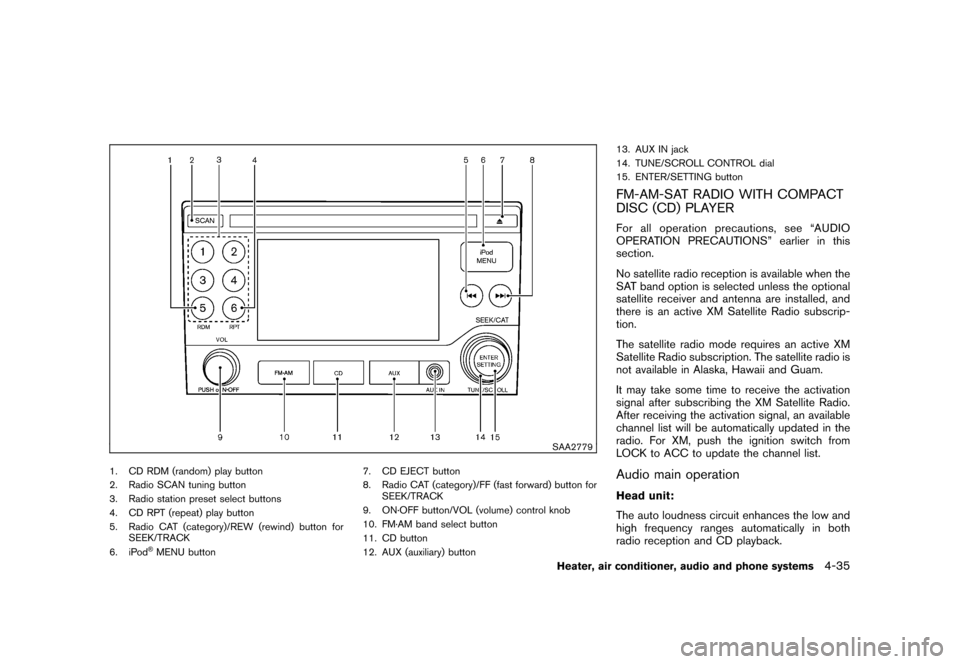
1. CD RDM (random) play button
2. Radio SCAN tuning button
3. Radio station preset select buttons
4. CD RPT (repeat) play button
5. Radio CAT (category)/REW (rewind) button forSEEK/TRACK
6. iPod
®MENU button 7. CD EJECT button
8. Radio CAT (category)/FF (fast forward) button for
SEEK/TRACK
9. ON·OFF button/VOL (volume) control knob
10. FM·AM band select button
11. CD button
12. AUX (auxiliary) button 13. AUX IN jack
14. TUNE/SCROLL CONTROL dial
15. ENTER/SETTING button
FM-AM-SAT RADIO WITH COMPACT
DISC (CD) PLAYERFor all operation precautions, see “AUDIO
OPERATION PRECAUTIONS” earlier in this
section.
No satellite radio reception is available when the
SAT band option is selected unless the optional
satellite receiver and antenna are installed, and
there is an active XM Satellite Radio subscrip-
tion.
The satellite radio mode requires an active XM
Satellite Radio subscription. The satellite radio is
not available in Alaska, Hawaii and Guam.
It may take some time to receive the activation
signal after subscribing the XM Satellite Radio.
After receiving the activation signal, an available
channel list will be automatically updated in the
radio. For XM, push the ignition switch from
LOCK to ACC to update the channel list.Audio main operationHead unit:
The auto loudness circuit enhances the low and
high frequency ranges automatically in both
radio reception and CD playback.
Heater, air conditioner, audio and phone systems
4-35
Page 179 of 329
Black plate (183,1)
Model "Z12-D" EDITED: 2009/ 9/ 17
SEEK tuning/CATEGORY
(CAT):
. For AM and FM radio
Push the SEEK button
or
to tune
from low to high or high to low frequencies
and to stop at the next broadcasting station.
. For XM Satellite Radio
Push the SEEK button
or
to tune
to the first channel of the next or previous
category.
SCAN tuning:
Push the SCAN tuning button to tune from low
to high frequencies and stop at each broad-
casting station/channel for 5 seconds. Pushing
the button again during this 5 seconds period
will stop SCAN tuning and the radio will remain
tuned to that station/channel.
If the SCAN tuning button is not pushed within 5
seconds, SCAN tuning moves to the next
station/channel.
*1
to
*6
Station memory operations:
12 stations/channels can be set for the FM band
(6 each for FM1 and FM2) , 12 for XM radio (6
each for XM1 and XM2) and 6 stations can be
set for the AM band. 1. Choose the radio band using the radio band
select button.
2. Tune to the desired station/channel using the SEEK/CAT, SCAN button or the radio
TUNE dial.
3. Push and hold the desired station preset button
*1
to*6
until the radio mutes.
4. The station indicator will then come on and the sound will resume. Memorizing is now
complete.
5. Other buttons can be set in the same manner.
If the battery cable is disconnected, or if the fuse
opens, the radio memory will be erased. In that
case, reset the desired stations/channels.
Compact Disc (CD) player operationPush the ignition switch to the ACC or ON
position and insert the Compact Disc (CD) into
the slot with the label side facing up. The CD will
be guided automatically into the slot and start
playing.
After loading the CD, the number of tracks on
the CD and the play time will appear on the
display.
If the radio is already operating, it will auto-
matically turn off and the CD will play. If the system has been turned off while the CD
was playing, pushing the ON·OFF button will
start the CD.
Do not use 3.1 in (8 cm) discs.
PLAY:
When the CD button is pushed with the system
off and the CD loaded, the system will turn on
and the CD will start to play.
When the CD button is pushed with the CD
loaded and the radio playing, the radio will
automatically be turned off and the CD will start
to play.
Next/Previous Track and Fast
Forward/Rewind:
When the(fast forward) or
(rewind)
button is pushed for more than 1.5 seconds
while the CD is being played, the CD will play
while fast forwarding or rewinding. When the
button is released, the CD will return to normal
play speed.
When the
or
button is pushed for less
than 1.5 seconds while the CD is being played,
the next track or the beginning of the current
track on the CD will be played.
Heater, air conditioner, audio and phone systems
4-37
Page 190 of 329
Black plate (194,1)
Model "Z12-D" EDITED: 2009/ 9/ 17
prompts you to enter more.
— “six six two” The system repeats the numbers and
prompts you to enter more.
— “six two zero zero”
. You can say “Star” for “*” and “Pound” for
“#” at any time in any position of the phone
number. (Available only when using the
“Special Dialing” command.)
Example: 1-555-1212 *123
— “One five five five one two one two star one two three”
. Say “pound” for “#”. Say “star” for “*”
(available when using the “Special Dialing”
command and the “Send” command during
a call) .
. Say “plus” for “+” (available only when using
the “Special Dialing” command) .
. Say “pause” for a 2 second pause (available
only when storing a phone book number) .
See “Making a call by entering a phone
number” later in this section and “LIST OF
VOICE COMMANDS” later in this section
for more information. NOTE:
For best results, say phone numbers as
single digits.
The voice command “Help” is available at any
time. Please say the “Help” command to get
information about how to use the system.
INFO
.
If you are controlling the telephone system
by voice command for the first time or do not
know the appropriate voice command,
speak “Help”. The system announces the
available commands.
. When you speak numbers, you can speak
both “zero” or “oh” for “0”.
Manual command selectionCommands can be selected manually. While the
commands are displayed on the audio screen,
select a command by operating the audio tuning
switch, and then push the
switch. Once a
command is manually selected, the voice
command function is cancelled. To return to
voice command mode, push the
switch to
cancel the current operation, and then perform
the first procedure of voice command.
SAA2351
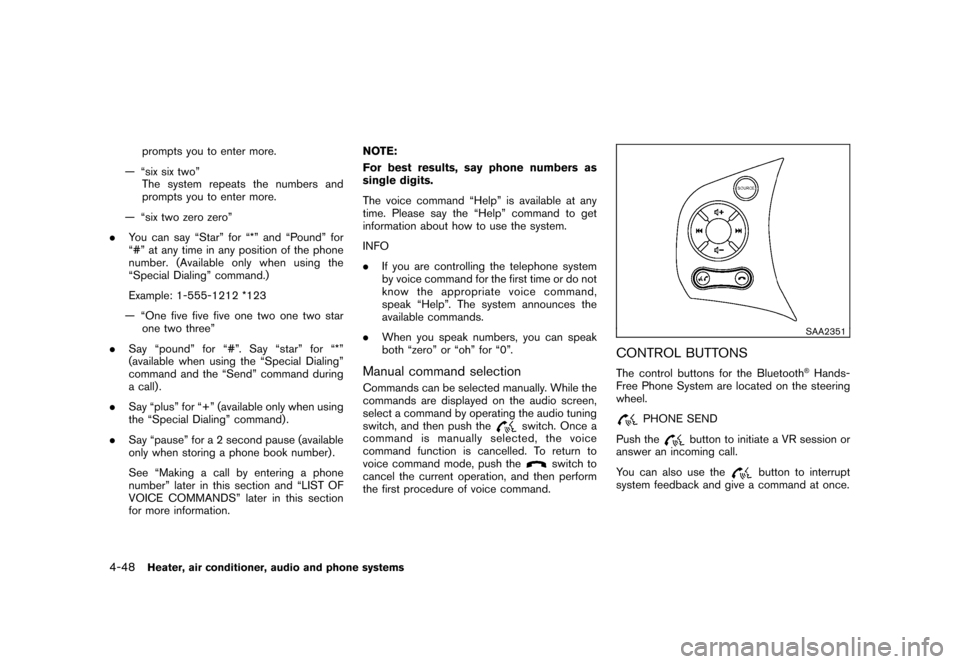
CONTROL BUTTONSThe control buttons for the Bluetooth
®Hands-
Free Phone System are located on the steering
wheel.
PHONE SEND
Push the
button to initiate a VR session or
answer an incoming call.
You can also use the
button to interrupt
system feedback and give a command at once.
4-48
Heater, air conditioner, audio and phone systems
Page 281 of 329
Black plate (285,1)
Model "Z12-D" EDITED: 2009/ 9/ 17
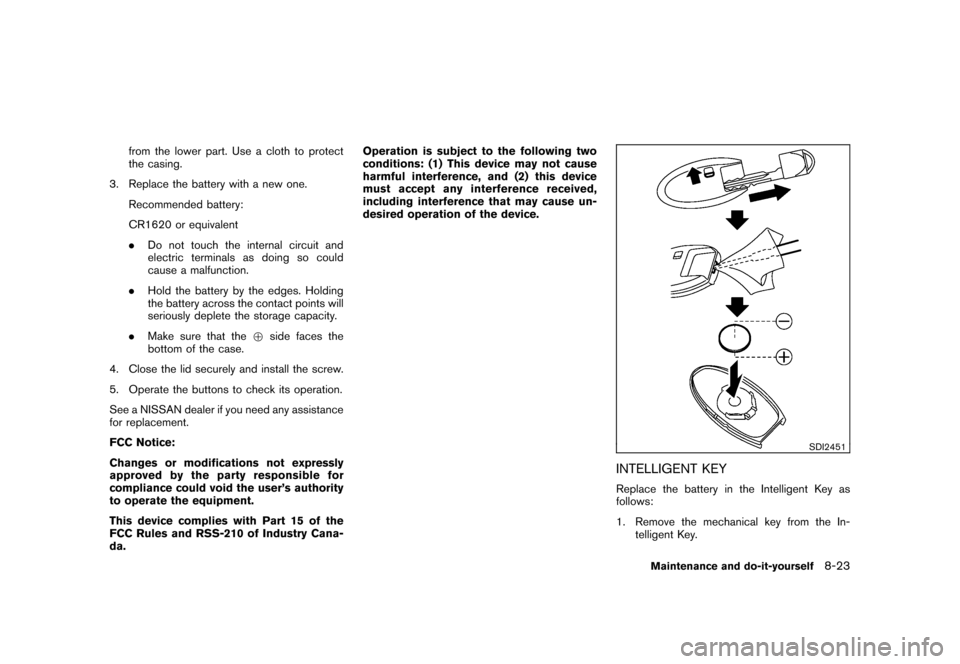
from the lower part. Use a cloth to protect
the casing.
3. Replace the battery with a new one. Recommended battery:
CR1620 or equivalent
.Do not touch the internal circuit and
electric terminals as doing so could
cause a malfunction.
. Hold the battery by the edges. Holding
the battery across the contact points will
seriously deplete the storage capacity.
. Make sure that the +side faces the
bottom of the case.
4. Close the lid securely and install the screw.
5. Operate the buttons to check its operation.
See a NISSAN dealer if you need any assistance
for replacement.
FCC Notice:
Changes or modifications not expressly
approved by the party responsible for
compliance could void the user’s authority
to operate the equipment.
This device complies with Part 15 of the
FCC Rules and RSS-210 of Industry Cana-
da. Operation is subject to the following two
conditions: (1) This device may not cause
harmful interference, and (2) this device
must accept any interference received,
including interference that may cause un-
desired operation of the device.
SDI2451
INTELLIGENT KEYReplace the battery in the Intelligent Key as
follows:
1. Remove the mechanical key from the In-
telligent Key.
Maintenance and do-it-yourself
8-23
Page 282 of 329
Black plate (286,1)
Model "Z12-D" EDITED: 2009/ 9/ 17
2. Insert a small screwdriver into the slit of thecorner and twist it to separate the upper part
from the lower part. Use a cloth to protect
the casing.
3. Replace the battery with a new one. Recommended battery:
CR2025 or equivalent
.Do not touch the internal circuit and
electric terminals as doing so could
cause a malfunction.
. Hold the battery by the edges. Holding
the battery across the contact points will
seriously deplete the storage capacity.
. Make sure that the +side faces the
bottom of the case.
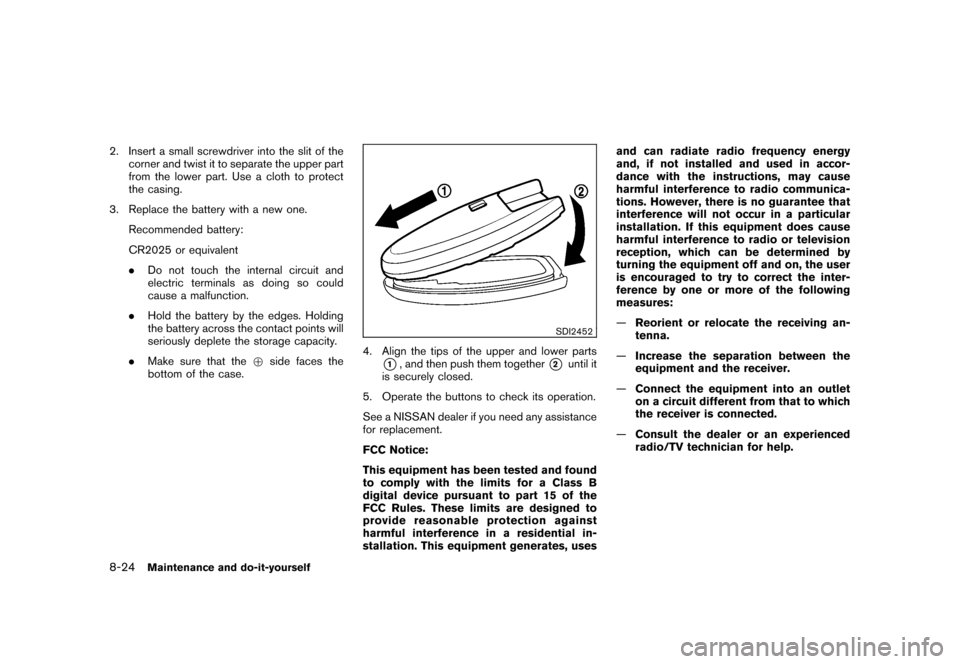
SDI2452
4. Align the tips of the upper and lower parts
*1, and then push them together
*2
until it
is securely closed.
5. Operate the buttons to check its operation.
See a NISSAN dealer if you need any assistance
for replacement.
FCC Notice:
This equipment has been tested and found
to comply with the limits for a Class B
digital device pursuant to part 15 of the
FCC Rules. These limits are designed to
provide reasonable protection against
harmful interference in a residential in-
stallation. This equipment generates, uses and can radiate radio frequency energy
and, if not installed and used in accor-
dance with the instructions, may cause
harmful interference to radio communica-
tions. However, there is no guarantee that
interference will not occur in a particular
installation. If this equipment does cause
harmful interference to radio or television
reception, which can be determined by
turning the equipment off and on, the user
is encouraged to try to correct the inter-
ference by one or more of the following
measures:
—
Reorient or relocate the receiving an-
tenna.
— Increase the separation between the
equipment and the receiver.
— Connect the equipment into an outlet
on a circuit different from that to which
the receiver is connected.
— Consult the dealer or an experienced
radio/TV technician for help.
8-24
Maintenance and do-it-yourself