Page 271 of 472
Rear display:
To adjust the rear display mode, press the DISP
(Display) button on the remote controller.
To adjust the display brightness, tint, color and
contrast, select each key using the joystick on the
remote controller and tilt the joystick to the right
or left.
Press the BACK button to apply the settings and
return to the previous display.
PLAYING A DIGITAL VERSATILE
DISC (DVD)
With the DVD player, you can hear DVD videos,
video CDs and CDs using headphones. Passen-
gers in the rear seat can enjoy the sound inde-
pendently of the front seat.
Press the DISC/AUX button located on the front
controls to hear the sound of the DVD play
through the speakers.
Press the REAR CTRL button located on the
front controls to disable or enable rear seat audio
controls. For more information on rear seat audio
controls see, “Rear Audio Controls” earlier in this
section.Pressing the
Page 272 of 472
DVD operation keys
To operate the DVD drive, touch the preferred key
(if so equipped) or select the preferred key dis-
played on the operation screen using the
NISSAN controller.
NOTE:
If the display in your vehicle is not touch
screen enabled; use the NISSAN controller
and the ENTER button to operate the fol-
lowing functions. For more information on
how to operate the NISSAN controller, see
“How to use the NISSAN controller” earlier
in this section.
Page 273 of 472
DVD settings
Touch the “Settings” key to adjust the following
settings while playing a DVD.
When all the changes have been made, press
BACK button to save all the settings.NOTE:
If the display in your vehicle is not touch
screen enabled; use the NISSAN controller
and the ENTER button to operate the fol-
lowing functions. For more information on
how to operate the NISSAN controller see,
“How to use the NISSAN controller” earlier
in this section.
Switch to DVD-AUX:
Switch the output source from the DVD drive to
another device connected to the auxiliary input
jacks located on the DVD player.For more information, see “DVD auxiliary input
jacks” later in this section.
Menu:
Some menus specific to each DVD will be
shown. For details, see the instructions attached
to the DVD.
Top Menu:
Each title menu in the disc will be shown. For
details, see the instructions attached to the DVD.
Page 276 of 472
The display will show the “AUX” in the upper left
corner of the display for 4 seconds once the
Mode is changed to AUX.
To use the input jacks, refer to “Auxiliary input
jacks” in this section.
Page 279 of 472

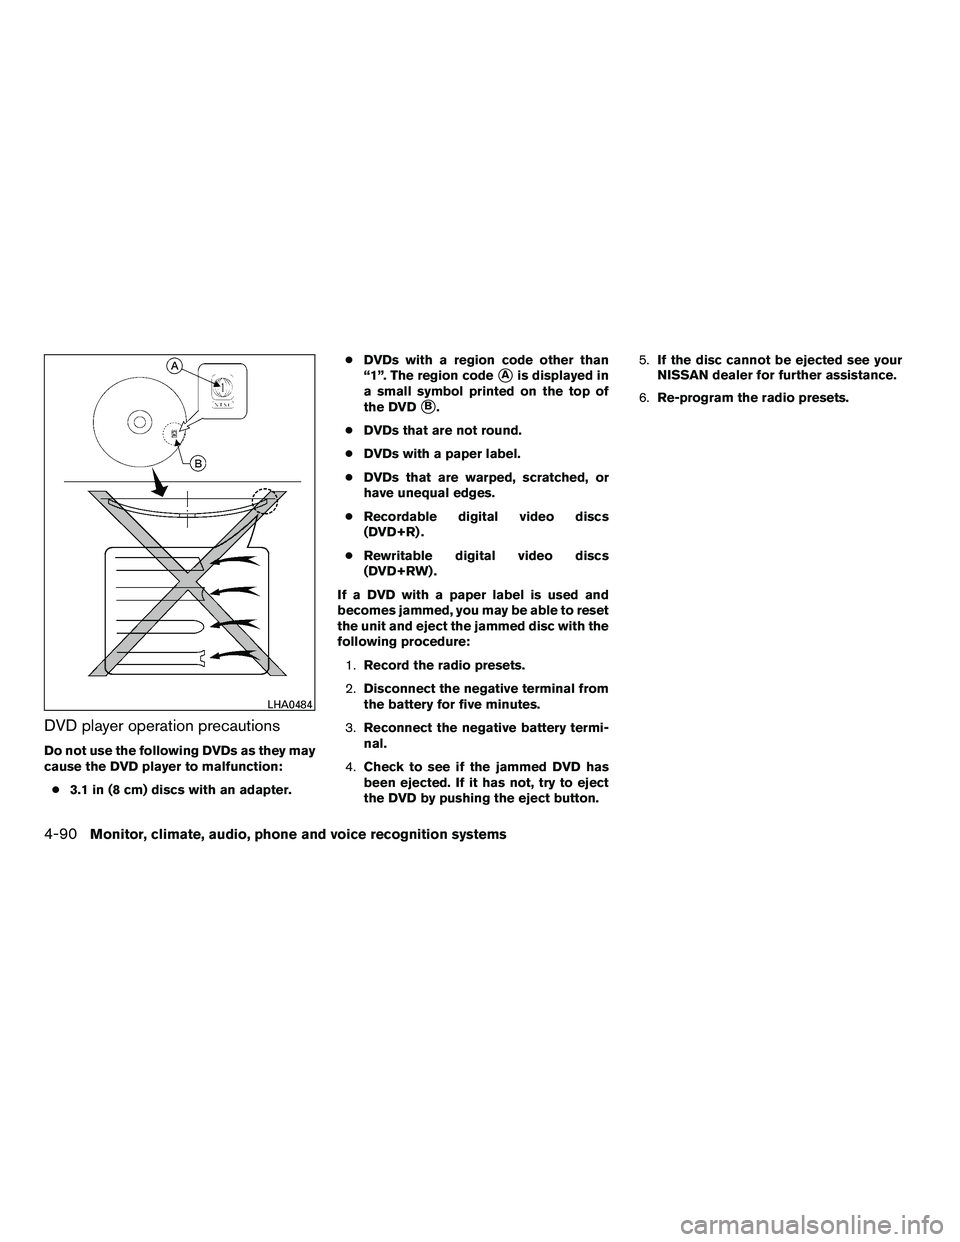
DVD player operation precautions
Do not use the following DVDs as they may
cause the DVD player to malfunction:● 3.1 in (8 cm) discs with an adapter. ●
DVDs with a region code other than
“1”. The region code
�Ais displayed in
a small symbol printed on the top of
the DVD
�B.
● DVDs that are not round.
● DVDs with a paper label.
● DVDs that are warped, scratched, or
have unequal edges.
● Recordable digital video discs
(DVD+R) .
● Rewritable digital video discs
(DVD+RW) .
If a DVD with a paper label is used and
becomes jammed, you may be able to reset
the unit and eject the jammed disc with the
following procedure: 1. Record the radio presets.
2. Disconnect the negative terminal from
the battery for five minutes.
3. Reconnect the negative battery termi-
nal.
4. Check to see if the jammed DVD has
been ejected. If it has not, try to eject
the DVD by pushing the eject button. 5.
If the disc cannot be ejected see your
NISSAN dealer for further assistance.
6. Re-program the radio presets.
Page 297 of 472

module when the ignition switch is turned to the
ON position with the paired cellular phone turned
on and carried in the vehicle.
You can register up to 5 different Bluetooth�
cellular phones to the in-vehicle phone module.
However, you can talk on only one cellular phone
at a time.
NISSAN Voice Recognition system supports the
phone commands, so dialing a phone number
using your voice is possible. For more details, see
“NISSAN Voice Recognition System (if so
equipped)” later in this section.
Before using the Bluetooth�Hands-Free Phone
System, refer to the following notes.
● Set up the wireless connection between a
cellular phone and the in-vehicle phone
module before using the hands-free phone
system.
● Some Bluetooth� enabled cellular phones
may not be recognized by the in-vehicle
phone module. Please visit
www.nissanusa.com/bluetooth for a recom-
mended phone list and pairing.
● You will not be able to use a hands-free
phone under the following conditions:
– Your vehicle is outside of the cellular ser- vice area. – Your vehicle is in an area where it is
difficult to receive cellular signal; such as
in a tunnel, in an underground parking
garage, near a tall building or in a moun-
tainous area.
– Your cellular phone is locked to prevent it from being dialed.
● When the radio wave condition is not ideal
or ambient sound is too loud, it may be
difficult to hear the other person’s voice dur-
ing a call.
● Immediately after the ignition switch is
pushed to the ON position or the DVD-ROM
for the navigation system is inserted into the
player, it may be impossible to receive a call
for a short period of time.
● Do not place the cellular phone in an area
surrounded by metal or far away from the
in-vehicle phone module to prevent tone
quality degradation and wireless connection
disruption.
● While a cellular phone is connected through
the Bluetooth� wireless connection, the bat-
tery power of the cellular phone may dis-
charge quicker than usual. The Bluetooth�
Hands-Free Phone System cannot charge
cellular phones. ●
If the hands-free phone system seems to be
malfunctioning, see “Troubleshooting guide”
later in this section. You can also visit
www.nissanusa.com/bluetooth for trouble-
shooting help.
● Some cellular phones or other devices may
cause interference or a buzzing noise to
come from the audio system speakers. Stor-
ing the device in a different location may
reduce or eliminate the noise.
● Refer to the cellular phone owner’s manual
regarding the telephone charges, cellular
phone antenna and body, etc.
● The signal strength display on the monitor
will not coincide with the signal strength
display of some cellular phones.
● If reception between callers is unclear, ad-
justing the incoming or outgoing call volume
may improve the clarity. See “Call volume”
later in this section.
4-108Monitor, climate, audio, phone and voice recognition systems
�REVIEW COPY—2010 Armada (wzw)
Owners Manual (owners)—USA_English (nna)
02/17/09—debbie
�
Page 299 of 472
NOTE:
If a phone is already paired with the sys-
tem, Step 1 will not work. To pair another
phone, press the SETTING button, then se-
lect the “Phone” key and press the ENTER
button. Scroll to the bottom of the list and
select the “Bluetooth Setup” key and press
the ENTER button. Select the “Pair Phone”
key, and press the ENTER button then fol-
low the instructions in Step 2.2. Select the “None (Add New)” key from thename list of the phones, and press the EN-
TER button. 3. When a PIN code appears on the screen,
operate the Bluetooth� cellular phone to
enter the PIN code.
The pairing procedure of the cellular phone
varies according to each cellular phone. See
the cellular phone Owner’s Manual for de-
tails. You can also visit
www.nissanusa.com/bluetooth or call the
NISSAN Consumer Affairs Department for
instructions on pairing recommended cellu-
lar phones.
When the pairing is complete, the screen
will return to the Bluetooth� setup display.
Page 300 of 472

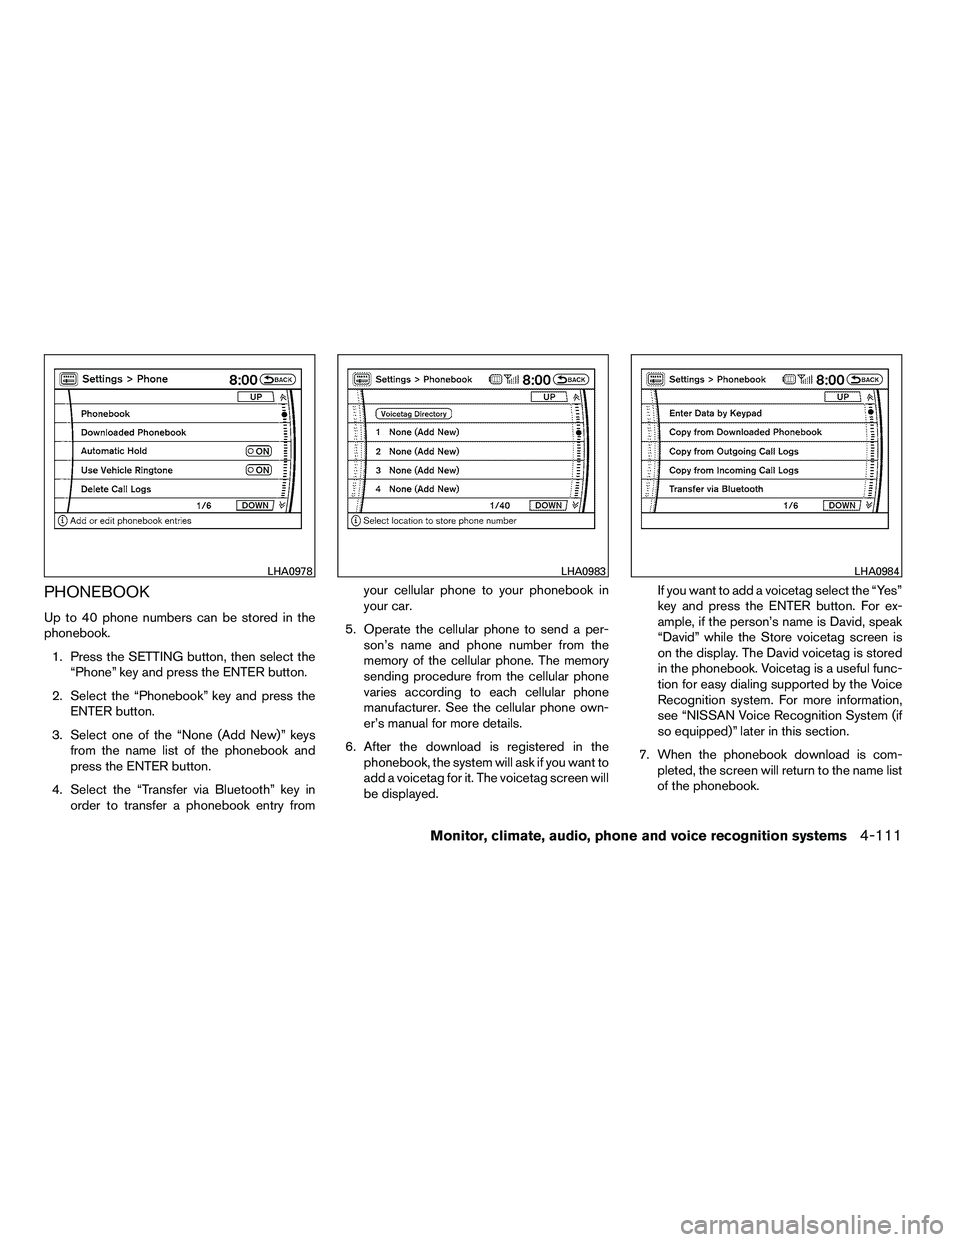
PHONEBOOK
Up to 40 phone numbers can be stored in the
phonebook.1. Press the SETTING button, then select the “Phone” key and press the ENTER button.
2. Select the “Phonebook” key and press the ENTER button.
3. Select one of the “None (Add New)” keys from the name list of the phonebook and
press the ENTER button.
4. Select the “Transfer via Bluetooth” key in order to transfer a phonebook entry from your cellular phone to your phonebook in
your car.
5. Operate the cellular phone to send a per- son’s name and phone number from the
memory of the cellular phone. The memory
sending procedure from the cellular phone
varies according to each cellular phone
manufacturer. See the cellular phone own-
er’s manual for more details.
6. After the download is registered in the phonebook, the system will ask if you want to
add a voicetag for it. The voicetag screen will
be displayed. If you want to add a voicetag select the “Yes”
key and press the ENTER button. For ex-
ample, if the person’s name is David, speak
“David” while the Store voicetag screen is
on the display. The David voicetag is stored
in the phonebook. Voicetag is a useful func-
tion for easy dialing supported by the Voice
Recognition system. For more information,
see “NISSAN Voice Recognition System (if
so equipped)” later in this section.
7. When the phonebook download is com- pleted, the screen will return to the name list
of the phonebook.