Page 388 of 472

When driving in areas using road salt or other
corrosive materials, check lubrication frequently.
Lights*Clean the headlights on a regular basis.
Make sure that the headlights, stop lights, tail
lights, turn signal lights, and other lights are all
operating properly and installed securely. Also
check headlight aim.
Road wheel nuts (lug nuts)* When checking
the tires, make sure no wheel nuts are missing,
and check for any loose wheel nuts. Tighten if
necessary.
Tire rotation* Tires should be rotated every
7,500 miles (12,000 km) .
Tires* Check the pressure with a gauge often
and always prior to long distance trips. If neces-
sary, adjust the pressure in all tires, including the
spare, to the pressure specified. Check carefully
for damage, cuts or excessive wear.
Tire Pressure Monitoring System (TPMS)
transmitter components Replace the TPMS
transmitter grommet seal, valve core and cap
when the tires are replaced due to wear or age.
Wheel alignment and balance If the vehicle
should pull to either side while driving on a
straight and level road, or if you detect uneven or
abnormal tire wear, there may be a need for wheel alignment. If the steering wheel or seat vibrates at
normal highway speeds, wheel balancing may be
needed.
● For additional information regarding tires,
refer to “Important Tire Safety Information”
(US) or “Tire Safety Information” (Canada) in
the Warranty Information Booklet.
Windshield Clean the windshield on a regular
basis. Check the windshield at least every six
months for cracks or other damage. Have a dam-
aged windshield repaired by a qualified repair
facility.
Windshield wiper blades* Check for cracks or
wear if they do not wipe properly.
Inside the vehicle
The maintenance items listed here should be
checked on a regular basis, such as when per-
forming periodic maintenance, cleaning the ve-
hicle, etc.
Additional information on the following
items with an “*” is found later in this sec-
tion.
Accelerator pedal Check the pedal for smooth
operation and make sure the pedal does not bind
or require uneven effort. Keep the floor mat away
from the pedal. Automatic transmission P (Park) position
mechanism
On a fairly steep hill check that your
vehicle is held securely with the shift selector in
the P (Park) position without applying any brakes.
Brake pedal Check the pedal for smooth opera-
tion. If the brake pedal suddenly goes down fur-
ther than normal, the pedal feels spongy or the
vehicle seems to take longer to stop, see a
NISSAN dealer immediately. Keep the floor mat
away from the pedal.
Brakes Check that the brakes do not pull the
vehicle to one side when applied.
Parking brake Check the parking brake opera-
tion regularly. The vehicle should be securely held
on a fairly steep hill with only the parking brake
applied. If the parking brake needs adjustment,
see a NISSAN dealer.
Seats Check seat position controls such as seat
adjusters, seatback recliner, etc. to ensure they
operate smoothly and all latches lock securely in
every position. Check that the head restraints
move up and down smoothly and the locks (if so
equipped) hold securely in all latched positions.
Seat belts Check that all parts of the seat belt
system (for example, buckles, anchors, adjusters
and retractors) operate properly and smoothly,
and are installed securely. Check the belt web-
bing for cuts, fraying, wear or damage.
Maintenance and do-it-yourself8-3
�REVIEW COPY—2010 Armada (wzw)
Owners Manual (owners)—USA_English (nna)
02/18/09—debbie
�
Page 402 of 472
WARNING
Be sure the engine and ignition switch are
off and that the parking brake is engaged
securely.
Page 408 of 472
If a type A fuse is used to replace a type B fuse,
the type A fuse will not be level with the fuse
pocket as shown in the illustration. This will not
affect the performance of the fuse. Make sure the
fuse is installed in the fuse box securely.
Type B fuses cannot be installed in the under-
hood fuse boxes. Only use type A fuses in the
underhood fuse boxes.ENGINE COMPARTMENT
Page 411 of 472
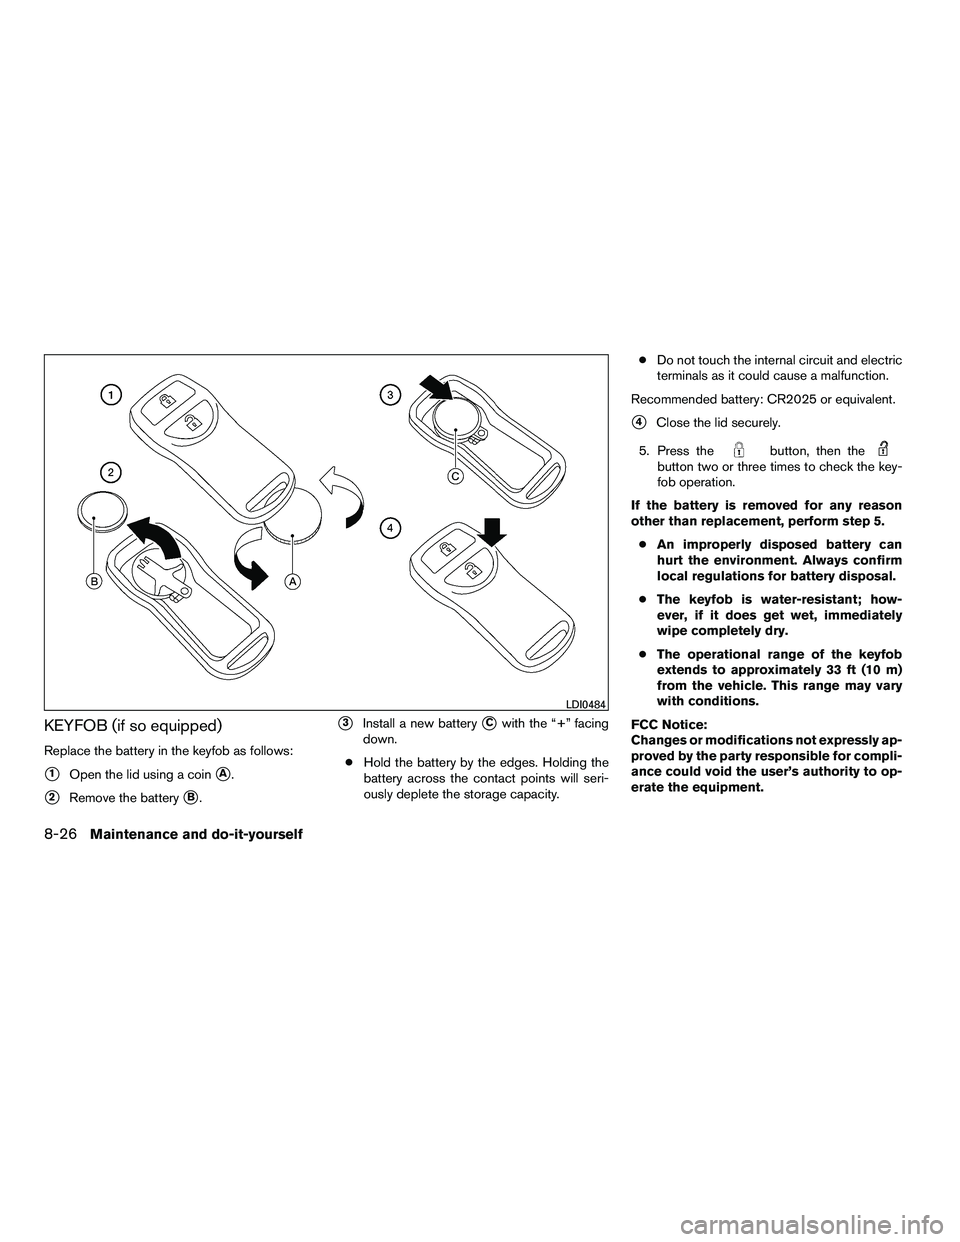
KEYFOB (if so equipped)
Replace the battery in the keyfob as follows:
�1Open the lid using a coin�A.
�2Remove the battery�B.
�3Install a new battery�Cwith the “+” facing
down.
● Hold the battery by the edges. Holding the
battery across the contact points will seri-
ously deplete the storage capacity. ●
Do not touch the internal circuit and electric
terminals as it could cause a malfunction.
Recommended battery: CR2025 or equivalent.
�4Close the lid securely.
5. Press the
Page 413 of 472
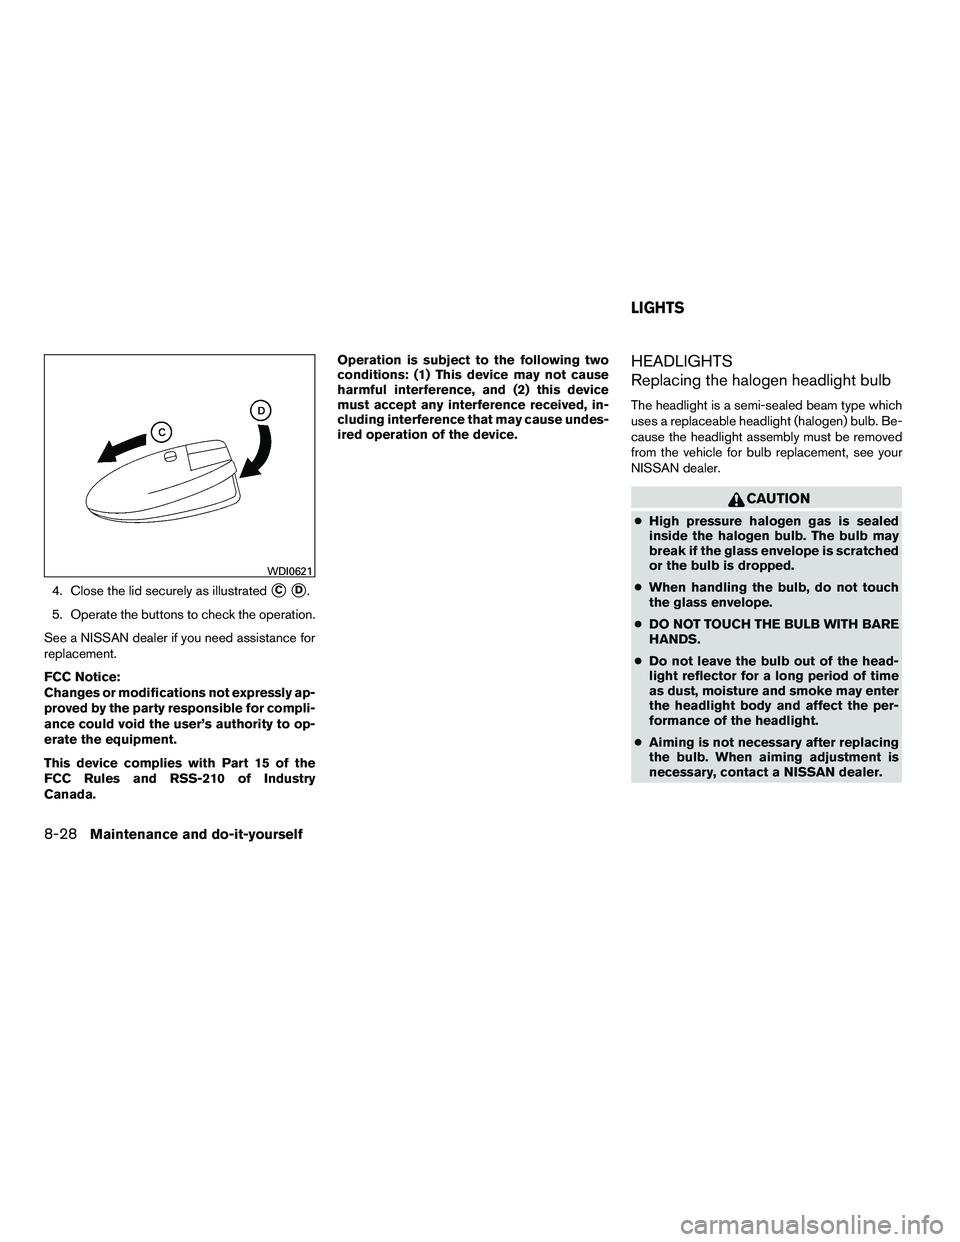
4. Close the lid securely as illustrated�C�D.
5. Operate the buttons to check the operation.
See a NISSAN dealer if you need assistance for
replacement.
FCC Notice:
Changes or modifications not expressly ap-
proved by the party responsible for compli-
ance could void the user’s authority to op-
erate the equipment.
This device complies with Part 15 of the
FCC Rules and RSS-210 of Industry
Canada. Operation is subject to the following two
conditions: (1) This device may not cause
harmful interference, and (2) this device
must accept any interference received, in-
cluding interference that may cause undes-
ired operation of the device.
HEADLIGHTS
Replacing the halogen headlight bulb
The headlight is a semi-sealed beam type which
uses a replaceable headlight (halogen) bulb. Be-
cause the headlight assembly must be removed
from the vehicle for bulb replacement, see your
NISSAN dealer.
Page 444 of 472

5. Determine the combined weight ofluggage and cargo being loaded on
the vehicle. That weight may not
safely exceed the available cargo and
luggage load capacity calculated in
Step 4.
6. If your vehicle will be towing a trailer, load from your trailer will be trans-
ferred to your vehicle. Consult this
manual to determine how this re-
duces the available cargo and lug-
gage load capacity of your vehicle.
Before driving a loaded vehicle, confirm
that you do not exceed the Gross Vehicle
Weight Rating (GVWR) or the Gross Axle
Weight Rating (GAWR) for your vehicle.
See “Measurement of Weights” later in
this section.
Also check tires for proper inflation pres-
sures. See the Tire and Loading Informa-
tion label.
SECURING THE LOAD
There are tie down hooks located in the cargo
area as shown. The tie down hooks can be used
to secure cargo with ropes or other types of
straps.
Do not apply a total load of more than 55
lbs. (245 N) to a single
�Aplastic hook or 44
lbs. (196 N) to a single
�Bplastic hook
when securing cargo.
Do not apply a total load of more than 110
lbs. (490 N) to a single metal floor tie-down
hook when securing cargo.
Page 450 of 472
TOWING SAFETY
Trailer hitch
Your vehicle may be equipped with an optional
trailer tow package. The trailer tow package in-
cludes a receiver-type frame mounted hitch. This
hitch is rated for the maximum towing capacity of
this vehicle when the proper towing equipment is
used. Choose a proper ball mount and hitch ball
that is rated for the trailer to be towed. Genuine
NISSAN ball mounts and hitch balls are available
from your NISSAN dealer.
If your vehicle is not equipped with the optional
trailer tow package, check the towing capacity of
your bumper hitch or receiver-type frame
mounted hitch. Choose a proper hitch for your
vehicle and trailer. A genuine NISSAN trailer
hitch is available from your NISSAN dealer. Make
sure the trailer hitch is securely attached to the
vehicle to help avoid personal injury or property
damage due to sway caused by crosswinds,
rough road surfaces or passing trucks.
Page 452 of 472
 . Suitable genu-
ine NISSAN hitches, ball mounts and
hitch balls for pickup trucks and s")
CAUTION
●Special hitches which include frame re-
inforcements are required for towing
above 2,000 lb (907 kg) . Suitable genu-
ine NISSAN hitches, ball mounts and
hitch balls for pickup trucks and sport
utility vehicles are available at a
NISSAN dealer.
● The hitch should not be attached to or
affect the operation of the impact-
absorbing bumper.
● Do not use axle-mounted hitches.
● Do not modify the vehicle exhaust sys-
tem, brake system, etc. to install a
trailer hitch.
● To reduce the possibility of additional
damage if your vehicle is struck from
the rear, where practical, remove the
receiver when not in use.
● Regularly check that all trailer hitch
mounting bolts are securely mounted.
● When towing with the hitch ball
mounted to the rear bumper, do not
make sharp turns. The trailer may con-
tact the bumper and cause damage to
the bumper or trailer.
Tire pressures
● When towing a trailer, inflate the ve-
hicle tires to the recommended cold
tire pressure indicated on the tire
placard.
● Trailer tire condition, size, load rating
and proper inflation pressure should
be in accordance with the trailer and
tire manufacturer’s specifications.
Safety chains
Always use suitable safety chains between your
vehicle and the trailer. The safety chains should
be crossed and should be attached to the hitch,
not to the vehicle bumper or axle. The safety
chains can be attached to the bumper if the hitch
ball is mounted to the bumper. Be sure to leave
enough slack in the chains to permit turning
corners.
Trailer lights