Page 87 of 472

2 Instruments and controls
Instrument panel...................................2-2
Meters and gauges ................................2-4
Speedometer and odometer .....................2-5
Tachometer ....................................2-6
Engine coolant temperature gauge ...............2-6
Fuel gauge . . ..................................2-7
Engine oil pressure gauge .......................2-8
Voltmeter ......................................2-8
Automatic transmission fluid temperature
gauge .........................................2-9
Compass display (if so equipped) ...................2-9
Compass display .............................. 2-10
Zone variation change procedure ................2-11
Warning/indicator lights and audible reminders ......2-13
Checking bulbs ............................... 2-13
Warning lights ................................ 2-14
Indicator lights ................................ 2-18
Audible reminders ............................. 2-20
Vehicle Information Display ........................2-21
How to use the Vehicle Information Display .......2-21
Security systems ................................. 2-25
Vehicle security system ......................... 2-25
NISSAN vehicle immobilizer system .............2-27Windshield wiper and washer switch
...............2-28
Switch operation .............................. 2-28
Rear window wiper and washer switch ..............2-29
Rear window and outside mirror defroster switch .....2-30
Headlight and turn signal switch ....................2-30
Headlight control switch ........................ 2-30
Daytime running light system (Canada only) ......2-32
Instrument brightness control ...................2-33
Turn signal switch ............................. 2-33
Fog light switch (if so equipped) ................2-33
Hazard warning flasher switch .....................2-34
Horn ............................................ 2-34
Heated seat (if so equipped) .......................2-35
Heated steering wheel (if so equipped) .............2-35
Vehicle Dynamic Control (VDC) OFF switch .........2-36
Rear sonar system
off switch (if so equipped) ........2-36
Front and rear sonar system off switch
(if so equipped) .................................. 2-37
Tow mode switch ................................. 2-38
Power outlet ..................................... 2-38
Storage ......................................... 2-40
Instrument panel storage trays ..................2-40
Console box .................................. 2-40
�REVIEW COPY—2010 Armada(wzw)
Owners Manual (owners)—USA_English (nna)
03/09/09—tbrooks
�
Page 113 of 472

brief period. Never leave your keys in the ignition,
and always lock the vehicle when unattended. Be
aware of your surroundings, and park in secure,
well-lit areas whenever possible.
Many devices offering additional protection, such
as component locks, identification markers, and
tracking systems, are available at auto supply
stores and specialty shops. Your NISSAN dealer
may also offer such equipment. Check with your
insurance company to see if you may be eligible
for discounts for various theft protection features.
How to arm the vehicle security
system
1. Close all windows.(The system can be
armed even if the windows are open.)
2. Place the ignition switch in the LOCK posi- tion and remove the key.
3. Close all doors. Lock all doors. The doors can be locked with:
● the power door lock switch (if the door is
opened, locked and then closed) .
● the key — master or mechanical (NISSAN
Intelligent Key™ models) .
● any request switch (NISSAN Intelligent
Key™ models) .
● the keyfob or NISSAN Intelligent Key™. Keyfob and NISSAN Intelligent Key™ opera-
tion:
●
Push the
Page 115 of 472

Security indicator light
The security indicator light blinks whenever the
ignition switch is placed in the LOCK, OFF or ACC
position. This function indicates the NISSAN Ve-
hicle Immobilizer System is operational.
If the NISSAN Vehicle Immobilizer System is mal-
functioning, the light will remain on while the
ignition switch is placed in the ON position.
If the light still remains on and/or the en-
gine will not start, see a NISSAN dealer for
NISSAN Vehicle Immobilizer System ser-
vice as soon as possible. Please bring all
registered keys that you have when visiting
your NISSAN dealer for service.
SWITCH OPERATION
The windshield wiper and washer operates when
the ignition switch is in the ON position.
Push the lever down to operate the wiper at the
following speed:
�1Intermittent (INT) — intermittent operation
can be adjusted by turning the knob toward
�A(Slower) or�B(Faster) . Also, the inter-
mittent operation speed varies in accor-
dance with the vehicle speed. (For example,
when the vehicle speed is high, the intermit-
tent operation speed will be faster.) NOTE:
You can turn on or turn off the driving
speed dependent intermittent wiper func-
tion. Refer to “Comfort & convenience set-
tings” in the “Monitor, climate, audio,
phone and voice recognition systems” sec-
tion later in this manual.
�2Low (LO) — continuous low speed operation
�3High (HI) — continuous high speed opera-
tion
Push the lever up
�4to have one sweep opera-
tion (MIST) of the wiper.
Pull the lever toward you
�5to operate the
washer. The wiper will also operate several times.
Page 134 of 472
To reinstall the 2nd row center console box:1. Slide the console box over the base toward the rear of the vehicle.
2. Push down to lock the console box in place.
3. Replace the cup holder tray.
CARGO AREA STORAGE BIN
To open the cargo area storage bin, pull down on
the tab and pull the lid off. To access the floor storage area, push down
�1
to raise the handle, then pull up on the handle�2
to lift the luggage board.
LUGGAGE HOOKS
The luggage hooks can be used to secure cargo
with ropes or other types of straps.
Page 135 of 472

WARNING
●Properly secure all cargo with ropes or
straps to help prevent it from sliding or
shifting. Do not place cargo higher than
the seatbacks. In a sudden stop or col-
lision, unsecured cargo could cause
personal injury.
● Use suitable ropes and hooks to secure
cargo.
● Never allow anyone to ride in the lug-
gage area. It is extremely dangerous to
ride in a cargo area inside of a vehicle.
In a collision, people riding in these
areas are more likely to be seriously
injured or killed.
● Do not allow people to ride in any area
of your vehicle that is not equipped with
seats and seat belts.
● The child restraint top tether strap may
be damaged by contact with items in
the cargo area. Secure any items in the
cargo area. Your child could be seri-
ously injured or killed in a collision if
the top tether strap is damaged.
● Be sure everyone in your vehicle is in a
seat and using a seat belt properly.
Side finisher
When hooking on ropes, do not apply a load of
more than 55 lb (245 N) to a single
�Ahook or 44
lb (196 N) to a single
�Bhook.
Floor hooks
Do not apply a load of more than 110 lb (490 N)
to a single hook.
Page 137 of 472
 on
entire roof rack. Be sure load is evenly distributed
across both crossbars. Be careful that your ve-
hic")
Always distribute the luggage evenly on the roof
rack. Do not load more than 200 lbs (91 kg) on
entire roof rack. Be sure load is evenly distributed
across both crossbars. Be careful that your ve-
hicle does not exceed the Gross Vehicle Weight
Rating (GVWR) or its Gross Axle Weight Rating
(GAWR front and rear) . The GVWR and GAWR
are located on the F.M.V.S.S. label (located on
the driver’s door pillar) . For more information
regarding GVWR and GAWR, refer to “Vehicle
loading information” in the “Technical and con-
sumer information” section later in this manual.The crossbars can be adjusted forward and
backward. Loosen the thumbwheel
�1and ad-
just the crossbar to the desired position. Tighten
the thumbwheel. Place your luggage on the bars
and secure the luggage with rope to the utility
loops
�2. Do not place luggage on the side rails
or tie rope directly to the side rails. Always be
sure the thumbwheels are fully tightened to keep
the crossbar in place. Do not use utility loops for
any purpose other than securing luggage.
POWER WINDOWS
Page 145 of 472
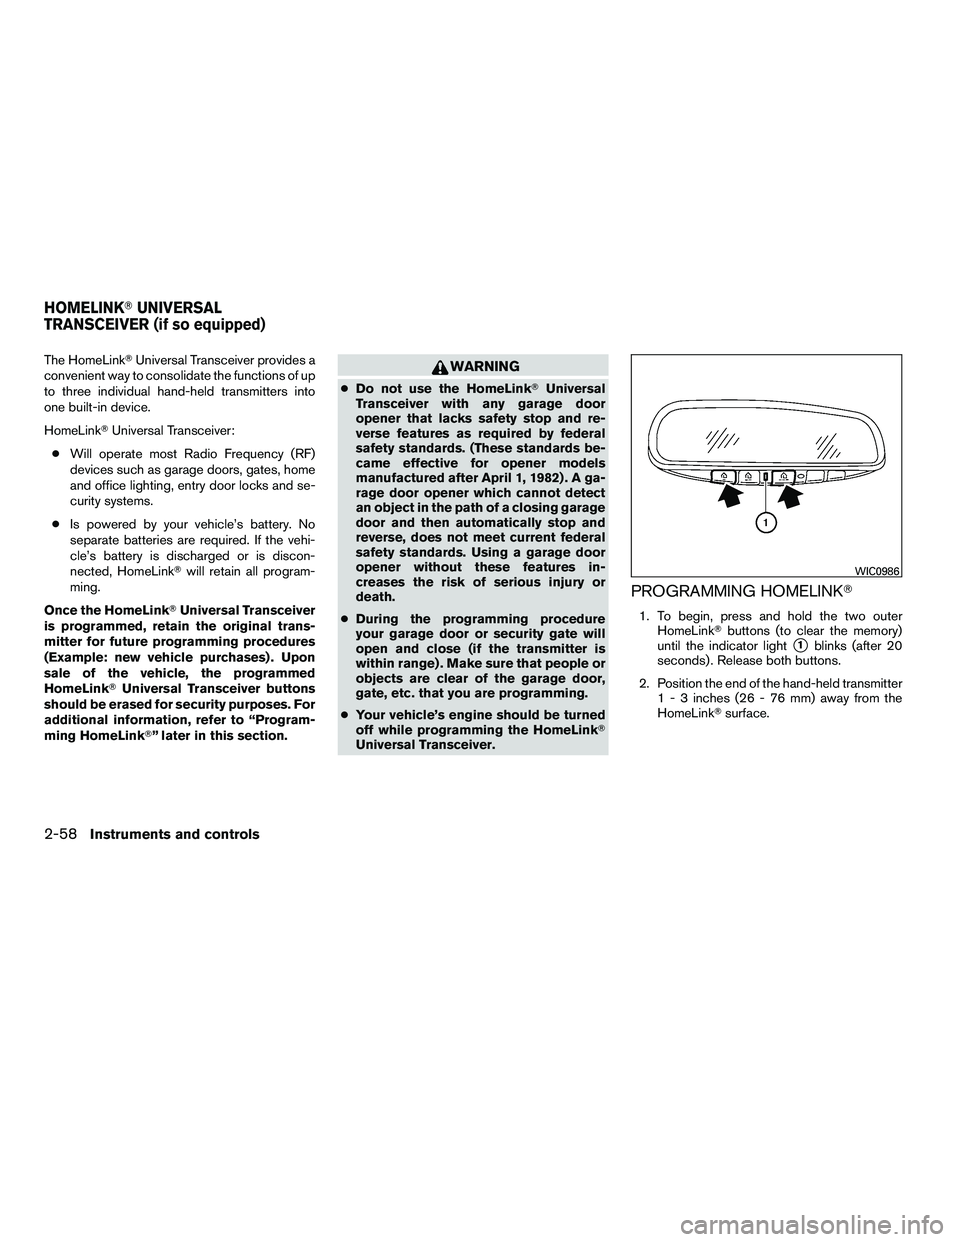
The HomeLink�Universal Transceiver provides a
convenient way to consolidate the functions of up
to three individual hand-held transmitters into
one built-in device.
HomeLink� Universal Transceiver:
● Will operate most Radio Frequency (RF)
devices such as garage doors, gates, home
and office lighting, entry door locks and se-
curity systems.
● Is powered by your vehicle’s battery. No
separate batteries are required. If the vehi-
cle’s battery is discharged or is discon-
nected, HomeLink� will retain all program-
ming.
Once the HomeLink� Universal Transceiver
is programmed, retain the original trans-
mitter for future programming procedures
(Example: new vehicle purchases) . Upon
sale of the vehicle, the programmed
HomeLink� Universal Transceiver buttons
should be erased for security purposes. For
additional information, refer to “Program-
ming HomeLink�” later in this section.
Page 163 of 472

OPERATING RANGE
The Intelligent Key functions can only be used
when the Intelligent Key is within the specified
operating range from the request switch
�1.
When the Intelligent Key battery is discharged or
strong radio waves are present near the operat-
ing location, the Intelligent Key operating range
becomes narrower, and the Intelligent Key may
not function properly.
The operating range is within 31.50 in (80 cm)
from each request switch
�1. If the Intelligent Key is too close to the door glass,
handle or rear bumper, the request switches may
not function.
When the Intelligent Key is within the operating
range, it is possible for anyone, even someone
who does not carry the Intelligent Key, to push the
request switch to lock/unlock the doors.
DOOR LOCKS/UNLOCKS
PRECAUTION
●
Do not push the door handle request switch
with the Intelligent Key held in your hand as
illustrated. The close distance to the door
handle will cause the Intelligent Key system
to have difficulty recognizing that the Intelli-
gent Key is outside the vehicle.
● After locking with the door handle request
switch, verify the doors are securely locked
by testing them.