Page 349 of 472
To engage:Firmly depress the parking brake.
To release: 1. Firmly apply the foot brake.
2. Move the shift selector to the P (Park) posi- tion.
3. Firmly depress the parking brake pedal and it will release.
4. Before driving, be sure the brake warning light goes out.1. ACCEL/RES switch
2. COAST/SET switch
3. CANCEL switch
4. ON·OFF switch
PRECAUTIONS ON CRUISE
CONTROL
●If the cruise control system malfunctions, it
cancels automatically. The SET indicator
light in the vehicle information display then
blinks to warn the driver, see “Vehicle infor-
mation display” in the “Instruments and con-
trols” section. ●
If the SET indicator light blinks, push the
cruise control ON·OFF switch off and have
the system checked by a NISSAN dealer.
● The SET indicator light may blink when the
cruise control ON·OFF switch is pushed ON
while pushing the ACCEL/RES,
COAST/SET, or CANCEL switch. To prop-
erly set the cruise control system, use the
following procedures.
Page 358 of 472

WARNING
●Do not stop or park the vehicle over
flammable materials such as dry grass,
waste paper or rags. They may ignite
and cause a fire.
●
Safe parking procedures require that
both the parking brake be set and the
transmission placed into P (Park) . Fail-
ure to do so could cause the vehicle to
move unexpectedly or roll away and re-
sult in an accident. Make sure the shift
selector has been pushed as far forward
as it can go and cannot be moved without
depressing the foot brake pedal
● Never leave the engine running while
the vehicle is unattended.
● Do not leave children unattended inside
the vehicle. They could unknowingly ac-
tivate switches or controls. Unattended
children could become involved in seri-
ous accidents.
1. Firmly apply the parking brake.
2. Move the shift selector to the P (Park) position.
3. To help prevent the vehicle from rolling into traffic when parked on an incline, it is a good
practice to turn the wheels as illustrated. ●
HEADED DOWNHILL WITH CURB:
�A
Turn the wheels into the curb and move the
vehicle forward until the curb side wheel
gently touches the curb.
● HEADED UPHILL WITH CURB:
�B
Turn the wheels away from the curb and
move the vehicle back until the curb side
wheel gently touches the curb.
● HEADED UPHILL OR DOWNHILL, NO
CURB:
�C
Turn the wheels toward the side of the road
so the vehicle will move away from the cen-
ter of the road if it moves.
4. Place the ignition switch in the LOCK posi- tion.
Page 368 of 472
WARNING
●Make sure the parking brake is securely
applied and the automatic transmission
is shifted into P (Park) .
● Never change tires when the vehicle is
on a slope, ice or slippery areas. This is
hazardous.
● Never change tires if oncoming traffic is
close to your vehicle. Wait for profes-
sional road assistance.
Blocking wheels
Place suitable blocks�1at both the front and
back of the wheel diagonally opposite the flat tire
�2to prevent the vehicle from moving when it is
jacked up.
Page 374 of 472
WARNING
Always follow the instructions below.
Failure to do so could result in damage to
the charging system and cause personal
injury.1. If the booster battery is in another vehicle, position the two vehicles to bring their bat-
teries near each other.
Do not allow the two vehicles to touch.
2. Apply the parking brake. Move the shift se- lector to P (Park) . Switch off all unnecessary
electrical systems (lights, heater, air condi-
tioner, etc.) . 3. Remove the vent caps on the battery (if so
equipped) . Cover the battery with an old
cloth to reduce explosion hazard.
4. Connect the jumper cables in the sequence illustrated (
�A,�B,�C,�D).
Page 388 of 472

When driving in areas using road salt or other
corrosive materials, check lubrication frequently.
Lights*Clean the headlights on a regular basis.
Make sure that the headlights, stop lights, tail
lights, turn signal lights, and other lights are all
operating properly and installed securely. Also
check headlight aim.
Road wheel nuts (lug nuts)* When checking
the tires, make sure no wheel nuts are missing,
and check for any loose wheel nuts. Tighten if
necessary.
Tire rotation* Tires should be rotated every
7,500 miles (12,000 km) .
Tires* Check the pressure with a gauge often
and always prior to long distance trips. If neces-
sary, adjust the pressure in all tires, including the
spare, to the pressure specified. Check carefully
for damage, cuts or excessive wear.
Tire Pressure Monitoring System (TPMS)
transmitter components Replace the TPMS
transmitter grommet seal, valve core and cap
when the tires are replaced due to wear or age.
Wheel alignment and balance If the vehicle
should pull to either side while driving on a
straight and level road, or if you detect uneven or
abnormal tire wear, there may be a need for wheel alignment. If the steering wheel or seat vibrates at
normal highway speeds, wheel balancing may be
needed.
● For additional information regarding tires,
refer to “Important Tire Safety Information”
(US) or “Tire Safety Information” (Canada) in
the Warranty Information Booklet.
Windshield Clean the windshield on a regular
basis. Check the windshield at least every six
months for cracks or other damage. Have a dam-
aged windshield repaired by a qualified repair
facility.
Windshield wiper blades* Check for cracks or
wear if they do not wipe properly.
Inside the vehicle
The maintenance items listed here should be
checked on a regular basis, such as when per-
forming periodic maintenance, cleaning the ve-
hicle, etc.
Additional information on the following
items with an “*” is found later in this sec-
tion.
Accelerator pedal Check the pedal for smooth
operation and make sure the pedal does not bind
or require uneven effort. Keep the floor mat away
from the pedal. Automatic transmission P (Park) position
mechanism
On a fairly steep hill check that your
vehicle is held securely with the shift selector in
the P (Park) position without applying any brakes.
Brake pedal Check the pedal for smooth opera-
tion. If the brake pedal suddenly goes down fur-
ther than normal, the pedal feels spongy or the
vehicle seems to take longer to stop, see a
NISSAN dealer immediately. Keep the floor mat
away from the pedal.
Brakes Check that the brakes do not pull the
vehicle to one side when applied.
Parking brake Check the parking brake opera-
tion regularly. The vehicle should be securely held
on a fairly steep hill with only the parking brake
applied. If the parking brake needs adjustment,
see a NISSAN dealer.
Seats Check seat position controls such as seat
adjusters, seatback recliner, etc. to ensure they
operate smoothly and all latches lock securely in
every position. Check that the head restraints
move up and down smoothly and the locks (if so
equipped) hold securely in all latched positions.
Seat belts Check that all parts of the seat belt
system (for example, buckles, anchors, adjusters
and retractors) operate properly and smoothly,
and are installed securely. Check the belt web-
bing for cuts, fraying, wear or damage.
Maintenance and do-it-yourself8-3
�REVIEW COPY—2010 Armada (wzw)
Owners Manual (owners)—USA_English (nna)
02/18/09—debbie
�
Page 389 of 472

Steering wheelCheck for changes in the steer-
ing system, such as excessive freeplay, hard
steering or strange noises.
Warning lights and chimes Make sure all
warning lights and chimes are operating properly.
Windshield wiper and washer* Check that
the wipers and washer operate properly and that
the wipers do not streak.
Windshield defroster Check that the air
comes out of the defroster outlets properly and in
sufficient quantity when operating the heater or
air conditioner.
Under the hood and vehicle
The maintenance items listed here should be
checked periodically (for example, each time you
check the engine oil or refuel) .
Battery* Check the fluid level in each cell. It
should be between the MAX and MIN lines. Ve-
hicles operated in high temperatures or under
severe conditions require frequent checks of the
battery fluid level.
Brake fluid level* Make sure that the brake fluid
level is between the MIN and MAX lines on the
reservoir.
Engine coolant level* Check the coolant level
when the engine is cold. Engine drive belts*
Make sure the drive belts
are not frayed, worn, cracked or oily.
Engine oil level* Check the level after parking
the vehicle on a level surface with the engine off.
Wait more than 10 minutes for the oil to drain
back into the oil pan.
Exhaust system Make sure there are no loose
supports, cracks or holes. If the sound of the
exhaust seems unusual or there is a smell of
exhaust fumes, immediately have the exhaust
system inspected by a NISSAN dealer. See the
carbon monoxide warning in the “Starting and
driving” section of this manual.
Fluid leaks Check under the vehicle for fuel, oil,
water or other fluid leaks after the vehicle has
been parked for a while. Water dripping from the
air conditioner after use is normal. If you should
notice any leaks or if gasoline fumes are evident,
check for the cause and have it corrected imme-
diately.
Power steering fluid level* and lines Check
the level when the fluid is cold, with the engine
off. Check the lines for proper attachment, leaks,
cracks, etc. Radiator and hoses
Check the front of the
radiator and clean off any dirt, insects, leaves,
etc., that may have accumulated. Make sure the
hoses have no cracks, deformation, rot or loose
connections.
Underbody The underbody is frequently ex-
posed to corrosive substances such as those
used on icy roads or to control dust. It is very
important to remove these substances from the
underbody, otherwise rust may form on the floor
pan, frame, fuel lines and exhaust system. At the
end of winter, the underbody should be thor-
oughly flushed with plain water, in those areas
where mud and dirt may have accumulated. See
the “Appearance and care” section of this
manual.
Windshield washer fluid* Check that there is
adequate fluid in the reservoir.
8-4Maintenance and do-it-yourself
�REVIEW COPY—2010 Armada (wzw)
Owners Manual (owners)—USA_English (nna)
02/18/09—debbie
�
Page 402 of 472
WARNING
Be sure the engine and ignition switch are
off and that the parking brake is engaged
securely.
Page 454 of 472
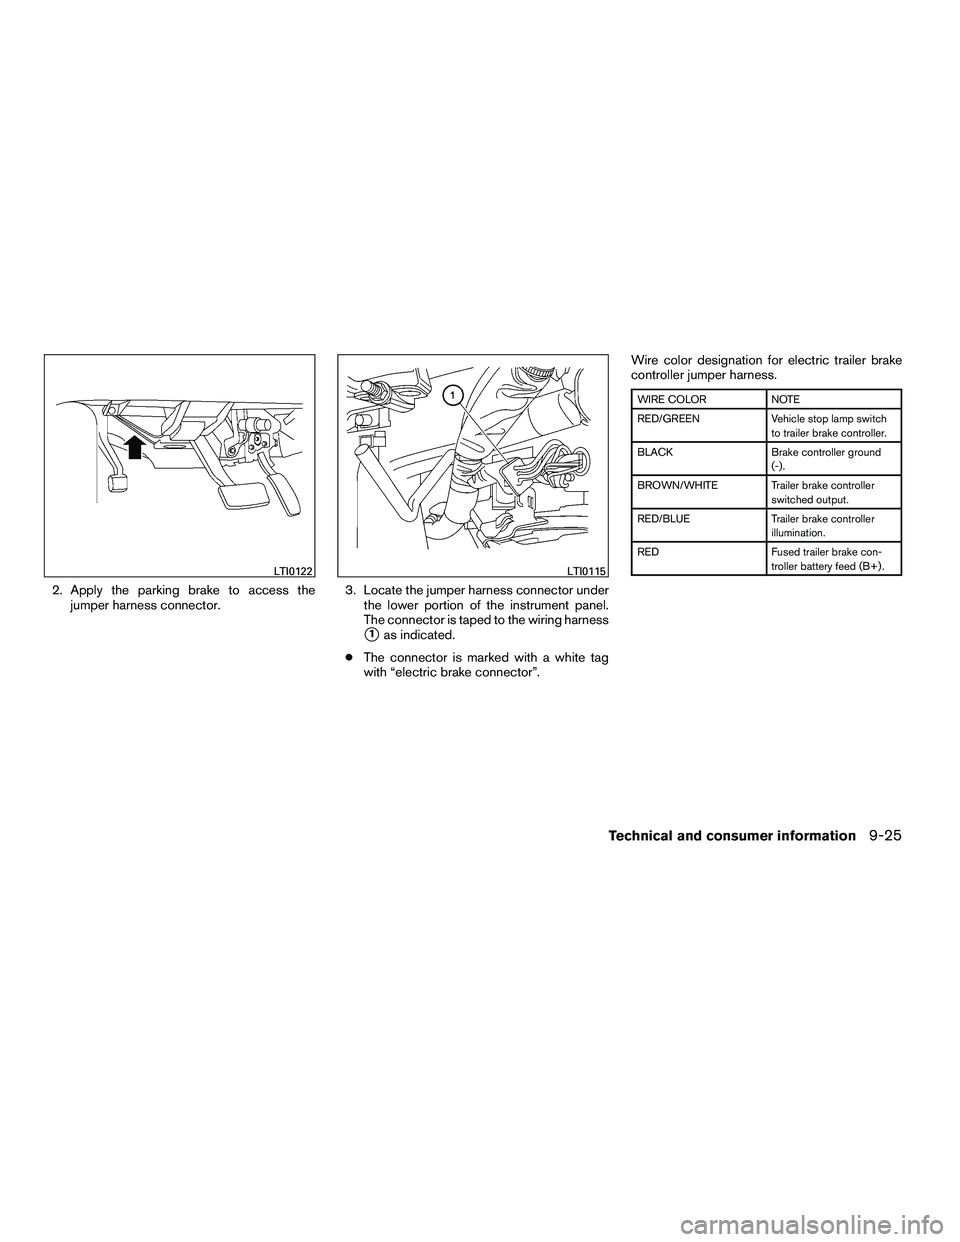
2. Apply the parking brake to access thejumper harness connector. 3. Locate the jumper harness connector under
the lower portion of the instrument panel.
The connector is taped to the wiring harness
�1as indicated.
● The connector is marked with a white tag
with “electric brake connector”. Wire color designation for electric trailer brake
controller jumper harness.
 posi- tion.
3. Firmly depress the parking brake pedal and it will rel")
 .
● Never change tires when the vehicle is
on a slope, ice or slippery areas. This")