Page 89 of 472
1. Vents (P. 4-35)
2. Headlight/fog light (if so equipped)/turnsignal switch (P. 2-30)
3. Instrument brightness control (P. 2-33)
4. Steering wheel switch for audio
control/hands-free Bluetooth� phone
(if so equipped) (P. 4-73)
5. Driver supplemental air bag/horn
(P. 1-53, P. 2-34)
6. Meters, gauges and warning/indicator
lights (P. 2-4, 2-13)
7. Cruise control main/set switches
(P. 5-18)
8. Windshield wiper/washer switch and
rear window wiper/washer switch
(P. 2-28, P. 2-29)
9. Ignition switch (P. 5-9)
10. Display screen/Display screen with
navigation system* (if so equipped)
(P. 4-2, P. 4-17)
11. Navigation system* controls
(if so equipped) (P. 4-17)
12. Audio system controls (P. 4-39)
13. Front passenger supplemental air bag
(P. 1-53)
14. Glove box (P. 2-41)
15. Hazard lights (P. 2-34)
Page 92 of 472
1. Speedometer
2. Odometer/twin trip display
3. Change button
SPEEDOMETER AND ODOMETER
Speedometer
The speedometer indicates vehicle speed.
Odometer/Twin trip odometer
The odometer/twin trip odometer is displayed
when the ignition switch is placed in the ON
position.
The odometer records the total distance the ve-
hicle has been driven.The twin trip odometer records the distance of
individual trips.
Changing the display:
Pushing the change button changes the display
as follows:
Trip
Page 94 of 472
CAUTION
If the gauge indicates coolant tempera-
ture near the hot (H) end of the normal
range, reduce vehicle speed to decrease
temperature. If the gauge is over the nor-
mal range, stop the vehicle as soon as
safely possible. If the engine is over-
heated, continued operation of the ve-
hicle may seriously damage the engine.
See “If your vehicle overheats” in the “In
case of emergency” section for immediate
action required.
FUEL GAUGE
The gauge indicates theapproximatefuel level
in the tank.
The gauge may move slightly during braking,
turning, acceleration, or going up or down hills.
The gauge needle returns to E (Empty) after the
ignition switch is placed in the OFF position.
The low fuel warning light comes on when the
amount of fuel in the tank is getting low.
Refill the fuel tank before the gauge regis-
ters E (Empty) . The
Page 102 of 472
Parking brake indicator
When the ignition switch is placed in the ON
position, the light comes on when the parking
brake is applied.
Low brake fluid warning light
When the ignition switch is placed in the ON
position, the light warns of a low brake fluid level.
If the light comes on while the engine is running
with the parking brake not applied, stop the ve-
hicle and perform the following:1. Check the brake fluid level. Add brake fluid as necessary. See “Brake fluid” in the “Main-
tenance and do-it-yourself” section of this
manual.
2. If the brake fluid level is correct, have the warning system checked by a NISSAN
dealer.
Page 104 of 472

When the low tire pressure warning light
illuminates, you should stop and adjust the
tire pressure of all 4 tires to the recom-
mended COLD tire pressure shown on the
Tire and Loading Information label located
in the driver’s door opening. The low tire
pressure warning light does not automati-
cally turn off when the tire pressure is ad-
justed. After the tire is inflated to the rec-
ommended pressure, the vehicle must be
driven at speeds above 16 MPH (25 km/h)
to activate the TPMS and turn off the low
tire pressure warning light. Use a tire pres-
sure gauge to check the tire pressure.
For additional information, see “Tire Pressure
Monitoring System (TPMS)” in the “Starting and
driving” section and in the “In case of emergency”
section.
TPMS malfunction:
If the TPMS is not functioning properly, the low
tire pressure warning light will flash for approxi-
mately 1 minute when the ignition switch is
placed in the ON position. The light will remain on
after the 1 minute. Have the system checked by a
NISSAN dealer.For additional information, see “Tire Pressure
Monitoring System (TPMS)” in the “Starting and
driving” section and “Tire pressure” in the “Main-
tenance and do-it-yourself” section in this
manual.
Page 107 of 472
Slip indicator light
This indicator light will blink when the traction
control system is limiting wheel spin. Slippery
road conditions may exist if the slip indicator
blinks on. If this happens, adjust your driving
accordingly.
The slip indicator light also comes on when you
place the ignition switch in the ON position. The
light will turn off after about 2 seconds if the
system is operational. If the light does not come
on or does not go off, have the traction control
system checked by a NISSAN dealer.
Page 113 of 472

brief period. Never leave your keys in the ignition,
and always lock the vehicle when unattended. Be
aware of your surroundings, and park in secure,
well-lit areas whenever possible.
Many devices offering additional protection, such
as component locks, identification markers, and
tracking systems, are available at auto supply
stores and specialty shops. Your NISSAN dealer
may also offer such equipment. Check with your
insurance company to see if you may be eligible
for discounts for various theft protection features.
How to arm the vehicle security
system
1. Close all windows.(The system can be
armed even if the windows are open.)
2. Place the ignition switch in the LOCK posi- tion and remove the key.
3. Close all doors. Lock all doors. The doors can be locked with:
● the power door lock switch (if the door is
opened, locked and then closed) .
● the key — master or mechanical (NISSAN
Intelligent Key™ models) .
● any request switch (NISSAN Intelligent
Key™ models) .
● the keyfob or NISSAN Intelligent Key™. Keyfob and NISSAN Intelligent Key™ opera-
tion:
●
Push the
Page 115 of 472

Security indicator light
The security indicator light blinks whenever the
ignition switch is placed in the LOCK, OFF or ACC
position. This function indicates the NISSAN Ve-
hicle Immobilizer System is operational.
If the NISSAN Vehicle Immobilizer System is mal-
functioning, the light will remain on while the
ignition switch is placed in the ON position.
If the light still remains on and/or the en-
gine will not start, see a NISSAN dealer for
NISSAN Vehicle Immobilizer System ser-
vice as soon as possible. Please bring all
registered keys that you have when visiting
your NISSAN dealer for service.
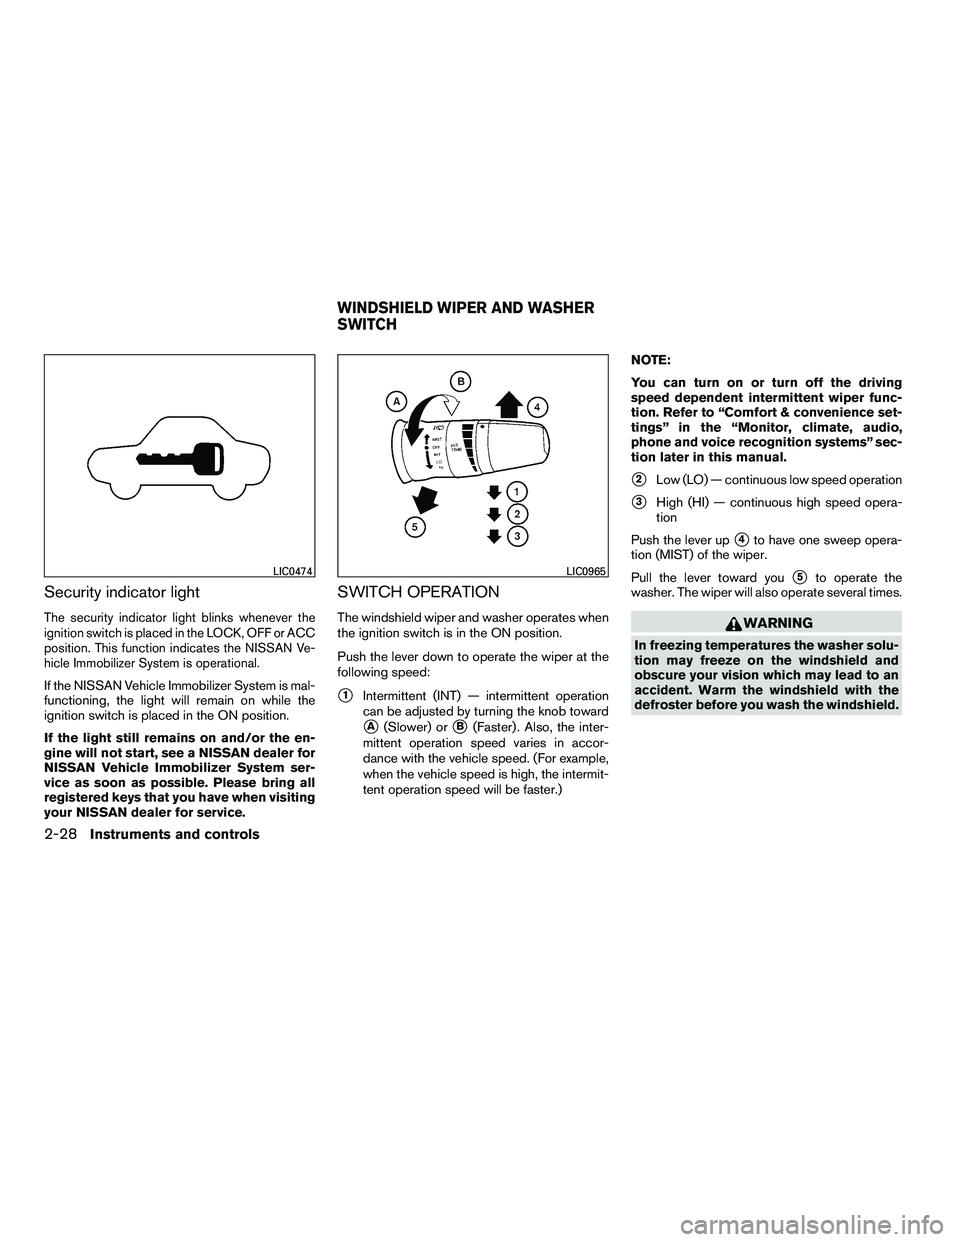
SWITCH OPERATION
The windshield wiper and washer operates when
the ignition switch is in the ON position.
Push the lever down to operate the wiper at the
following speed:
�1Intermittent (INT) — intermittent operation
can be adjusted by turning the knob toward
�A(Slower) or�B(Faster) . Also, the inter-
mittent operation speed varies in accor-
dance with the vehicle speed. (For example,
when the vehicle speed is high, the intermit-
tent operation speed will be faster.) NOTE:
You can turn on or turn off the driving
speed dependent intermittent wiper func-
tion. Refer to “Comfort & convenience set-
tings” in the “Monitor, climate, audio,
phone and voice recognition systems” sec-
tion later in this manual.
�2Low (LO) — continuous low speed operation
�3High (HI) — continuous high speed opera-
tion
Push the lever up
�4to have one sweep opera-
tion (MIST) of the wiper.
Pull the lever toward you
�5to operate the
washer. The wiper will also operate several times.