Page 10 of 472
1. Engine hood (P. 3-23)
2. Windshield wiper and washer switch(P. 2-28)
3. Windshield (P. 8-19)
4. Power windows (P. 2-50)
5. Door locks, NISSAN Intelligent Key™,
keys (P. 3-5, 3-12, 3-2)
6. Mirrors (P. 3-32)
7. Tire pressure (P. 9-12)
8. Flat tire (P. 6-2)
9. Tire chains (P. 8-41)
10. Replacing bulbs (P. 8-31)
11. Headlight and turn signal switch
(P. 2-30)
12. Fog light switch (P. 2-33)
13. Tow hooks (if so equipped) (P. 6-13)
See the page number indicated in paren-
theses for operating details.
Page 11 of 472
1. Roof rack (P. 2-49)
2. Vehicle loading (P. 9-13)
3. Glass hatch (P. 3-28)
4. Rear window washer (P.2-29)
5. Glass hatch release (P.3-28)
6. Lift gate release (P. 3-27)
7. Rearview monitor (if so equipped)(P.4-33)
8. Replacing bulbs (P. 8-31)
9. Fuel-filler cap, fuel recommendation
(P. 3-28, P. 9-3, 9-4)
10. Fuel-filler door (P. 3-28)
11. Child safety rear door locks (P. 3-7)
See the page number indicated in paren-
theses for operating details.
Page 19 of 472

WARNING
●Do not ride in a moving vehicle when
the seatback is reclined. This can be
dangerous. The shoulder belt will not
be against your body. In an accident,
you could be thrown into it and receive
neck or other serious injuries. You
could also slide under the lap belt and
receive serious internal injuries. ●
For the most effective protection when
the vehicle is in motion, the seat should
be upright. Always sit well back in the
seat with both feet on the floor and
adjust the seat properly. See “Precau-
tions on seat belt usage” later in this
section.
● After adjustment, gently rock in the seat
to make sure it is securely locked.
● Do not leave children unattended inside
the vehicle. They could unknowingly ac-
tivate switches or controls. Unattended
children could become involved in seri-
ous accidents. ●
The seatback should not be reclined
any more than needed for comfort. Seat
belts are most effective when the pas-
senger sits well back and straight up in
the seat. If the seatback is reclined, the
risk of sliding under the lap belt and
being injured is increased.
Page 20 of 472
Forward and backward
Pull the lever up and hold it while you slide the
seat forward or backward to the desired position.
Release the lever to lock the seat in position.
Reclining
To recline the seatback, pull the lever up and lean
back. To bring the seatback forward, pull the lever
up and lean your body forward. Release the lever
to lock the seatback in position.
The reclining feature allows adjustment of the
seatback for occupants of different sizes for
added comfort and to help obtain proper seat
belt fit. See “Precautions on seat belt usage” later
in this section. Also, the seatback can be reclined
to allow occupants to rest when the vehicle is
stopped and the transmission is in the P (Park)
position.
Page 24 of 472

WARNING
●After adjustment, gently rock in the seat
to make sure it is securely locked.
● Do not ride in a moving vehicle when
the seatback is reclined. This can be
dangerous. The shoulder belt will not
be against your body. In an accident,
you could be thrown into it and receive
neck or other serious injuries. You
could also slide under the lap belt and
receive serious internal injuries.
● For the most effective protection when
the vehicle is in motion, the seat should
be upright. Always sit well back in the
seat and adjust the seat belt properly.
See “Precautions on seat belt usage”
later in this section.
Tip up for easy entry to the 3rd row
The outboard seating positions on the 2nd row
bench seat can be tipped forward for easy entry
or exit from the 3rd row bench seat. To enter the
3rd row
�1, lift up on the seatback latch located
on the upper corner of the seatback on the 2nd
row bench seat and fold the seatback forward at
an angle over the seat base. This will release the
back of the seat so it may be tipped forward. Then
�2lift up on the lower corner of the seat
base and tip the outboard seating position of the
2nd row bench seat forward. To exit the 3rd row
bench seat, lift up on the same seatback latch
and fold the seatback forward onto the seat base.
Then lift up on the seat base and tip it forward.
Page 26 of 472
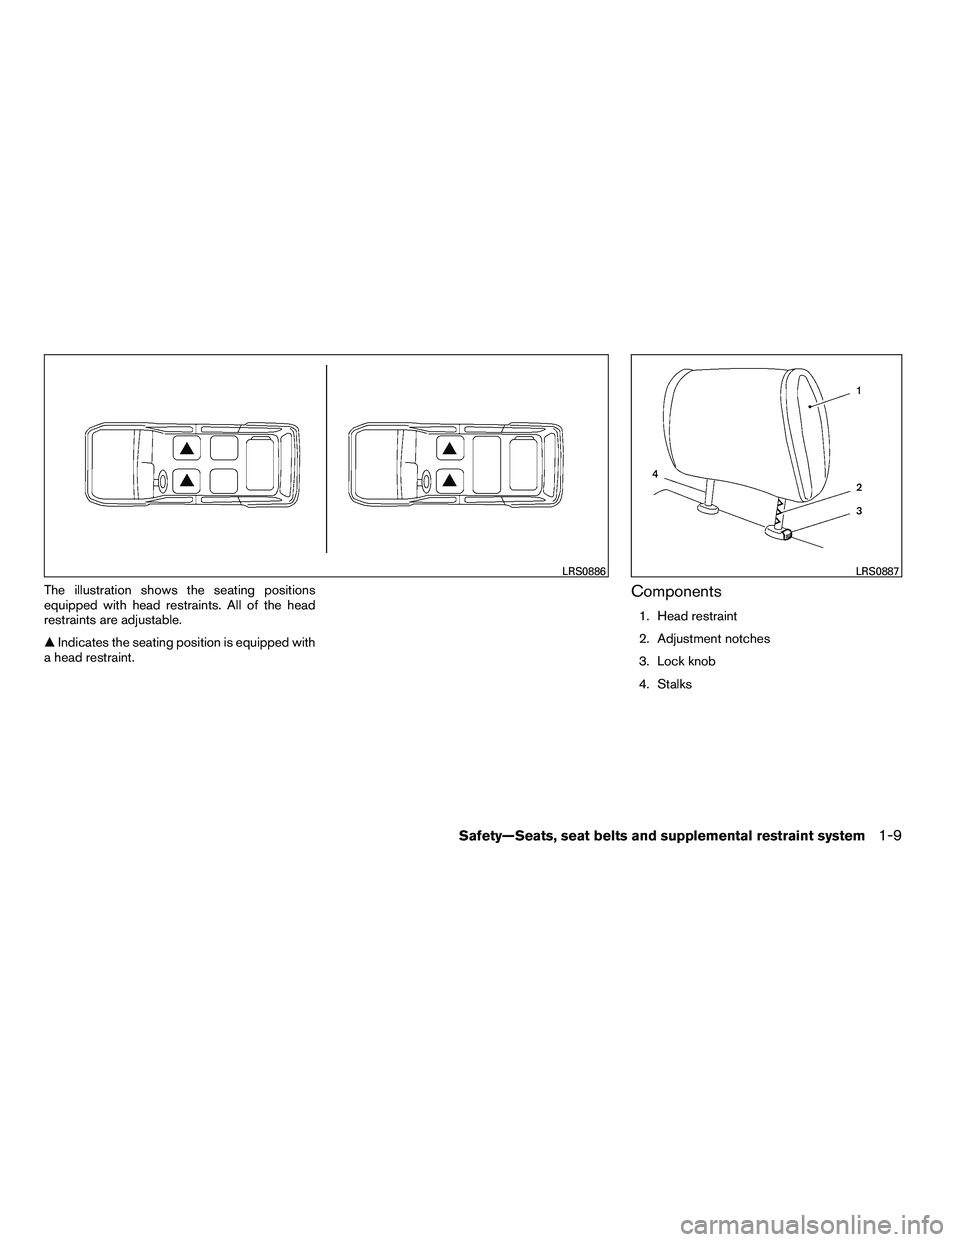
The illustration shows the seating positions
equipped with head restraints. All of the head
restraints are adjustable.
�Indicates the seating position is equipped with
a head restraint.Components
1. Head restraint
2. Adjustment notches
3. Lock knob
4. Stalks
Page 27 of 472
Adjustment
Adjust the head restraint so the center is level
with the center of the seat occupant’s ears.To raise the head restraint, pull it up.
To lower, push and hold the lock knob and push
the head restraint down.
Page 28 of 472

Removal
Use the following procedure to remove the ad-
justable head restraints.1. Pull the head restraint up to the highest position.
2. Push and hold the lock knob.
3. Remove the head restraint from the seat.
4. Store the head restraint properly so it is not loose in the vehicle.
5. Install and properly adjust the head restraint before an occupant uses the seating posi-
tion.
Install
1. Align the head restraint stalks with the holesin the seat. Make sure the head restraint is
facing the correct direction. The stalk with
the adjustment notches
�1must be installed
in the hole with the lock button
�2.
2. Push and hold the lock knob and push the head restraint down.
3. Properly adjust the head restraint before an occupant uses the seating position.
Front-seat Active Head Restraints
The Active Head Restraint moves forward utiliz-
ing the force that the seatback receives from the
occupant in a rear-end collision. The movement
of the head restraint helps support the occu-
pant’s head by reducing its backward movement
and helping absorb some of the forces that may
lead to whiplash-type injuries.
Active Head Restraints are effective for collisions
at low to medium speeds in which it is said that
whiplash injury occurs most.
Active Head Restraints operate only in certain
rear-end collisions. After the collision, the head
restraints return to their original position.

2. Windshield wiper and washer switch(P. 2-28)
3. Windshield (P. 8-19)
4. Power windows (P. 2-50)
5. Door locks, NISSAN Intelligent Key™,
keys (P. 3-5, 3-12, 3-2)
6. Mirrors")

2. Vehicle loading (P. 9-13)
3. Glass hatch (P. 3-28)
4. Rear window washer (P.2-29)
5. Glass hatch release (P.3-28)
6. Lift gate release (P. 3-27)
7. Rearview monitor (if so eq")